Express Admin


MySQL, MariaDB, PostgreSQL, SQLite admin for Node.js
brief history
Express Admin is a tool for creating end user administrative interfaces for relational databases in (literally) less than 10 minutes.
It was initially conceived back in 2012 and it was released officially in 2013. The user interface is built with Bootstrap (v3.3.1) and it is fully responsive and it works on any device. It also comes with all Bootswatch themes for that version of Bootstrap.
The entirety of the admin consists of just 3 views: main view, list view, and edit view. The main view lists all tables available inside the database and optionally a list of custom views. The list view lists table records with support for pagination and a powerful filtering widget for filtering and ordering the list. The edit view is responsible for viewing and editing database records and is capable of correctly modeling any table relationship, and it supports rich user input controls, such as date/time pickers and text editors.
The rendering is done entirely on the backend using Hogan.js (a mustache.js derivative). The frontend is using jQuery (v1.9.1) mainly for initializing the beautiful plugins: Chosen (v1.2.0) for rendering select boxes for many-to-one and many-to-many relationships and Bootstrap Datepicker for rendering various time and date pickers.
At the heart of the admin is the settings.json file. The settings.json file contains a robust data structure responsible for configuring all aspects of the admin, such as: table relationships, table visibility inside the main views, column settings such as: type and input control to use, verbose name, visibility etc., view settings, filter configuration etc.
Lastly, the admin also comes with various extension points for: custom static files on the frontend, custom views on the backend, and pre/post save hooks to augment the behavior of the admin.
quick preview
How it Looks
- Table Relationships
- Control Types
- Complex Inline
- Listview Filter (click on the little funnel icon next to the page header)
- Custom Views
Examples
Get the admin up and running on your localhost in less than 10 minutes and play around with the examples.
Tests
Express Admin comes with a comprehensive integration tests suite: https://vimeo.com/795985128
Table of Contents
Middleware
Express Admin is an Express.js middleware:
var express = require('express')
var admin = require('express-admin')

express()
  .use(admin({
    config: require('config.json'),
    settings: require('settings.json'),
    users: require('users.json'),
    custom: require('custom.json'),
  }))
  .listen(3000)
At the minimum you need Express.js, Express Admin, and a database driver:
{
  "dependencies": {
    "express": "^4.18.2",
    "express-admin": "^2.0.0",
    "mysql": "^2.18.1"
  }
}
Express Admin was tested and is known to work with the following database drivers:
| Driver | Version | Engine |
|---|---|---|
| mysql | ^2.18.1 |
MySQL (from v5 up to latest) MariaDB (from v10.0 up to latest) |
| pg | ^8.9.0 |
PostgreSQL (from v9 up to latest) |
| sqlite3 | ^5.1.4 |
SQLite (from v3.8.0 up to latest) |
Configuration
| Key | Availability | Description |
|---|---|---|
config |
required | general configuration about the database and the admin |
settings |
required | settings for all tables, columns, relationships, views, etc. |
users |
required | list of admin users |
custom |
optional | custom views, event hooks, and static files to be loaded with the admin |
For simplicity all of the examples are storing all of their configuration in JSON files. However, only the settings configuration is required to be a JSON file stored on your server, because the admin may add new default table entries in it whenever you add a new table to your database. On the contrary the config and the users configuration, potentially containing sensitive passwords in plain text, can be loaded during the initialization of your server from an external storage and fed into the admin middleware as an object.
Configuration: config
{
  "mysql": { // or "pg" or "sqlite"
    "database": "...",
    "user": "...",
    "password": "..."
    // "schema": "... pg only"
  },
  "admin": {
    "settings": "/absolute/path/to/settings.json"
  }
}
Database Connection
The mysql, pg and sqlite key instruct the admin to load the relevant database driver, either: mysql, pg or sqlite3. That driver needs to be set as a dependency in your package.json file and installed:
-
mysql - accepts any connection option for the
mysqlmodule -
pg - accepts any connection option for the
pgmodule -
sqlite - accepts only a
databaseoption containing an absolute path to a database file to use
At the minimum you need:
-
mysql or pg or sqlite - database connection options
- database - name of the database to use for this connection (or absolute path to a database file for SQLite)
- user - database user to authenticate with (not used wih SQLite)
- password - password for that database user (not used wih SQLite)
Outside of the regular connection options for PostgreSQL the admin also accepts a schema name to use for that database. It defaults to public.
Admin Configuration
The admin config key is used to customize various aspects of the admin app:
-
settings (required) - the absolute path to the
settings.jsonfile -
layouts (default: true) - toggle the layouts selection button inside the header
-
themes (default: true) - toggle the themes selection button inside the header
-
languages (default: true) - toggle the languages selection button inside the header
-
favicon - absolute path to a folder containing a
favicon.icofile. When this path is set the admin will serve your customfavicon.icofile instead of the default one -
footer - accepts
{text: '..', url: '..'}object to customize the default footer text and URL. Set it to empty{}object to hide the footer -
locale - absolute path to a locale.json file. Copy/paste some of the existing locale files and customize it to your liking. The name of your file will be used as either a new locale or it will override an existing one with the same name. The locale that you set through this option will be selected and used by default for new users
-
root (default: '') - path prefix for the admin instance. Required only when you mount the admin under a path prefix with
app.use('/prefix', admin({})). Also take a look at the hosting examples -
upload (default: 'public/upload') - absolute path to the upload location for columns with control type set to
file: true. By default the admin will upload and store such files insideyour-project/node_modules/express-admin/public/upload -
session - accepts any of the configuration options for the underlying session middleware. The default configuration is:
{name: 'express-admin', secret: 'very secret', saveUninitialized: true, resave: true} -
readonly (default: false) - when set to
truethe authentication, CSRF, session logout and database updates are off. The readonly mode is useful while configuring the admin using thesettings.jsonfile. Additionally a watcher can be set to reload your server on changes being made to thesettings.jsonfile. Don't forget to turn off the readonly mode when you are done editing thesettings.jsonfile! -
debug (default: false) - set this to
trueto print the underlying SQL queries that the admin performs. Additionally a logging middleware, such as morgan, can be mounted before the admin to log the underlying HTTP requests as well
Configuration: settings
All settings related to the default Express Admin views are set inside the settings.json file, which is automatically generated with default values at first start up. Every time you add a new table to your database a default configuration object will be added for it to your settings.json file at startup.
table
The settings.json file contains a list of objects representing tables in your database:
{
  "table_name": {
    "slug": "unique-slug",
    "table": {
      "name": "table_name",
      "pk": "pk_name",
      "verbose": "Verbose Name"
      // "schema": "name" // pg: set specific schema for this table only
    },
    "columns": [
      {...}, // see column definition below
      // { "manyToMany" ... } // see 'Many to Many' documentation
    ],
    "mainview": {
      "show": true
    },
    "listview": {
      "order": {
        "column_name1": "asc",
        "column_name2": "desc"
      },
      "page": 25,
      "filter": ["column_name1", "column_name2" ...]
    },
    "editview": {
      "readonly": false,
      // "manyToOne": { ... }, // see 'Many to One' documentation
      // "oneToOne": { ... } // see 'One to One' documentation
    }
  }
}- slug - unique slug among all other tables
-
table - table settings
- name - the table name in your database (typically you won't change this)
- pk - the table's primary key (it will be set automatically)
- verbose - user friendly name to use for this table inside the admin
- columns - array of all columns found in this table (see below)
-
mainview - settings about the mainview (where tables are listed)
- show - toggle the table visibility inside the table list. Typically you want to hide tables that will be edited as inlines of other tables, or tables that are used as links for many to many relationships
-
listview - settings about the listview (where the table records are listed)
- order - default record order, either ascending or descending (defaults to ascending)
- page - how many records to show per page (defaults to 25)
- filter - list of column names to enable as filtering options inside the filter widget
-
editview - settings about the editview (where the record is being shown and edited)
- readonly - to make the table non editable set this flag to true, in that case the save and delete buttons below the record won't be rendered
- manyToOne - set inline tables to be edited along with this one (see many to one documentation)
- oneToOne - set inline tables to be edited along with this one (see one to one documentation)
To re-order how the tables appear inside the mainview copy/paste the entire table object and move it to another place inside the settings.json file.
column
Each table object contains a list of colum objects:
{
  "verbose": "Verbose Name",
  "name": "column_name",
  "control": {
    "text": true
  },
  "type": "varchar(45)",
  "allowNull": false,
  "defaultValue": null,
  "listview": {
    "show": true
  },
  "editview": {
    "show": true
  },
  // "oneToMany": { ... }, // see 'One to Many' documentation
}-
verbose - user friendly name to use for this column inside the admin
-
name - the column name in your database (typically you won't change this)
-
control - one of these:
{"text": true} // input type="text"
{"textarea": true} // textarea
{"textarea": true, "editor": "some-class"} // text editor (see customization section)
{"number": true} // input type="number"
{"date": true} // datepicker
{"time": true} // timepicker
{"datetime": true} // datetimepicker
{"year": true} // yearpicker
{"file": true} // input type="file" (uploads to file system)
{"file": true, "binary": true} // input type="file" (uploads to blob|bytea fields)
{"radio": true, "options": ["True","False"]} // input type="radio"
{"select": true} // select single (used for one-to-many relationships)
{"select": true, "multiple": true} // select multiple (used for many-to-many relationships)
{"select": true, "options": ["value&text",{"value":"text"}]} // select with static options
-
type - the column data type in your database (typically you won't change this)
-
allowNull - allowed to be null inside the database or not
-
defaultValue - currently not used
-
listview - settings about the listview (where the table records are listed)
- show - toggle the column visibility inside the listview. Typically you want to see only colums that contain short and meaningful information describing the whole record clearly. Primary key columns and columns that contain large amount of text typically should be hidden in this view
-
editview - settings about the editview (where the record is being shown and edited)
-
show - toggle the column visibility inside the listview
All auto increment columns should be hidden!
Foreign keys for inline tables should be hidden!
Columns that are not allowed to benullinside the database cannot be hidden as this will result in a database error when trying to insert or update the record
-
show - toggle the column visibility inside the listview
-
oneToMany - configure one to many relationship (see one to many documentation)
Additionally a column entry can be added manually inside the columns array for configuring many to many relationships.
To re-order how the columns appear inside the listview and the editview copy/paste the entire column object and move it to another place inside the columns array.
Configuration: users
The users configuration accepts a list of unique keys identifying the admin users:
{
  "admin": {
    "name": "admin",
    "pass": "1234abCD"
  }
}-
"unique key name"
- name - user name to login with
- pass - user password to login with
Each user get access to the entirety of your admin instance. There are no roles and different levels of access.
For increased security you may want to load the user password from external storage dynamically and feed that into the admin middleware on startup.
Configuration: custom
The custom configuration can be used to extend the admin with additional static files, endpoints on the backend, custom views rendered inside the admin, and pre/post save event hooks.
You can arrange your custom resources any way you want. The custom config should contain uniquely named objects containing any of the supported custom configuration keys:
{
  "Unique Name": {
    "app": {
      "path": "/absolute/path/to/custom/app.js",
      "slug": "unique-slug",
      "verbose": "Verbose Name",
      "mainview": {
        "show": true
      }
    },
    "public": {
      "external": {
        "css": [
          "https://absolute/url/external.css"
        ],
        "js": [
          "https://absolute/url/external.js"
        ]
      },
      "local": {
        "path": "/absolute/path/to/custom/public/folder",
        "css": [
          "/relative/to/above/global.css"
        ],
        "js": [
          "/relative/to/above/global.js"
        ]
      }
    },
    "events": "/absolute/path/to/custom/events.js"
  }
}-
app - Epress.js application (middleware) (see custom views documentation)
- path - absolute path to the file to mount
- slug - prefix for all routes in this custom app
- verbose - user friendly name to show inside the mainview
-
mainview - settings about the mainview
- show - toggle the custom view visibility inside the mainview (inside the custom views list below the table list)
-
public - custom static files to include inside the
<head>tag (see custom static files documentation)-
external - external files
- css - list of css files to be included
- js - list of js files to be included
-
local - local files
- path - absolute path to the static files location
- css - list of css files to be included
- js - list of js files to be included
-
external - external files
- events - path to file containing event hooks (see event hooks documentation)
Relationships
Relationships: One to Many
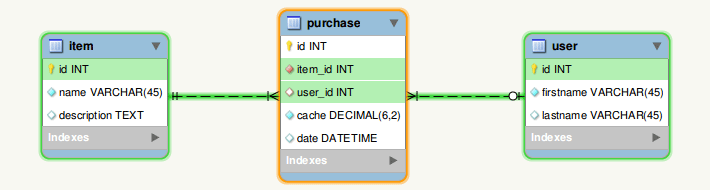
- Find the table that you want to configure inside the
settings.jsonfile - Find the foreign key column that you want to use for the relation
- Copy/paste the following
oneToManyobject into the column settings and configure it - Change the control type of the column to
select
"control": {
  "select": true
},
"oneToMany": {
  "table": "user",
  "pk": "id",
  "columns": [
    "firstname",
    "lastname"
  ]
}
The
oneToManykey can contain aschemaname to use for the relation table (PostgreSQL only)
-
oneToMany - configuration about the table that this foreign key references
- table - name of the table that is being referenced
- pk - name of the referenced table primary key column (can be array as well, see compound primary key documentation)
- columns - array of columns to select from the referenced table and use that as a label inside the select box (space delimited)
Relationships: Many to Many
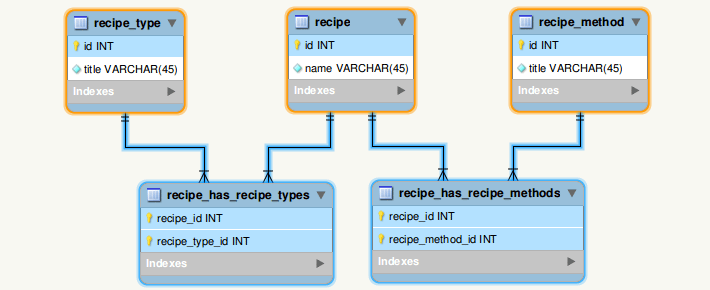
- Find the table that you want to configure inside the
settings.jsonfile - Copy/paste the following object inside the
columnsarray and configure it
{
  "verbose": "Recipe Types",
  "name": "recipe_type",
  "control": {
    "select": true,
    "multiple": true
  },
  "type": "int(11)",
  "allowNull": false,
  "listview": {
    "show": false
  },
  "editview": {
    "show": true
  },
  "manyToMany": {
    "link": {
      "table": "recipe_has_recipe_types",
      "parentPk": "recipe_id",
      "childPk": "recipe_type_id"
    },
    "ref": {
      "table": "recipe_type",
      "pk": "id",
      "columns": [
        "title"
      ]
    }
  }
}
The
linkandrefkeys can contain aschemaname to use for the relation table (PostgreSQL only)
- verbose - user friendly name to use for this column inside the admin
- name - some arbitrary name but it has to be unique among all other columns in this table
- control - the control type have to be a multi select
- type - leave this as it is
- allowNull - allowed to create record in this table without selecting any item from the referenced one, or not
-
listview - settings about the listview (where the table records are listed)
- show - toggle the column visibility inside the listview
-
editview - settings about the editview (where the record is being shown and edited)
- show - toggle the column visibility inside the listview
-
manyToMany - configuration about the many to many relationship
-
link - configuration about the table that links this one and the referenced one
- table - name of the table that acts as a link
- parentPk - name of the primary key of the parent table (can be array as well)
- childPk - name of the primary key of the child table (can be array as well)
-
ref - configuration about the referenced table
- table - name of the table that is being referenced
- pk - name of the referenced table primary key column (can be array as well)
- columns - array of columns to select from the referenced table and use that as a label inside the select box (space delimited)
-
link - configuration about the table that links this one and the referenced one
The
parentPkandchildPkkeys of thelinktable can be array as well.
Thepkkey of thereftable can be array as well.
See compound primary key documentation.
Relationships: Many to One

- Find the table that you want to configure inside the
settings.jsonfile - Copy/paste the following object inside the
editviewobject and configure it
"manyToOne": {
  "repair": "car_id",
  "driver": "car_id"
}-
manyToOne - configuration about the tables that will be included and edited as inline record
- table:fk - each item in this object is a table name and its foreign key column that is referencing the parent table (or array of foreign keys, see compound primary key documentation)
Relationships: One to One

- Find the table that you want to configure inside the
settings.jsonfile - Copy/paste the following object inside the
editviewobject and configure it
"oneToOne": {
  "address": "user_id",
  "phone": "user_id"
}-
oneToOne - configuration about the tables that will be included and edited as inline record
- table:fk - each item in this object is a table name and its foreign key column that is referencing the parent table (or array of foreign keys, see compound primary key documentation)
Compound Primary Key

Any table in settings.json can have multiple primary keys specified:
{
  "table": {
    "name": "tbl",
    "pk": [
      "id1",
      "id2"
    ],
    "verbose": "tbl"
  }
}
Compound: One to Many

In case One to Many table relationship is referenced by multiple foreign keys, the regular One to Many configuration cannot be used, as it expects to be put inside an existing column inside the settings.json file.
Therefore an additional column entry have to be added to the columns array, similar to how Many to Many relationship is being configured.
The fk key specifies the foreign keys in this table that are referencing the other one:
{
  "verbose": "otm",
  "name": "otm",
  "control": {
    "select": true
  },
  "type": "varchar(45)",
  "allowNull": false,
  "listview": {
    "show": true
  },
  "editview": {
    "show": true
  },
  "fk": [
    "otm_id1",
    "otm_id2"
  ],
  "oneToMany": {
    "table": "otm",
    "pk": [
      "id1",
      "id2"
    ],
    "columns": [
      "name"
    ]
  }
}
Compound: Many to Many

In case tables with multiple primary keys are part of a Many to Many table relationship, the regular Many to Many setting is used, but additionally the parentPk and childPk keys inside the link table, and the pk key inside the ref table, can be set to an array of foreign and primary keys respectively to accommodate that design:
{
  "verbose": "mtm",
  "name": "mtm",
  "control": {
    "select": true,
    "multiple": true
  },
  "type": "varchar(45)",
  "allowNull": false,
  "listview": {
    "show": true
  },
  "editview": {
    "show": true
  },
  "manyToMany": {
    "link": {
      "table": "tbl_has_mtm",
      "parentPk": [
        "tbl_id1",
        "tbl_id2"
      ],
      "childPk": [
        "mtm_id1",
        "mtm_id2"
      ]
    },
    "ref": {
      "table": "mtm",
      "pk": [
        "id1",
        "id2"
      ],
      "columns": [
        "name"
      ]
    }
  }
}
Compound: Many to One

Similar to the regular Many to One configuration, but additionally the value for each table listed there can be set to an array of foreign keys referencing this table.
"manyToOne": {
  "mto": [
    "tbl_id1",
    "tbl_id2"
  ]
}
Compound: One to One
Similar to the regular One to One configuration, but additionally the value for each table listed there can be set to an array of foreign keys referencing this table.
"oneToOne": {
  "oto": [
    "tbl_id1",
    "tbl_id2"
  ]
}
Filter
Columns can be enabled to be available for filtering inside the listview by listing them inside the filter list for that table's listview config:
"listview": {
  "order": {},
  "page": 5,
  "filter": [
    "item_id",
    "user_id",
    "cache",
    "date",
    "deleted",
    "deleted_at"
  ]
}
All column data types and control types will be picked from the columns definition for that table. For example, a foreign key identifier configured as one-to-many relationship will be rendered as select box to allow the user to pick a value from. Similarly a many-to-many column entry can be listed by its name key and it will be rendered as multiple select box allowing you to pick multiple values from the referenced table to filter by. Date and time pickers will be rendered as pairs of two controls to allow you to specify date and time ranges if needed.
Listview Filter Example (click on the little funnel icon next to the page header)
Customization
Custom: Static Files
Custom static files can be included at the end of the <head> tag of the base template:
{
  "something": {
    "public": {
      "external": {
        "js": [
          "https://cdn.ckeditor.com/4.4.2/standard/ckeditor.js"
        ]
      },
      "local": {
        "path": "/absolute/path/to/folder",
        "css": [
          "/some.css"
        ],
        "js": [
          "/some.js"
        ]
      }
    }
  }
}
Take a look at the examples repository.
CKEditor
One good example of the use of custom files could be extending the admin with a rich text editor.
Find the column that you want to configure in settings.json and set its control type to a textarea and additionally set a CSS class name to use for the rich text editor:
"control": {
  "textarea": true,
  "editor": "class-name"
}
Then inside the custom.json file specify the static files to include:
{
  "Rich Text Editors": {
    "public": {
      "external": {
        "js": [
          "https://cdn.ckeditor.com/4.4.2/standard/ckeditor.js"
        ]
      },
      "local": {
        "path": "/absolute/path/to/folder",
        "js": [
          "/relative/path/to/the/above/init.js"
        ]
      }
    }
  }
}
CKEditor v4.4.2 can be initialized like this:
$(function () {
  if (typeof CKEDITOR !== 'undefined') {
    CKEDITOR.replaceAll(function (textarea, config) {
      // exclude textareas that are inside hidden inline rows
      if ($(textarea).parents('tr').hasClass('blank')) return false
      // textareas with this class name will get the default configuration
      if (textarea.className.includes('class-name')) return true
      // all other textareas won't be initialized as ckeditors
      return false
    })
  }
})

// executed each time an inline is added
function onAddInline (rows) {
  if (typeof CKEDITOR !== 'undefined') {
    // for each of the new rows containing textareas
    $('textarea', rows).each(function (index) {
      // get the DOM instance
      var textarea = $(this)[0]
      // textareas with this class name will get the default configuration
      if (textarea.className.includes('class-name')) return CKEDITOR.replace(textarea)
      // all other textareas won't be initialized as ckeditors
      return false
    })
  }
}
Note that jQuery $ is loaded globally for the entire admin.
The class-name is the same class name that we specified for that column inside the settings.json file.
The CKEDITOR.replaceAll method loops throgh all textareas available on the page and filters them out to only those that needs to be initialized as CKEditors. Inline records for Many to One and One to One relationships has a hidden blank row used as a template whenever the user tries to add new inline record to the page. Any textarea inside that blank row have to be excluded.
The hidden textareas are initialized after the user clicks on the link to add a new inline record. The onAddInline is an event like global function that is called each time an inline record is appended to the list of inline records. The rows parameters contains all table rows that has been added. Again we loop through all of them and initialize only those textareas that have the class we specified in settings.json
Custom: Views
The custom view config is configured by the app key:
{
  "My Awesome View": {
    "app": {
      "path": "/absolute/path/to/app.js",
      "slug": "hi",
      "verbose": "Basic View",
      "mainview": {
        "show": true
      }
    }
  }
}
The app.js file contains an Express.js middleware:
var express = require('express')
var app = module.exports = express()
var path = require('path')

app.set('views', __dirname)

app.get('/hi', (req, res, next) => {
  // variable that will be available inside your template
  res.locals.hello = 'Hi'
  // realtive path from the admin's view folder to your custom folder
  var relative = path.relative(res.locals._admin.views, app.get('views'))
  // the content partial holds the main content of the page
  res.locals.partials = {
    // path to your hello.html template
    content: path.join(relative, 'hello')
  }
  // continue so that the admin can render the entire page
  next()
})
The hello.html template is an HTML file that contains Hogan.js (mustache.js) variables:
<p>{{hello}}, how are you?</p>The res.locals object contains all of the template variables that will be used across various partials to render the entirety of the admin UI.
One additional variable called res.locals._admin exposes the admin internals to your route. The contents of this variable are not meant to be rendered and are there for internal use by your custom routes.
For example, the res.locals._admin.db.client holds a reference to the underlying database client wrapper that the admin uses internally:
app.get('/hi', (req, res, next) => {
  var client = res.locals._admin.db.client
  // do some queries
  client.query('... sql ...', (err, result) => {
    // do something with result data
  })
}
To find more about the available data there you can put a breakpoint inside your custom route handler and inspect it with a debugger.
Also have a look at the examples repository.
Custom: Event Hooks
The supported event hooks are:
- preSave - before a record is saved
- postSave - after a record was saved
- preList - before the listview is rendered
The event hooks config is configured by the events key:
{
  "My Awesome Event Hooks": {
    "events": "/absolute/path/to/event/handlers.js"
  }
}
The event handlers are similar to Express.js middlewares, but they have one additional args parameter:
exports.preSave = (req, res, args, next) => {
  // do something
  next()
}
exports.postSave = (req, res, args, next) => {
  // do something
  next()
}
exports.postList = (req, res, args, next) => {
  // do something
  next()
}
You can put a breakpoint inside any of your event hook handlers and inspect the available handler parameters with a debugger.
Also have a look at the examples repository.
Custom: preSave
The args parameter contains:
-
action - query operation:
insert,updateorremove - name - the table name for which this operation was initiated for
- slug - the slug of that table
-
data - data submitted via POST request or returned from the database
- view - this table's data (the one currently shown inside the editview)
-
oneToOne | manyToOne - inline tables data
"table's name": {
  "records": [
    "columns": {"column's name": "column's value", ...},
    "insert|update|remove": "true" // only for inline records
  ]
}
- upath - absolute path to the upload folder location
- upload - list of files to be uploaded submitted via POST request
- db - database connection instance
preSave - set created_at and updated_at fields
In this example we are updating the created_at and the updated_at fileds for a table called user:
var moment = require('moment')

exports.preSave = (req, res, args, next) => {
  if (args.name === 'user') {
    var now = moment(new Date()).format('YYYY-MM-DD hh:mm:ss')
    var record = args.data.view.user.records[0].columns
    if (args.action === 'insert') {
      record.created_at = now
      record.updated_at = now
    }
    else if (args.action === 'update') {
      record.updated_at = now
    }
  }
  next()
}
The created_at and the updated_at columns have to be hidden inside the editview because they will be updated internally by your event hook. Set show: false for the editview key for those columns inside the settings.json file.
preSave - generate hash identifier
In this example we are generating a hash id for a table called cars. That table view also contains manyToOne inline tables to be edited along with it that also needs their id generated:
var shortid = require('shortid')

exports.preSave = (req, res, args, next) => {
  if (args.name == 'car') {
    if (args.action == 'insert') {
      var table = args.name
      var record = args.data.view[table].records[0].columns
      record.id = shortid.generate()
    }
    for (var table in args.data.manyToOne) {
      var inline = args.data.manyToOne[table]
      if (!inline.records) continue
      for (var i=0; i < inline.records.length; i++) {
        if (inline.records[i].insert != 'true') continue
        inline.records[i].columns.id = shortid.generate()
      }
    }
  }
  next()
}
All of the id columns have to be hidden inside the editview because they will be generated internally by your event hook. Set show: false for the editview key for those columns inside the settings.json file.
preSave - soft delete records
In this example we are soft deleting records for a table called purchase. That table view also contains manyToOne inline tables to be edited along with it that also requires their records to be soft deleted:
var moment = require('moment')

exports.preSave = (req, res, args, next) => {
  if (args.name === 'purchase') {
    var now = moment(new Date()).format('YYYY-MM-DD hh:mm:ss')
    // all inline oneToOne and manyToOne records should be marked as deleted
    for (var table in args.data.manyToOne) {
      var inline = args.data.manyToOne[table]
      if (!inline.records) continue
      for (var i=0; i < inline.records.length; i++) {
        if (args.action !== 'remove' && !inline.records[i].remove) continue
        // instead of deleting the record
        delete inline.records[i].remove
        // update it
        inline.records[i].columns.deleted = true
        inline.records[i].columns.deleted_at = now
      }
    }
    // parent record
    if (args.action == 'remove') {
      // instead of deleting the record
      args.action = 'update'
      // update it
      var record = args.data.view.purchase.records[0].columns
      record.deleted = true
      record.deleted_at = now
    }
  }
  next()
}
All of the deleted and deleted_at columns have to be hidden inside the editview because they will be managed by your event hook. Set show: false for the editview key for those columns inside the settings.json file.
Custom: postSave
The args parameter contains:
-
action - query operation:
insert,updateorremove - name - the table name for which this operation was initiated for
- slug - the slug of that table
-
data - data submitted via POST request or returned from the database
- view - this table's data (the one currently shown inside the editview)
-
oneToOne | manyToOne - inline tables data
"table's name": {
    "records": [
        "columns": {"column's name": "column's value", ...},
        "insert|update|remove": "true" // only for inline records
    ]
}
- upath - absolute path to the upload folder location
- upload - list of files to be uploaded submitted via POST request
- db - database connection instance
postSave - upload files to a third party server
- in this example our table will be called
item - the item's table
image's column control type should be set tofile:trueinsettings.json - use the code below to upload the image, after the record is saved
In this example we are uploading an image to a third-party service for a table called item:
var cloudinary = require('cloudinary')
var fs = require('fs')
var path = require('path')
cloudinary.config({cloud_name: '...', api_key: '...', api_secret: '...'})

exports.postSave = (req, res, args, next) => {
  if (args.name === 'item') {
    // file upload control data
    var image = args.upload.view.item.records[0].columns.image
    // in case file is chosen through the file input control
    if (image.name) {
      // file name of the image already uploaded to the upload folder
      var fname = args.data.view.item.records[0].columns.image
      // upload
      var fpath = path.join(args.upath, fname)
      cloudinary.uploader.upload(fpath, (result) => {
        console.log(result)
        next()
      })
    }
    else next()
  }
  else next()
}
The image column needs to have its control type set to file: true inside the settings.json file.
Custom: preList
The args parameter contains:
- name - the table name for which this operation was initiated for
- slug - the slug of that table
-
filter - filter data submitted via POST request
- columns - list of columns (and their values) to filter by
- direction - sort order direction
- order - column names to order by
-
or -
true|falsewhether to use logical or or not
-
statements - sql query strings partials
- columns - columns to select
- table - table to select from
- join - join statements
- where - where statements
- group - group by statements
- order - order by statements
- from - limit from number
- to - limit to number
- db - database connection instance
preList - hide soft deleted records by default
Have a look at the preSave hook example about soft deleted records.
exports.preList = (req, res, args, next) => {
  if (args.name === 'purchase') {
    // check if we are using a listview filter
    // and we want to see soft deleted records
    var filter = args.filter.columns
    if (filter && (filter.deleted == '1' || filter.deleted_at && filter.deleted_at[0])) {
      return next()
    }
    // otherwise hide the soft deleted records by default
    var filter =
      ' `purchase`.`deleted` IS NULL OR `purchase`.`deleted` = 0' +
      ' OR `purchase`.`deleted_at` IS NULL ';
    args.statements.where
      ? args.statements.where += ' AND ' + filter
      : args.statements.where = ' WHERE ' + filter
  }
  next()
}
Hosting
By default all of the static assets needed by the admin will be served by the admin middleware itself. A good way to improve the performance of your admin instance is to serve only the dynamic routes with Node.js and leave the static files to be served by a reverse proxy instead.
Hosting: Nginx
# redirect HTTP to HTTPS
server {
  listen 80;
  server_name mywebsite.com;
  return 301 https://$host$request_uri;
}
# HTTPS only
server {
  listen 443 ssl;
  server_name mywebsite.com;

  # (optional) you can put an additional basic auth in front of your admin
  auth_basic 'Restricted';
  auth_basic_user_file /absolute/path/to/.htpasswd;

  access_log /var/log/nginx/mywebsite.com-access.log;
  error_log /var/log/nginx/mywebsite.com-error.log debug;

  # certificates for HTTPS
  ssl_certificate /etc/letsencrypt/live/mywebsite.com/fullchain.pem;
  ssl_certificate_key /etc/letsencrypt/live/mywebsite.com/privkey.pem;

  # forward all requests to Node.js except for the static files below
  location / {
    # this is where your admin instance is listening to
    proxy_pass http://127.0.0.1:3000/$uri$is_args$args;
    # (optional) hide the fact that your app was built with Express.js
    proxy_hide_header X-Powered-By;
  }

  # express-admin - static files bundled with the admin
  location /express-admin.css {
    root /absolute/path/to/express-admin/node_modules/express-admin/public;
    try_files $uri =404;
  }
  location /express-admin.js {
    root /absolute/path/to/express-admin/node_modules/express-admin/public;
    try_files $uri =404;
  }
  location /favicon.ico {
    root /absolute/path/to/express-admin/node_modules/express-admin/public;
    try_files $uri =404;
  }

  # express-admin-static - third-party static files bundled with the admin
  location /jslib/ {
    root /absolute/path/to/express-admin/node_modules/express-admin-static;
    try_files $uri =404;
  }
  location /csslib/ {
    root /absolute/path/to/express-admin/node_modules/express-admin-static;
    try_files $uri =404;
  }
  location /font/ {
    root /absolute/path/to/express-admin/node_modules/express-admin-static;
    try_files /csslib/fonts/$uri =404;
  }
  location /bootswatch/ {
    root /absolute/path/to/express-admin/node_modules/express-admin-static;
    try_files $uri =404;
  }

  # (optional) any custom static file that you may have
  location /custom.css {
    root /absolute/path/to/custom/static/files;
    try_files $uri =404;
  }
  location /custom.js {
    root /absolute/path/to/custom/static/files;
    try_files $uri =404;
  }
}
Hosting: Multiple Admins
Multiple admin instances can be served with a single Node.js server:
var express = require('express')
var admin = require('express-admin')

express()
  .use('/admin1', admin({
    config: require('/path1/config.json'),
    settings: require('/path1/settings.json'),
    users: require('/path1/users.json'),
    custom: require('/path1/custom.json'),
  }))
  .use('/admin2', admin({
    config: require('/path2/config.json'),
    settings: require('/path2/settings.json'),
    users: require('/path2/users.json'),
    custom: require('/path2/custom.json'),
  }))
  .use('/admin3', admin({
    config: require('/path3/config.json'),
    settings: require('/path3/settings.json'),
    users: require('/path3/users.json'),
    custom: require('/path3/custom.json'),
  }))
  .listen(3000)
In case you are serving them directly with Node.js then you have to set the root prefix for each admin instance inside the config.json file.
However, in case you are using Nginx on top of Node.js to route the traffic, you can setup different sub domains for each admin instance and route the traffic to the correct path prefix:
# map the sub domain being used to the path prefix for that admin instance
map $http_host $admin_prefix {
  admin1.mywebsite.com   admin1;
  admin2.mywebsite.com   admin2;
  admin3.mywebsite.com   admin3;
}
and then update the above Nginx configuration by prepending the $admin_prefix variable to the path:
location / {
  # route to the appropriate admin prefix based on the sub domain being used
  proxy_pass http://127.0.0.1:3000/$admin_prefix$uri$is_args$args;
  # (optional) hide the fact that your app was built with Express.js
  proxy_hide_header X-Powered-By;
}
In that case there is no need to set the root configuration for the admin inside the config.json file because the routing will be done in Nginx, and for the Node.js (Express.js) server it will look like as if that was served on the default root / path.