Botmaster-socket.io

![]()


This is the socket.io integration for botmaster. It allows you to place your bot on any arbitrary web or mobile app that supports using socket.io as a client.
If you want to build your own bot on your own website, this is what you'll want to use.
Botmaster is a lightweight chatbot framework. Its purpose is to integrate your existing chatbot into a variety of messaging channels.
Documentation
Find the whole documentation for the framework on: http://botmasterai.com/documentation/latest
Installing
yarn add botmaster-socket.ioor
npm install --save botmaster-socket.ioCode
Server
const Botmaster = ;const SocketioBot = ;const botmaster = ; const socketioSettings = id: 'SOME_BOT_ID_OF_YOUR_CHOOSING' server: botmasterserver // this is required for socket.io. You can set it to another node server object if you wish to. But in this example, we will use the one created by botmaster under the hood; const socketioBot = socketioSettings;botmaster; botmaster;Client
const io = ; const socket = ; socket; The Botmaster Socket.io bot
Socket.io is a great library that allows developers to write apps using webSockets (with fallbacks to http long-polling and others when webSockets aren't available on the client). You can read more about it on their own website here: http://socket.io.
Because you might want to have a bot that not only works on some arbitrary platform but also on your own webapp/app, support for socket.io was added to the Botmaster core. Although Socket.io enables developers to use their technology in a bunch of different applications, the fact that you want to use it in Botmaster means that you want to handle 1-1 conversations between users and your bot (managed by botmaster).
If you've never used both botmaster and socket.io, It's probably still pretty unclear how all of this fits in together. Hopefully the next section will help you understand and get started with this.
Botmaster Socket.io bot mini-tutorial
By following these steps, you will have a fully functional Socket.io bot using botmaster. The client will live in a tiny web-page. The point of this tutorial is to get you started so that you can develop it further in any way you wish. This is completely based on the socket.io web "get started" guide found here: http://socket.io/get-started/chat/.
Server
After making sure that we have a project folder with a node.js project initialised and the botmaster package in it as per the installation guide.
We want to make sure botmaster is setup and make sure that messages coming from a websocket connection are received. So in our poject folder, in our app.js file, we simply copy the code found at the top of this page:
const Botmaster = ;const SocketioBot = ;const botmaster = ; const socketioSettings = id: 'SOME_BOT_ID_OF_YOUR_CHOOSING' server: botmasterserver // this is required for socket.io. You can set it to another node server object if you wish to. But in this example, we will use the one created by botmaster under the hood; const socketioBot = socketioSettings;botmaster; botmaster;We will need to add a couple of lines to this code because we will be serving a webpage from our server. Not just listening on for botmaster messages. To do so, we will use express and share the server instance between express, botmaster and socket.io. We also assume that we will be serving our static assets (the components of our webpage) from a folder called 'public' within our project directory. Our updated code looks like this:
const express = ; //addedconst port = processenvPORT || 3000; //addedconst app = ; //added // Routing for index.htmlapp; //added const server = app; const Botmaster = ;const SocketioBot = ; const botmaster = server; const socketioSettings = id: 'SOME_BOT_ID_OF_YOUR_CHOOSING' server; const socketioBot = socketioSettings;botmaster; botmaster; botmaster; // addedWe also added the botmaster 'error' event listener, because that's just always good to do.
Client side
As mentioned in the "Server side" part, we will create a folder named 'public' within our poject dir. In it, we will have the following three files:
- index.html
- style.css
- client_app.js
So that your final tree structure looks like this:
your_project_folder
├── app.js
└── public
    ├── client_app.js
    ├── index.html
    └── style.css
In the index.html file, we will put some very basic html that looks like this:
Botmaster bot Send The important line here is the line where we are importing socket.io. This works because socket.io adds a path to our server (in this case, a server created by botmaster under the hood) to serve this exact endpoint. The other imports are simply the ones we will be creating.
In the style.css file, simply add the following:
This is the exact look from the socket.io tutorial mentioned above (and mostly their code too).
Finally, in the client_app.js file, you should include the following:
// the following line could also be: "var socket = io('ws://<URL>:<PORT_Number>?botmasterUserId=wantedUserId');"// if you know you will be communicating with a server different from the one that served you the page you are on.// this only works because the socket.io library assumes with this syntax that the socket.io server// lives at the same address as the server that served this page (this should mostly be your case)var socket = ; // just get the html elements we will be needing by IDvar form = document;var textInput = document;var messages = document; form { // just making sure the page isn't refreshed event; // don't do anything if there is no text if !textInputvalue return; // Add the user message to the web page messages; // create a botmaster compatible message from the text input by the user const update = message: text: textInputvalue ; // send the message over the webSocket socket; // finally, clear the user textInput field textInputvalue = '';}; socket;You should have a read through this code to make sure you understand it as that is the code communicating with our botmaster backend.
On the first line, we call: var socket = io('?botmasterUserId=wantedUserId');. This effectively opens up a socket connection with our backend by making a request to something like this: io('ws://localhost:3000?botmasterUserId=wantedUserId');. Here as you can see, we are setting a query param called botmasterUserId to "wantedUserId". This is done because we want to make sure that when we are getting updates in our backend, the update.sender.id part will be what we set it to here and not anything else (by default the randomly allocated socket.id value). This is even more important when your users can connect from different clients and you want to make sure the botmaster reply is propagated to all the clients.
In the form.onsubmit part, we make sure that the text contained in the input cell is correctly formatted then sent to botmaster via the websocket. We also make sure to display it in our page and to then clear the input.
In the socket.on('message') part, we simply display the received message.
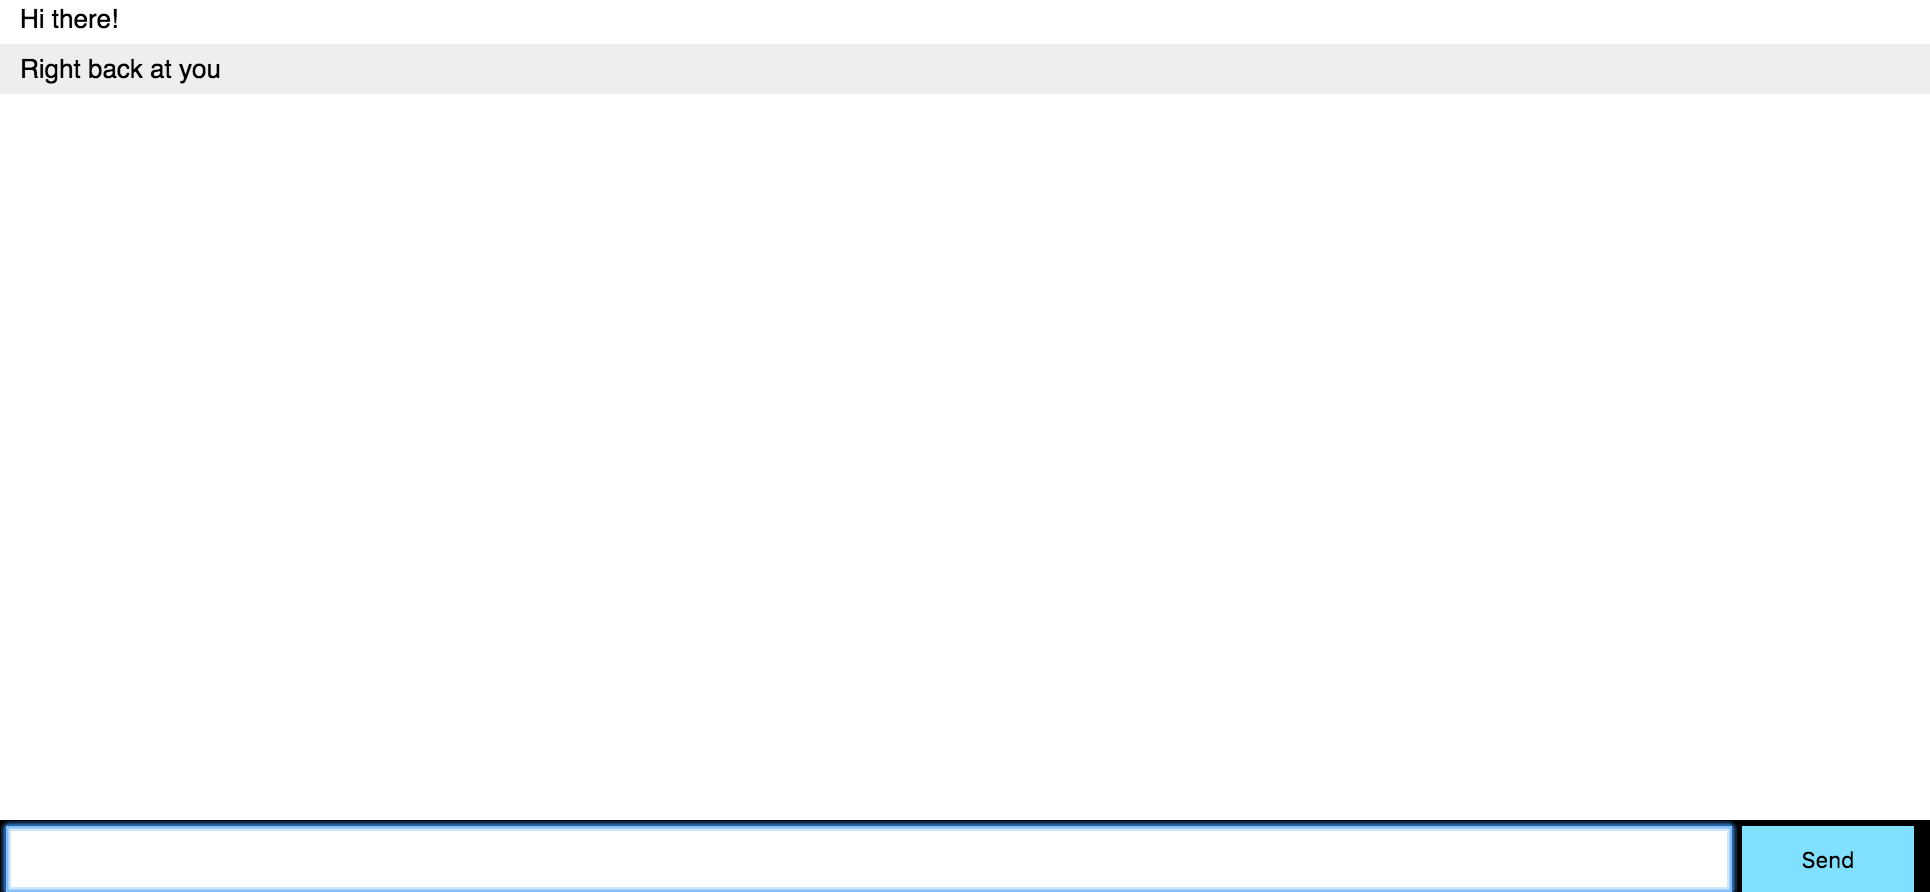
Now that our code is here, simply go to your command line and run node app.js. If you now open a browser to 127.0.0.1:3000 you should be able to chat with your pretty useless (for now) bot. Just like this:
Security
You might be wondering how you can secure your Botmaster socket.io app. I.e. how can you make sure that a client connecting with a certain id really is who they claim they are. Well, this part is actually left to you, the developer to do. I didn't want to make any assumptions with regards to what people would want to use to secure their app. So what I do is expose the socket.io server object through the bot object. It can be accessed in the following way
socketioBotioServerThen you'll be able to register a middleware function to your socket.io server as such:
socketioBotioServer;This is shamelessly stolen from the socket.io documentation here: http://socket.io/docs/server-api/#namespace#use(fn:function):namespace
This function will be executed every time there is an incoming socket connection. Indeed, no need to do so on every message as once the connection is made, all transfers are secured on the open socket. That's really the whole point of webSockets.
License
This library is licensed under the MIT license