
threlte-xr


Svelte components and hooks for creating VR/AR applications with threlte (v6), inspired by the design of react-xr.
Warning
threlte-xris early in development. There will likely be frequent breaking changes until it reaches 0.1.0. It will only work with Threlte v6 onward.
npm install threlte-xrExamples

Getting started
The following adds a button to start your session and controllers inside an XR manager to prepare your scene for WebXR rendering and interaction.
<script>
  import { VRButton, ARButton } from 'threlte-xr'
  import { Canvas } from '@threlte/core'
  import Scene from './scene.svelte'
</script>

<Canvas>
  <Scene />
</Canvas>

<VRButton />
Then, in scene.svelte:
<script>
  import { XR, Controllers, Hands } from 'threlte-xr'
</script>

<XR />
<Controllers />
<Hands />
If you want the hands, controllers, or other objects to only be added to the THREE.Scene when the XR session starts, make them children of the <XR> component:
<script>
  import { XR, Controllers, Hands } from 'threlte-xr'
</script>

<XR>
  <Controllers />
  <Hands />
</XR>
XRButton
<XRButton /> is an HTML <button /> that can be used to init and display info about your WebXR session. This is aliased by ARButton and VRButton with sensible session defaults.
<!--
  mode - The type of `XRSession` to create
  sessionInit - `XRSession` configuration options, see https://immersive-web.github.io/webxr/#feature-dependencies
  force - Whether this button should only enter / exit an `XRSession`. Default is to toggle both ways

  on:error - Dispatched if XR initialization fails.
  on:click - Dispatched if a click occurs.
-->
<XRButton
  mode={'immersive-ar' | 'immersive-vr' | 'inline'}
  sessionInit={{ optionalFeatures: ['local-floor', 'bounded-floor', 'hand-tracking', 'layers'] }}
  force={'enter' | 'exit' | undefined}
  on:error={(event) => {}}
  on:click={(event) => {}}
/>
XR
<XR /> is a WebXR manager that configures your scene for XR rendering and interaction. This lives within a Threlte <Canvas />.
<Canvas>
  <!--
    foveation -
    Enables foveated rendering. Default is `0`
    0 = no foveation, full resolution
    1 = maximum foveation, the edges render at lower resolution

    frameRate -
    The target framerate for the XRSystem. Smaller rates give more CPU headroom at the cost of responsiveness.
    Recommended values are `72`, `90`, or `120`. Default is unset and left to the device.
    @note If your experience cannot effectively reach the target framerate, it will be subject to frame reprojection
    which will halve the effective framerate. Choose a conservative estimate that balances responsiveness and
    headroom based on your experience.
    @see https://developer.mozilla.org/en-US/docs/Web/API/WebXR_Device_API/Rendering#refresh_rate_and_frame_rate

    referenceSpace -
    Type of WebXR reference space to use. Default is `local-floor`

    on:sessionstart -
    Dispatched as an XRSession is requested

    on:sessionend -
    Dispatched after an XRSession is terminated

    on:visibilitychange -
    Dispatched when an XRSession is hidden or unfocused

    inputsourceschange -
    Dispatched when available inputsources change
  -->
  <XR
    foveation={0}
    frameRate={90}
    referenceSpace='local-floor'
    on:sessionstart={(event: XREvent<XRManagerEvent>) => {}}
    on:sessionend={(event: XREvent<XRManagerEvent>) => {}}
    on:visibilitychange={(event: XREvent<XRSessionEvent>) => {}}
    on:inputsourceschange={(event: XREvent<XRSessionEvent>) => {}}
  />
  <!-- All your regular threlte elements go here -->
</Canvas>
useXR
This hook gives you access to the current state configured by <XR />.
import { useXR } from 'threlte-xr'

const {
  isPresenting, // CurrentWritable<boolean> - Whether the XR device is presenting in an XR session
  isHandTracking, // CurrentWritable<boolean> - Whether hand tracking inputs are active
  session, // CurrentWritable<XRSession | undefined> - The active `XRSession`
  xrFrame, // { current: XRFrame } - The current XRFrame
} = useXR()
Controllers
Controllers can be added with <Controllers /> for motion-controllers and/or <Hands /> for hand-tracking. These will activate whenever their respective input mode is enabled on-device and provide default models for a left and right XRController.
<Controllers
  modelLeft={undefined | THREE.Object3D}
  modelRight={undefined | THREE.Object3D}
  on:connected={(event) => {}}
  on:disconnected={(event) => {}}
  on:select={(event) => {}}
  on:selectstart={(event) => {}}
  on:selectend={(event) => {}}
  on:squeeze={(event) => {}}
  on:squeezeend={(event) => {}}
  on:squeezestart={(event) => {}}
/>

<Hands
  profile={'mesh' | 'spheres' | 'boxes' | 'none'}
  on:connected={(event) => {}}
  on:disconnected={(event) => {}}
  on:pinchstart={(event) => {}}
  on:pinchend={(event) => {}}
/>
Controllers and Hands can optionally have children attached to their Object3ds.
<Controllers>
  <T slot='left' is={$gltf1.scene} />
  <T slot='right' is={$gltf2.scene} />
</Controllers>
useController
useController returns a currentWritable of an XRController by handedness, exposing position and orientation info.
const leftController = useController('left')
const rightController = useController('right')
const gazeController = useController('none')

console.log(leftController.current)
useGamepad
useGamepad is a convenience hook that returns a currentWritable to easily reference an XRController's gamepad.
// Instead of this...
const leftController = useController('left')
$: gamepad = leftController?.inputSource.gamepad

// You can do this...
const leftController = useController('left')
const leftGamepad = useGamepad('left')

console.log(leftGamepad.current)
useControllerEvent / useHandEvent
To handle controller events that are not bound to any object in the scene you can use useControllerEvent hook. This is a low-level abstraction that subscribes directly into the native XRInputSource (see XRInputSourceEvent).
useControllerEvent('squeeze', (event: XRControllerEvent) => {})It supports an optional third parameter with options for filtering by handedness or input.
By default, no filtering occurs.
useControllerEvent('squeeze', (event: XRControllerEvent) => {}, {
  handedness: 'left' | 'right' | 'none',
})
Hand events are also supported with the useHandEvent.
useHandEvent('pinchstart', (event: XRHandEvent) => {})Additionally, individual hand joint data can be retrieved with the useHandJoint hook. See MDN for a list of all available joints.
const jointSpace = useHandJoint('left', 'wrist')Movement
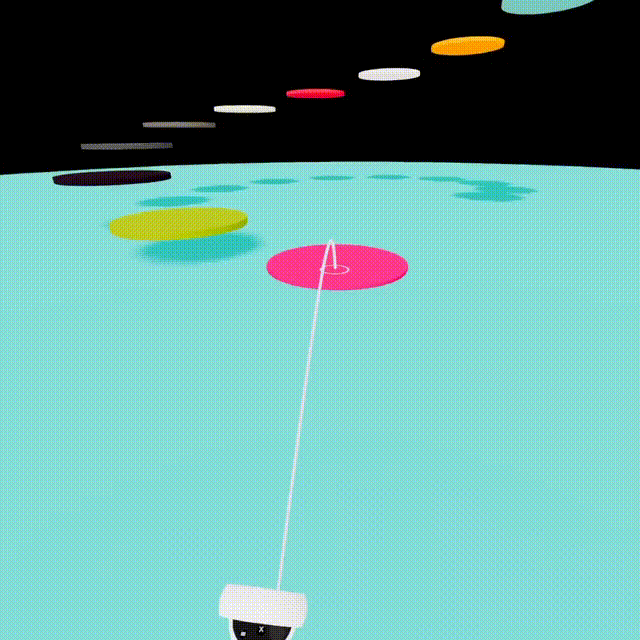
TeleportControls
The <TeleportControls> component allows the creation of a teleportation experience that is meant to closely mirror those found in many games - such as Half Life: Alyx - as well as the Quest home environment.
Adding the <TeleportControls> component to a scene will enable spawning a teleport indicator if the gamepad's joystick is pushed forward. Users will then be able to teleport to any area specified by one or more navigation meshes that are provided as children to this component.
<TeleportControls
  on:teleport={(destination) => { /* Occurs after a teleportation */ }}
>
  <!--
    Creates a circular navmesh that the user can teleport on.
    These can be visible or invisible objects.
  -->
  <T.Mesh rotation={[-Math.PI / 2, 0, 0]}>
    <T.CircleGeometry args={[5]} />
    <T.MeshStandardMaterial color='#fff' />
  </T.Mesh>
</TeleportControls>
useTeleport
useTeleport is a low-level hook that returns a teleport function, which allows you to move the reference frame of the user to a desired position.
const teleport = useTeleport()
const vector3 = new THREE.Vector3()

// The desired position
vector3.set(10, 0, -5)

teleport(vector3)
useTeleport Can be used with useFrame for smooth movement.
useFrame(() => {
  vector3.z += 0.1
  teleport(vector3)
})
Custom XRButton
While you can customize <XRButton>, you can also create your own. For this there's a low-level utility available of a headless xr button: toggleXRSession.
import { toggleXRSession } from 'threlte-xr'

const handleClick = async () => {
  const session = await toggleXRSession('immersive-vr')
  if (session) {
    button.innerText = 'Exit VR'
  } else {
    button.innerText = 'Enter VR'
  }
}

const button = document.createElement('button')
button.innerText = 'Enter VR'
button.addEventListener('click', handleClick)
document.appendChild(button)
AR
useHitTest
Use hook during an immersive-ar session to recieve hit test results on each frame.
useHitTest((hitMatrix: THREE.Matrix4, hit: XRHitTestResult) => {})