


Powerful Tabby plugin that implements Model Context Protocol (MCP) server, enabling AI-powered terminal control and automation.
Plugin for Tabby Terminal - a modern, highly configurable terminal emulator.
Watch the full video demonstration of Tabby-MCP in action:
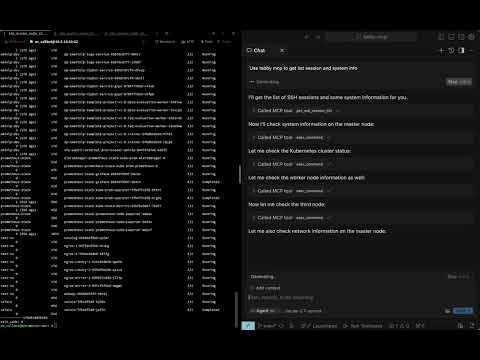
- 🤖 AI Connection: Seamlessly connect AI assistants to your terminal
- 🔌 MCP Server: Built-in Model Context Protocol server implementation
- 🖥️ Terminal Control: Allow AI to execute commands and read terminal output
- 🔍 Session Management: View and manage SSH sessions
- 🚫 Command Abort: Safely abort running commands
- 📋 Buffer Access: Retrieve terminal buffer content with flexible options
- 🔒 Pair Programming Mode: Optional confirmation dialog before command execution
- 📊 Command History: Track and review previously executed commands
- 🔄 Command Output Storage: Paginated access to complete command outputs
- 🚀 Tabby-MCP-Server
- Go to Tabby settings → Plugins → MCP
- Click "Install" on the Tabby MCP plugin
- Restart Tabby
- Configure your AI client to connect to the MCP server (see Connecting to MCP)
You can build and install the plugin using Docker with the following command:
git clone https://github.com/thuanpham582002/tabby-mcp-server.git
cd tabby-mcp-server
# Build the Docker image
docker build -t tabby-mcp . && docker run -v $(pwd)/build:/output tabby-mcp
bash scripts/copy_to_plugin_folder.sh
This command builds a Docker image tagged as 'tabby-mcp' and runs a container from this image, mounting your local 'build' directory to '/output' in the container. The script scripts/copy_to_plugin_folder.sh will copy the built files to the Tabby plugin folder.
- Install the plugin using one of the methods above
- Start Tabby and navigate to Settings → Plugins → MCP
- Configure the MCP server port (default: 3001)
- Toggle "Start on Boot" to automatically start the server when Tabby launches
- Connect to the MCP server from any supported AI client listed at https://modelcontextprotocol.io/clients
- Start Tabby with the MCP plugin enabled
- Configure your AI client to connect to the MCP server (see Connecting to MCP)
- Ask your AI assistant to run commands or manage your terminal sessions
Example AI prompt:
Connect to my Tabby MCP server and list all available terminal sessions.
Then execute the command "ls -la" in the first available terminal.
To configure AI clients to use your MCP server, add the following to your ~/.cursor/mcp.json file:
STDIO mode:
{
  "mcpServers": {
    "Tabby MCP": {
      "command": "npx",
      "args": [
        "-y",
        "tabby-mcp-stdio",
        "--port",
        "3001"
      ]
    }
  }
}
SSE mode:
{
  "mcpServers": {
    "Tabby MCP": {
      "type": "sse",
      "url": "http://localhost:3001/sse"
    }
  }
}
Select your preferred MCP server in your AI client settings. The Tabby MCP plugin must be running for the "Tabby MCP" (SSE) option to work, while the STDIO and Docker options will start their own server instances.
Configure the MCP server through the Tabby settings:
{
  "mcp": {
    "port": 3001,
    "host": "http://localhost:3001",
    "enableLogging": false,
    "startOnBoot": true,
    "pairProgrammingMode": {
      "enabled": true,
      "showConfirmationDialog": true,
      "autoFocusTerminal": true
    }
  }
}The plugin includes a "Pair Programming Mode" that adds safety features when AI assistants control your terminal:
- Confirmation Dialog: Prompt user before executing commands
- Auto Focus Terminal: Automatically focus terminal when commands are executed
- Command Rejection: Ability to reject commands with feedback
To enable Pair Programming Mode:
- Go to Tabby settings → Plugins → MCP
- Toggle "Enable Pair Programming Mode"
- Configure additional safety options as needed
| Tool | Description | Parameters |
|---|---|---|
get_ssh_session_list |
Get list of all terminal sessions | None |
exec_command |
Execute a command in terminal |
command, tabId, commandExplanation
|
get_terminal_buffer |
Get terminal content |
tabId, startLine, endLine
|
get_command_output |
Retrieve complete command output |
outputId, startLine, maxLines
|
Contributions are welcome! Here's how you can help:
- Fork the repository
- Create a feature branch (
git checkout -b feature/your-feature) - Commit your changes (
git commit -m 'Add your feature') - Push to the branch (
git push origin feature/your-feature) - Open a Pull Request
See the contributing guidelines for more details.
-
Clone the repository and install dependencies:
git clone https://github.com/thuanpham582002/tabby-mcp-server.git cd tabby-mcp-server npm install -
Make your changes to the codebase
-
Build the plugin:
docker build -t tabby-mcp . && docker run -v $(pwd)/build:/output tabby-mcp
-
Test the plugin with Tabby:
bash scripts/copy_to_plugin_folder.sh
This project is licensed under the MIT License - see the LICENSE file for details.
Made with ❤️ by Pham Tien Thuan