
Rameter
With Rameter, you can write load test with simple NodeJS scripts!

Table of Contents
About the Project
What is Rameter?
Rameter is a NodeJS based HTTP endpoint/API load test/performance test tool inspired by Jmeter, Locust, K6.
The name "Rameter" do come from Ram(from AOC) + (J)meter.
Why do I make Rameter?
- I like the code-driven way of Locust & K6.
- I like the web dashboard UI of Locust
- I like the detail HTML test report generated by Jmeter.
- I like the idea that we can write load test in JS like K6 do, but I want native Javascript library support.
Why Rameter?
- Use it if you want to write some simple nodeJS script to do load test to your API.
- Use it if you are using Jmeter, and you feel difficult about how to write dynamic logics with the testing endpoints.
- Use it if you are using Locust, but you want to generate pretty HTML test report like Jmeter do.
- Use it if you are using K6, but you want to use NodeJS native libraries, and you do not need the ultra performance of K6.
Features
- Write NodeJS code to define multiple user groups & dynamic scenarios.
- Calling HTTP request sampler with Axios wrapper.
- Realtime web dashboard UI during test running.
- Distributed mode.
- Support Jmeter format CSV output, hence you can use Jmeter to generate HTML report.
Getting Started
Install
npm i rameter
Hello World
helloWorld.js
import { Rameter, HttpRequestSampler, sleep, UserModelConfig } from "rameter";

const rameter = new Rameter();

/**
 * up-lifting
 */
await rameter.runStandalone();

/**
 * define user groups
 */
rameter.defineUserGroup("members");

/**
 * define user test scenario
 */
rameter.defineUserScenario("hello scenario", async ({ globalContext, nodeContext, userContext, userId }) => {
  try {
    // call an HTTP endpoint
    await HttpRequestSampler.request({
      method: "GET",
      url: `http://localhost:8080/hello`, // replace this with ur endpoint
    });
  } catch (e) {
    console.error(e);
  } finally {
    await sleep(100); // think time
  }
});

await rameter.readyTest(); // Get ready to test

/**
 * Start the load test. Run until test finished.
 */
await rameter.runUntilFinished([
  {
    userModel: UserModelConfig.stepUserForTime({
      maxUsers: 20,
      steps: 10,
      rampUpTime: 10,
      holdTime: 20,
    }),
    userGroups: ["members"],
    scenarios: ["hello scenario"],
  },
]);

/**
 * shutdown
 */
await rameter.down();
process.exit();
Steps to run:
- Install rameter.
- Add the hello world script.
- Just a reminder. The hello world script is using ES module. So you may need to have your package.json defined with
... "type" : "module", .... Or otherwise you need to change the module import syntax. - Replace the "hello scenario" part to call your endpoint.
- Run the script.
- You will then see the console is logging that it is calling the endpoint.
- It will also auto open the web dashboard to show real-time graphs.
Concepts
Component Diagram
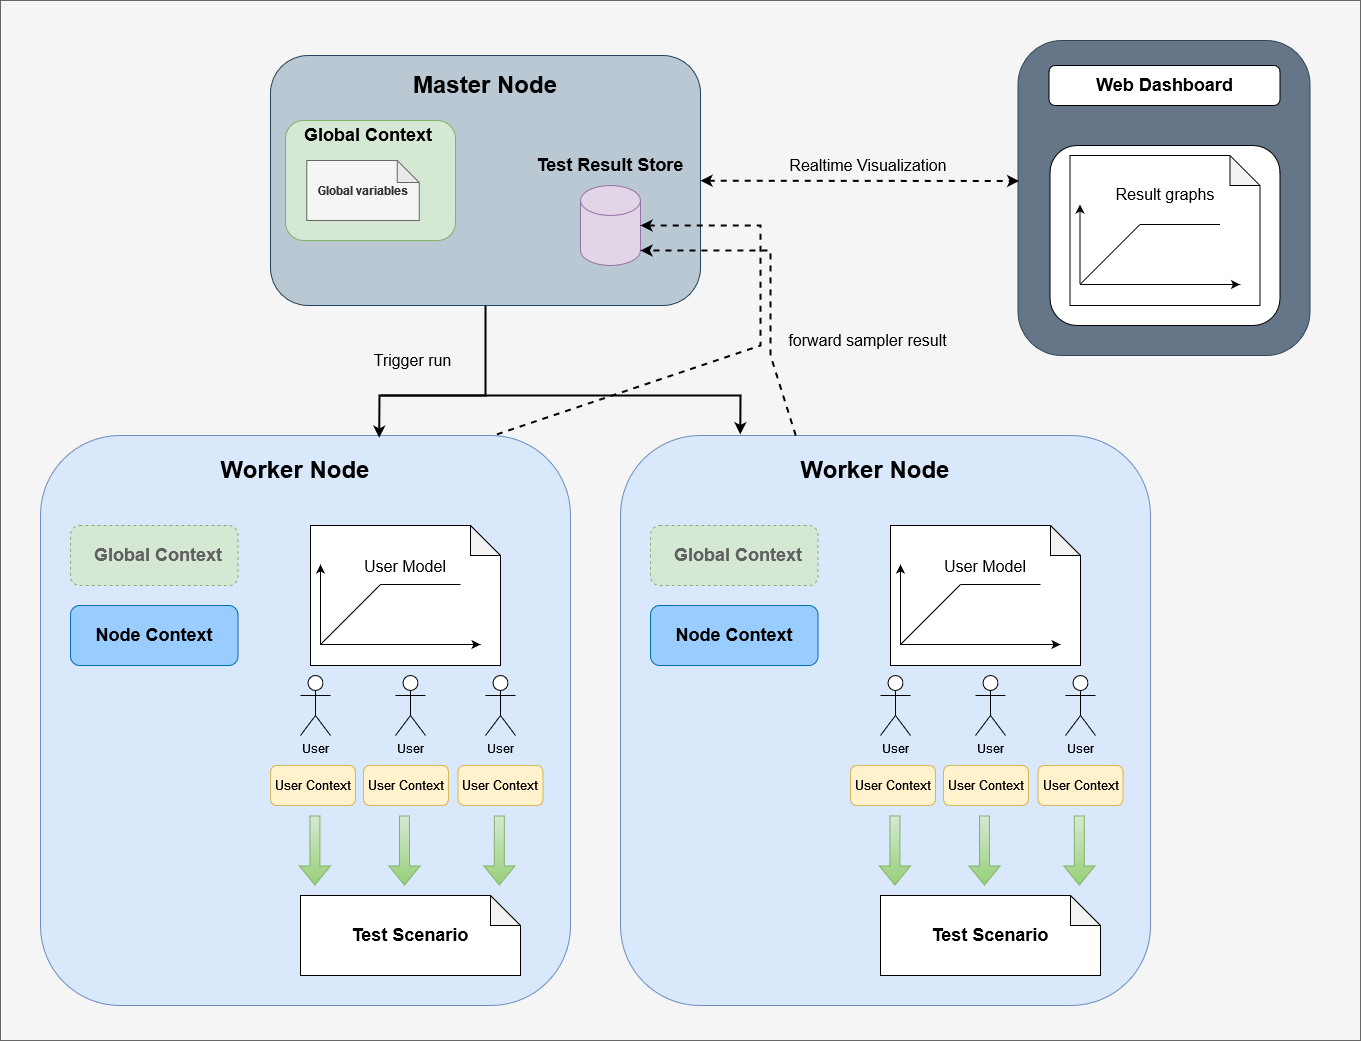
-
Master: Serve as controller. It fire commands to worker nodes to run the test. It collect result statistics.
-
Worker Node: The actual component to run the test. There can be N worker nodes to scale out test client side capacity.
-
Web Dashboard: Realtime web dashboard to view test statistics.
Shared variable context
-
Global Context: Context variable to globally shared in the whole test scope.
-
User Context: Context variable to share within user scope.
-
Node Context: Each worker node can load local resources (e.g: large file) and share within the same node scope.
Realtime Dashboard Demo Screen
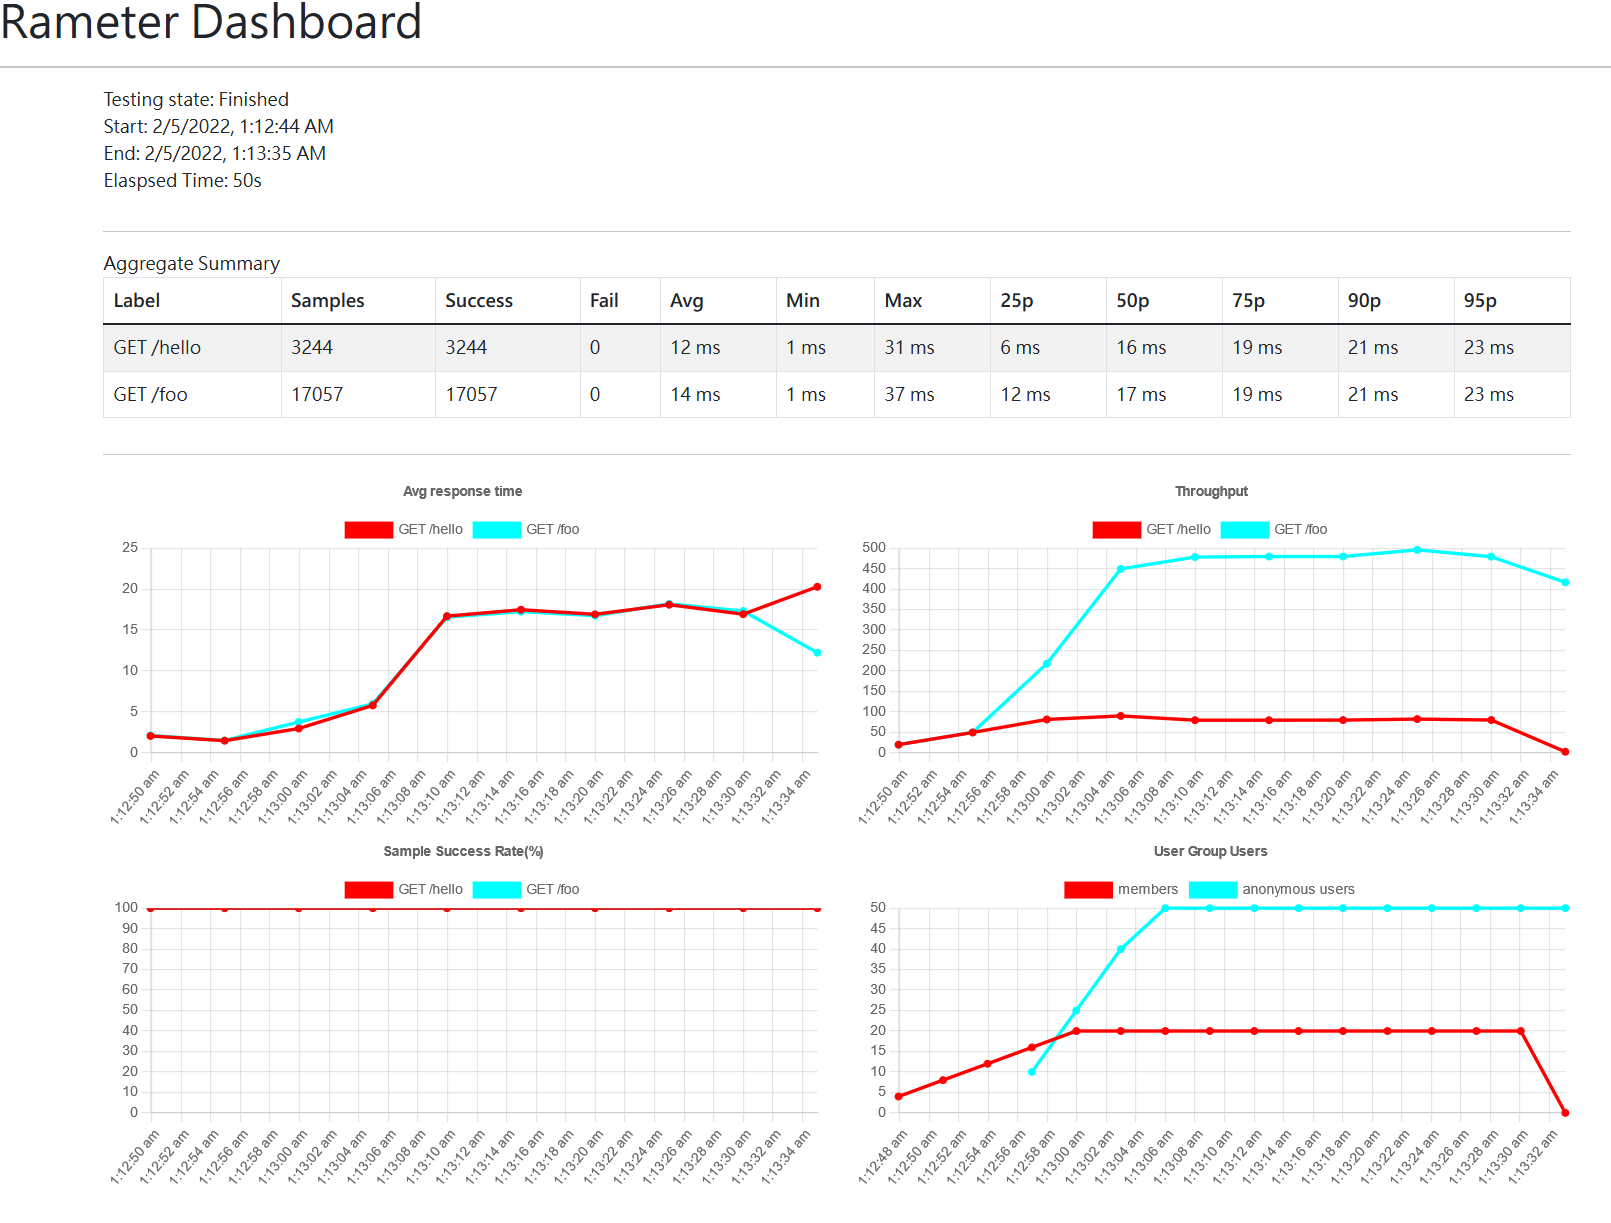
It dynamically shows:
- Average response time per API over time
- Throughput per API over time
- API successful rate per API over time
- User Group number of users over time
Docs
User Models
stepUserForTime
- Ramp up M users.
- Each User would loop the scenario infinitely.
- After all users are spawned, the test would end after holding for N seconds.
Details
await rameter.runUntilFinished([
  {
    userModel: UserModelConfig.stepUserForTime({
      maxUsers: 20,
      rampUpTime: 10,
      steps: 10,
      holdTime: 60,
      delayTime: 0
    }),
    userGroups: ["members"],
    scenarios: ["hello scenario"],
  },
]);
Options
| Option | Description | Mandatory? | Default Value |
|---|---|---|---|
| maxUsers | The maximum number of users you want to spawn. | Yes | - |
| steps | The users would be spawn with this number of steps. | Yes | - |
| rampUpTime | The number of seconds to ramp up all users. | Yes | - |
| holdTime | The number of seconds to hold after all users spawned. | Yes | - |
| delayTime | The number of seconds to wait before the user ramp up. | No | 0 |
stepUserLoopN
- Ramp up M users.
- Each User would loop the scenario for N times.
- After all users finished the loops, the test would be ended.
Details
await rameter.runUntilFinished([
  {
    userModel: UserModelConfig.stepUserLoopN({
      maxUsers: 20,
      steps: 10,
      rampUpTime: 10,
      runNTimes: 100,
      delayTime: 0
    }),
    userGroups: ["members"],
    scenarios: ["hello scenario"],
  },
]);
Options
| Option | Description | Mandatory? | Default Value |
|---|---|---|---|
| maxUsers | The maximum number of users you want to spawn. | Yes | - |
| steps | The users would be spawn with this number of steps. | Yes | - |
| rampUpTime | The number of seconds to ramp up all users. | Yes | - |
| runNTimes | Each user would run the scenario for N times. | No | 1 |
| delayTime | The number of seconds to wait before the user ramp up. | No | 0 |
userLoopForTime
- Spawn M users.
- Each User would loop the scenario infinitely.
- The test would end after holding for N seconds.
Details
await rameter.runUntilFinished([
  {
    userModel: UserModelConfig.userLoopForTime({
      maxUsers: 20,
      holdTime: 60,
      delayTime: 0
    }),
    userGroups: ["members"],
    scenarios: ["hello scenario"],
  },
]);
Options
| Option | Description | Mandatory? | Default Value |
|---|---|---|---|
| maxUsers | The maximum number of users you want to spawn. | Yes | - |
| holdTime | The number of seconds to hold after all users spawned. | Yes | - |
| delayTime | The number of seconds to wait before the user ramp up. | No | 0 |
userLoopN
- Spawn M users.
- Each User would loop the scenario for N times.
- After all users finished the loops, the test would be ended.
Details
await rameter.runUntilFinished([
  {
    userModel: UserModelConfig.userLoopN({
      maxUsers: 20,
      holdTime: 60,
      delayTime: 0
    }),
    userGroups: ["members"],
    scenarios: ["hello scenario"],
  },
]);
Options
| Option | Description | Mandatory? | Default Value |
|---|---|---|---|
| maxUsers | The maximum number of users you want to spawn. | Yes | - |
| runNTimes | Each user would run the scenario for N times. | No | 1 |
| delayTime | The number of seconds to wait before the user ramp up. | No | 0 |
Calling HTTP request
TLDR: The HttpRequestSampler.request method is a light wrapper for Axios request client.
const response = await HttpRequestSampler.request({
  method: "GET",
  url: `http://localhost:8080/hello`,
});
or
const response = await HttpRequestSampler.request({
  label: "hello API",
  method: "GET",
  url: `http://localhost:3000/hello`,
});
What the HttpRequestSampler.request actually is:
- Having a optional
labeloption to group HTTP APIs. Otherwise we would use {HTTP method + URL path} as the label. - Default to config that all HTTP status code interpret as not error.
- All remaining options are passed to Axios to call the HTTP request.
- Collect the time taken and success state statistics.
- Return back the response object for your own usage.
Custom Sampler
What if you want to verify operation performance which is not HTTP request call? For examples, loading DB operation? Schedule job processing time?
Actually Rameter provide you the CustomSampler which you can run any code fragment as an operation. Rameter would measure the time to complete it just like it do for HTTP requests.
Inside your scenario, you can write like this.
// use CustomSampler to measure some operation
await CustomSampler.run(async () => {
  await sleep(Math.round(Math.random() * 2000));
  return {
    data: { foo: 1 },
    sampleRecord: {
      label: "Mocking some operation",
    },
  };
});
Notice the code function passed to the CustomSampler.run.
It is expected to be an async function, which return { data: XXX, sampleRecord: YYY }:
-
XXXis any data result that you may want to return to scenario. -
YYYis test metadata. It is optional and usually you don't need it but it is recommended that you at least definelabelattribute which can group sampler result.
You can see an full example in Custom Sampler.
API
Rameter class
This is the major class to use to control the test.
Import:
import { Rameter } from "rameter";Methods
For run the standalone setup (Both Master & Worker Node is in local)
/**
 * Run the setup for standalone mode.
 * It would create a Master & a local Workder Node
 *
 * @param config
 * @returns
 */
runStandalone(config: MasterConfig & WorkerNodeConfig): Promise<{
    master: Master;
    workerNode: WorkerNode;
}>;
For run the distributed mode's Master and Worker Node
/**
 * Run the setup for distribute mode - Run the Master
 *
 * @param config
 * @returns
 */
runMaster(config: MasterConfig): Promise<Master>;
/**
 * Run the setup for distribute mode - Run the Worker Node
 *
 * @param config
 * @returns
 */
runWorkerNode(config: WorkerNodeConfig): Promise<WorkerNode>;
Let the Master broadcast Global Context to Worker Nodes.
/**
 * Export the globalContext. It would broadcase to all connecting Workder Node
 *
 * @param globalContext
 */
exportGlobalContext(globalContext: any): Promise<void | undefined>;
(it must be run after called runStandalone or runMaster)
Define a handler to load Node Context. This is for the case that you want every Workder Node doing some operation to load Worker Node local shared variables.
/**
 * Set the handler for loading Node Context.
 *
 * @param loadNodeContextHandler
 */
loadNodeContext(loadNodeContextHandler: (globalContext: any) => Promise<any>): Promise<void | undefined>;
Notes:
- You should define this
loadNodeContextin your Workder Node, coz it is run on Worker Node side. - The node context handler is optional. You may no need to call this if you don't use Node Context.
Define user group
/**
 * Define User Group.
 *
 * @param name
 * @param initUserContext
 */
defineUserGroup(name: string, initUserContext: InitUserContextFunction): Promise<void | undefined>;

declare type InitUserContextFunction = (parameters: {
    globalContext: any;
    nodeContext: any;
    userId: string;
}) => Promise<any>;
Define user scenario
/**
 * Define User Scenario.
 *
 * @param name
 * @param scenario
 */
defineUserScenario(name: string, scenario: Scenario): Promise<void | undefined>;

declare type Scenario = (parameters: {
    globalContext: any;
    nodeContext: any;
    userContext: any;
    userId: string;
}) => Promise<void>;
The above two define function
(it must be run after called runStandalone or runMaster)
Let the Workder Node to declare ready for start testing
/**
 * Mark for Work Node ready for start testing.
 *
 * @returns
 */
readyTest(): Promise<void | undefined>;
Notes:
- This must be called after you defined all users, scenarios.
- This must be called in your Workder Node.
- Without calling this, the Master would not able to start testing becoz it is waiting worker nodes to notify ready.
Start running the test, and wait until test finished
/**
 * Start running the test, and wait until test finished
 *
 * @param options
 * @param param1
 */
runUntilFinished(options: RunTestOptions[], { log, intermediateSummary, tickSummary, openDashboard, }?: {
    log?: boolean;
    openDashboard?: boolean;
}): Promise<void>;
Noted:
- log: it control whether to console out summary logs for every some seconds during test running. Default true.
- openDashboard: it control whether auto open a web dashboard to view real-time statistics. Default true.
Shut down Master & Workder Nodes
down(): Promise<void>;Shut down Worker Nodes
downNodes(): Promise<void>;Util for Transform output file to Jmeter CSV format out file
transformJmeterOut(inFile: string, outFile: string): Promise<void>;Full configuration
Sample:
{
    "master": {
        "host": "localhost",
        "port": 3001
    },
    "numWorkerNodes": 1,
    "fileResultStore": {
        "outFile": "./result.csv",
        "batchRecordThershold": 100,
        "batchTimeThershold": 5000
    },
    "sampleForwarder": {
        "batchRecordThershold": 100,
        "batchTimeThershold": 5000
    },
    "dashboard": {
        "origin": "http://localhost:3000",
        "port": 3000
    }
}| Option | Description | Mandatory? | Default Value |
|---|---|---|---|
| master.host | The host of Master. This is the host which workder nodes can resolve to connect | No | localhost |
| master.port | The port of Master. | No | 3001 |
| numWorkerNodes | The number of Worker Nodes. | No but recommend explicitly set | 1 |
| fileResultStore.outFile | The csv file to write test samples. | No | "./result.csv" |
| fileResultStore.batchRecordThershold | The store would flush if buffered N records | No | 100 |
| fileResultStore.batchTimeThershold | The store would flush if passed N milleseconds | No | 5000 |
| sampleForwarder.batchRecordThershold | The forwarder would flush if buffered N records | No | 100 |
| sampleForwarder.batchTimeThershold | The forwarder would flush if passed N milleseconds | No | 5000 |
| dashboard.origin | The dashboard website origin | No | "http://localhost:3000" |
| dashboard.port | The dashboard port | No | 3000 |