


pigpio
A wrapper for the pigpio C library to enable fast GPIO, PWM, servo control, state change notification and interrupt handling with Node.js on the Raspberry Pi Zero, 1, 2, 3 or 4.
pigpio supports Node.js versions 10, 12, 14, 15 and 16.
Contents
Features
- Digital IO
- Up to 3.5 million digital reads per second *)
- Up to 2.5 million digital writes per second *)
- PWM on any of GPIOs 0 through 31
- Multiple frequencies and duty cycle ranges supported
- Servo control on any of GPIOs 0 through 31
- Jitter free
- Alerts when any of GPIOs 0 through 31 change state
- The time of the state change is available accurate to a few microseconds
- Notification streams for monitoring state changes on any of GPIOs 0 through 31 concurrently
- The time of the state changes are available accurate to a few microseconds
- Low latency interrupt handlers
- Handle up to 20000 interrupts per second *)
- Read or write up to 32 GPIOs as one operation with banked GPIO
- Trigger pulse generation
- Pull up/down resistor configuration
- Waveforms to generate GPIO level changes (time accurate to a few µs)
*) On a Raspberry Pi 4 Model B running Raspberry Pi OS 2021-03-04 (Buster 10.8) with pigpio v3.3.1, Node.js v16.0.0 and V79 of the pigpio C library.
Installation
Step 1 - Install the pigpio C library
The pigpio C library is a prerequisite for the pigpio Node.js module.
Run the following command to determine which version of the pigpio C library is installed:
pigpiod -v
For the Raspberry Pi Zero, 1, 2 and 3 V41 or higher of the pigpio C library is required. For the Raspberry Pi 4 V69 or higher is required.
If the pigpio C library is not installed or if the installed version is too old, the latest version can be installed with the following commands:
sudo apt-get update
sudo apt-get install pigpio
Alternative installation instructions for the pigpio C library can be found here.
Warning: The pigpio C library contains a number of utilities. One of these utilities is pigpiod which launches the pigpio C library as a daemon. This utility should not be used as the pigpio Node.js package uses the C library directly.
Step 2 - Install the pigpio Node.js package
npm install pigpio
Usage
Assume there's an LED connected to GPIO17 (pin 11) and a momentary push button connected to GPIO4 (pin 7).
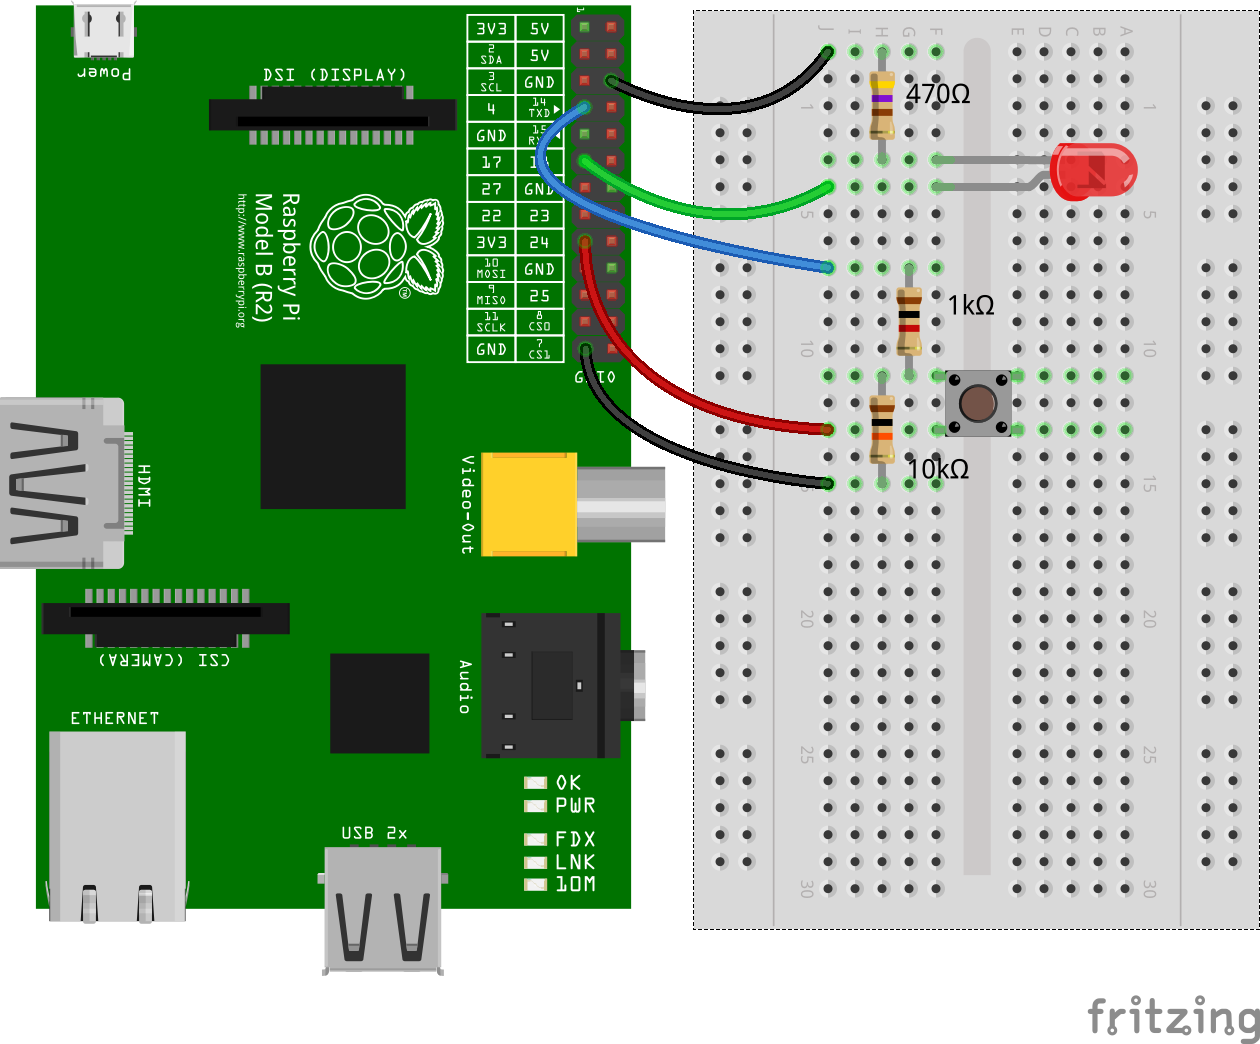
Pulse an LED with PWM
Use PWM to pulse the LED connected to GPIO17 from fully off to fully on continuously.
const Gpio = require('pigpio').Gpio;

const led = new Gpio(17, {mode: Gpio.OUTPUT});

let dutyCycle = 0;

setInterval(() => {
  led.pwmWrite(dutyCycle);

  dutyCycle += 5;
  if (dutyCycle > 255) {
    dutyCycle = 0;
  }
}, 20);
Buttons and Interrupt Handling
Turn the LED connected to GPIO17 on when the momentary push button connected to GPIO4 is pressed. Turn the LED off when the button is released.
const Gpio = require('pigpio').Gpio;
const led = new Gpio(17, {mode: Gpio.OUTPUT});
const button = new Gpio(4, {
mode: Gpio.INPUT,
pullUpDown: Gpio.PUD_DOWN,
edge: Gpio.EITHER_EDGE
});
button.on('interrupt', (level) => {
led.digitalWrite(level);
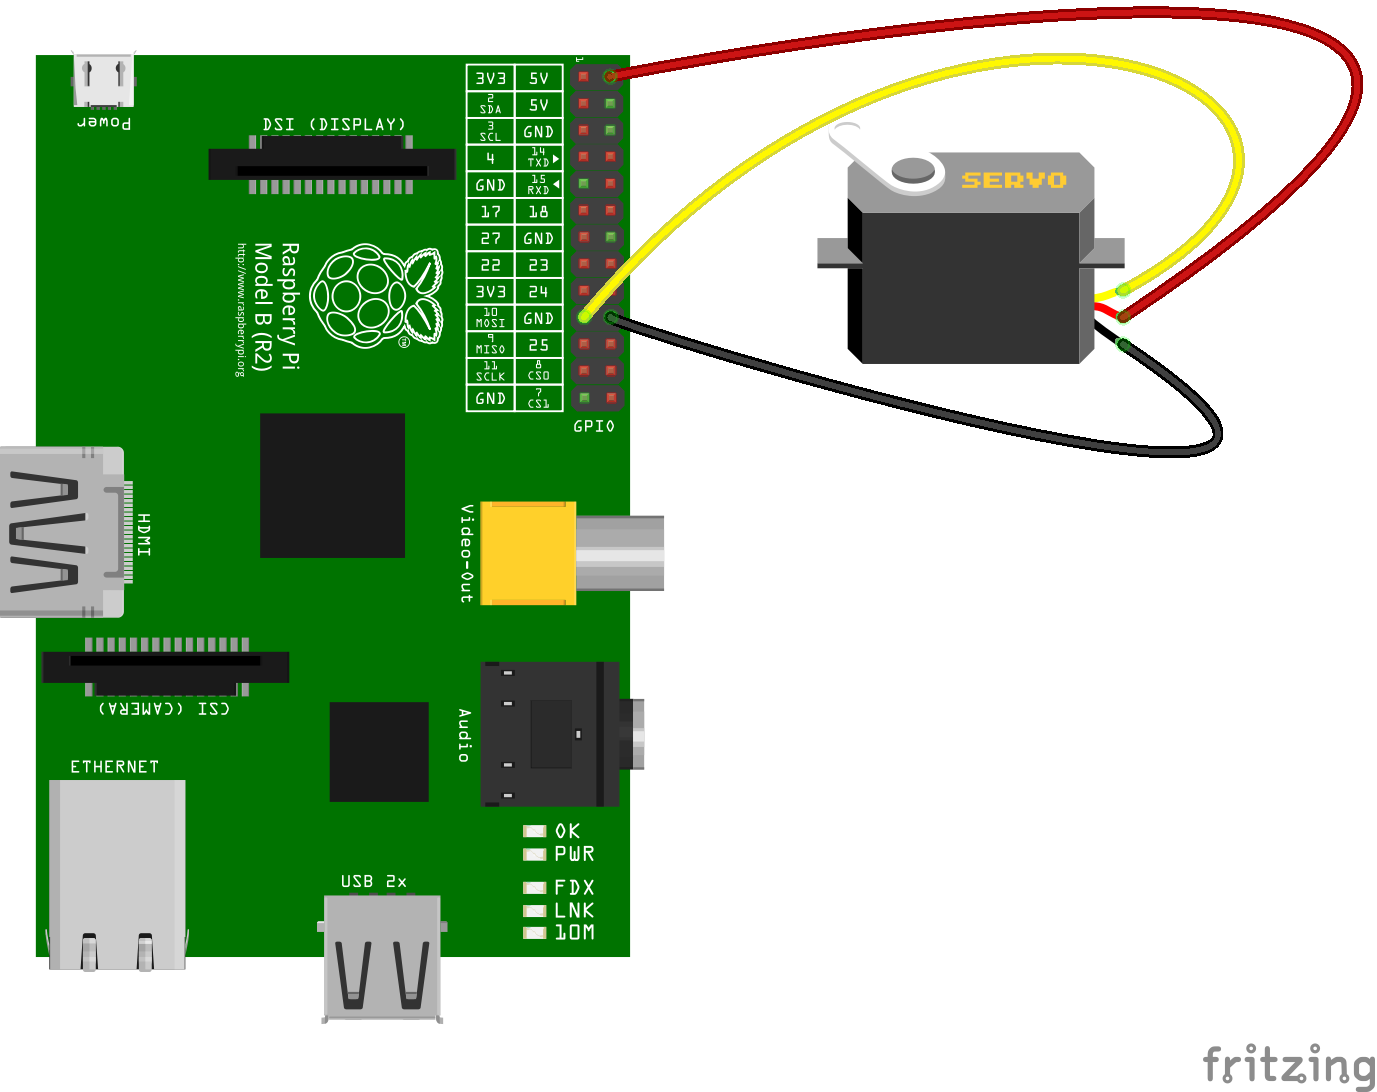
});Servo Control
Continuously move a servo connected to GPIO10 clockwise and anti-clockwise.
const Gpio = require('pigpio').Gpio;
const motor = new Gpio(10, {mode: Gpio.OUTPUT});
let pulseWidth = 1000;
let increment = 100;
setInterval(() => {
motor.servoWrite(pulseWidth);
pulseWidth += increment;
if (pulseWidth >= 2000) {
increment = -100;
} else if (pulseWidth <= 1000) {
increment = 100;
}
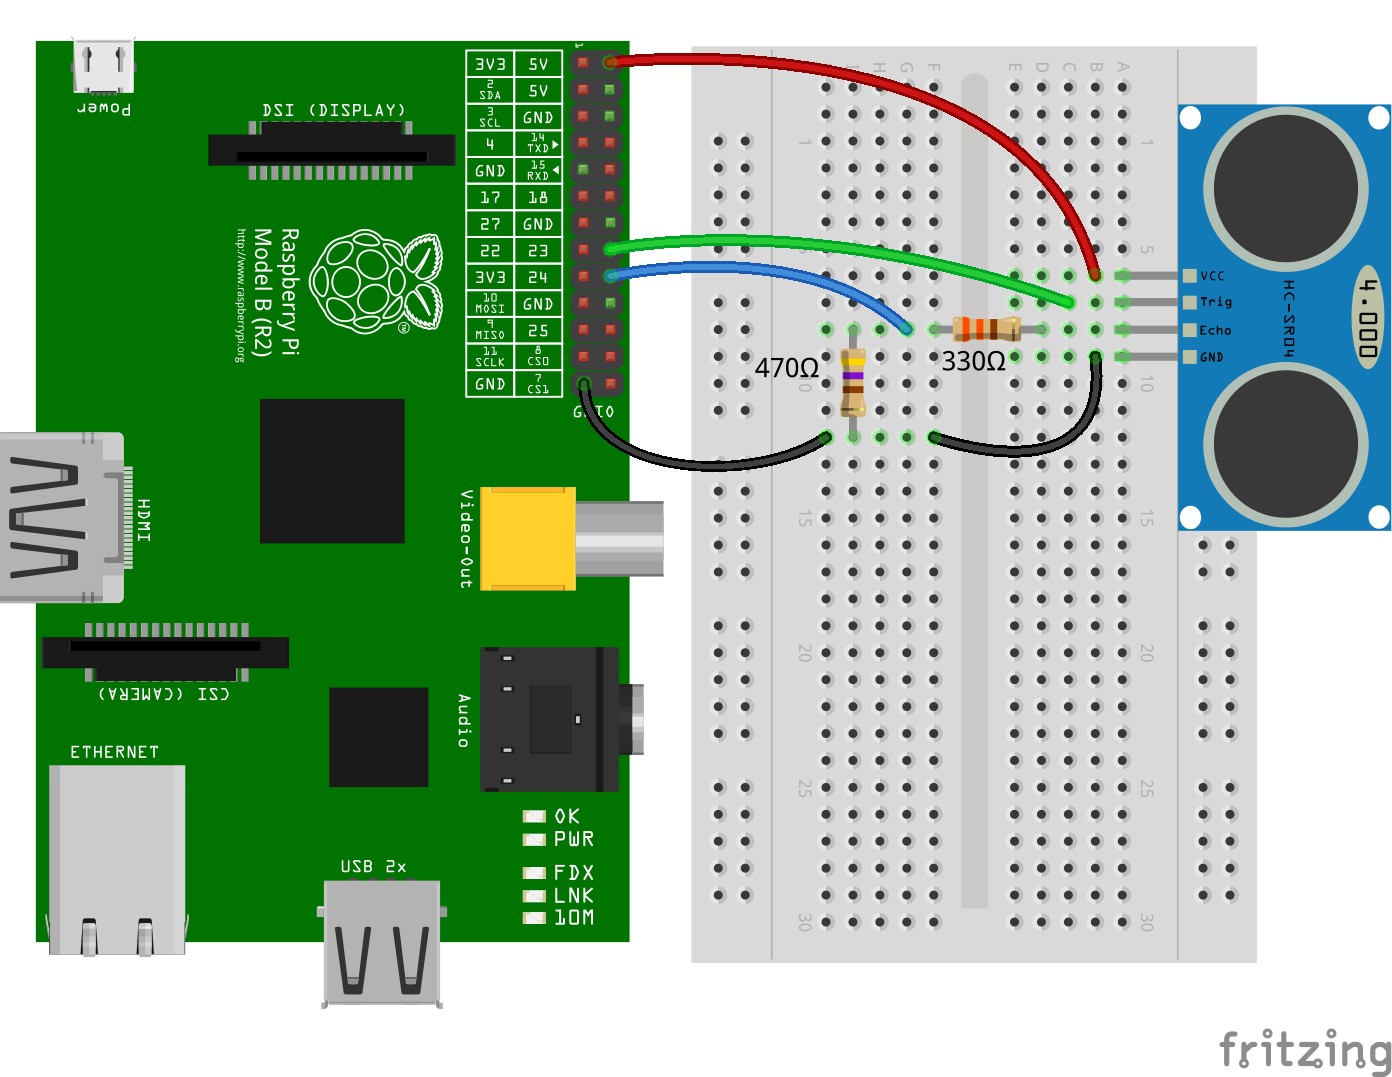
}, 1000);Measure Distance with a HC-SR04 Ultrasonic Sensor
The trigger function can be used to generate a pulse on a GPIO and alerts can
be used to determine the time of a GPIO state change accurate to a few
microseconds. These two features can be combined to measure distance using a
HC-SR04 ultrasonic sensor.
const Gpio = require('pigpio').Gpio;

// The number of microseconds it takes sound to travel 1cm at 20 degrees celcius
const MICROSECDONDS_PER_CM = 1e6/34321;

const trigger = new Gpio(23, {mode: Gpio.OUTPUT});
const echo = new Gpio(24, {mode: Gpio.INPUT, alert: true});

trigger.digitalWrite(0); // Make sure trigger is low

const watchHCSR04 = () => {
  let startTick;

  echo.on('alert', (level, tick) => {
    if (level == 1) {
      startTick = tick;
    } else {
      const endTick = tick;
      const diff = (endTick >> 0) - (startTick >> 0); // Unsigned 32 bit arithmetic
      console.log(diff / 2 / MICROSECDONDS_PER_CM);
    }
  });
};

watchHCSR04();

// Trigger a distance measurement once per second
setInterval(() => {
  trigger.trigger(10, 1); // Set trigger high for 10 microseconds
}, 1000);
Determine the Width of a Pulse with Alerts
Alerts can be used to determine the time of a GPIO state change accurate to a
few microseconds. Typically, alerts will be used for GPIO inputs but they can
also be used for outputs. In this example, the trigger method is used to
pulse the LED connected to GPIO17 on for 15 microseconds once per second.
Alerts are used to measure the length of the pulse.
// Assumption: the LED is off when the program is started

const Gpio = require('pigpio').Gpio;

const led = new Gpio(17, {
  mode: Gpio.OUTPUT,
  alert: true
});

const watchLed = () => {
  let startTick;

  // Use alerts to determine how long the LED was turned on
  led.on('alert', (level, tick) => {
    if (level == 1) {
      startTick = tick;
    } else {
      const endTick = tick;
      const diff = (endTick >> 0) - (startTick >> 0); // Unsigned 32 bit arithmetic
      console.log(diff);
    }
  });
};

watchLed();

// Turn the LED on for 15 microseconds once per second
setInterval(() => {
  led.trigger(15, 1);
}, 1000);
Here's an example of the typical output to the console:
15
15
15
15
15
15
20
15
15
15
15
Debounce a Button
The GPIO glitch filter will prevent alert events from being emitted if the corresponding level change is not stable for at least a specified number of microseconds. This can be used to filter out unwanted noise from an input signal. In this example, a glitch filter is applied to filter out the contact bounce of a push button.

const Gpio = require('pigpio').Gpio;

const button = new Gpio(23, {
  mode: Gpio.INPUT,
  pullUpDown: Gpio.PUD_UP,
  alert: true
});

let count = 0;

// Level must be stable for 10 ms before an alert event is emitted.
button.glitchFilter(10000);

button.on('alert', (level, tick) => {
  if (level === 0) {
    console.log(++count);
  }
});
Generate a waveform
Waveforms can be used to time and execute Gpio level changes with an accuracy up to 1 microsecond. The following example generates a waveform that starts with a 1µs pulse, then has a 2µs pause, followed by a 3µs pulse and so on. The waveform definition is a simple Array where each entry is an object with the properties gpioOn, gpioOff and usDelay.
The basic workflow to generate and execute waveforms is as follows:
First, we usually clear previous wave entries with the waveClear method.
Then we can add pulses with the waveAddGeneric method to the cleared waveform.
We then create a waveId by calling the waveCreate method.
To execute the waveform, we call the waveTxSend method.
Once the wave is sent, we can delete the wave by calling the waveDelete method.
const pigpio = require('pigpio');
const Gpio = pigpio.Gpio;

const outPin = 17;

const output = new Gpio(outPin, {mode: Gpio.OUTPUT});

output.digitalWrite(0);
pigpio.waveClear();

let waveform = [];

for (let x = 0; x < 20; x++) {
  if (x % 2 === 1) {
    waveform.push({ gpioOn: outPin, gpioOff: 0, usDelay: x + 1 });
  } else {
    waveform.push({ gpioOn: 0, gpioOff: outPin, usDelay: x + 1 });
  }
}

pigpio.waveAddGeneric(waveform);

let waveId = pigpio.waveCreate();

if (waveId >= 0) {
  pigpio.waveTxSend(waveId, pigpio.WAVE_MODE_ONE_SHOT);
}

while (pigpio.waveTxBusy()) {}

pigpio.waveDelete(waveId);
Sending a wavechain
The waveChain method allows you to chain multiple waveforms together.
A chain is basically just an array with several waveId's. However you can insert different modifiers as described here.
In the example the chain consists of two waves. The first waveform is transmitted normally, then the second waveform is repeated 3 times.
const pigpio = require('pigpio');
const Gpio = pigpio.Gpio;

const outPin = 17;
const output = new Gpio(outPin, {mode: Gpio.OUTPUT});

output.digitalWrite(0);
pigpio.waveClear();

let firstWaveForm = [];
let secondWaveForm = [];

for (let x = 0; x < 10; x++) {
  if (x % 2 === 0) {
    firstWaveForm.push({ gpioOn: outPin, gpioOff: 0, usDelay: 10 });
  } else {
    firstWaveForm.push({ gpioOn: 0, gpioOff: outPin, usDelay: 10 });
  }
}

pigpio.waveAddGeneric(firstWaveForm);
let firstWaveId = pigpio.waveCreate();

for (let x = 0; x < 10; x++) {
  if (x % 2 === 0) {
    secondWaveForm.push({ gpioOn: outPin, gpioOff: 0, usDelay: 20 });
  } else {
    secondWaveForm.push({ gpioOn: 0, gpioOff: outPin, usDelay: 20 });
  }
}

pigpio.waveAddGeneric(secondWaveForm);
let secondWaveId = pigpio.waveCreate();

if (firstWaveId >= 0 && secondWaveId >= 0) {
  let chain = [firstWaveId, 255, 0, secondWaveId, 255, 1, 3, 0];
  pigpio.waveChain(chain);
}

while (pigpio.waveTxBusy()) {}

pigpio.waveDelete(firstWaveId);
pigpio.waveDelete(secondWaveId);
API Documentation
Classes
- Gpio - General Purpose Input Output
- GpioBank - Banked General Purpose Input Output
- Notifier - Notification Stream
pigpio Module
- Global - Module Globals
Configuring pigpio
- Configuration - pigpio configuration
Limitations
- The pigpio Node.js package is a wrapper for the pigpio C library. A limitation of the pigpio C library is that it can only be used by a single running process.
- The pigpio C library and therefore the pigpio Node.js package requires root/sudo privileges to access hardware peripherals.
Troubleshooting
If you have a problem with the library, before you remove it from your code and start trying something else, please check the troubleshooting page first. Some problems are solvable and documented.
Related Packages
Here are a few links to other hardware specific Node.js packages that may be of interest.
- onoff - GPIO access and interrupt detection
- i2c-bus - I2C serial bus access
- spi-device - SPI serial bus access
- mcp-spi-adc - Analog to digital conversion with the MCP3002/4/8, MCP3202/4/8 and MCP3304
- pigpio-dht - Implements logic to read DHT11 or DHT22/AM2302 temperature and relative humidity sensor
- pigpio-mock - A pigpio mock library for development on your local machine