
Phaser3 9-slice Plugin
This is built for Phaser v3 and was inspired by the fantastic v2/CE version contributed by AleBles. Find it at @orange-games/phaser-nineslice.
What is 9-slice scaling?
tl;dr: See a demo!
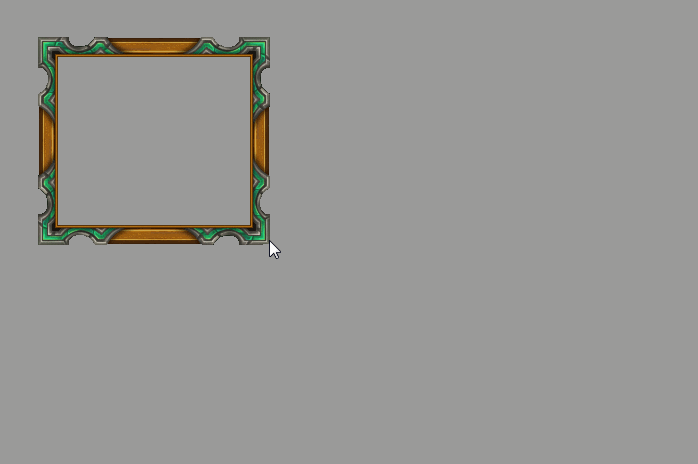
9-slice scaling is a technique to deform a 2D texture allowing it to be scaled without deforming the corners. Usually this is done to retain the shape or embelishments on the corners. Wikipedia has a good description. But it's pretty easy to show an example:
Requirements
- phaser3-nineslice version >= 0.4.0 require Phaser >= 3.12.
- phaser3-nineslice versions 0.3.x require Phaser >= 3.10.
Getting the plugin: Directly including it.
Include nineslice.js in your project:
I used this method in the demo. The source is included in this repository.
Getting the plugin: npm and yarn

This is published under phaser3-nineslice add can be added to your project via:
# npm: npm install phaser3-nineslice --save # yarn: yarn add phaser3-ninesliceUsage
Once you've included the plugin through one of the methods above there are two final steps to make use of it in your project:
1. Enable the Plugin in your Game config:
// Assuming you use use ES6 imports... let phaserConfig = type: PhaserAUTO parent: 'phaser-display' backgroundColor: '0x9a9a9a' width: 800 height: 600 plugins: global: NineSlicePluginDefaultCfg scene: Scene1 phaserConfigYou likely won't need to mess with it but, internally, DefaultCfg is
defined as { key: 'NineSlice', plugin: NineSlicePlugin, start: true } but any key
can be used if you need to change it.
2. Use the plugin to make 9-sliced objects!
The easiest way to construct a new sliced object is to use the new
GameObjectFactory method (this.add.nineslice) or new GameObjectCreator
method (this.make.nineslice).
{ thisdlg = thisadd // ... additional scene creation code }Examining the resulting object added to your scene we can observe how the numbers above are used.
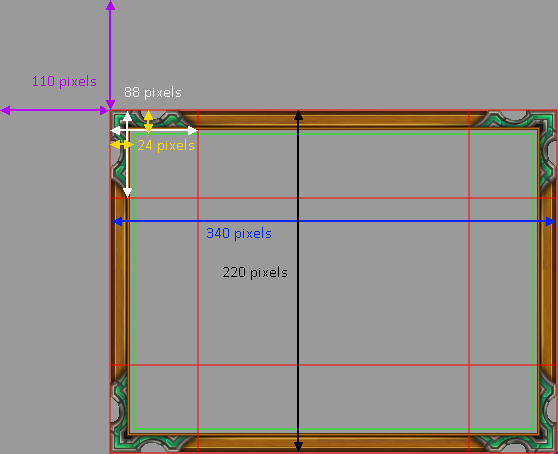
The red lines are the slices that have been created out of the underlying
texture. The green rectangle is an area called the "safe usable area" which
represents the space that can be used to house content within this 9-slice
object. It's available as a Phaser.Geom.Retangle via .getUsableBounds
method on the 9 slice object. Whenever the object changes x/y position or
is resized an event NineSlice.EVENT.UPDATE_SAFE_BOUNDS is emitted;
code ref.
Spritesheets and Texture Atlases
The fifth paramater is used to specify the texture and can be provided as a string to use a loaded texture or an object with the structure
key: string frame: string | numberif you would like to specify a frame within a spritesheet or atlas indicated
by key.
Non-uniform corner slices
If your texture doesn't have uniform corners you can define the width and height offsets of each independently using a slightly more complicated format. The same true for the safe usage area.
thisdlg = thisaddThis results in the following texture slicing:
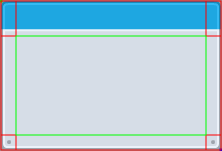
When an array is used it can be 1 to 4 elements and the values are assigned the same way as when defining border offsets in CSS.
| Array Length | Use | Explanation |
|---|---|---|
| 1 | [ topRightBottomLeft ] |
The first (only) element is used as the value for all four sides |
| 2 | [ topBottom, leftRight ] |
The first element is used for the top and bottom, the second element is used as the for the left and right |
| 3 | [ top, rightLeft, bottom ] |
The first element is used for the top, second is used for the right and left, and the third element is used for the bottom |
| 4 | [ top, right, bottom, left ] |
Each element is assigned to a specific side |
In addition to switching to an array to define the pixel offsets for the corners our example also left out the safe area usage. In this case will be derived from the four corner offsets as seen above by the green area. If an array is used instead of a number it is expanded in the same way as
Resizing your 9 Slice
Directly setting the .width and .height attributes will cause scaling issues
(#1). If you wish to change the object's size you should use .resize:
thisdlg = thisadd // ... thisdlgIf the call to resize would result in the safe area having an area of less than 0 or the corners to overlap then it will only reduce its size to that point.
Direct Configuration
In addition to the factory/creator methods you can construct a NineSlice directly:
thisdlg = scene // the parent scene of this objects sliceConfig // configures the source texture and layout of slice relative to it positionConfig // specifies location and dimensions of the constructed objectFor details about the structure of the config objects referenced above see
NineSliceConfig and PositionConfig in types.js.
They may also be passed to .add and .make:
thismakeSummary
Valid arguments to .add.nineslice and .make.nineslice are:
Arguments =
  | (NineSliceConfig, PositionConfig)
  | (x: number,
     y: number,
     w: number,
     h: number,
     source: FrameSelection,
     corner: OffsetConfig,
     safeArea: OffsetConfig | null)

FrameSelection =
  | key: string
  | {
      key: string,
      frame: number | string,
    }

OffsetConfig =
  | number
  | [topRightBottomLeft: number]
  | [topBottom: number, rightLeft: number],
  | [top: number, rightLeft: number, bottom: number],
  | [top: number, right: number, bottom: number, left: number]