We introduce OpenLIME (Open Layered IMage Explorer), an open, scalable, and flexible framework for creating web-based interactive tools to annotate and inspect large multi-layered and multi-channel standard and relightable image models.
OpenLIME is jointly developed by CRS4 Visual and Data-intensive Computing Group and CNR ISTI - Visual Computing Lab.
OpenLIME is released as an open-source JavaScript library and is accompanied by back-office tools to facilitate data preparation.
It natively supports RGB images, multispectral images, Bidirectional Reflectance Distribution Function (BRDF), and Reflectance Transformation Imaging (RTI) datasets. It can be extended (and has been extended!) to accommodate other multi-channel raster datasets, such as neural representations. Common web image types (jpg, png, gif, etc...), as well as the most common multi-resolution image formats (deepzoom, zoomify, IIIF, google maps), can be used directly or composed to support more complex formats.
Adaptive image management and display use a data-flow approach, where images from sources of any size are efficiently streamed into screen-sized buffers that can be processed and combined using customizable WebGL shaders.
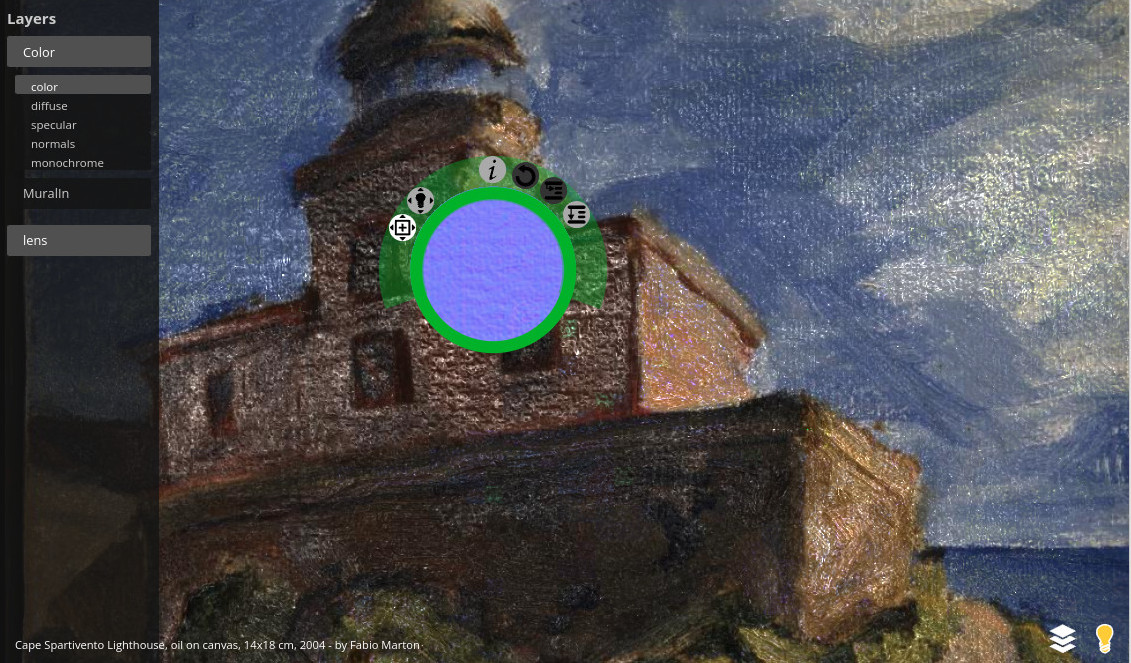
Multi-layer and multi-faceted visualizations are achieved through opacity adjustments, blending modes, and interactive lenses.
The released library provides a set of pre-configured layers, facilitating the rapid deployment of web-based datasets and kiosk applications. Its responsive user interface is compatible with desktop, mobile, and general multitouch environments, while its modular architecture allows for extensive customization, making it adaptable to diverse annotation and visualization needs.
OpenLime has already been used for a variety of specific use cases (see references below), including the inspection of RTI models, the integration of novel relightable image formats, archaeological data documentation and annotation, and creation and deployment of standalone museum applications.
The released library contains a convenient set of examples that can be used both to understand how the library works and as a starting point for programming with OpenLIME itself.
API Docs: https://cnr-isti-vclab.github.io/openlime/
Further information on the design and architecture of OpenLIME can be found in our publications. If you use the framework or build upon its concepts, please cite our work.
Overview and general design:
@inproceedings{Ponchio:2025:OOF,
    author = 	{Federico Ponchio and Fabio Bettio and Fabio Marton and
				 Ruggero Pintus and Leonardo Righetto and Andrea Giachetti and Enrico Gobbetti},
    title = 	{{OpenLIME}: An open and flexible web framework
				 for creating and exploring complex multi-layered relightable image models},
    booktitle = {Proc. Digital Heritage},
    month = 	{September},
    year = 		{2025},
    note = 		{To appear},
}
Techniques and applications:
@article{Righetto:2024:EUV,
    author = 	{Leonardo Righetto and Mohammad Khademizadeh and Andrea Giachetti and
				 Federico Ponchio and Davit Gigilashvili and Fabio Bettio and Enrico Gobbetti},
    title = 	{Efficient and user-friendly visualization of neural relightable images for
				 cultural heritage applications},
    journal = 	{ACM Journal on Computing and Cultural Heritage (JOCCH)},
    volume = 	{17},
    number = 	{4},
    pages = 	{54:1--54:24},
    year = 		{2024},
    doi = {10.1145/3690390},
}
@inproceedings{Righetto:2023:ACS,
    author = 	{Leonardo Righetto and Arianna Traviglia and Michela {De Bernardin} and
				 Enrico Gobbetti and Federico Ponchio and Andrea Giachetti},
    title = 	{Ancient coins' surface inspection with web-based neural {RTI} visualization},
    booktitle = {Optics for Arts, Architecture, and Archaeology (O3A) IX},
    volume = 	{12620},
    pages = 	{12620:0D},
    publisher = {SPIE},
    year = 		{2023},
    doi = 		{10.1117/12.2674888},
}
@inproceedings{Ahsan:2022:EFU,
    author = 	{Moonisa Ahsan and Giuliana Altea and Fabio Bettio and Marco Callieri and
				 Antonella Camarda and Paolo Cignoni and Enrico Gobbetti and Paolo Ledda and
				 Alessandro Lutzu and Fabio Marton and Giuseppe Mignemi and Federico Ponchio},
    title = 	{Ebb \& Flow: Uncovering {Costantino Nivola}'s {Olivetti} Sandcast through
				 {3D} Fabrication and Virtual Exploration},
    booktitle = {The 20th Eurographics Workshop on Graphics and Cultural Heritage},
    pages = 	{85--94},
    month = 	{September},
    year = 	{2022},
    doi = 	{10.2312/gch.20221230},
}OpenLIME research and development received funding from the EU under Grant Agreement 101157364 – ECHOES and from Sardinian Regional Authorities under project XDATA (RAS Art9 LR 20/2015). Project REFLEX (PRIN2022, EU Next-GenerationEU PNRR M4C2 Inv. 1.1) contributed to supporting the study of NeuralRTI components.
The easiest way to use OpenLIME is via a CDN like unpkg or jsdelivr:
<!-- Using unpkg -->
<link rel="stylesheet" href="https://unpkg.com/openlime@1.2.3/dist/css/skin.css">
<link rel="stylesheet" href="https://unpkg.com/openlime@1.2.3/dist/css/light.css">
<script src="https://unpkg.com/openlime@1.2.3/dist/js/openlime.min.js"></script>

<!-- OR using jsdelivr -->
<link rel="stylesheet" href="https://cdn.jsdelivr.net/npm/openlime@1.2.3/dist/css/skin.css">
<link rel="stylesheet" href="https://cdn.jsdelivr.net/npm/openlime@1.2.3/dist/css/light.css">
<script src="https://cdn.jsdelivr.net/npm/openlime@1.2.3/dist/js/openlime.min.js"></script>If you're using a build system like webpack or rollup:
npm install openlimeThen import it into your project:
import * as OpenLIME from 'openlime';

// Or import specific components
import { Viewer, Layer, LayerImage } from 'openlime';const OpenLIME = require('openlime');import OpenLIME from 'openlime';Here's a simple example of how to create a viewer with a single image layer:
<!DOCTYPE html>
<html>
<head>
  <meta charset="utf-8">
  <title>OpenLIME Basic Example</title>
  <link rel="stylesheet" href="https://unpkg.com/openlime@1.2.3/dist/css/lime.css">
  <style>
    #viewer {
      width: 100%;
      height: 600px;
    }
  </style>
</head>
<body>
  <div id="viewer"></div>

  <script src="https://unpkg.com/openlime@1.2.3/dist/js/openlime.min.js"></script>
  <script>
    document.addEventListener('DOMContentLoaded', function() {
      // Create a viewer
      const viewer = new OpenLIME.Viewer('viewer', {
        prefetchBorder: 1,
        layout: 'basic'
      });

      // Create and add an image layer
      const imageLayer = new OpenLIME.LayerImage({
        id: 'base-image',
        layout: 'image',
        url: 'path/to/your/image.jpg'
      });

      viewer.addLayer(imageLayer);

      // Add pan/zoom controller
      const controller = new OpenLIME.ControllerPanZoom();
      viewer.addController(controller);
    });
  </script>
</body>
</html>
For multi-resolution images:
// Using a DeepZoom image
const deepZoomLayer = new OpenLIME.LayerImage({
  id: 'deepzoom-image',
  layout: 'deepzoom',
  url: 'path/to/your/deepzoom_files/'
});

// Using a Zoomify image
const zoomifyLayer = new OpenLIME.LayerImage({
  id: 'zoomify-image',
  layout: 'zoomify',
  url: 'path/to/your/zoomify/'
});

// Using an IIIF image
const iiifLayer = new OpenLIME.LayerImage({
  id: 'iiif-image',
  layout: 'iiif',
  url: 'https://your-iiif-server.org/your-image-id'
});sudo pacman -S npmsudo apt install npmYou might have some problem using the old npm version shipped with Ubuntu18.04, and even upgrading it. This worked for us:
sudo npm install -g npm@latest-6To obtain npm for Windows, you need to download the Windows version of node.js from https://nodejs.org/en/download/ . You can download either the Windows Installer (.msi) or the Windows Binary (.zip). If you download and expand the Windows Binary zip file, you will afterwards need to set your PATH variable to include the directory that contains the npm executable (this directory is the subdirectory node_modules\npm\bin).
The following step should be performed in the openlime directory that was cloned from this repository.
Before using npm, you need to install the required packages locally. This only needs to be done once. The following command tells npm to download all the webpack packages (and their dependencies) listed in the package.json file. These will be put in the ./node_modules directory.
npm installThe downloaded packages include rollup, documentation,
and nodemon, which will be used below.
These steps should be performed in the openlime directory that was cloned from this repository.
The following command reads the javascript code in ./src, and puts the transpiled webpack code in ./dist/main.js.
npm run buildThe webpack code is used, for example, by the
./dist/index.html web page.
For development, it is handy to run the node.js development server to serve your web pages. This server will use ./dist as the home directory. The server is run in "hot" mode, which means that whenever you change a file in the ./src directory, the webpack code will automatically be rebuilt. Your web browser will automatically refresh to reflect your latest changes.
npm run startThen access the demo app at http://localhost:8080 (which, by default, is ./dist/index.html).
If you prefer to serve from a different port, say 8088, you can call
npm run start -- --port 8088To create a rollup file that can be used with other servers, you don't need to rely on Node.js as the server. Instead, you can embed the rollup file directly in your web page using the <script> tag. You can reference either ./dist/js/openlime.min.js or ./dist/js/openlime.js.
In the ./dist/examples folder, you'll find simple openLIME web apps that demonstrate how to use this approach. These files will display correctly when served from any web server.
To generate the rollup files, run the following command:
npm run rollupIf you keep a nodemon (node monitor) script running, it will automatically update the rollup files
./dist/js/openlime.min.js
and
./dist/js/openlime.js
whenever anything changes in the ./src directory. Note that, unlike with the node.js server, the browser will not refresh automatically; you will have to do that yourself once the rollup files have been updated.
npm run nodemonThe documentation is extracted from structured comments in the source code (in ./src). Once created, it is accessible from ./docs/index.html
npm run docskin.css
skin.svg
Run
svgo -p 1 skin.svg -o skin.min.svgto minimize svg.
Documentation.js supports markdown syntax and JSDoc syntax.
JSON example of the configuration:
{
	camera: {
	},
	canvas: {
		rasters: [
			{
				id:
				name:
				width: //optional
				height: //optional
				url:
				layout: <image|google|deepzoom|zoomify|iip|iiif> //optional if can be determined from the url.


			}
		]
	},
	overlay: {
	}
}