Editor: The First Reversible HTTP/HTTPS Server
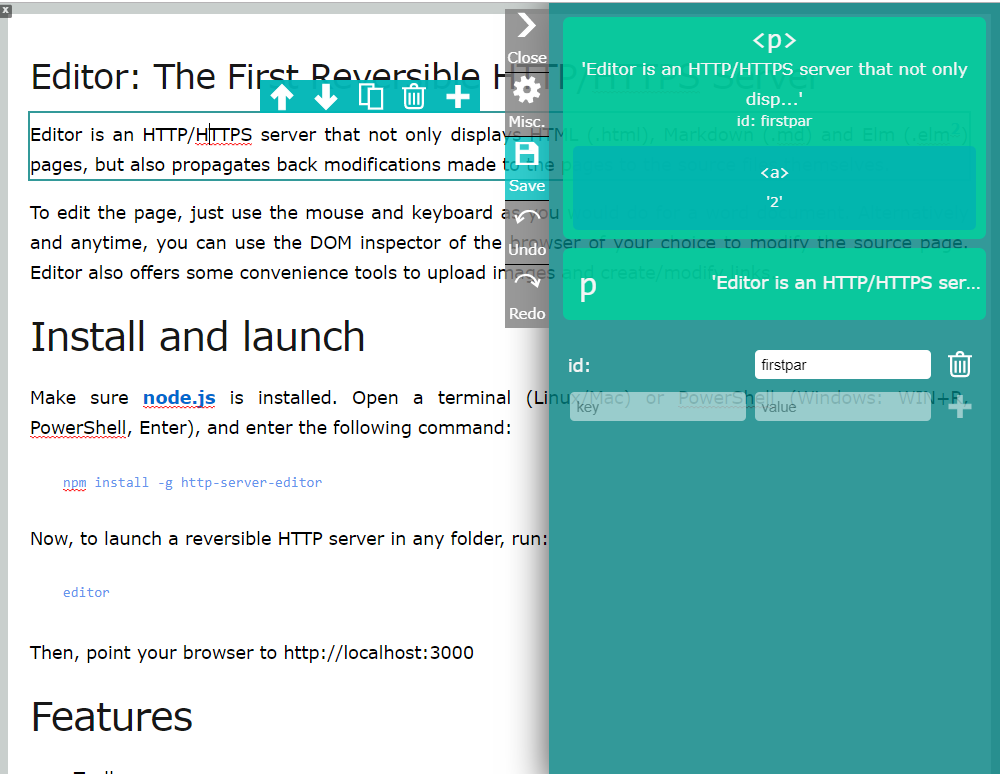
Editor is an HTTP/HTTPS server that not only displays HTML (.html), Markdown (.md) and Elm (.elm[^elm-pages]) pages, but also propagates back modifications made to the pages to the source files themselves.
To edit the page, just use the mouse and keyboard as you would do for a word document. Alternatively and anytime, you can use the DOM inspector of the browser of your choice to modify the source page. Editor also offers some convenience tools to upload images and create/modify links.
Install and launch
Make sure node.js is installed. Open a terminal (Linux/Mac) or PowerShell (Windows: WIN+R, PowerShell, Enter), and enter the following command:
npm install -g http-server-editor
Now, to launch a reversible HTTP server in any folder, run:
editor
Then, point your browser to http://localhost:3000
Features
- Toolbar
- One-click close/open Edit mode
- Display and modify the source code of the page being viewed.
- Autosave or Save button (default)
- Manual ambiguity resolution
- Preview of changes to the visual webpage
- Summary of changes to the file system
- Save/cancel current solution
- Automatic ambiguity resolution button ('questions')
- Special interface for linking to internal elements on the page.
- Page viewing and edition
- Static files *.html, *.md supported
- Dynamic files *.elm or *.leo supported with file reading on disk and a full-feature functional programming language.
- Entire page editable via
contenteditable-- Change any text, add elements to lists, delete images, etc. - Contextual menu to edit links
- Image drop at the caret location
- DOM modifiable using developer's tools (F12 in most browsers)
- File listing to rename or delete files (
?ls=trueon URL) - Javascript API for custom page edition buttons
- Customize css for rendering markdown
- Keyboard shortcuts (links cTRL+K, save CTRL+S)
- Security
- Editor launches in HTTPS if the key and certificates are present (see below)
- path-based access permissions configurable (
htaccess.elm) - Authentication is currently experimental
- Compatibility with plug-ins
- Editor is compatible with Google Analytics, Google Sign-in, Ace Editor and many functions of Grammarly.
- Javascript API to specify which modifications to the DOM should not be back-propagated.
- Integration
- Command-line launch
- Configurable options
- Serve a folder
- Open a file on disk
- Windows integration
- Open a file on disk
- NPM package
- Command-line launch
Simple dynamic example
Create a file pizzas.elm with the following content:
user     = listDict.get "user" vars |> Maybe.withDefaultReplace "Anonymous"
userdata = [("Mikael", 2)]
options  = ["Margharita", "Four Cheese", "Pepper"]
main     = <html><head></head><body>
  <span>Hello @user!<br>
  Select the pizza you want
  @Html.select[]("Choose one..."::options)(
  listDict.get user userdata
  |> Maybe.withDefaultReplace (freeze 0))<br><br>
 Final choices:<br>
@(List.map (\(name, id) ->
  <span>@name choose @(List.find (\(i, n) -> i == id) (List.zipWithIndex options)
    |> Maybe.map Tuple.second
    |> Maybe.withDefault "that does not exist").<br></span>
  ) userdata)
</span></body></html>
Now launch Editor, and point your browser to http://localhost:3000/pizzas.elm?user=RandomDude
Congratulations. In 16 lines of code, you created a Content Management System where all the CRUD operations (create-read-update-delete) can be done in the browser:
- Selecting/Modifying someone's pizza choice
- Add/Modify/delete pizzas
- Modify any text you see
- Display a summary of choices
Advanced example
Look into test/pizzas.elm and CONTRIBUTING.md for more advanced examples covering the same website with file reading, evaluation, translation to different languages, deletion of choices, modification of pizza by name, and more.
Supported features
Command-line arguments
Editor can be run with some commands to change its default behavior.
--edit=falsedeactivates the edit mode (activated by default). It can always be re-added on any URL by adding?edit=true--autosave=falsedeactivates the autosave functionality (activated by default). It can always be re-added on any URL by adding?autosave=true--question=falseautomatically chooses the first answer in case of ambiguity (interactive questioning by default). It can always be re-added on any URL by adding?question=true--admin=trueactivates the admin mode (mostly to changeserver.elm-- deactivated by default). It can always be re-added on any URL by adding?admin=false--path=dirlaunch Editor at the given directory (can be relative or absolute)--port=8080sets the listening port to 8080 (default: 3000).--google-client-id=YOURCLIENTID.apps.googleusercontent.comsets the google authentification client ID (see authentication below)--openbrowser=truelaunches a browser to open the URL where Editor is listening--key=file-key.pemsets the file containing the key for the https protocol (default:localhost-key.pem)--cert=file.pemsets the file containing the certificate for the https protocol (default:localhost.pem)
Editing pages
Uploading media files.
When Editor displays a webpage in edit mode, place the caret anywhere and drop an image from your file system. Images are automatically uploaded at the same location the first image of the page is fetched from, or the current relative location if no image exists yet. After the image is uploaded, an <img> is inserted. See how this works:
To customize where to save the image (e.g. in the top-level folder media/images), add any of the following to you document's header. If you omit file-type, it will specify the storage location for all files using the API editor.uploadFile.
<meta editor-storagefolder="media/images" file-type="image">
Instead of adding this line directly to the <head>, you might want to add it as an editor plug-in (look for Externalize edition features in this document).
Edit links
In edit mode, if you click on a link, a pop-up appears, allowing you to
- Navigate to the link
- Modify the link's address
- Delete the link
For now, you can add links by selecting some text and pressing CTRL+K, and then use the method above to edit the newly inserted link.
Listing, Renaming, Deleting files
When the path on which Editor is opened is a folder, Editor will look for an index.elm, and index.html or a README.md to display by default.
Else it will display a list of files (unless htaccess.elm prevents it).
In any case, to force Editor to list the files in a folder, append &ls=true in the URL query parameters.
From any view listing files, you can delete files by deleting the corresponding bullet point. Similarly, to rename a file, browser the file list in edit mode and rename a bullet point.
 insert nodes, or add or modify attributes. These nodes, new attributes and modified attribute values should be ignored.
Editor defines two notions to ignore them: ghosts and ignored.
- A
ghostnode or attribute is never back-propagated. Mark node or attributes as ghosts if they have been added dynamically. - An ignored attribute is back-propagated with its original value, all modifications are ignored. In the case of attributes, Editor provides a way to change the base values.
If your own scripts dynamically add nodes or attributes to the page, Editor lets you mark them as ghosts or ignored so that edits are not back-propagated. Here is how:
- Add the attribute
isghost="true"to an element by javascript code to ensure it is ignored when back-propagation occurs. Alternatively, setting the propertyelement.isghost=truein JavaScript does the same. - The attribute
children-are-ghosts="true"on an element ensures that any inserted or modified child to this element is not back-propagated. - Attributes starting with "ghost-" are considered as ghosts (e.g. ghost-visible)
- The attribute
list-ghost-attributes="attr1 attr2 ... attrn"on an element ensures that any inserted attribute with one of the nameattr1...attrnwill not be back-propagated. - The attribute
list-ignored-attributes="attr1 attr2 ... attrn"on an element ensures that any existing attribute namedattr1...attrnwill have its original value back-propagated.
Be careful of the use of ghosting mechanisms in raw HTML, as if the targetted ghost nodes or attributes already existed, marking them as ghost would be automatically erase on the first save.
Dynamically mark nodes and attributes as ghosts or ignored
If you are not yourself adding dynamic elements or attributes, Editor also observes insertions and deletions and lets you mark inserted elements as ghosts. Insert the following in a script after the <body> tag:
(typeof editor == "object" ? editor.ghostNodes : []).push(insertedNode => /*PREDICATE ON insertedNode*/);: For any inserted node, if this predicate returnstrue, Editor will mark and consider theinsertedNodeas ghost.
A simple predicate to filter out inserted nodes which have the class "dummy" would look like:insertedNode.nodeType == 1 && insertedNode.classList && insertedNode.classList.contains("dummy").(typeof editor == "object" ? editor.ghostAttrs : []).push(node => /*ARRAY OF STRINGS*/);: For any node, the array of strings respresents attribute names that should always be considered as ghost.(typeof editor == "object" ? editor.ignoredAttrs : []).push(node => /*ARRAY OF STRINGS*/);: For any node, the array of strings respresents attribute names that should always be ignored.(typeof editor == "object" ? editor.ghostChildNodes : []).push(node => PREDICATE);: For any node, if this predicate returnstrue, Editor will mark and consider all children as ghosts.(typeof editor == "object" ? editor.ignoredChildNodes : []).push(node => PREDICATE);: For any node, if this predicate returnstrue, Editor will ignore any modification to the children and return the original value of children.
Instead of putting this code right into your page, you can also create a file .editor where your document is located, and insert the following script:
Regex.replace "(?=</head>)" (\_ -> """
  <script>
    editor.ghostNodes.push(insertedNode => /*PREDICATE ON insertedNode*/);
    editor.ghostAttrs.push(insertedNode =>  /*ARRAY OF STRINGS*/);
    editor.ignoredAttrs.push(insertedNode =>  /*ARRAY OF STRINGS*/);
    editor.ghostChildNodes.push(insertedNode => /*PREDICATE ON insertedNode*/);
    editor.ignoredChildNodes.push(insertedNode => /*PREDICATE ON insertedNode*/);
  </script>
""") content
Saving ghost and ignored attributes and properties on page rewrite after edits.
Editor re-writes the whole page each time a update is back-propagated. It is however possible to save some ghost attributes and some ghost nodes. Here is the list of things Editor saves and restores:
- Any node with an
idand aghost-visibleDOM attribute will have itsghost-visibleDOM attribute value restored. - Any node with an
idand asave-propertiesDOM attribute will have all the javascript properties, that are encoded in the value ofsave-propertiesseparated with space, restored. - Any node with an
idand asave-ghost-attributesDOM attribute will have all its attributes, whose name are encoded in the value ofsave-ghost-attributesseparated with spaces, restored. Attributes insave-ghost-attributesare automatically considered as ghost attributes, so nolist-ghost-attributesis necessary; - Any node with a
save-ghostattribute set totrue, that is a child ofheador whose parent has anid, will be reinserted back as a child to theheador the parent, if it does not yet exists. - Any node with an
idand asave-ignored-attributesDOM attribute will have all its attributes, whose name are encoded in the value ofsave-ignored-attributesseparated with spaces, restored. Attributes insave-ignored-attributesare automatically considered as ignored attributes, so nolist-ignored-attributesis necessary;
Add/Customize edition capabilities on your webpage
Selectability: If you want some elements not to be selectable when clicking on them, but their parents should be selected instead, insert the following statement in the header:
<meta editor-noselect=[CSS Selector 1] editor-doselect=[CSS Selector 2]>
Whatever clicked element matching [CSS Selector 1] will pass the click to its parent, unless it also satisfies the selector [CSS Selector 2].
For example, <meta editor-noselect="td, tr, tbody"> has the effect that clicking on a cell will select the entire table.
You can add as many such statements as needed, the last one has precedence over the previous ones.
Custom edition buttons: When Editor is in Edit mode, the following style is injected to the page:
.editor-menu { display: initial !important; }
This means that whatever had the class editor-menu will be displayed in this edit mode.
For example, <button style="display:none" class="editor-menu">Click me</button> is a button that will only appear when the page is opened with Editor in edit mode.
You can use this mechanism to define your own scripts that self-modify the page.
JavaScript helpers: Here is a couple of function helpers that Editor provides globally to simplify your button's callbacks:
// Recursively deletes all text nodes of the HtmlNode
emptyTextContent(node: HtmlNode)

// Returns the innermost node of the given tag that contains the caret.
getEnclosingCaret(tagName: String): HtmlNode

// Inserts `node` before the `beforeNode` which should be a child of `parent`
// If `beforeNode` is undefined or not provided, `node` is appended to the children of `parent`
insertBefore(parent: HtmlNode, node: HtmlNode [, beforeNode: HtmlNode])

// Duplicates `node`.
//   If the node is a <tr>, <th>, <td> or <li> followed by a text node (whitespace) and a node of the same tag,
//   then duplicates the whitespace as well.
// All options have default values.
// options: {
//   // If `after` is true, then the cloned node is inserted *after* the original node instead of before (default);
//   after: Bool,
//   // If set, will insert the cloned node after or before this target.
//   target: HtmlNode,
//   // `onBeforeInsert` transforms the cloned node just before it is inserted.
//   onBeforeInsert: HtmlNode -> HtmlNode
// }
duplicate(node: HtmlNode [, options])

// Removes a node. If the node is a <tr>, <th>, <td> or <li>, removes the whitespace before as well.
remove(node: HtmlNode)
Externalize edition features: Instead of adding advanced editing capabilities directly to the files you want to edit,
you can also describe how to add edition features as a separate file.
Add a file .editor in the folder containing the files to modify. The content is Elm code taking path and content as input,
and it should the modified content. For example, here is a .editor file that adds a button at the end of the body for all html files:
if Regex.matchIn "\\.html$" path then
  content |>
  Regex.replace "(?=</body>)" (\m ->
    String.update.freezeLeft <| String.update.freezeRight <|
      """<button onclick="this.insertAdjacentHTML('beforebegin', '\n<p>Paragraph</p>')"
           >Add paragraph</button>"""
else
  content
String.update.freezeLeft prevents the inserted paragraph to appear in this .editor file.
Security
Configure HTTPS
The recommended way to create a localhost HTTPS certificate is to use mkcert which is very easy to install.
mkcert --install
mkcert localhost
To have Editor launch an HTTPS server instead of HTTP, just place localhost-key.pem and localhost.pem where you launch Editor.
Alternatively, you can specify the path to these files via command-line (see --key and --cert above).
To launch a production server, make sure to deny access to the certificate and the key (see htaccess.elm above);
Path-based access permisions
If a file htaccess.elm is at the root of the folder, it will be executed with an environment containing the variables path and method ("GET" or "POST") and should produce a boolean (True/False)indicating if the operation is allowed.
For example, a simple htaccess.elm that prevents relative paths and access to the local key and certificate looks at follows:
not (Regex.matchIn """\.\.(?:/|\\)|(?:/|\\)\.\.|^\.\.$""" path) &&
not (Regex.matchIn """.*\.pem""" path)
Authentication (experimental)
It is now possible to authenticate on dynamic webpages using Google's Sign-in. The following is a minimal example illustrating how to authenticate and use the result:
<html><head><meta name="google-signin-client_id" content=@googleClientId></head>
<body>@googlesigninbutton
<h1><img src=@(listDict.get "picture" user |> Maybe.withDefault "")>
Hello @(listDict.get "given_name" user |> Maybe.withDefault "Anonymous")!</h1>
</body></html>
That's it! Under the hood, googleClientId is by default my own app's client ID that works only for localhost:3000. If you want to modify it to use your own, register an app and credentials there, obtain a cliend ID, and add to the command-line that runs Editor --google-client-id=... as specified in the Command-line arguments section above.
A more advanced example using authentication to create a doodle where users can only modify the data they own is the file test/authenticated-pizzas.elm;
Administrator rights (soon obsolete, to be replaced by authentication)
It's possible to active the admin rights by setting &admin=true or ?admin=true in the URL. With these rights,
- If you point the browser to a non-existing HTML or Elm file and modify it, it will display a default template and automatically create the file as soon as you modify the template.
- If you modify the menus, it will create a modified
server.elmat the root the folder instead of using the built-in one. Careful: when you upgrade Editor, you should remove this file as there might be incompatibilities.
Integrate Editor
Use Editor to open *.html, *.md and *.elm files
Editor can also be used to open files on the command line. This can be useful to quickly edit one html or markdown file. Sample syntax:
editor test/links.html
This will launch a temporary version of Editor and open an URL to this file in the default browser. When the tab or window is closed, the temporary server is killed.
On Windows, if you want to open a file from the explorer window, right-click on an HTML file, Open with, Choose another app[^note], More apps, Look for another app on this PC, navigate to C:\Users\[your username]\AppData\Roaming\npm and select editor.cmd.
[^note]: At this point, check "Always use this app to open *.html/*.md files" to ensure Editor always appears in the list of apps that can open html files.
You can always revert to your favorite Desktop application to open these files later.
NPM require package
You can invoke Editor as an NPM package in node.js. To do so, after installing http-server-editor, place in your code:
require("http-server-editor")({edit:true});
You can use the syntax option:true to pass along any option described in the previous section 'Command line arguments'.
As example, Hyde is a website builder is using this way to launch Editor.
Limitations, future work and caution
-
Ambiguities: There are more ambiguity than there should be. We are working on removing meaningless ambiguities. Stay in touch!
-
HTML formatting caution: On Windows, while loading dynamic
.elmwebpages, if you usefs.read, make sure to convert the resulting string withString.newlines.toUnix. This is a reversible function that ensures that the newlines are \n and not \r\n. Else, the reverse interpreter will replace all windows-like newlines \r\n by Unix-like newlines \n anyway but this might take a looong time. -
Need for concurrent editing: In case there are two conflicting edits, they will not be merged, only the second will take place. There is a work in progress for merging edit diffs.
-
Need for better diffs: The set of edits to nodes is limited to modifications, insertions and deletions. There is no wrapping/unwrapping or other forms of clones. We are working on a new way to express a greater set of edits.
-
Need for templates: Editor could allow you to create a page from given templates. We'll work on that. We already have several templates in Sketch-n-sketch. Among the templates, we want slides, docs, recipe editor, worksheet, contact forms, academic webpage, etc.
-
Need for a toolbar: It would be very easy to add menus or contextual menus to do actions on the page, so we would not need to rely on devtools. The link edition is such an example. PR are welcome to have a better menu bar to edit images, tables, etc.
License
This technology is offered without any warranty (for the moment). Please refer Sketch-n-sketch's license to use this technology commercially. For academic projects and webpages this should be fine.
[^elm-pages]: Similar to PHP, pages written in an Elm-like language are executed and served as HTML. For more info on how to write such pages, visit the main project page