A colorful logger with browser-/environment-dependent formatting possibilities.
- Colorize messages
- Custom formatting possible based on log level, browser name, OS, and other attributes
- Display or hide stack trace / origin, timestamp, log level, etc.
- Shorten arrays, shorten strings, limit object depth of deeply nested objects, etc.
- Print tables
- Set and forget mentality, but also allows overriding the logging config for individual logging messages later on
- Written in typescript
This logger is not intended to be highly performant, if you are looking for something like that, look somewhere else. This library aims to provide a flexible, versatile and simple logger, to make debugging etc. a slight bit easier.
npm install --save cheese-log
Or if you use Yarn:
yarn add cheese-log
The following subsections are showing different usage examples of varying complexity. For a full set of options and possibilities however, refer to the options sections here.
import cheese, { CheeseConfig } from "cheese-log";

// it is mandatory to initialize the cheese logger like so:
const cheeseConfig: CheeseConfig = {};
cheese.config(cheeseConfig);

// now you can use it:
cheese.log("some log message");
cheese.info("some info message");
cheese.debug("some debug message");
cheese.warn("some warn message");
cheese.error("some error message");
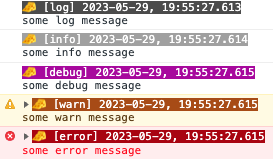
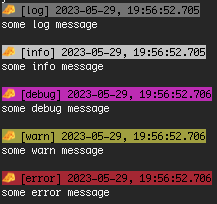
The corresponding output in the Google Chrome browser's console:
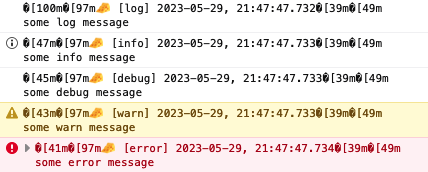
The default configuration of cheese-log avoids color coding in certain browser, that don't support it. For instance, in Firefox, instead of seeing messed up logging messages like this...
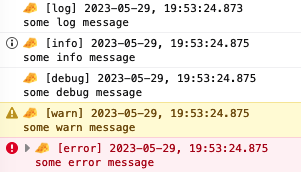
...you will instead see un-colored messages like this:
You can always further adjust the mentioned default configuration to avoid colors (or other properties) in certain browsers, operating systems, etc. - see here.
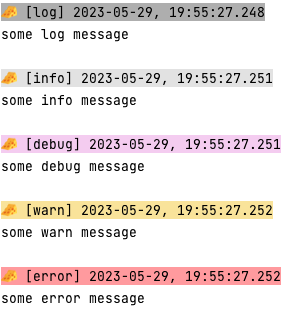
Further optimizations are part of the implementation. So does it not use the white logging color for message headers in classical consoles - instead, my IDE would show the same messages like this for example:
My classical OS terminal would show the output like so:
Check out the live demo at https://stackblitz.com/edit/cheese-log-simple-usage.
import cheese, { CheeseConfig } from "cheese-log";

const cheeseConfig: CheeseConfig = {
  showDate: false, // is true by default
  showCheeseIcon: false, // is true by default
  showOrigin: true, // is false by default
};
cheese.config(cheeseConfig);

cheese.log("some log message");
cheese.info("some info message");
cheese.debug("some debug message");
cheese.warn("some warn message");
cheese.error("some error message");
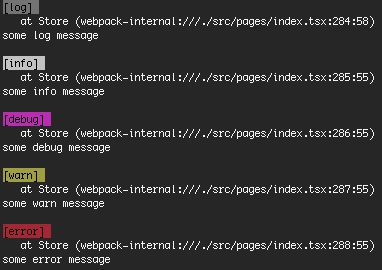
The corresponding output would hide the timestamp and the icon, while showing some stacktrace info:
A full list of config options can be found here.
Check out the live demo at https://stackblitz.com/edit/cheese-log-explore-some-config-props.
You can override the options for individual messages by using 2 kinds of functions as shown in the following example:
import cheese, { CheeseConfig } from "cheese-log";

const cheeseConfig: CheeseConfig = {};
cheese.config(cheeseConfig);

cheese.info("some standard info message");

// 1) _LOGLEVEL functions allow you to pass an option object as the 1st argument...
cheese._info(
  // note the leading underscore!
  { showCheeseIcon: false },
  "some info message where the cheese icon is hidden",
);

// 2) ...while LOGLEVEL_ functions allow you to pass an option object as the last argument:
cheese.info_("some info message where the timestamp is hidden", {
  // note the trailing underscore!
  showDate: false,
});
// ^ Note that you could pass multiple arguments to `._info()` - cheese-log assumes the last argument will be your option object.
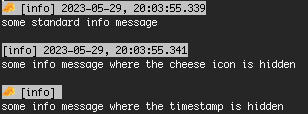
The corresponding output would be:
Check out the live demo at https://stackblitz.com/edit/cheese-log-override-config.
Cheese-log offers some coloring possibilities. While certain coloring happens automatically for objects, you can always override the color by using the option colorOverride. On top of that, to make the coder's life easier, you can instead also use the predefined log functions in the shape [LOGLEVEL][COLOR](), like the following example shows:
import cheese, { CheeseConfig } from "cheese-log";

const cheeseConfig: CheeseConfig = {};
cheese.config(cheeseConfig);

cheese.logBlack("Some message in a black color");
cheese.logGray("Some message in a gray color");
cheese.logLightgray("Some message in a lightgray color");
cheese.logWhite("Some message in a white color");
cheese.logLightyellow("Some message in a lightyellow color");
cheese.logYellow("Some message in a yellow color");
cheese.logRed("Some message in a red color");
cheese.logLightred("Some message in a lightred color");
cheese.logMagenta("Some message in a magenta color");
cheese.logLightmagenta("Some message in a lightmagenta color");
cheese.logBlue("Some message in a blue color");
cheese.logLightblue("Some message in a lightblue color");
cheese.logCyan("Some message in a cyan color");
cheese.logLightcyan("Some message in a lightcyan color");
cheese.logGreen("Some message in a green color");
cheese.logLightgreen("Some message in a lightgreen color");
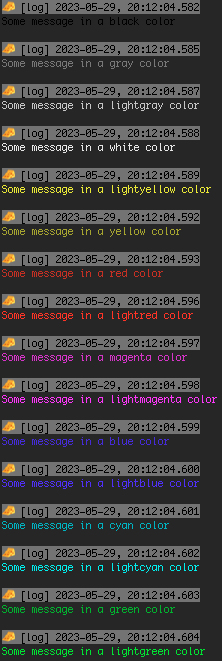
The corresponding output would be:
You can also use the color functions with leading and trailing underscores, to pass additional options, for instance:
cheese._logLightblue({ showCheeseIcon: false }, "hello world");
cheese.logMagenta_("foo bar", "1234", "mic check one two", { showDate: false });
Check out the live demo at https://stackblitz.com/edit/cheese-log-built-in-color-functions.
Configs passed to cheese-log can be static option objects as described here OR you can also pass a function returning such an option object. Advantage of the latter is that you get access to the "context" / the "environment" - meaning, you can make the output and formatting dependent on the browser name (if any), the operating system and other attributes.
The following example should be self-explanatory:
import cheese, { CheeseConfig } from "cheese-log";

const contextDependentCheeseConfig: ContextDependentCheeseConfig = (
  who,
  logLevel,
) => {
  if (who.browserName === "Firefox" || who.osName === "Android") {
    return { allColorsDisabled: true, showCheeseIcon: false };
  }
  return {
    allColorsDisabled: true,
    showCheeseIcon: true,
  };
};
cheese.config(contextDependentCheeseConfig);

cheese.info("some info message");
The resulting output on Chrome would be...
...and on Firefox and/or Android it would be:
Check out the live demo at https://stackblitz.com/edit/cheese-log-context-dependent-config.
If you want to change the format of logged messages, you can do it by passing a custom formatMessage function (either to the global cheese config at the beginning, or to individual log messages).
The function shown below is the default, used by this library. It can serve as a template when creating your own:
const formatMessageDefault: FormatMessageFn = (
  message: string,
  who: Who,
  showLogLevel: boolean,
  logLevel: LogLevel,
  millisecondsSince1970: number,
  showDate: boolean,
  dateFormat: string,
  showOrigin: boolean,
  autoColorizeObject: boolean,
  showCheeseIcon: boolean,
  allColorsDisabled: boolean,
  colorOverride: string,
  messagePrefix: string,
  messageSuffix: string,
) => {
  const cheeseIconPrepared = showCheeseIcon ? CHEESE_ICON + " " : "";
  const messagePrefixPrepared = messagePrefix ? messagePrefix + " " : "";
  const logLevelPrepared = showLogLevel
    ? "[" + logLevel + "]" + (showDate ? " " : "")
    : "";
  const datePrepared = showDate
    ? getTimestamp(dateFormat, millisecondsSince1970)
    : "";
  const originInfo = showOrigin ? getStackTrace() ?? "" : "";

  let prefixPrepared = `${cheeseIconPrepared}${messagePrefixPrepared}${logLevelPrepared}${datePrepared}`;
  if (!allColorsDisabled) {
    const textColorFn = who.isServerApp ? black : white;
    if (logLevel === LogLevel.error) {
      prefixPrepared = bgRed(textColorFn(prefixPrepared));
    } else if (logLevel === LogLevel.warn) {
      prefixPrepared = bgYellow(textColorFn(prefixPrepared));
    } else if (logLevel === LogLevel.info) {
      prefixPrepared = bgLightGray(textColorFn(prefixPrepared));
    } else if (logLevel === LogLevel.log) {
      prefixPrepared = bgDarkGray(textColorFn(prefixPrepared));
    } else if (logLevel === LogLevel.debug) {
      prefixPrepared = bgMagenta(textColorFn(prefixPrepared));
    }
  }

  const originInfoPrepared = originInfo ? `   ${originInfo}\n` : "";
  return `${prefixPrepared}\n${originInfoPrepared}${message}${messageSuffix}`;
};
Since version 1.10.0 you can also import getStackTrace, getTimestamp as well as the individual coloring functions via ansicolor, which can be helpful when building your own custom message format function.
Check out the live demo at https://stackblitz.com/edit/cheese-log-custom-msg-format-function.
When logging (nested) objects, the library tries to automatically colorize individual props, according to their type (string would have different colors, than numbers etc.). See the following example:
import cheese, { CheeseConfig } from "cheese-log";

cheese.config({});

cheese.log({
  this: {
    is: { someNested: "object" },
    itHasNumbers: 112358,
    andArrays: ["hello", "world"],
  },
});
The result:
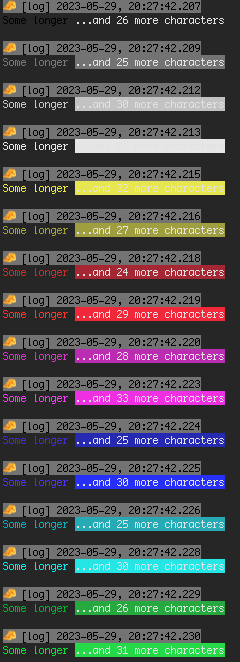
Cheese-log allows you to automatically truncate strings that exceed certain lengths.
import cheese, { CheeseConfig } from "cheese-log";

const cheeseConfig: CheeseConfig = { maxStringLength: 12 };
cheese.config(cheeseConfig);

cheese.logBlack("Some longer message - in a black color");
cheese.logGray("Some longer message - in a gray color");
cheese.logLightgray("Some longer message - in a lightgray color");
cheese.logWhite("Some longer message - in a white color");
cheese.logLightyellow("Some longer message - in a lightyellow color");
cheese.logYellow("Some longer message - in a yellow color");
cheese.logRed("Some longer message - in a red color");
cheese.logLightred("Some longer message - in a lightred color");
cheese.logMagenta("Some longer message - in a magenta color");
cheese.logLightmagenta("Some longer message - in a lightmagenta color");
cheese.logBlue("Some longer message - in a blue color");
cheese.logLightblue("Some longer message - in a lightblue color");
cheese.logCyan("Some longer message - in a cyan color");
cheese.logLightcyan("Some longer message - in a lightcyan color");
cheese.logGreen("Some longer message - in a green color");
cheese.logLightgreen("Some longer message - in a lightgreen color");
The corresonding output would be:
Check out the live demo at https://stackblitz.com/edit/cheese-log-shorten-strings.
The shortening/truncating of strings also works for values in (nested) objects:
cheese.logGreen({
  hello: "world",
  msg: "Some longer message inside an object",
});
It is allowed to pass maxStringLength: 0:
import cheese, { CheeseConfig } from "cheese-log";

const cheeseConfig: CheeseConfig = { maxStringLength: 0 };
cheese.config(cheeseConfig);

cheese.logGreen({
  hello: "world",
  msg: "Some longer message inside an object",
});
Even when using an uncolored function (which leads to auto-coloring an object), the truncating info in the output will always be highlighted green. The following example logs 2 arguments, a plain string and a nested object -> the latter will be auto-colored, while the plain string will not be auto-colored - see output:
cheese.log("a first log argument, which is simply a plain string", {
  hello: "world",
  someArray: [1, 2, 3, 4, 5],
  nested: { hi: "friends and family" },
});Similarly to string truncating, you can also let cheese-log automatically shorten arrays exceeding certain lengths:
import cheese, { CheeseConfig } from "cheese-log";

const cheeseConfig: CheeseConfig = { maxArrayLength: 5 };
cheese.config(cheeseConfig);

cheese.log("some arrays that will be shortened", [1, 2, 3, 4, 5, 6, 7, 8, 9], {
  my: "nested object",
  that: "also holds an array",
  here: ["a", "b", "c", "d", "e", "f", "g", "h", "i", "j", "k"],
});
Array shortening messages are always highlighted with a red background, except for cases where colorOverride is being used.
Also for arrays, passing maxArrayLength: 0 is a valid option:
Check out the live demo at https://stackblitz.com/edit/cheese-log-shorten-arrays.
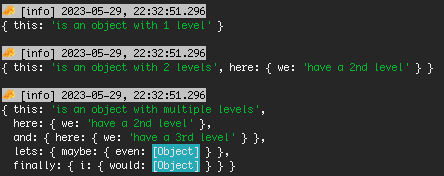
As developers, we often come across situations where we need to deal with deeply nested objects. Fortunately many browser consoles allow collapsing- and expanding-functionalities. For cases where this is not helpful or possible, cheese-log allows to limit the depth of printed objects:
import cheese, { CheeseConfig } from "cheese-log";

const cheeseConfig: CheeseConfig = { depth: 3 };
cheese.config(cheeseConfig);

cheese.info({ this: "is an object with 1 level" });
cheese.info({
  this: "is an object with 2 levels",
  here: { we: "have a 2nd level" },
});
cheese.info({
  this: "is an object with multiple levels",
  here: { we: "have a 2nd level" },
  and: { here: { we: "have a 3rd level" } },
  lets: { maybe: { even: { add: "a 4th level" } } },
  finally: {
    i: { would: { say: { five: "leves are enough for this example" } } },
  },
});
The corresponding depth-limited output would be:
Check out the live demo at https://stackblitz.com/edit/cheese-log-limit-object-depth.
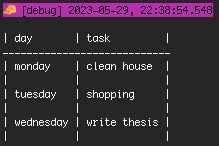
If you need to show data in a row/colum way, you can easily print tables with cheese-log. Make sure you provide an array of objects, where every object features the same set of keys, like so:
import cheese, { CheeseConfig } from "cheese-log";

const cheeseConfig: CheeseConfig = { table: true };
cheese.config(cheeseConfig);

cheese.debug([
  { day: "monday", task: "clean house" },
  { day: "tuesday", task: "shopping" },
  { day: "wednesday", task: "write thesis" },
]);
The corresponding output would be:
Similarly to the built-in color functions you can also use built-in table functions, so you don't have to pass the table: true prop to the config. Another advantage is that it allows you to define the necessary table data structure via typescript, see the following example:
type TableData = { colum1: string, column2: string, someNumberColumn: number };

cheese.logTable<TableData>(...);
cheese._logTable<TableData>(...);
cheese.logTable_<TableData>(...);
cheese.infoTable<TableData>(...);
cheese._infoTable<TableData>(...);
// ... etc. -> all combinations of log-levels plus 'Table' exist!
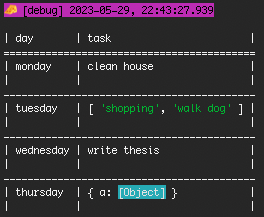
You can adjust a few formatting options for tables, by setting a tableOptions prop:
import cheese, { CheeseConfig } from "cheese-log";

const cheeseConfig: CheeseConfig = {
  table: true,
  tableOptions: { rowSeparator: "-", headerSeparator: "=" },
  depth: 0,
};
cheese.config(cheeseConfig);

cheese.debug([
  { day: "monday", task: "clean house" },
  { day: "tuesday", task: ["shopping", "walk dog"] },
  { day: "wednesday", task: "write thesis" },
  { day: "thursday", task: { a: { nested: "object" } } },
]);
The corresponding output would be:
Note how the individual formatting functionalities also work inside individual table cells (the depth of object has been limited in this example).
Check out the live demo at https://stackblitz.com/edit/cheese-log-print-tables.
While the section above shows various example, the following table aims to be a complete list of available options.
For now, every single prop is optional, not providing it will result in some default value being used - as shown in the table:
| name | type | default value | description |
|---|---|---|---|
allColorsDisabled |
boolean | (who: Who, logLevel: LogLevel) => boolean |
(who: Who) => who.browserName === "Firefox" || who.browserName === "Safari" |
If this is set to true no ansi colors are being used at all. This is helpful, if your environment is not supporting color codes, for instace. The default value is a function, checking if the logger is running on Firefox or Safari, in these cases returning false, since these browser don't natively support color codes. |
autoColorizeObject |
boolean | (who: Who, logLevel: LogLevel) => boolean |
true |
Logged objects would be automatically colored, as described here. You can turn this feature off. |
colorOverride |
CheeseColors |
undefined |
This allows you to colorize entire messages. Using this as part of the global config might be a bit useless, you can however highlight individual messages when used on individual log statements. |
dateFormat |
string | (who: Who, logLevel: LogLevel) => string |
"YYYY-MM-DD, HH:mm:ss.SSS" |
The date format used for the log statements. |
depth |
number | (who: Who, logLevel: LogLevel) => number |
100 |
The depth of logged objects can be limited, as described here. |
escapeWhitespaces |
boolean | (who: Who, logLevel: LogLevel) => boolean |
false |
If set to true, whitespace characters (to be more precise \t, \n, \r and \f) will be escaped, when logging. Note, this does not affect classical spaces " " though. |
forceNewlines |
boolean | (who: Who, logLevel: LogLevel) => boolean |
false |
If set to true every single logging argument will appear on a new line. If set to false, only arrays and objects appear on newlines, successive strings for instance would be printed on the same line though. |
formatMessage |
(message: string, who: Who, showLogLevel: boolean, logLevel: LogLevel, millisecondsSince1970: number, showDate: boolean, dateFormat: string, showOrigin: boolean, autoColorizeObject: boolean, showCheeseIcon: boolean, allColorsDisabled: boolean, colorOverride: CheeseColors) => string |
Check the corresponding code to see the default function. | This function is one of the centerpieces and determines how logged messages appear. Examples can be seen here. |
logLevelEnabled |
(logLevel: LogLevel) => boolean |
(logLevel: LogLevel) => process.env.NODE_ENV !== "production" |
This function can be used to disable certain log messages in certain scenarios, for instance on production environments. |
maxArrayLength |
number | (who: Who, logLevel: LogLevel) => number |
10000 |
Logging long arrays would truncate them automatically via this option. See more details. |
maxStringLength |
number | (who: Who, logLevel: LogLevel) => number |
10000 |
Logging long strings would truncate them automatically via this option. See more details. |
messagePrefix |
string | (who: Who, logLevel: LogLevel) => string |
"" |
This message prefix allows you to prepend a certain string to every log message. Please be aware, that the cheese icon - if logged - will appear even before this prefix. |
messageSuffix |
string | (who: Who, logLevel: LogLevel) => string |
"" |
This message suffix allows you to append a certain string to every log message. |
reportGlobalConfigChange |
boolean |
true |
Changing the global config after initialization might be a mistake, therefore a warning will be presented. This warning can be disabled via this option. |
reportInitialization |
boolean |
true |
Successfully initializing the logger via cheese.config() will print some corresponding info messages. These info messages can be disabled via this option. |
showCheeseIcon |
boolean | (who: Who, logLevel: LogLevel) => boolean |
true |
Decides whether log messages show the 🧀 icon or not. |
showDate |
boolean | (who: Who, logLevel: LogLevel) => boolean |
true |
Decides whether log messages show date / timestamp or not. |
showLogLevel |
boolean | (who: Who, logLevel: LogLevel) => boolean |
true |
Decides whether log messages show the logLevel or not. |
showOrigin |
boolean | (who: Who, logLevel: LogLevel) => boolean |
false |
Decides whether log messages show the (stacktrace) origin or not. |
spaces |
boolean | (who: Who, logLevel: LogLevel) => boolean |
true |
Decides if there should be a space " " between individual log arguments or not. This only concerns args that would be printed on the same line. |
table |
boolean | (who: Who, logLevel: LogLevel) => boolean |
false |
Via this option you can print messages in a "table format". Details can be seen here. |
tableOptions |
TableOptions | (who: Who, logLevel: LogLevel) => TableOptions |
undefined |
Via this option you can control some formatting details for the table printing. The following options are allowed: outerBorder: string, innerBorder: string, rowSeparator: string and headerSeparator: string. |
config(cheeseConfig: CheeseConfig | ContextDependentCheeseConfig)
log(...args: any[])info(...args: any[])debug(...args: any[])warn(...args: any[])error(...args: any[])_log(cheeseConfig: CheeseConfig, ...args: any[])_info(cheeseConfig: CheeseConfig, ...args: any[])_debug(cheeseConfig: CheeseConfig, ...args: any[])_warn(cheeseConfig: CheeseConfig, ...args: any[])_error(cheeseConfig: CheeseConfig, ...args: any[])log_(...args: any[], cheeseConfig: CheeseConfig)info_(...args: any[], cheeseConfig: CheeseConfig)debug_(...args: any[], cheeseConfig: CheeseConfig)warn_(...args: any[], cheeseConfig: CheeseConfig)error_(...args: any[], cheeseConfig: CheeseConfig)
logTable<T>(...args: T[])infoTable<T>(...args: T[])debugTable<T>(...args: T[])warnTable<T>(...args: T[])errorTable<T>(...args: T[])_logTable<T>(cheeseConfig: CheeseConfig, ...args: T[])_infoTable<T>(cheeseConfig: CheeseConfig, ...args: T[])_debugTable<T>(cheeseConfig: CheeseConfig, ...args: T[])_warnTable<T>(cheeseConfig: CheeseConfig, ...args: T[])_errorTable<T>(cheeseConfig: CheeseConfig, ...args: T[])logTable_<T>(...args: T[], cheeseConfig: CheeseConfig)infoTable_<T>(...args: T[], cheeseConfig: CheeseConfig)debugTable_<T>(...args: T[], cheeseConfig: CheeseConfig)warnTable_<T>(...args: T[], cheeseConfig: CheeseConfig)errorTable_<T>(...args: T[], cheeseConfig: CheeseConfig)
^ providing <T> is optional and allows you to define the required data structure as needed to avoid bugs. After all every object in the provided array(s) need to have the same props.
logBlack(...args: any[])infoBlack(...args: any[])debugBlack(...args: any[])warnBlack(...args: any[])errorBlack(...args: any[])_logBlack(cheeseConfig: CheeseConfig, ...args: any[])_infoBlack(cheeseConfig: CheeseConfig, ...args: any[])_debugBlack(cheeseConfig: CheeseConfig, ...args: any[])_warnBlack(cheeseConfig: CheeseConfig, ...args: any[])_errorBlack(cheeseConfig: CheeseConfig, ...args: any[])logBlack_(...args: any[], cheeseConfig: CheeseConfig)infoBlack_(...args: any[], cheeseConfig: CheeseConfig)debugBlack_(...args: any[], cheeseConfig: CheeseConfig)warnBlack_(...args: any[], cheeseConfig: CheeseConfig)errorBlack_(...args: any[], cheeseConfig: CheeseConfig)logWhite(...args: any[])- etc.
^ this works with the following colors: Black, White, Gray, Lightgray, Blue, Lightblue, Cyan, Lightcyan, Red, Lightred, Green, Lightgreen, Yellow, Lightyellow, Magenta, Lightmagenta
All the live demos shown above can be found collected here.
Another very basic usage example - this time as part of a react native app though - can be found in this expo snack. Open your browser console there to see the log output from cheese-log. Note that it is only visible if you run the snack for the web platform though!
- add unit tests
- grouping functionalities
- (async) hook functionality to allow sending logs to external services etc.
Various videos for this library can be found here. I am always happy if you pay me a visit on my channel!


