CHIPCODE fonts
This is the long-missing CHIP-8 text rendering library you've been wishing
existed already so you didn't have to write it!
Not real quotes from Joseph Weisbecker, obviously ;)
Featuring:
- Six different fonts in different text sizes, ranging from insanely small to really quite big
- An easy system to adapt fonts or add new fonts of your own
- Text positioning
- Text boxing (to stay within a given width or not overflow a given height)
- Proper word wrapping, if desired
- Multiple fonts in one project, if desired
Binary sizes
Since this is CHIP-8, the first question to ask is: how many bytes will this cost me?
The first thing we need that takes up space is the library, of which there are a couple of flavours. Using Octopus options you can build it for regular CHIP-8 (VIP), for Super-CHIP or for XO-CHIP. Also, you can choose to include word wrapping functionality, or leave that out.
| Library | Binary size |
|---|---|
| SUPERCHIP WRAP | 320 |
| SUPERCHIP NOWRAP | 180 |
| VIP WRAP | 320 |
| VIP NOWRAP | 176 |
| XOCHIP WRAP | 322 |
| XOCHIP NOWRAP | 178 |
Next you need an actual font, of which we also have a couple to choose from. The number of pixels in the font name refer to the height of the displayed characters. The rest of the name refers to the characteristics of the font:
| Font | Binary size |
|---|---|
| 3-pix | 286 |
| 4-pix-high | 357 |
| 4-pix-low | 357 |
| 5-pix-narrow | 428 |
| 5-pix-wide | 428 |
| 6-pix | 499 |
| LICENSE | 499 |
Since you can load multiple fonts if you wish, you can make it as wild as you see fit. But as you can see the total binary size mostly depends on the character height of the chosen font and on if your project needs word wrapping or not.
Speed
The second question is usually: how many CPU cycles will this cost me?
Drawing text is not a fast thing to do. Looking up each character in a string, finding the right font data for that character and drawing it to the screen takes quite a bit of time. If you're running in the tens of cycles per frame you will definitely see the text build up character by character.
Word wrapping is also quite slow. And what's worse is that while the library is calculating where the text should wrap there will be absolutely no feedback. Which may result in looking at a blank screen for a couple of seconds (at low cycles per frame).
So either don't use word wrapping and accept that text will take some time to
build up (which can be a fun effect of its own) or run this library at at least
a couple hundred cycles per frame. You have been warned
Available fonts
All fonts included with this library have been hand-drawn by me. Any resemblance to existing typefaces is either pure coincidence or a result of the limited space of possibilities at these low resolutions. I have released these fonts under a Creative Commons Attribution-NonCommercial 4.0 International License.

This basically means that you may use them for anything you like, as long as your work does not have a commercial purpose, and as long as you give credit (a link back to the project Github or NPM page will suffice).
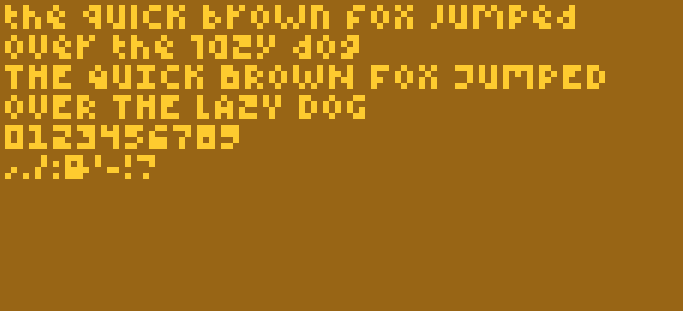
3-pix
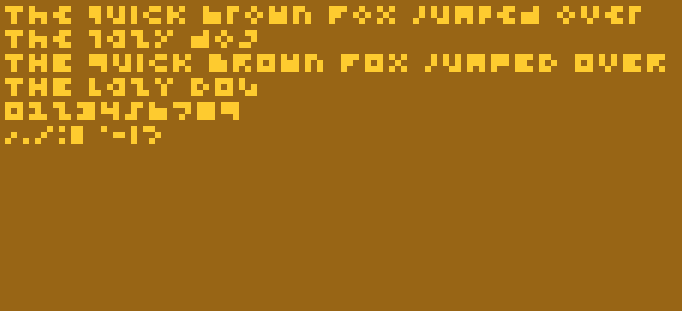
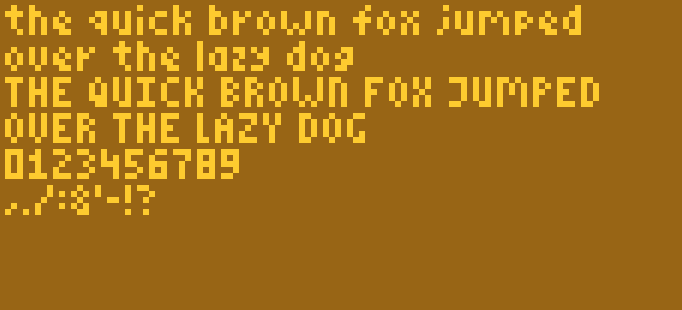
4-pix-low
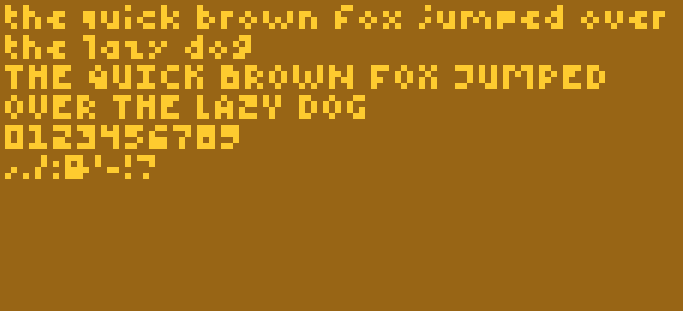
4-pix-high
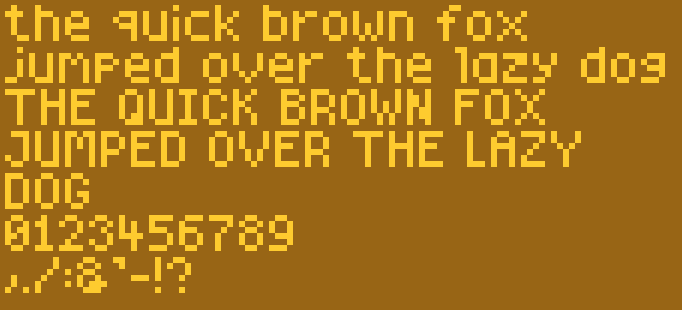
5-pix-narrow
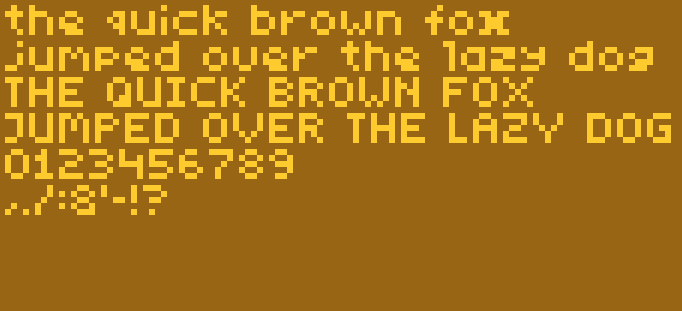
5-pix-wide
6-pix
Example code
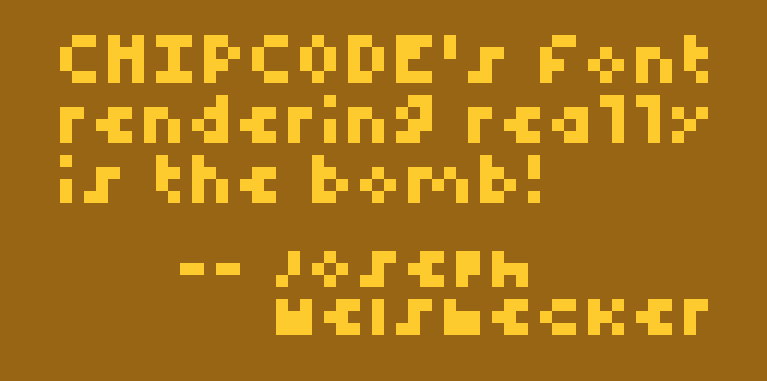
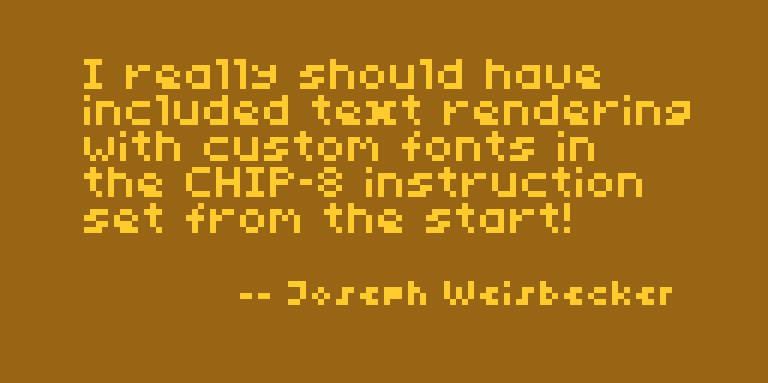
This program generates the screenshot at the top of this README file:
# Tell the library that we're assembling this program for XO-CHIP
:const XOCHIP 1

# Include the font-header first, it contains the constants and macros needed to
# define and draw your strings
:include "@chipcode/fonts/dist/font-header.8o"

: main
  hires
  clear

  setFont font-5-pix-wide
  drawTextWrapped quote 14 10 114 64

  setFont font-4-pix-low
  drawText signature 40 47 118 64

  loop again

: quote
  str "I really should have included text rendering with custom fonts in the CHIP-8 instruction set from the start!" str-end
: signature
  str "-- Joseph Weisbecker" str-end

# Include the font library anywhere you like
:include "@chipcode/fonts/dist/font-library.8o"

# Include the font data for the font(s) you want to use at the end if you use
# XO-CHIP (in the non-executable space). Or anywhere you like otherwise.
:include "@chipcode/fonts/dist/fonts/5-pix-wide.8o"
:include "@chipcode/fonts/dist/fonts/4-pix-low.8o"
Installing
Install Octopus and this library through NPM:
npm install --save-dev @chipcode/octopus @chipcode/fontsAnd then include the necessary files in your project:
- A header file containing the constants and macros needed to define and draw your strings. Add this above where you want to use text drawing;
- The actual font library, which can be added pretty much anywhere as long as it can be called / jumped to;
- One or more fonts.
See the code example above. If you look at the
dist/fonts
directory, you will see which files you can include for the different fonts.
Then you can build your project by invoking:
npx octopus your-project.8o your-project-built.8oThe library listens to a couple of Octopus options. You can either provide these as command line parameters or as constants in your Octo source.
-
VIP- build for original CHIP-8 -
SUPERCHIP- build for Super-CHIP -
XOCHIP- build for XO-CHIP -
FONTLIB-NOWRAP- leave out word wrapping functionality
The below methods build an identical Super-CHIP version of the library:
npx octopus your-project.8o your-project-built.8o SUPERCHIPor
# In your Octo source:
:const SUPERCHIP 1
# Then:
:include "font-header.8o"
# Et cetera...
Programming API
setFont <pointer-to-font>
Select the given font to be used for all following drawText and
drawTextWrapped invocations. The pointer should be one of the following,
corresponding to which font file you have loaded:
font-3-pixfont-4-pix-lowfont-4-pix-highfont-5-pix-narrowfont-5-pix-widefont-6-pix
Or it can be a pointer to your own font definition.
Make sure you use setFont before you try to draw any text!
drawText <pointer-to-string> minX minY maxX maxY
Draw a string of text to the box defined by minX, minY, maxX and maxY.
minX and minY define the top left corner of the text drawn. maxX defines
the boundary at which the text wraps. maxY defines the boundary at which the
text overflows (stops being drawn).
If you're not interested in wrapping or overflowing, just set maxX to 64 or
128 and maxY to 32 or 64 (depending on if you're using lores or
hires).
  # Draw my string in the top left corner
  drawText my-string 0 0 64 32
Strings are defined like this:
: my-string
  str "Hello CHIP-8!" str-end
The str macro tells Octo how to encode the string that follows. str-end tells the font library where the string ends. You can also use str-newline to insert new lines:
: my-broken-string
  str "Hello" str-newline
  str "World!" str-end
Please be aware that you can only use characters that are actually present in the fonts shown above.
drawTextWrapped <pointer-to-string> minX minY maxX maxY
drawTextWrapped is the word-wrapping version of drawText. It works exactly
the same, except that drawText can wrap on any character when it hits maxX
whereas drawTextWrapped will only wrap on word boundaries. Unless the space
between minX and maxX is too small for the word to fit in.
  # Draw a long string from the top left corner
  drawTextWrapped long-string 0 0 64 32
Modifying fonts or making your own
It's fairly easy to modify the supplied fonts or to use the font library with
your own font. You can load any valid font definition with setFont:
setFont my-font
Font definitions follow this basic structure:
: my-font
  4 # Global character height of this font in pixels

  5 # Character width of this specific character in pixels, including any margins
  0b01100000  # Bitmap data for character "A"
  0b10010000
  0b11110000
  0b10010000

  4 # Character width of this specific character in pixels, including any margins
  0b10000000  # Bitmap data for character "B"
  0b10000000
  0b11100000
  0b11100000
Having to hand-code each character gets pretty tedious pretty quickly though. The easiest way to build up this data structure is by editing an actual image. This is the image format I use for my fonts:

The scattered dots in the first and seventh line are the character widths in
binary. The last empty character represents the space. See the
fonts directory
for the images for all included fonts, which can also be a great starting-point
for your own adaptations.
You can import the font image using the image-loader plugin to Octopus. Like so:
: my-font
  4 # Global character height of this font in pixels
  :include "my-font.png" 8x5 no-labels