
![]()
A lightweight, fast and reliable dependence-less TypeScript framework for building serverless applications on AWS.
![]()
Description
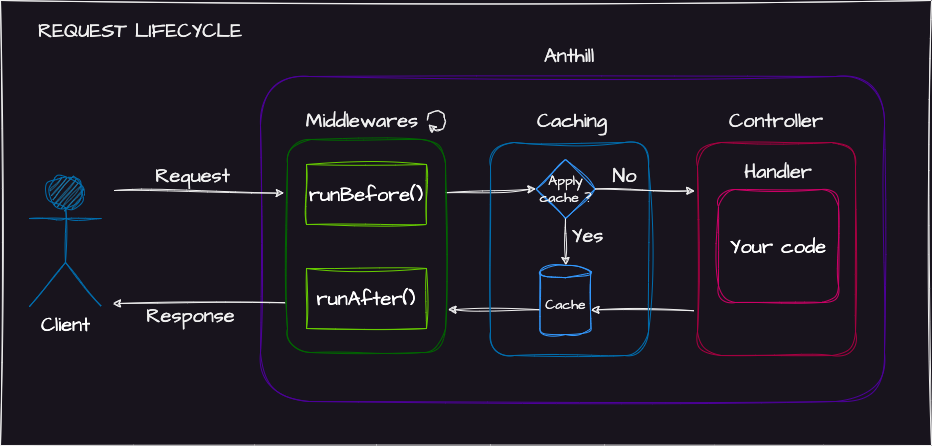
The project aims to provide an environment and tools for developing REST API using AWS Lambda and API Gateway. Anthill Framework comes with an HTTP request handling system capable of caching, running middlewares, dealing with CORS and much more ! It can handle classic AWS Lambda invocation as well (i.e. No HTTP / AWS API Gateway integration).
Anthill comes with strong typing and structure because readability counts and code benefits from being explicit.
Why Anthill Framework ?
There are a lot of existing frameworks to build amazing web backends. So, why should you use Anthill ?
- It has ZERO dependency
- It's tailor-made for AWS using API Gateway and Lambda
- It's light and fast even when facing cold starts
- It's 100% TypeScript and strongly typed
Table of contents
- Quick start
- Installation
- Request lifecycle
- Anthill
- Configuration
- Routing
- Controllers & Handlers
- Middlewares
- Cache
- Samples
- Logger
- Time tracker
Quick start
Here is the code for an "Hello world" example:
import {
  AwsEvent,
  HttpResponse,
  HttpResponseBodyStatusEnum,
  RestMethodEnum,
  RestController,
  RestHandler,
  anthill,
} from "@antl4b/anthill-framework";

@RestController()
class MyController {
  /**
   * Handle the request
   * @param event AWS event
   * @returns My handler response
   */
  @RestHandler({ method: RestMethodEnum.Get })
  myHandler(event: AwsEvent): HttpResponse {
    return HttpResponse.success({
      status: HttpResponseBodyStatusEnum.Success,
      payload: "Hello World",
    });
  }
}

const app = anthill();

app.configure({
  controllers: [MyController],
});

const handlers = app.exposeHandlers();
exports.myHandler = handlers.myHandler;
$ curl --request GET 'http://localhost:3000/dev/my-handler'
{"status":"success","payload":"Hello world"}Installation
This is a Node.js module available through the npm registry. Installation is done using the npm install command:
$ npm install @antl4b/anthill-framework --saveRequest lifecycle
Anthill
Anthill class is the main entry point of an Anthill project. To define an Anthill app, you'll have to declare your app in the root file of your project such as:
const app = anthill();Anthill app can then be configured using configure() method to register controllers and to set up common configuration within your project.
app.configure({
  controllers: [MyController],
  options: {
    defaultLogLevel: LogLevelEnum.Info,
    displayPerformanceMetrics: true,
  },
});
Finally, all registered controllers can have their handlers exposed inside an object using exposeHandlers() method to export and link them with the serverless configuration file.
const handlers = app.exposeHandlers();
exports.myHandler = handlers.myHandler;
Configuration
Anthill Framework uses a configuration inheritance system allowing to apply common logics within your app, controller or handler scope.
Ex: For dealing with cors for all the REST handlers of the application, set it on Anthill app scope:
const app = anthill();
app.configure({
  controllers: [MyController],
  restHandlerConfig: {
    middlewares: [new CorsMiddleware()],
  },
});
Ex: The following code will enable caching and require that an Authorization header is provided for each of the controller handlers.
The second handler configuration will override the caching configuration to apply a shorter TTL.
@RestController({
  cacheConfig: {
    cacheable: true,
    ttl: 120,
  },
  middlewares: [new HeaderFieldMiddleware(["Authorization"])],
})
class MyController {
  /**
   * My First handler
   */
  @RestHandler({ method: RestMethodEnum.Get })
  myHandler1(event: AwsEvent): HttpResponse {
    return HttpResponse.success({
      status: HttpResponseBodyStatusEnum.Success,
    });
  }

  /**
   * My second handler
   */
  @RestHandler({
    method: RestMethodEnum.Get,
    cacheConfig: { ttl: 60 },
  })
  myHandler2(event: AwsEvent): HttpResponse {
    return HttpResponse.success({
      status: HttpResponseBodyStatusEnum.Success,
    });
  }
}
[!NOTE] Middleware inheritance is cumulative so the 3 layers of middleware will be applied successively. Through Anthill, Controller and Handler during runBefore and in reversed order during runAfter. See more in Middlewares section.
Routing
Anthill Framework doesn't provide a proper way of routing requests to a given handler according to some path related rules. Traditional frameworks used to do it this way but, being in a serverless context, routing of requests to handlers benefits more from being carried out by API Gateway.
Here is an example of how requests can be routed to handlers using Serverless YML configuration file:
create-resource:
  handler: src/index.createResource
  events:
    - http:
        path: /resources
        method: post
list-resources:
  handler: src/index.listResources
  events:
    - http:
        path: /resources
        method: get
get-resource:
  handler: src/index.getResource
  events:
    - http:
        path: /resources/{id}
        method: get
delete-resource:
  handler: src/index.deleteResource
  events:
    - http:
        path: /resources/{id}
        method: delete
For more information on routing to handler, see Serverless official documentation.
Ensuring that each service is hosted by a single Lambda also helps a lot in terms of monitoring and troubleshooting. Plus, it doesn't cost anything extra.

If you're still not convinced and want to map an ANY method event to a single handler, then feel free to create your own middleware to manage routing rules the way you prefer !
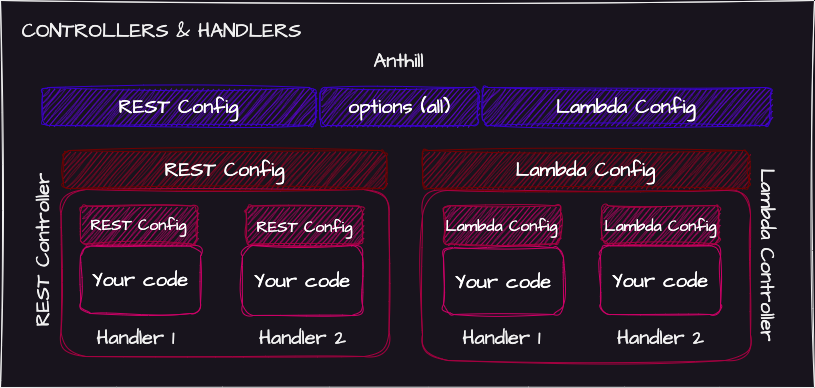
Controllers & Handlers
Controllers are groups of handlers defining a scope in which some common configuration is applied.
Registering a controller to Anthill with configure() (see Anthill), makes its handlers exposeable by the Anthill exposeHandlers() method.
Handlers are methods that can be either instance or static methods. They are the main entry points for the code implementation
To create controllers and handlers, Anthill Framework uses classes and decorators.
Two types of controllers and handlers are available: @RestController and @LambdaController going in pair with @RestHandler and @LambdaHandler
[!WARNING] All handlers within the app MUST have different names. By default, the handler registration system will use the handler method name but there's a possibility this name won't be unique. Ex: MyController1.list() and MyController2.list() won't work.
If two handlers located in two controllers have the same name, you will have to declare an alternative name for at least one handler.
The name property of the configuration object of @RestHandler and @LambdaHandler decorators is made for that purpose.
REST
To create a REST controller containing a handler, decorate the controller class with @RestController and decorate the handler with @RestHandler
@RestController()
class MyController {
  @RestHandler({ method: RestMethodEnum.Get })
  myHandler(event: AwsEvent): HttpResponse {
    return HttpResponse.success({
      status: HttpResponseBodyStatusEnum.Success,
    });
  }
}
@RestController decorator takes an optional argument to apply common configuration to all handlers inside it. See configuration for more details on how it works.
REST handlers have to respect this signature:
restHandlerMethod(
  event: AwsEvent,
  context?: AwsContext,
  callback?: AwsCallback,
): Promise<HttpResponse> | HttpResponse;
As for the @RestController decorator, @RestHandler decorator takes an argument to apply configuration to the handler scope.
@RestController()
class MyController {
  @RestHandler({
    method: RestMethodEnum.Get,
    name: "myHandlerAlternativeName",
    middlewares: [new JsonBodyParserMiddleware()],
  })
  myHandler(event: AwsEvent): HttpResponse {
    return HttpResponse.success({
      status: HttpResponseBodyStatusEnum.Success,
    });
  }
}
Lambda
To create a Lambda controller containing a handler, decorate the controller class with @LambdaController and decorate the handler with @LambdaHandler
@LambdaController()
class MyController {
  @LambdaHandler()
  myHandler(event: AwsEvent): any {
    return null;
  }
}
Lambda controllers and handlers follow the same rules as the REST ones. However, the way in which requests are processed is much simpler since there is way less possible configuration and no middleware execution system
Lambda handlers have to respect this signature:
lambdaHandlerMethod(
  event: AwsEvent,
  context?: AwsContext,
  callback?: AwsCallback,
): Promise<any> | any;
Middlewares
Middlewares are classes that extend Middleware containing methods executed before and after the handler is called (or the cache is retrieved).
The runBefore() method executed before calling the handler has the capability of:
- Executing any code
- Making changes to the incoming request event
- End the request lifecycle by returning an
HttpResponse
Its signature is as follow:
type RunBeforeReturnType = AwsEvent | HttpResponse;
runBefore(event: AwsEvent, context: AwsContext): Promise<RunBeforeReturnType> | RunBeforeReturnType;
It must return the event even if not altering it or an HttpReponse to end the request lifecycle.
The runAfter() method executed after a response has been emitted (either by the handler, the cache or a middleware runBefore()) has the capability of:
- Executing any code
- Making changes to the request response
Its signature is as follow:
runAfter(httpResponse: HttpResponse, event: AwsEvent, context: AwsContext): Promise<HttpResponse> | HttpResponseIt must return the httpResponse even if not altering it.
Both runBefore() and the runAfter() methods can be overridden when extending Middleware.
[!IMPORTANT]
Middleware execution order is something to take into consideration.
Let's take the example of 3 middlewares m1, m2 and m3 having all a runBefore() and a runAfter() implementation.
The nominal scenario is this one:
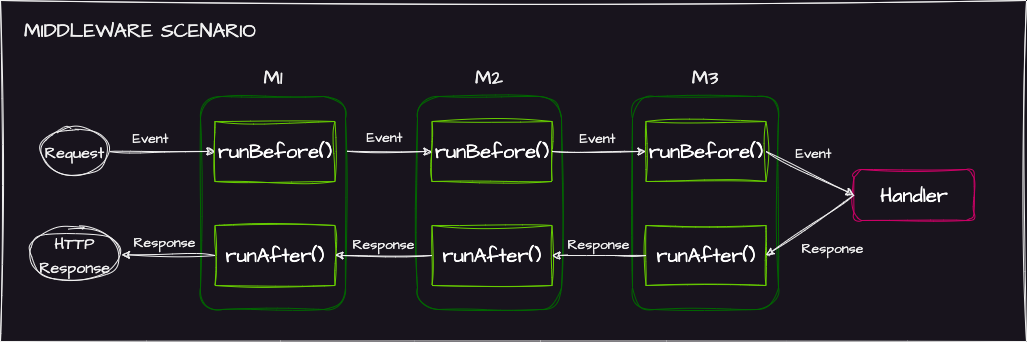
runBefore() and runAfter() are called as a mirror around the handler.
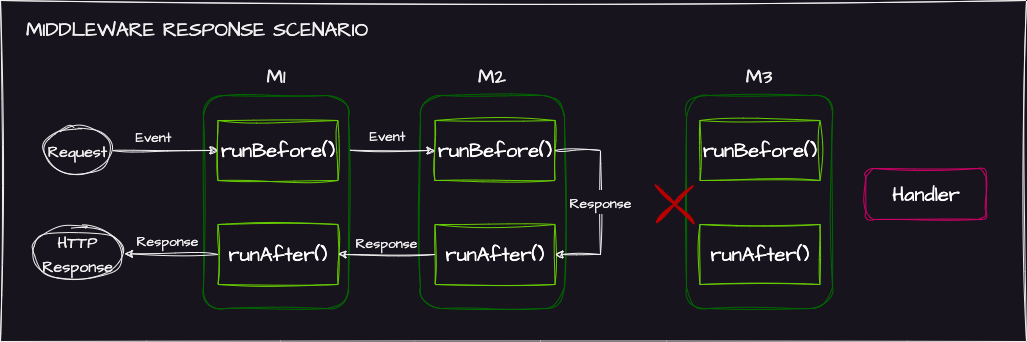
[!WARNING] In case a middleware
runBefore()returns anHttpResponse, all following middlewaresrunBefore()won't be called and only those that have already been called will see theirrunAfter()method called.
In the previous example of m1, m2 and m3, if m2 runBefore() returns an HttpReponse
The scenario will be this one:
Use existing ones
Some middlewares have already been developed and are included in Anthill Framework to cover most frequent needs such as dealing with CORS or parsing JSON body. Browse middleware folder for more details.
The middleware list is likely to grow over time. Don't hesitate to request or to create a pull request if you want to contribute.
Create your own
As told at the beginning of the middlewares section, middlewares are classes that extend Middleware class.
Let's imagine a ticketing service that opens on October 10, 2023 at 8 p.m. the and which rejects all incoming requests before this time.
import {
  AwsContext,
  AwsEvent,
  HttpResponse,
  HttpResponseBodyStatusEnum,
  Middleware,
  RunBeforeReturnType,
} from "@antl4b/anthill-framework";

export class BlockBeforeDateMiddleware extends Middleware<Date> {
  // Declare payload as a date, it will store the time before which we block the request
  constructor(payload: Date) {
    super(payload);
  }

  override runBefore(event: AwsEvent, context?: AwsContext): RunBeforeReturnType {
    // If current date is less than the middleware payload (the time before which we block the request)
    if (new Date() < this.payload) {
      // Return an HttpResponse with an error
      return HttpResponse.error({
        status: HttpResponseBodyStatusEnum.Error,
        message: "Not opened yet, retry later",
      });
    }

    // Otherwise, forward the event
    return event;
  }
}
Now to use it in a handler, instantiate the middleware inside the @RestHandler decorator:
@RestController()
export class TicketingController {
  @RestHandler({
    method: RestMethodEnum.Post,
    middlewares: [
      new BlockBeforeTimeMiddleware(
        new Date("2023-10-10 20:00:00"), // Init the middleware with the time before which we block incoming requests
      ),
    ],
  })
  buyTicket(event: AwsEvent): HttpResponse {
    // Do stuff to buy a ticket

    return HttpResponse.success({
      status: HttpResponseBodyStatusEnum.Success,
      payload: {
        /* the ticket */
      },
    });
  }
}
Cache
Cache can be activated for HTTP requests. It avoids calling the handler if a similar request has already been returned within a given time (TTL).
Caching greatly improves the latency of requests to your API in addition to reducing (if not almost eliminating) the costs linked to the execution time of your Lambdas.
[!NOTE] Caching is natively supported by API Gateway and you may prefer using it directly. However activating it via the Anthill cache feature ensures that your middleware will be executed. In case there are some side effect to apply to the incoming requests than can't be handled by API Gateway, Anthill cache is a good alternative.
When caching is enabled, Anthill Framework caches responses from your handler for the specified time-to-live (TTL) period, in seconds. Anthill Framework then responds to the request by looking for the handler's response in the cache instead of sending a request to your handler. Check request lifecycle diagram.
Cache items are identified with:
- The request path
- The request path parameters
- The request query string parameters
- [Optionally if set] Some of the request headers
Cache option for HTTP requests is an object looking like this:
const cacheConfig: RestHandlerCacheConfig = {
  cacheable: true,
  ttl: 120, // 2 minutes cache
  maxCacheSize: 1000000, // 1MB cache
  headersToInclude: ["Origin"], // Add Origin header to cache item identifier
};
This Cache configuration object will allow caching with a time-to-live of two minutes.
The overall cache size won't be able to exceed 1MB.
Cache items will be identified by the Origin header. This means that two similar requests from two different origins will result in two distinct cache items.
[!IMPORTANT]
If maxCacheSize is reached, the cache will remove oldest items to free up space even if their TTL is still valid.
Samples
Sample projects have been developed to serve as a source of working examples. Browse samples to see dummy project's anatomy.
Logger
Anthill Framework comes with some common logging features:
- Set the application log level from
TRACEtoERROR - Override the default log formatter to customize the way your logs look like
- Add logging handlers to emit logs elsewhere than inside the console (API, Message Queuing, write inside files...)
- Logging multiple values
Default log level is INFO but can be changed configuring Anthill app (See Anthill) or manually using Logger.getInstance().setLogLevel(LogLevelEnum.Error); for example.
Here is an example of how to use it:
Logger.getInstance().setLogLevel(LogLevelEnum.Trace);

logTrace("My object", { isTrue: true });
logDebug("Connected to DB with host and user", dbHost, dbUser);
logInfo("Initializing application");
logWarn("Negative index might leads to errors");
logError("Err: something went wrong :/", e.message);
Changing logs format
Setting a new formatter allows you to change logs format. A formatter is a function with the following signature:
type LoggerFormatter = (payload: any) => string;It takes one argument that could be absolutely anything and returns a string which is the stringified version of the payload argument.
The resulting string will then be transmitted forward to the log handler list.
Let's make a new formatter to stringify the log payload using JSON.stringify():
Logger.getInstance().setformatter((payload: any) => {
  return JSON.stringify(payload, null, 2);
});
This formatter will now be replacing the default one.
Adding logs handler
Log handlers are functions that will be called each time something is logged. Anthill Framework provide a default handler that will forward the logs to the console logging using console.(trace | debug | info | warn | error).
A log handler must respect this signature:
type LoggerHandler = (messages: Array<string>, logLevel: LogLevelEnum, context: LoggerContext) => void;It receives an array of messages to process. Messages have been formatted beforehand and are, at this point, strings. Here is how to add a handler to the log handler list:
Logger.getInstance().addHandler(
  (messages: Array<string>, logLevel: LogLevelEnum, context: LoggerContext) => {
    for (let message of messages) {
      console[logLevel](`[${logLevel}][${new Date().toISOString()}] - ${message}`);
    }
  }
);
Creating a new log handler will push it at the end of the log handler list.
To empty the list, call Logger.getInstance().removeAllHandlers().
Time tracker
Anthill Framework provides utility classes to measure execution time of some blocks of code. It can be used to measure different segments of code regrouped in a time tracking session.
It basically uses two classes: TimeSegment and TimeTracker.
TimeSegment is a time measurement tool allowing to start measuring, stop measuring and retrieve the time elapsed between start and stop.
const timeSegment = new TimeSegment("my-segment");
timeSegment.start();

// Do some stuff ...

timeSegment.stop(true); // set verbose option to true to for auto logging segment duration

logInfo(`Time segment ${timeSegment.name} started at ${timeSegment.startTime}, ended at ${timeSegment.endTime}. Total duration: ${timeSegment..getDuration()}`);
TimeTracker is a more advanced tool that regroups and manages time segments to display the detailed log tracking session afterwards.
Let's create our own time tracking session:
const tracker = new TimeTracker();

// Start recording time
tracker.startTrackingSession();

tracker.startSegment("my-segment1"); // +1
// Do some stuff 1
tracker.startSegment("my-segment-2"); // +2
// Do some stuff 2
tracker.stopSegment("my-segment-2"); // -2
tracker.startSegment("my-segment-3"); // +3
// Do some stuff 3
tracker.stopSegment("my-segment-3"); // -3
// Finish doing some stuff 1
tracker.stopSegment("my-segment1"); // -1

// Stop recording
tracker.stopTrackingSession(); // Will auto stop unstopped segments

// Display the result
tracker.logTrackingSession();
Adding some code between segment start and stop will permit a precise measurement of the time it takes to perform each segment.
[!NOTE]
During the REST handling process, a time tracking session is automatically launched. If thedisplayPerformanceMetricsoption is set to true, the session will be logged at the end.
2023-10-06T16:38:09.332Z :: info :: "myHandler-tracking-session: [xxxxxxxxxxxxxxxxxxxxxxxxxxxxxxxxxxxxxxxxxxxxxxxxxx](1.882 ms)"
2023-10-06T16:38:09.332Z :: info :: "middleware-runBefore      : .....[xxxx].........................................(0.148 ms)"
2023-10-06T16:38:09.332Z :: info :: "callable-run              : ..........[xxxxxxxxxxxxxxxxxxxxxxxxxxxxxxxxxxxxxxx].(1.486 ms)"
2023-10-06T16:38:09.332Z :: info :: "middleware-runAfter       : ..................................................[](0.002 ms)"