

capacitor-callkit-voip
Provide PushKit functionality to ionic capacitor
This plugin has been written for BetterCall app.
Install
- Install plugin
npm install @capgo/capacitor-callkit-voip
ionic cap sync- Xcode Project > Capabilities pane. Select the checkbox for Voice over IP, as shown in Image

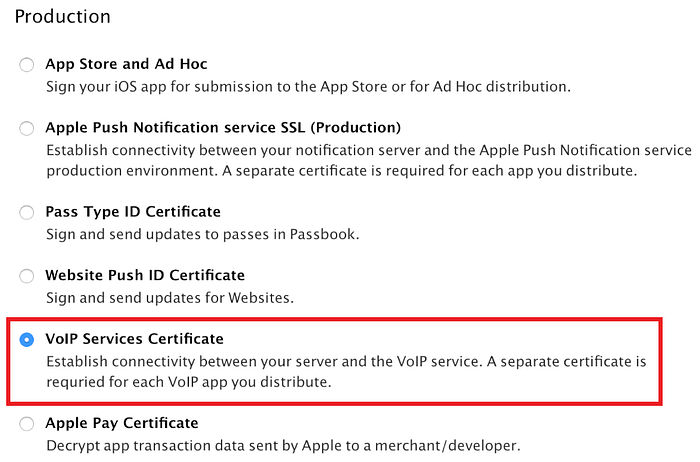
- Register certificate on developer.apple.com/certificates
-
Download the certificate and open it to import it into the Keychain Access app.
-
Export certificates as shown bellow

- Now, navigate to the folder where you exported this file and execute following command:
openssl pkcs12 -in YOUR_CERTIFICATES.p12 -out app.pem -nodes -clcerts- You will receive
app.pemcertificate file that can be used to send VOIP notification (you can use my script bellow)
Usage
To make this plugin work, you need to call .register() method and then you can use API bellow.
import {CallKitVoip} from "@capgo/capacitor-callkit-voip"


async function registerVoipNotification(){
    // register token
    CallKitVoip.addListener("registration", (({token}:Token) =>
      console.log(`VOIP token has been received ${token}`)
    ))

    // start call
    CallKitVoip.addListener("callAnswered", (({username, connectionId}:CallData) =>
      console.log(`Call has been received from ${username} (connectionId: ${connectionId})`)
    ));

    // init plugin, start registration of VOIP notifications
    await CallKitVoip.register(); // can be used with `.then()`
    console.log("Push notification has been registered")

}
Once the plugin is installed, the only thing that you need to do is to push a VOIP notification with the following data payload structure:
{
    "Username"      : "Display Name",
    "ConnectionId"  : "Unique Call ID"
}
You can use my script (bellow) to test it out:
./sendVoip.sh <connectionId> <deviceToken> <username>
sendVoip.sh:
#!/bin/bash

function main {
    connectionId=${1:?"connectionId should be specified"}
    token=${2:?"Enter device token that you received on register listener"}
    username=${3:-Anonymus"}

    curl -v \
    -d "{\"aps\":{\"alert\":\"Incoming call\", \"content-available\":\"1\"}, \"Username\": \"${username}\", \"ConnectionId\": \"${connectionId}\"}" \
    -H "apns-topic: <YOUR_BUNDLE_ID>.voip" \
    -H "apns-push-type: voip" \
    -H "apns-priority: 10" \
    --http2 \
    --cert app.pem \
"https://api.development.push.apple.com/3/device/${token}"
}

main $@
Pay attention:
- replace <YOUR_BUNDLE_ID> with your app bundle
- ensure that you are using correct voip certificate (specified in
--cert app.pem) - if you'll go to production version, you will need to do request to
api.push.apple.com/3/device/${token}instead ofapi.development.push.apple.com/3/device/${token}, otherwise you will receiveBadDeviceTokenissue
If you will have some complication, feel free to write me email at yurii.leso@bfine.cz
Donation
If this project help you reduce time to develop, you can give me a cup of coffee :)
Links
API
register()addListener("registration", handler)addListener("callAnswered", handler)addListener("callStarted", handler)- Interfaces
register()
Register your device to receive VOIP push notifications. After registration it will call 'registration' listener (bellow) that returns VOIP token.
import {CallKitVoip} from "@capgo/capacitor-callkit-voip"
//...
await CallKitVoip.register();
// or
CallKitVoip.register().then(() => {
    // Do something after registration
});
Returns: void
addListener("registration", handler)
Adds listener on registration. When device will be registered to receiving VOIP push notifications, listenerFunc will be called.
As usually, it's called after .register() function
import {CallKitVoip, Token} from "@capgo/capacitor-callkit-voip"
//...
CallKitVoip.addListener("registration", (({token}:Token) => {
    // do something with token
    console.log(`VOIP token has been received ${token}`)
}));| Param | Type |
|---|---|
eventName |
"registration" |
listenerFunc |
(token: Token) => void |
Returns: any
addListener("callAnswered", handler)
Adds listener to handle when user answers on call.
import {CallKitVoip, Token} from "@capgo/capacitor-callkit-voip"
//...
CallKitVoip.addListener("callAnswered", (({username, connectionId}:CallData) => {
    // handle call (e.g. redirect it to specific page with call)
    console.log(`Call has been received from ${username} (connectionId: ${connectionId})`)
}));| Param | Type |
|---|---|
eventName |
"callAnswered" |
listenerFunc |
(callDate: CallData) => void |
Returns: void
addListener("callStarted", handler)
Adds listener to handle call starting. I am not sure if it's usable, because you can handle it directly in your app
import {CallKitVoip, Token} from "@capgo/capacitor-callkit-voip"
//...
CallKitVoip.addListener("callStarted", (({username, connectionId}:CallData) => {
    // handle call (e.g. redirect it to specific page with call)
    console.log(`Call has been started with ${username} (connectionId: ${connectionId})`)
}));| Param | Type |
|---|---|
eventName |
"callStarted" |
listenerFunc |
(callDate: CallData) => void |
Returns: any
Interfaces
Token
| Prop | Type |
|---|---|
token |
string |
PluginListenerHandle
| Prop | Type |
|---|---|
remove |
() => any |
CallData
| Prop | Type |
|---|---|
connectionId |
string |
username |
string |