Xbit VSCode Extension
Canvas Software Suite includes a VS Code Extension called Xbit. This extension provides an easy interaction with Canvas Firmware compatible DVKs and IoT products for loading python scripts to the device, interacting with the python REPL prompt and underlying RTOS shell prompt (if supported by the device).
Features
- Write firmware .hex images to supported boards.
- Read, Write, Rename, Delete python files on supported boards.
- Psuedo-terminal integration for interactions with the MicroPython REPL on supported boards.
- Auto-completion and docs for supported Micro Python libraries.
- Virtual-workspace provider for supported boards.
- Development environment for Xbit Applets.
Requirements
- Canvas Device
- Python 3.10 or later
- Pip 22 or later
- On Linux, you may need to install the python venv package. On Ubuntu, this can be done with the following command:
sudo apt install python3.10-venv
Visual Studio Code extensions:
- ms-python.python | Install Show
-
visualstudioexptteam.vscodeintellicode| [Install] [Show] -
ms-python.vscode-pylance| [Install] [Show]
Getting started
On the first run of the extension, you are prompted to select a folder for the tool to store the Python virtual environment it will operate within for Python-based operations. When prompted, click and select a location for the tool to store its virtual environment. The tool will create its own subfolder named xbit.venv in the folder you select and operate from there. If your system doesn't meet the minimum requirements for python, the tool will prompt you to install the missing requirements.
Opening VS Code should automatically display the Xbit extension icon in the sidebar when installed. When the Xbit extension is activated by clicking on its icon, it will scan your workstation for compatible USB devices and present a USB serial port list in the sidebar. If a Python REPL is detected, you will see a name next to each device serial port and an icon indicating the type of interface available. A triple greater-than '>>>' icon indicates a Python REPL prompt.

If a USB serial port is detected but the identity of the port cannot be determined, you’ll see a generic device listing identified by the default icon. At any time you can refresh the list of devices by clicking the refresh button in the USB DEVICES header bar. If the device's name indicates that the device is busy, it is likely that the device is already connected to another application. You will not be able to interact with the device until the other application releases the device.
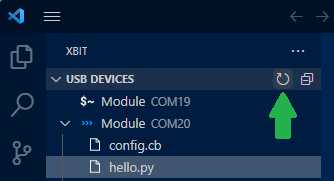
This extension will also allow interaction with Zephyr console shells on devices that support it, though these are hidden by default. Enable Zephyr shell in the extension options to see them.A Zephyr shell is indicated by a '$~' icon. If a Zephyr shell is detected, you can click on the device name to open a terminal window and interact with the shell.

Updating Canvas Firmware
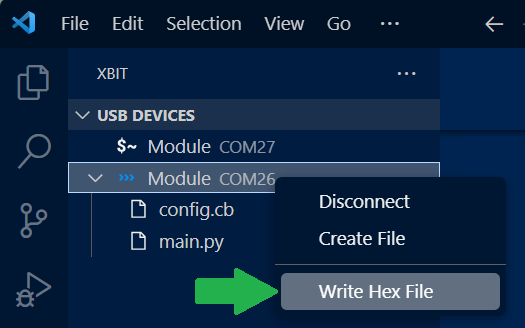
Canvas Firmware is the underlying software enabling Canvas-enabled radio modules to run Python scripts and access underlying hardware via APIs. It is important to make sure your hardware is using the latest Canvas Firmware before you start developing application scripts. See the product page for details on where to locate the latest Canvas Firmware for your specific hardware.
Canvas firmware is released as a firmware image in a .hex file that can be programmed right from within the Xbit VS Code extension. To program a .hex file to update your hardware, right-click on the REPL port in the USB DEVICES panel and select Write Hex File. Once clicked, a file selection dialog will appear where you can select the desired .hex file to program onto your device.
Interacting with the Device’s Python REPL
When interacting with a device, you can Connect or Disconnect from the associated USB serial port. When the port is connected, the icon for the device will be highlighted in blue. The Xbit user interface panel has a header displaying SELECTED DEVICE providing a few options for interacting with the device including a Connect/Disconnect button. Pressing the Connect button will bring up a Terminal within VS Code that you can press Enter to interact with. To access the Python REPL of the device, select the serial port displaying the 3 greater than symbol >>> in the USB DEVICES panel, then click the Connect button down below. This will open a new terminal to the selected device that you can use to interact with the Python REPL.

Working With Files
Files are stored in a virtual filesystem while working in VS Code. If files are changed on the device outside of VS Code, you can refresh the device (or individual file) by right-clicking on the item and selecting 'Refresh' to reload the files into VS Code. A backup copy of all files that you open/edit from devices will be stored in the xbit.venv folder.
Creating a Python Script on a Device
To create your first Python script on a compatible device, right-click the name of the device that lists the serial port of the board you’d like to interact with and select Create File.
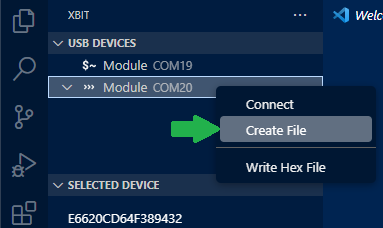
You will then be prompted for a file name to create on the device.

Type the name of the file you’d like to create such as hello.py and then press Enter to create it.
Editing Python Files on a Device
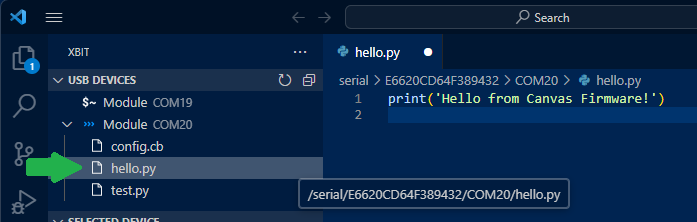
To open and edit a file on your device, single click the file of interest in the device view to load it into an editor panel. You can then type directly into the text editor to modify the contents of the file.
Renaming a Python Script on a Device
To rename a file such as a Python script already on your device, right click the file in the device view and select Rename File.
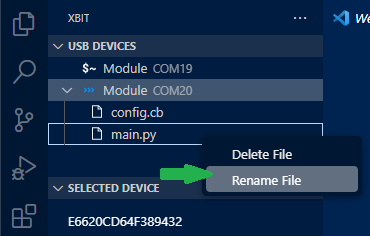
You will then be prompted for the new name you would like to assign to the file. enter the new name and press Enter to rename the file.
Intellisense
This extension comes with intellisense support for the Canvas MicroPython libraries. To enable intellisense, open a workspace and right click on any file. Select the "Xbit: Initialize Workspace..." option. The .vscode folder will be created in the workspace and the necessary files will be created.
You can now open a python file and start typing. Intellisense will provide suggestions for the current word. You can use the arrow keys to select the desired suggestion and press Enter to insert it into the editor.
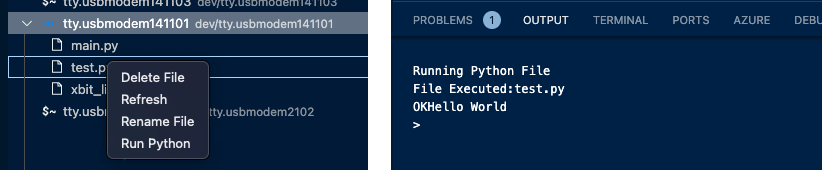
Running Python Scripts on a Device
When viewing the files on a device, you can right click on a python script and select Run File to execute the script on the device. The output of the script will be displayed in the output window.
Troubleshooting
Serial Port Unavailable or Busy
If you are unable to connect to a device and see an error like this, double check if another application is already connected and using the port. If not, the serial port may be in a bad state. This can be fixed by unplugging the device and plugging it back in.

Timeout Errors
These will occur if the extension doesn’t get a response from the connected device. This usually means that the repl console is in a state where it can’t process commands. Try to manually connect to the device to see it the repl comes up. See Interacting with the Device’s Python REPL. If you are unable to get a REPL terminal unplug the device and plug it back in, click the refresh button to redetect the devices.

Using Xbit Applets
This extension supports working with Xbit Applets. Xbit Applets are a way to develop and deploy desktop applications for Canvas Devices. Xbit Applets are written in Javascript. These applets typically provide a user interface to interact with the device. They can also be used to pipe data from the device to the applet for logging or other purposes.
- Connect a Canvas Device to your computer.
- Open an Xbit Applet folder in your VS Code workspace.
- Find the package.json file for the applet you want to run, right click and select "Run Xbit Applet..."
- Switch to the Xbit extension and find the device you want to use for the applet.
- Connect to the device.
- In the lower "selected device" panel, from the drop down "selected applet" choose the running applet to pipe device data to the applet.
- To stop sending data, change the drop down to "none"