
Introduction
Sample ReactJS project acting as a frontend for my UDOO Neo / Rasperry PI.
The software consists of a frontend (ReactJS) and backend (NodeJS) enabeling you to
- Define "boards" (any physical devices that exposes pins)
- Present them on a webpage
- Interact with the GPIOs
This is very much still a work in progress and far from finished. Consider it alpha stage at the moment.
We support various ways of installing / running the software:
- Installing through npm as a node package
- Installing it a a service on a linux distro
- Running it from the source using npm start
- Running it with your own webserver.
More details can be found below:
Installing
You can install this module using the node package manager (npm) like this:
sudo npm install web-gpio-react -g
In order to start the server manually simply execute the following command
web-gpio-react
Point your browser to http://localhost:3000/
In order to interact with your board, you'll need to setup haProxy. (see later section)
Installing a a service
If you're installing this on a linux distro (as is probably the case in terms of UDOO Neo / RaspberryPi Zero), you can install the software as a linux service using forever-service. The advantages are :
- It's the standard way of doing things in Linux
- It start automatically when device is rebooted
- Auto-restart in case the service crashes.
Here are the very simple steps needed :
We will be using forever and the forever-service packages. These need to be installed globally.
sudo npm install -g forever
sudo npm install -g forever-service
Install the service
sudo forever-service install web-gpio-react --script /usr/local/bin/web-gpio-react

forever-service version 0.5.4

Platform - Ubuntu 14.04.3 LTS
runuserpath not found
web-gpio-react provisioned successfully

Commands to interact with service web-gpio-react
Start   - "sudo start web-gpio-react"
Stop    - "sudo stop web-gpio-react"
Status  - "sudo status web-gpio-react"
Restart - "sudo restart web-gpio-react"
This will have installed the web-gpio-react service using the following configuration file : /etc/init/web-gpio-react.conf.
Running from the source
You can also clone the repo, enter the folder and run
npm start
If you don't have node installed, you can also start a simply http server using Python.
Enter the public folder and run the following command
python -m SimpleHTTPServer
This will start a webserver on port 8000. Point your browser to http://localhost:8000/
Live app
Live app (Github pages)
Configuration
The tool receives the board information via a REST API. This REST API is very simple. At the moment the following calls are supported
curl http://localhost:3000/boards
It return a collection of board objects with one property, its name.
Using its name we can retrieve the details of the board.
We currently have 2 boards defined :
The details of these boards can be retrieved like this:
curl http://localhost:3000/boards/udoo-neo
curl http://localhost:3000/boards/raspberrypi-zero
These are currently stored as json files in the public/json folder.
Server side setup
The basic idea is to make your IoT device available through some kind of VPN solution.
When the IoT device has started the web-gpio-react software, you'll be able to interface with its hardware from anywhere in the world.
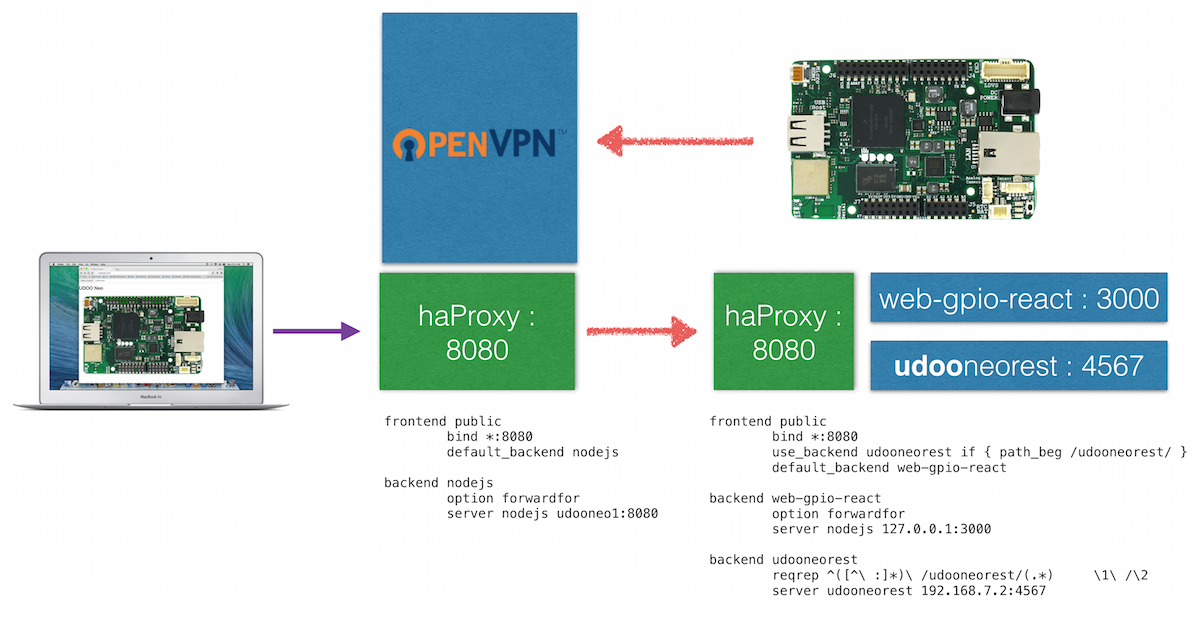
haProxy
In order to interact with the board itself, we can plugin different implementations. We currently support the udooneorest library that can be installed as a ruby gem. By default, the udooneorest library will run at http://localhost:4567.
Using the provided haProxy config file, we can expose the solution on http://localhost:8080. haProxy will ensure that
- web-gpio-react calls are redirected to http://localhost:3000.
- udooneorest calls are redirected to http://localhost:4567.
UDOO integration
haProxy
haProxy can be installed using the following commands.
wget http://ports.ubuntu.com/ubuntu-ports/pool/main/h/haproxy/haproxy_1.4.24-2ubuntu0.4_armhf.deb
sudo dpkg -i haproxy_1.4.24-2ubuntu0.4_armhf.deb
Then simply drop the configuration file in /etc/haproxy/haproxy.cfg
GPIOs
The GPIOs we'll be working with are defined in our javascript like this :
var gpios = [
    {"key":1, "pin":"13","gpio":"102","description":"pin 13 inner bank"},
    {"key":2, "pin":"12","gpio":"100","description":"pin 12 inner bank"},
    {"key":3, "pin":"11","gpio":"147","description":"pin 11 inner bank"},
    {"key":3, "pin":"8","gpio":"105","description":"pin 8 inner bank"},
    {"key":4, "pin":"2","gpio":"104","description":"pin 2 inner bank"},
    {"key":5, "pin":"3","gpio":"143","description":"pin 3 inner bank"},
    {"key":6, "pin":"4","gpio":"142","description":"pin 4 inner bank"},
    {"key":7, "pin":"42","gpio":"127","description":"pin 42 outer bank"}
];
The sample qpplication will be using a REST API running on the UDOO to interact with the GPIOs. But before we do that, let me show you how you can interact with the GPIOs on a lower level (Linux OS)
We can manipulate them using Linux by
- Exporting them
- Setting the proper direction (in/out)
- Reading / Writing values
Exporting GPIOs
We need to export GPIOs before we can start using them. Once exported they will become available as resources in /sys/class/gpio.
root@udooneo:/sys/class/gpio# ls -ltr /sys/class/gpio

total 0
lrwxrwxrwx 1 root root       0 Jan  1  1970 gpiochip96 -> ../../devices/soc0/soc.0/2000000.aips-bus/20a8000.gpio/gpio/gpiochip96
lrwxrwxrwx 1 root root       0 Jan  1  1970 gpiochip64 -> ../../devices/soc0/soc.0/2000000.aips-bus/20a4000.gpio/gpio/gpiochip64
lrwxrwxrwx 1 root root       0 Jan  1  1970 gpiochip32 -> ../../devices/soc0/soc.0/2000000.aips-bus/20a0000.gpio/gpio/gpiochip32
lrwxrwxrwx 1 root root       0 Jan  1  1970 gpiochip192 -> ../../devices/soc0/soc.0/2000000.aips-bus/20b4000.gpio/gpio/gpiochip192
lrwxrwxrwx 1 root root       0 Jan  1  1970 gpiochip160 -> ../../devices/soc0/soc.0/2000000.aips-bus/20b0000.gpio/gpio/gpiochip160
lrwxrwxrwx 1 root root       0 Jan  1  1970 gpiochip128 -> ../../devices/soc0/soc.0/2000000.aips-bus/20ac000.gpio/gpio/gpiochip128
lrwxrwxrwx 1 root root       0 Jan  1  1970 gpiochip0 -> ../../devices/soc0/soc.0/2000000.aips-bus/209c000.gpio/gpio/gpiochip0
--w--w---- 1 root dialout 4096 Jan  1  1970 unexport
lrwxrwxrwx 1 root root       0 Dec 19 15:46 gpio102 -> ../../devices/soc0/soc.0/2000000.aips-bus/20a8000.gpio/gpio/gpio102
lrwxrwxrwx 1 root root       0 Dec 19 15:46 gpio127 -> ../../devices/soc0/soc.0/2000000.aips-bus/20a8000.gpio/gpio/gpio127
lrwxrwxrwx 1 root root       0 Dec 19 16:18 gpio25 -> ../../devices/soc0/soc.0/2000000.aips-bus/209c000.gpio/gpio/gpio25
--w--w---- 1 root ugpio   4096 Dec 19 20:39 export
lrwxrwxrwx 1 root root       0 Dec 19 20:39 gpio104 -> ../../devices/soc0/soc.0/2000000.aips-bus/20a8000.gpio/gpio/gpio104
Some sample commands :
# Exporting GPIOs
echo 102 > /sys/class/gpio/export
echo 127 > /sys/class/gpio/export

# Setting the diection
echo out > /sys/class/gpio/gpio102/direction
echo out > /sys/class/gpio/gpio127/direction

# Writing values
echo 0 > /sys/class/gpio/gpio102/value
echo 0 > /sys/class/gpio/gpio127/value
echo 1 > /sys/class/gpio/gpio102/value
echo 1 > /sys/class/gpio/gpio127/value

# Reading values
cat /sys/class/gpio/gpio147/value