
push sdk
npm install vibes-react-nativeimport Vibes from 'vibes-react-native';In the android/build.gradle file of your react-native project, make the following entry in the allprojects> repositories section.
allprojects {
  repositories {
    ....
    maven { url "https://raw.githubusercontent.com/vibes/android-sdk-repository/releases/"}
  }
}
You will need values for vibesAppId and vibesApiUrl in the android/app/build.gradle file of your react-native project as shown below.
defaultConfig {
  ...
  manifestPlaceholders = [vibesAppId: "YOUR_VIBES_APPID"),
                          vibesApiUrl: "VIBES_API_URL"]
}In the Info.plist file of your react-native project, make the following entries: VibesAppId and VibesApiURL.
<key>VibesAppId</key>
<string><your vibes app id></string>
<key>VibesApiURL</key>
<string><your vibes api url></string>The vibesAppId is Vibes AppID supplied to you by the Vibes Team. For the value of vibesApiUrl, choose one of the following.
- Default Vibes Push endpoint (US): https://public-api.vibescm.com/mobile_apps
- Vibes Push Europe endpoint (UE): https://public-api.vibescmeurope.com/mobile_apps
With the supplied credentials, the plugin initializes itself and calls Vibes.registerDevice and Vibes.registerPush when a Firebase token or APNS token is available within the app. This should be enough to start receiving push notifications. However, these additional functions can be called within your application's own lifecycle after the initialization process.
This call registers the device with the Vibes environment, returning a promise that either contains a unique device_id that stays with the app until it is uninstalled, or an error message if registration fails. This is invoked automatically at startup, and is not required unless you desire to do so. Calling it multiple times has no negative effect.
This call unregisters the device with the Vibes environment, as well as stops a device from receiving a push notification. It also disables any data collection or reporting functionality on this device. This call returns a promise, which on success contains no data and on failure contains an error message. To recover from this you need to invoke both Vibes.registerDevice and Vibes.registerPush.
This call fetches the platform specific token for the device and submits it to the Vibes environment, which it can then use to target this device. This call returns a promise, which on success contains no data and on failure contains an error message.
For Android, this is invoked automatically at startup of application, and is not required unless you desire to do so.
For iOS, you will need to manually call
Vibes.registerPush()from the lifecycle point of entry of your landing page inside your react-native project. This should show push notifications permissions alert dialog, which once granted, will trigger registerPush call on the Vibes SDK with the APNS push token.
This call notifies the Vibes environment not to send any more push notifications to this device. This call returns a promise, which on success contains no data and on failure contains an error message.
This call returns a json payload containing the device_id and push_token which identifies an installed instance of the app. This call returns a promise with the json payload on success and on failure contains an error message. The payload looks like below.
{
    'device_id': 'vXJ6f67XfnH/OYWskzUakSczrQ8=',
    'push_token': 'eAY6g9q3raJ4P03wNdSWC5MOW1EfxoomWNXsPhi7T6Q9yAqmxqn0sLEUjLL1Ib0LCH3nKQWBXdxapQ5LgbHu+g==',
}Your react-native application can register to be notified of the json payload associated with 2 types of events.
- pushReceived - this is raised immediately a push notification is received.
- pushOpened - this is raised when a user of your app interacts with the received notification by tapping on it.
An example of how to subscribe to these 2 events is shown below.
const onPushReceived = (event: { payload: string }) => {
  alert('Push received. Payload -> ' + JSON.stringify(event.payload));
};

const onPushOpened = async (event: { payload: string }) => {
  // eslint-disable-next-line no-alert
  alert('Push opened. Payload -> ' + JSON.stringify(event.payload));
};

const eventEmitter =
  Platform.OS === 'ios'
    ? new NativeEventEmitter(NativeModules.PushEventEmitter)
    : DeviceEventEmitter;

eventEmitter.addListener('pushReceived', onPushReceived);
eventEmitter.addListener('pushOpened', onPushOpened);


const App = (): React.ReactElement => {
  ...
}
...
The json payload may look like below for an Android app
{
   "message_uid":"d4799f7e-442e-45e6-a2d7-e7a82785333a",
   "body":"Test Message",
   "title":"Test Message",
   ...
}
The json payload may look like below for an iOS app
{
    "aps":{
      "alert":{
         "title":"Test Message",
         "body":"Test Message",
      },
      "badge":1,
      "content-available":1,
      "mutable-content":1
   }
   ...
}To link a device to a user, perhaps by their username/email or any other unique identifier, you can use the associatePerson bridge function.
const onPress = () => {
    try {
      const result = await Vibes.associatePerson('me@vibes.com');
      console.log(result)
    } catch (error) {
      console.error(error);
    }
};To fetch details of a person associated with a device, use getPerson bridge function.
const onPress = () => {
    try {
      const result = await Vibes.getPerson();
      console.log(result.person_key())
      console.log(result.external_person_id())
    } catch (error) {
      console.error(error);
    }
};This call updates client device information with Vibes. It returns a promise, which on success contains no data and on failure contains an error message. The method requires key parameters i.e.
updateCredential of type boolean which indicates whether an update is a token update otherwise false latitude and longitude of type Double
-
Push notification icon - The plugin looks for a drawable named
ic_stat_vibes_notif_icon.pngin the resources section of your project, and uses that to display an icon when push is received. -
Sound - The plugin looks for sound files in
rawfolder of the Android resources, and plays them when instructed to do so based on the payload contained in the notification. Note that sound will only play if you pass along a Notification Channel in the push payload else the default VIBES notification channel will be used, which doesn't play sound.
Refer to the sample app included in the sample-app folder in this project to see how these 2 are configured.
Further documentation on customizing the notification icon, notification channels, sound, displaying images in notification and other extras can be found in the Android SDK documentation here
To Add Rich Push to iOS, you need to add a Service Extenstion to the project. The service extension sits between the APNS server and the final content of the push and gets a limited execution time to perform some logic on the incoming push payload. This allows you to intercept the push content coming in from the APNS, modify it and then deliver the modified payload to the user.
Steps to add:
- Go to the iOS project under
<your_rn_project>/iosand open the.xcworkspaceon XCode. - On XCode create a new target by clicking
File ▸ New ▸ Target…. - Filter for the
Notification ServiceExtension and click Next: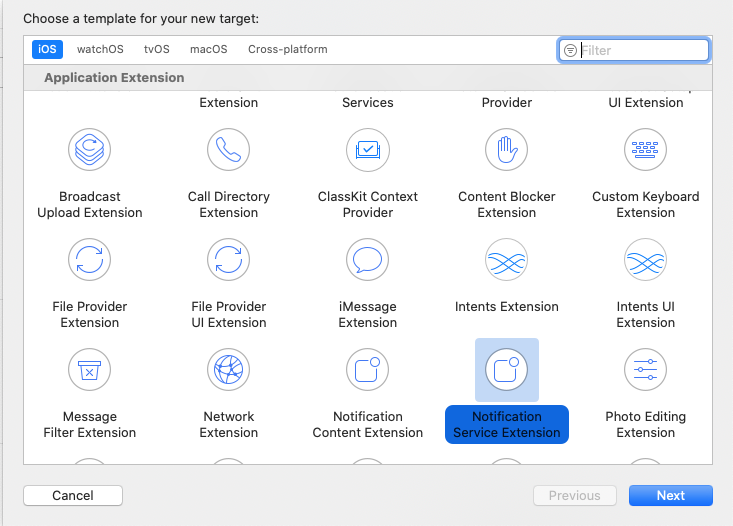
- Give it a name say
RichPush, select Team, Bundle ID and language to use (you mostly want to stick with Swift here) and should be set toEmbeded in Application(this is your main application project).Then click Finish. - If you wish to expose some of the helper classes to the new services extension you created, select the file you wish to expose, go to
File Inspectorand add a check to your service extension target.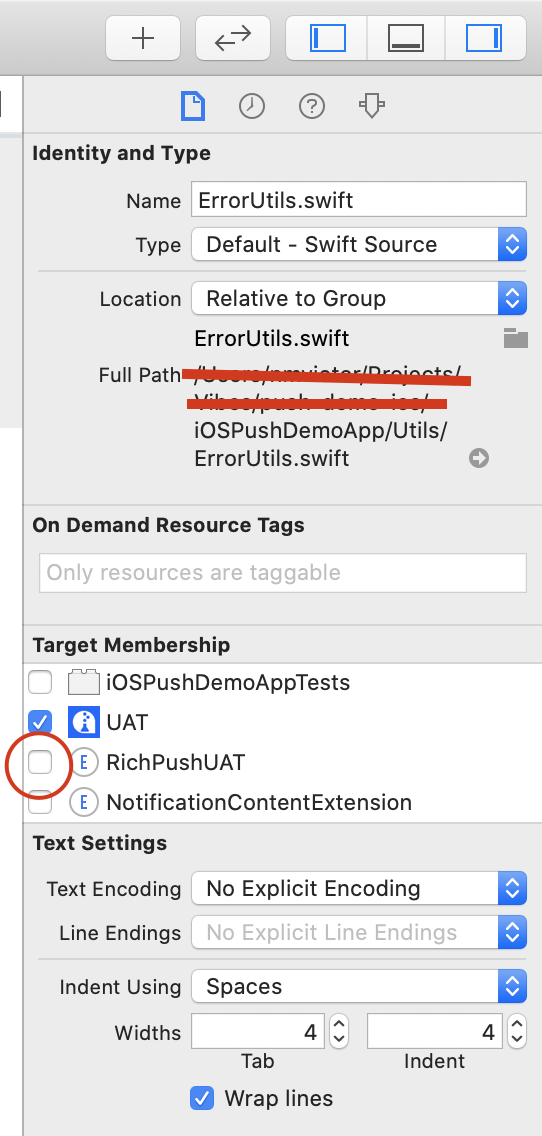
- Next go to your Apple Developer Page and create a
Siging Certificate and Provisioning Profilefor theBundle IDyou selected above. Make sure these are selected underSigning & Capabilitiestab on your XCode project setting. You may also just useAutomatic Signingif this suits your needs.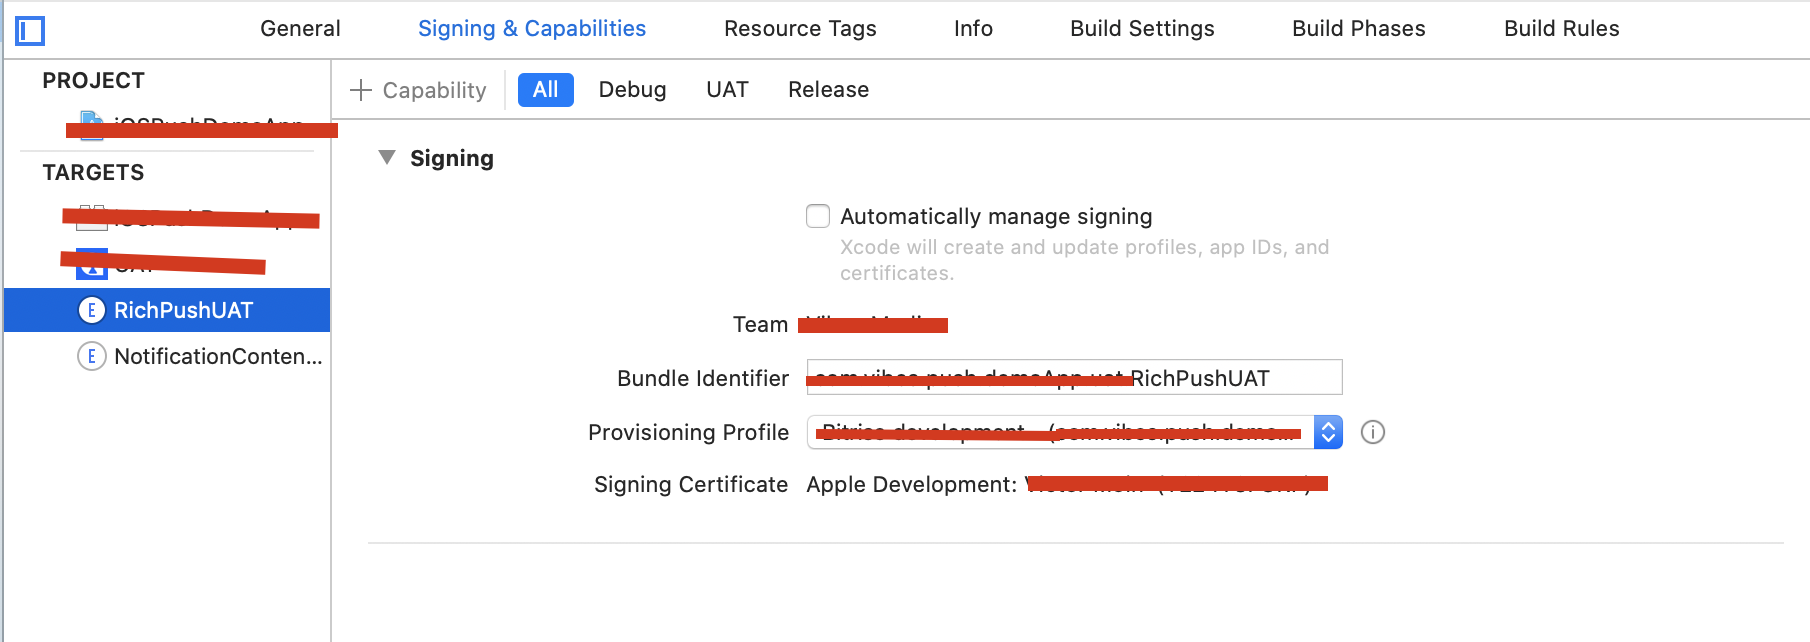
- You new RichPush target will have a
NotificationService.swiftfile created wich should allow you to intercept and modify the notification.


import UserNotifications
import MobileCoreServices

@available(iOS 10.0, *)
class NotificationService: UNNotificationServiceExtension {
 let parse = RichPushNotificationParsing()

 override func didReceive(_ request: UNNotificationRequest, withContentHandler contentHandler: @escaping (UNNotificationContent) -> Void) {
     // you may add your notification Parser here e.g to intercept and maybe dowload a media as in our case
   parse.didReceive(request, withContentHandler: contentHandler)
 }

 override func serviceExtensionTimeWillExpire() {
   parse.serviceExtensionTimeWillExpire()
 }
}- This is how the notification Parser may loook like if you are looking to download image with url specified in
client_app_datausing the keymedia_urlwhen posted from the Campaign Manager.
import UIKit
import UserNotifications

class RichPushNotificationParsing: NSObject {
    var contentHandler: ((UNNotificationContent) -> Void)?
    var bestAttemptContent: UNMutableNotificationContent?
    fileprivate let kClientDataKey = "client_app_data"
    fileprivate let kMediaUrlKey = "media_url"
    fileprivate let kRichContentIdentifier = "richContent"

    func didReceive(_ request: UNNotificationRequest, withContentHandler contentHandler: @escaping (UNNotificationContent) -> Void) {
        self.contentHandler = contentHandler
        bestAttemptContent = (request.content.mutableCopy() as? UNMutableNotificationContent)

        if let bestAttemptContent = bestAttemptContent {
            if let clientData = bestAttemptContent.userInfo[kClientDataKey] as? [String: Any] {

                guard let attachmentString = clientData[kMediaUrlKey] as? String else {
                    return
                }

                if let attachmentUrl = URL(string: attachmentString) {
                    let session = URLSession(configuration: URLSessionConfiguration.default)
                    let attachmentDownloadTask = session.downloadTask(with: attachmentUrl, completionHandler: { (location, response, error) in
                        if let location = location {
                            let tmpDirectory = NSTemporaryDirectory()
                            let tmpFile = "file://".appending(tmpDirectory).appending(attachmentUrl.lastPathComponent)
                            let tmpUrl = URL(string: tmpFile)!
                            do {
                                try FileManager.default.moveItem(at: location, to: tmpUrl)
                                if let attachment = try? UNNotificationAttachment(identifier: self.kRichContentIdentifier, url: tmpUrl) {
                                    self.bestAttemptContent?.attachments = [attachment]
                                }
                            } catch {
                                print("An exception was caught while downloading the rich content!")
                            }
                        }
                        // Serve the notification content
                        self.contentHandler!(self.bestAttemptContent!)
                    })
                    attachmentDownloadTask.resume()
                }
            }
        }
    }

    func serviceExtensionTimeWillExpire() {
        // Called just before the extension will be terminated by the system.
        // Use this as an opportunity to deliver your "best attempt" at modified content, otherwise the original push payload will be used.
        if let contentHandler = contentHandler, let bestAttemptContent =  bestAttemptContent {
            contentHandler(bestAttemptContent)
        }
    }
}- Compile and Build your project to a device capable of receiving Push notifications on the APNs certificate used for your application project.
- You should end up with Rich Push notification, when you send a broadcast that has a media attachment from the Campaign Manager.
More information about setting up your iOS app for Rich Push notifications can be found here
This SDK also supports interaction with inbox messages. The following actions are available for inbox message support.
This call returns a JSON array of inbox messages that have been received for this person. The promise returns on success with the array of inbox messages, or an error message when there's a failure. The array of fetched inbox messages should look like below.
[
  {

    "content": "Content here",
    "created_at": "Jun 16, 2020 6:26:52 PM",
    "expires_at": "Sep 14, 2020 12:00:00 AM",
    "message_uid": "a62b9c70-3b50-40c0-aaf5-9d55c0149e7c",
    "read": false,
    "subject": "Subject here",
    "collapse_key": "vibes-acee3b99-10c1-4dd5-b0e5-1589296ba3a2",
    "detail": "https://publiclyhostedurl.com/image.png",
    "images": {
      "icon": "https://publiclyhostedurl.com/icon.jpg",
      "main": "https://publiclyhostedurl.com/main.jpg"
    },
    "apprefdata": {
      "personUid": "83497970-280e-4cc8-92c3-e699c3db0738",
      "activityUid": "acee3b99-10c1-4dd5-b0e5-1589296ba3a2",
      "vibesDeviceId": "32515f9b-f722-4914-9afc-c734790e5789",
      "flightUid": "f76cd0c9-6245-4ea1-ae36-0b5a13b8fba5",
      "deviceUid": "7e0d100e-c549-4d0d-a28f-3f7336c04f3e",
      "activityType": "Broadcast",
      "last_opened_at": "2020-06-16T18:25:55Z"
    }
  },
  {

    "content": "This is the content",
    "created_at": "Jun 16, 2020 6:26:20 PM",
    "expires_at": "Sep 14, 2020 12:00:00 AM",
    "message_uid": "3407658c-85d2-439c-9c6d-2b642ef78761",
    "read": false,
    "subject": "This is the message",
    "collapse_key": "vibes-c9ae6ba9-8041-437d-9521-c3db803c19ce",
    "detail": "https://publiclyhostedurl.com/image.png",
    "images": {
      "icon": "https://publiclyhostedurl.com/icon.jpg",
      "main": "https://publiclyhostedurl.com/main.jpg"
    },
    "apprefdata": {
      "personUid": "83497970-280e-4cc8-92c3-e699c3db0738",
      "activityUid": "c9ae6ba9-8041-437d-9521-c3db803c19ce",
      "vibesDeviceId": "32515f9b-f722-4914-9afc-c734790e5789",
      "flightUid": "bcfe6100-516a-484f-84cb-60686e216041",
      "deviceUid": "7e0d100e-c549-4d0d-a28f-3f7336c04f3e",
      "activityType": "Broadcast",
      "last_opened_at": "2020-06-16T18:25:55Z"
    },
  }
]
This call fetches a single inbox message based on the message_uid supplied. This is ideal for cases when a push message is linked to an inbox message. It returns a promise, which contains the inbox message on success, or an error message on failure. Note that the message_uid is required to invoke this call.
{
    "collapse_key": "vibes-acee3b99-10c1-4dd5-b0e5-1589296ba3a2",
    "content": "Content here",
    "created_at": "Jun 16, 2020 6:26:52 PM",
    "expires_at": "Sep 14, 2020 12:00:00 AM",
    "message_uid": "a62b9c70-3b50-40c0-aaf5-9d55c0149e7c",
    "read": false,
    "subject": "Subject here"
    "apprefdata": {
      "personUid": "83497970-280e-4cc8-92c3-e699c3db0738",
      "activityUid": "acee3b99-10c1-4dd5-b0e5-1589296ba3a2",
      "vibesDeviceId": "32515f9b-f722-4914-9afc-c734790e5789",
      "flightUid": "f76cd0c9-6245-4ea1-ae36-0b5a13b8fba5",
      "deviceUid": "7e0d100e-c549-4d0d-a28f-3f7336c04f3e",
      "activityType": "Broadcast",
      "last_opened_at": "2020-06-16T18:25:55Z"
    }
  }
This call is used to mark a message for expiry. The call requires a message_uid. It marks the message as expired immediately. The promise returns with the updated json payload of the expired message, or an error message if there's a failure. Note that the message_uid is required to invoke this call.
This call is used to mark a message as read. The call requires a message_uid. The promise returns with the updated json payload with the read field set to true, or an error message if there's a failure. Note that the message_uid is required to invoke this call.
This call generates an event showing that a single inbox message has been opened. The call requires the full message that has been viewed to be passed as JSON. The promise returns with no data on success, or an error message on failure.
This call generates an event for tracking the usage of inbox functionality by recording the most recent time when inbox messages were fetched for the person on this device. It should typically be called after the fetchInboxMessages call above. The promise returns with no data on success, or an error message on failure.
MIT