Transcribe! .xsc file converter
Get your data out of your .xsc files.
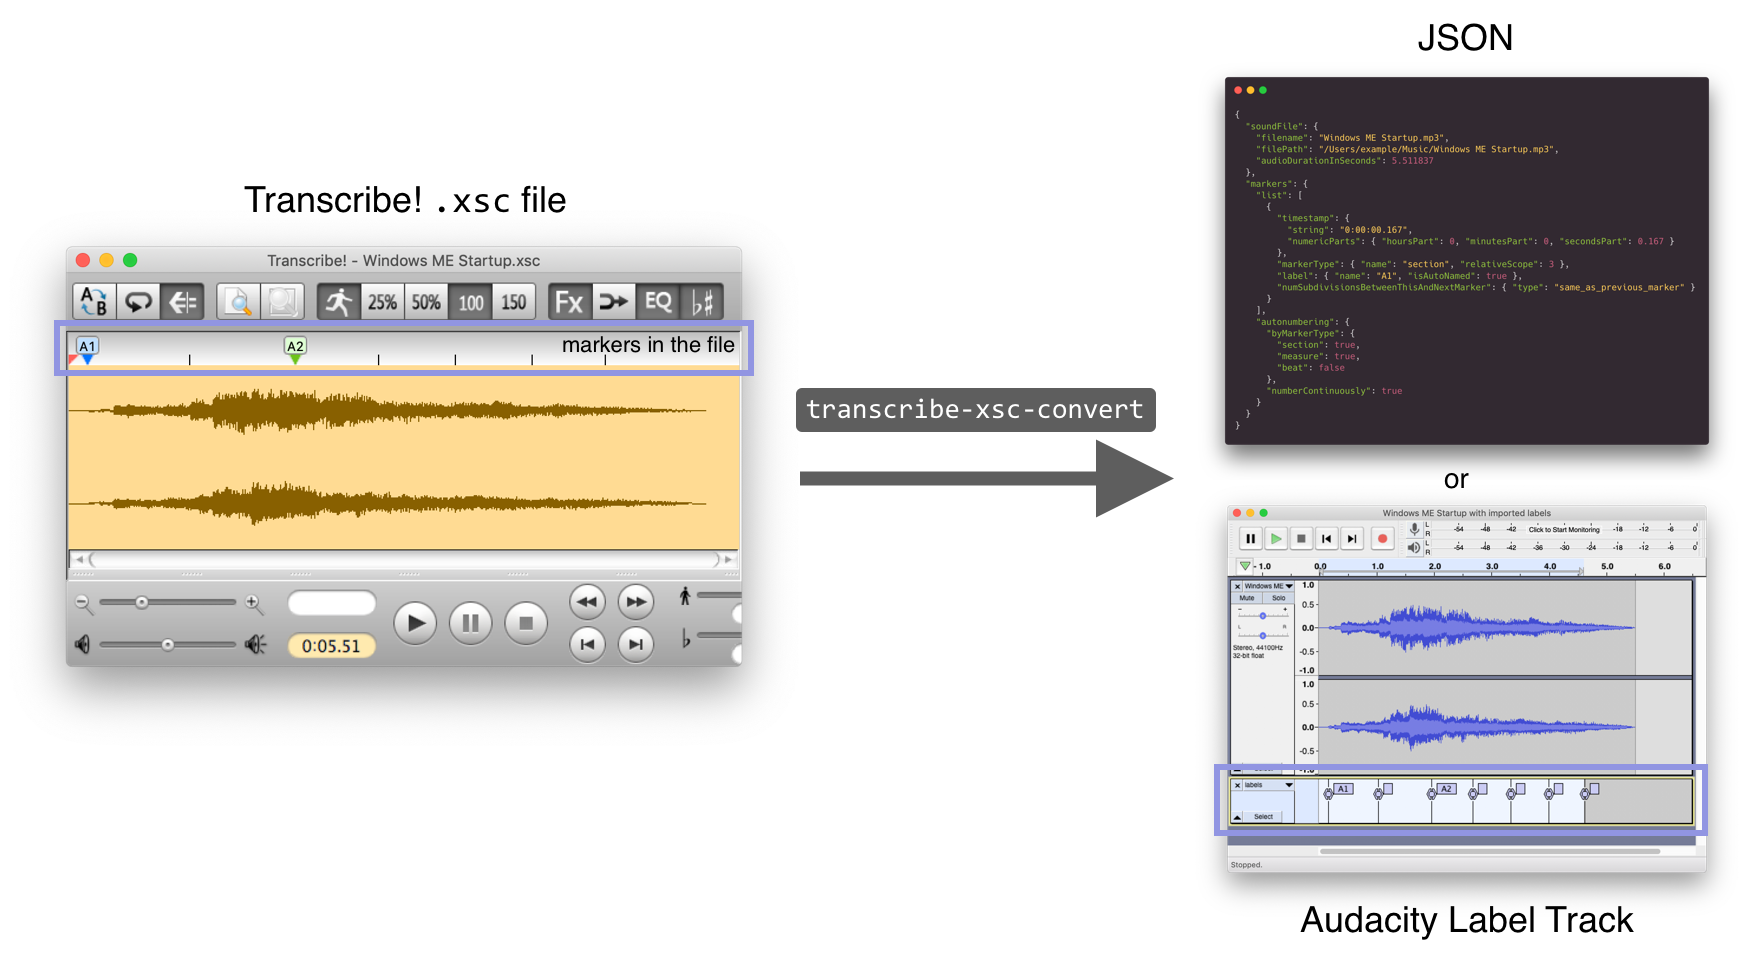
Transcribe! v7’s proprietary .xsc files contain the user’s annotations of their music or audio files. This command-line tool, transcribe-xsc-convert, converts those .xsc files to a readable JSON format. This JSON can be more easily processed with other tools for various purposes such as music analysis. The part of the JSON you will probably find the most useful is the timestamps of section, measure, and beat markers in the sound.
If you want to use your Transcribe! .xsc file’s markers in an Audacity project, this tool also supports exporting directly to Audacity’s Label Track format.
Background: Transcribe! and .xsc files
Transcribe! is commercial software by Seventh String Software (not affiliated) that aids in music transcription by letting you play and annotate audio. Transcribe!’s official description:
The Transcribe! application is an assistant for people who want to work out a piece of music from a recording, in order to write it out, or play it themselves, or both. It doesn’t do the transcribing for you, but it is essentially a specialised player program which is optimised for the purpose of transcription. It has many transcription-specific features not found on conventional music players.
After you open a piece of music in Transcribe! and manually annotate it with markers, Transcribe! lets you save this data in an .xsc file. The purpose of this Transcribe! .xsc file converter is to get your data out of your saved .xsc files and into other programs.
Output formats
This program can output an .xsc file’s data in either of these formats:
- generic JSON format
- Audacity Label Track format
The generic JSON format is not (yet) natively readable by any programs. Its goal is to be clear and well-structured enough that it will be easy for you, the user, to convert the JSON to the format you need. Here are some ideas for using the marker data within this tool’s JSON output:
- Convert the marker placements into a text file that your favorite audio editor can import, for example a
.cuefile. (The file format of the Audacity audio editor is already supported; see below.) - Automatically create a remixed version of a track by playing only the first half of each measure.
- Automatically create a swing-time version of a track by slowing down the first half of each measure and speeding up the last half. (
swinger.pydoes time-stretching like this but uses a service that tries to auto-detect where the beats are; you could adapt it to use your manually-entered beats from your.xscfiles.)
The Audacity Label Track format can be used to import your .xsc file’s marker placements as a Label Track within the Audacity audio editor. Support for this format was built on top of the generic JSON format, as an example of using the JSON output of this tool to interoperate with a third-party program.
Example
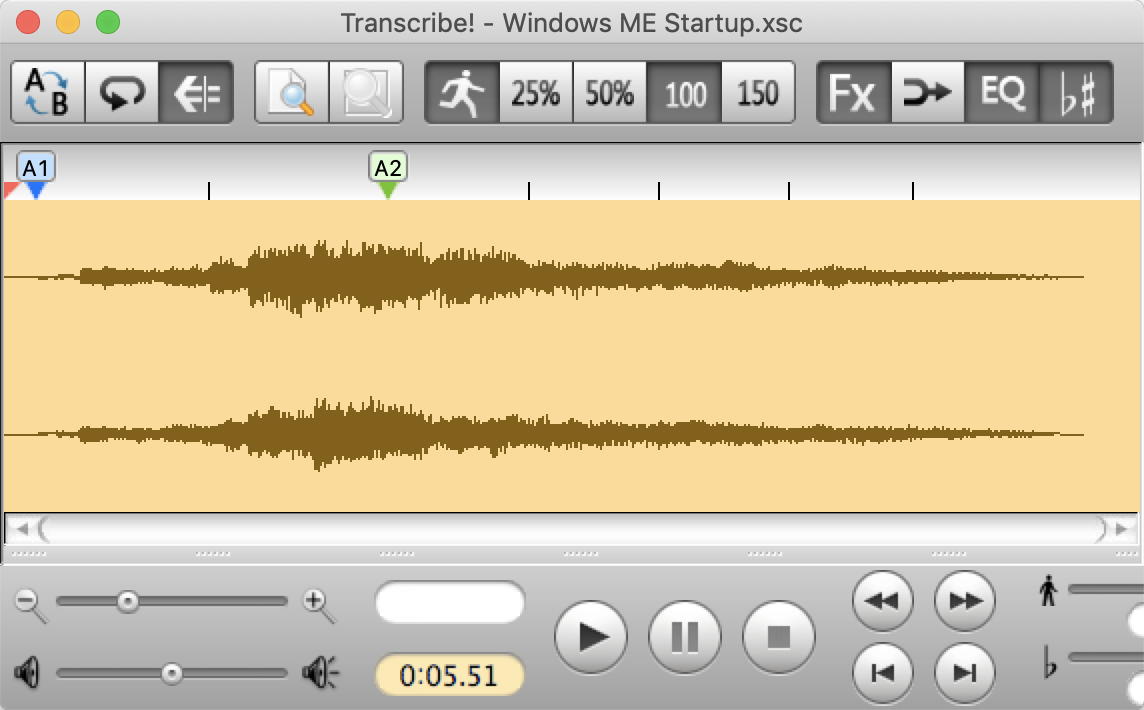
An example .xsc input file
Say you have a file Windows ME Startup.xsc that annotates a 5.5-second sound file with markers:
Getting generic JSON
Pass that .xsc file to this program with the following command in your shell:
transcribe-xsc-convert "Windows ME Startup.xsc"The output will be thoroughly-labeled, easy-to-process JSON like this:
(The preceding example JSON has been hand-reformatted for readability and might not exactly match the structure of JSON output by the current version of the program.)
Getting an Audacity Label Track file
With the .xsc file from the previous example, you can create a file label_track.txt in Audacity Label Track format by running this command:
transcribe-xsc-convert --format audacity_label_track "Windows ME Startup.xsc" > label_track.txtNext, in Audacity, import the file label_track.txt as a Label Track. The markers from your Transcribe! .xsc file will now be usable in your Audacity project:

What this program does for you: the original .xsc text
.xsc files like Windows ME Startup.xsc are plain text, so you could theoretically read it directly without using this program:
Transcribe! for Macintosh document. Version 6089.00
Transcribe!,Macintosh OS-X,8,50,7,S,0

SectionStart,Main
SoundFileName,Windows ME Startup.mp3,MacOSX,/Users/roryokane/Music/iTunes/iTunes Music/Music/Unknown Artist/Unknown Album/Windows ME Startup.mp3
SoundFileInfo,MP3 (MPEG audio layer 3),MP3 (MPEG-1 Layer III\C Bitrate 256K),2,187294,44100,243072,5.511837
Loops,0:0,0:0,0:0,0:0,0:0,0:0,0:0,0:0,0:0,0:0
MarkerNumberContinuously,1
MarkerAutoSection,0
MarkerAutoMeasure,0
MarkerAutoBeat,1
SectionEnd,Main

SectionStart,View0
[…]
SectionEnd,View0

SectionStart,Markers
Howmany,7
S,7350,1,A1,0,0:00:00.167
B,45829,1,,0,0:00:01.039
M,86471,1,A2,0,0:00:01.961
B,118105,1,,0,0:00:02.678
B,147432,1,,0,0:00:03.343
B,176400,1,,0,0:00:04.000
B,204503,1,,0,0:00:04.637
SectionEnd,Markers

SectionStart,TextBlocks
TextBlockFont,80,12,,
Howmany,0
SectionEnd,TextBlocks

SectionStart,Loops
Howmany,20
L,1,0,0,0,,White,
L,2,0,0,0,,White,
L,3,0,0,0,,White,
[…]
L,18,0,0,0,,White,
L,19,0,0,0,,White,
L,20,0,0,0,,White,
SectionEnd,Loops
As the earlier JSON example hopefully demonstrates, reading this program’s JSON output with software is much easier than trying to read the .xsc file directly would be.
Installation and usage
Prerequisites
- For your computer:
- For you, the user:
- You know the basics of running a program on the a command line and piping input to it.
Installation
npm install --global transcribe-xsc-file-converterUsage
Basic usage:
transcribe-xsc-convert file-to-convert.xscThis will convert the file contents to a generic JSON format and print that JSON to stdout. file-to-convert.xsc should be the path to your own .xsc file.
To see all supported arguments:
transcribe-xsc-convert --help
Tip for extracting the parts of the JSON you care about
The output JSON is verbose and somewhat redundant on purpose, for the sake of being easy to interpret without having to consult a separate documentation file. If you want to slim the resulting JSON down to only the fields you care about, you can pass the JSON through the jq tool.
For example, to get only the timestamp string and the label string of each marker in the file:
cat convertedTranscribeFile.json | jq '[{timestamp: .markers.list[].timestamp.string, label: .markers.list[].label.name}]'Example output:
The interactive tool at https://jqplay.org/ can help you experiment with jq filters.
For developers: running this tool from its source code
Installation from source code
Set up your environment like any other Git repo containing an npm package:
- Download the code onto your computer, e.g. with
git clone. cdinto the directory of this source code.- Run
npm install(oryarnif you prefer) to install required dependencies.
Running from source code
npm start file-to-convert.xscfile-to-convert.xsc should be the path to your own .xsc file. If you prefer Yarn, useyarn start file-to-convert.xsc instead.
See the scripts key in package.json for other scripts you can run.