tamagot-cli
To play this incredibly hard game, run
npm install --global tamagot-cliAbout this project
We are diving back in the 1990's by creating a CLI to raise a pet, in tamagot-cli. A tamagotchi hatches from an egg, after what it will go through all stages of life:
- baby.
- child.
- teenage.
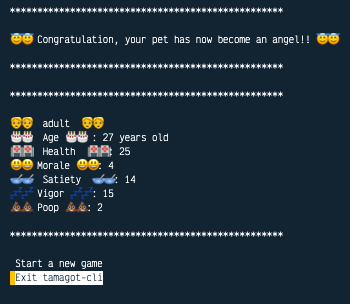
- adult.
It can unfortunately also die. There are two reasons for our pet to die:
- age, in which case the game is won.
- poor care, in which case the game is lost.
Here is how we can interact with the tamagotcli:
- feed it.
- play with it.
- clean it.
- take it to bed.
- make it do it's toilet.
Some actions will be performed by the animal itself when time comes:
- it will poo when it has eaten too much. It does not prompt us when it does so.
- it will go to bed when it's tiredness is at its peak.
The health of a pet starts to decline when the following happens:
- it is hungry.
- it is sad.
- it is surrounded by poop.
- it's tiredness level is between the sleepy phase and the peak.
The only way to regain health is to have a clean, well fed, happy and not tired pet. As long as all the values combined are above a certain treshold, the health will rise.
Project setup
Nodejs
You will need to have the lts version of nodejs installed. You can get it either by downloading it from here, using nvm for Linux and macOS. To install nvm, you can follow the nvm install script tutorial.
When you have nvm installed, run the following command:
nvm install --ltsnvm useIn subsequent sessions, run nvm use to switch to node lts.
Follow the official documentation on a windows operating system.
Installing dependencies
To install our project dependencies run:
npm installRunning the game
Running from the scripts
There are two ways to run the project from the scripts:
Run the developer script
npm run devBuild the application and run the start script
npm run build && npm startRunning as CLI
In a terminal run
npm linkThis will link the local build to npm. In other words, it allows us to use a new command: tamagot-cli. Nothing better than trying it:
tamagot-cliOnce you don't use the cli anymore, it is a good idea to unlink it:
npm unlinkAn alternative to this approach would be to install the local package globally running:
npm install --global .It also enables us to call tamagot-cli directly.
Running from docker
To run the application from docker:
docker build -t tamagot-cli:latest ./docker run -it tamagot-cli:latestThe -i flag is to keep STDIN open, which is quite handy in our case, as we interact with the terminal.
Installing from npm
Before digging in this step, if you used any of the previous way to install the package please either:
- unlink the package
npm unlink- or uninstall the local package installed globally
npm uninstall --global .Now is the fun part. You don't need to have any of this code locally, as it is available on npm. Simply run:
npm install --global tamagot-cliThat's it, run tamagot-cli and have fun playing the game.
Notes on nodemon
I initially installed nodemon as a dependency to watch for code changes and refresh the game. The problem with that is that nodemon would not yield the terminal to the application and thus it was impossible to watch easily. So when developing in the future, the game needs to be restarded as there is no change listener.
Stopping the game
There are two ways to stop the game:
- Either by exiting the game when prompted to do so in the main game menu.
- Or by using the shortcut
ctrl-cat any time.
Publishing the CLI to npm
In order to publish the cli to the npm registry, you need to be authenticated to npm. If you don't have an account already create one. Then run:
npm loginOnce you are logged in run:
npm publishThe version of the package needs to be updated if it was previously pushed.
npm scripts
npm run build: Compiles the typescript in/srcto javascript. The compiles files are stored in/lib.npm run clean: Remove the/libfolder and it's content.npm run dev: Usests-nodeto run the raw typescript code in/src. Avoid usingts-nodein production as it is resource-hungry.npm run lint: Checks the code for code that does not follow the project's conventions.npm run lint.fix: Fixes the code where it does not adhere to the linting conventions.npm start: Starts the application from/lib/index.js. It requiresnpm run buildto have been run.npm test: Runs the unit tests.
Code release
In a CI/CD pipeline, I would perform the following actions:
- Run the linting and the unit tests in parallel using
npm-run-all. - I would then build the project for production
- I would finally deploy the package to npm running
npm publish
That would occur in a docker instance. Because of that, there is a need for a Secrets manager (for npm secrets). One of the steps would imply retrieving the secrets from the manager.
Design approach
The game consists of three important pieces:
- The game engine, represented by the Tamagotchi class.
- The pet, represented by the Pet class.
- The user interface, represented by the ConsoleUserInterface class.
Pet
The Pet is the class that represents the animal that we are raising. It can be passed a configuration to initialise it's characteristics. If this configuration object is empty, default values are used. Those characteristics includes:
- morale, satiety, vigor, health and their max values.
- the maximum age: after that age, the game is won
- a set of increment and decrement values, used to adjust the characteristics depending on given actions
- a set of treshold values that will define actions.
The class itself comes with a few public methods:
- playGames, feed, sleep, clean and poll status (polling the characteristics). Those are all actions available to the user.
- isAlive and isSleeping, functions that are helpers to the game engine.
- live. This function is the main function of the pet. What happens in this function is the process of life: the pet becomes hungry if no food is provided, sad if not played with, it poops if it is too full, gets tired, and goes to sleep automatically if it is too tired. This is also where the damages are dealt to the pet. One last thing is that if the characteristics are above a certain treshold percentage of their max values, the pet is healed.
Here is the pet explained. But on itself none of those actions can happen. This is where the game engine comes into play.
Tamagotchi
Tamagotchi is the class that represents the game engine. It's content is fairly easy, with 2 main features:
- A loop that runs while the pet is alive. In this loop, we just prompt the player with a set of actions that he can perform. The same set of choice is always available to the user until the animal dies.
- In parallel, at a given time interval, the live function runs every 3 seconds. This is where the non-decisional actions happen: damage, healing, automatic sleeping, decrement of the characteristics and poo decisions happen. When the pet is dead, the while loop stops and the interval is cleaned.
As for the prompting and displaying of information, this is also driven by the game engine. Who tells the user interface what to do.
ConsoleUserInterface
ConsoleUserInterface is the class that represents the UI. It is also the most boring class, as it is just a set of helper methods to display information on the screen given values provided by the game engine.
Notes
Time lost - Status refreshing
I have been loosing quite some time figuring out if there was a way to refresh the status of the pet while the prompt for the next action prompt would remain visible. I believe that it could have been achievable, but it would take me too much time. After watching a video of an old tamagotchi, I realised that the status was not displayed on the screen, but it was rather a choice of the user to get that piece of information. In the end I decided to add it to the list of actions that are available to the user.
Time lost - Made the game unwinable
At first I made the game unwinnable, even in the unit tests. Which led me to spending quite some time trying to figure out what was wrong in my code... In the end, what was wrong was not the code, but rather the harsh default game rules I had set up.
Time lost - Unit testing terminal kit
When attempting to test the class ConsoleUserInterface, I ran into an issue where mocking the terminal kit would just set the terminal to undefined. This would then make the constructor step fail, as it was trying to call some functions of undefined.
It finally came to my mind that one thing I could try is to bypass terminal-kit and mock process.stdout.write directly, and check if that has been called. And that worked as expected.
What needs to be improved
Tests
The Tamagotchi class is not unit tested. It would be preferable to have those unit tests.
The ConsoleUserInterface is only "partially" tested, I tested only one function. But the process for all othe functions is similar and quite tedious, this is why I tested onl this one function.
If that was a front-end project, I would write some integration tests, using tools such as cypress or pupeteer. I did not have time to dig around if it is even possible to do that on a terminal. But that would be the next tests I would write.
Status refreshing
As I mentioned earlier, it would have been nice to have the pet status refreshing everytime the status changed in the background. I ran out of time for that but I think it could be achieved using terminal-kit's ScreenBuffer
Game difficulty
The game in it's current state is quite difficult because of the pet's default configuration values. The reason why I left that in the constructor is that I thought that it would be a nice addition to the game to be able to select the game's difficulty. With that also comes the problem of unplayable games because of bad configuration. So some validation would have to be implemented in that case.
Better UX
At the moment the user does not know the possible maximum values of the characterisitics. It would be nice to display:
Health: 42/42rather than
Health 42Better UI
terminal-kit allows us to change the background color of the terminal and to display using different colors. With more time, this would be a nice touch to make this hard game more friendly.
Final note
The game is winnable. Hard, but winnable.