
![]()
Rooster
Rooster is a framework-independent JavaScript rich-text editor neatly nested
inside one HTML <div> element. Editing operations performed by end users are
handled in simple ways to generate the final HTML.
To view the sample site, please click the link below:
Upgrade from RoosterJs 7.*
Please see here.
Features
Packages
Rooster contains 6 basic packages.
-
roosterjs: A facade of all Rooster code for those who want a quick start. Use the
createEditor()function in roosterjs to create an editor with default configurations. -
roosterjs-editor-core: Defines the core editor and plugin infrastructure. Use
roosterjs-editor-coreinstead ofroosterjsto build and customize your own editor. -
roosterjs-editor-api: Defines APIs for editor operations. Use these APIs to modify content and formatting in the editor you built using
roosterjs-editor-core. -
roosterjs-editor-dom: Defines APIs for DOM operations. Use
roosterjs-editor-apiinstead unless you want to access DOM API directly. -
roosterjs-editor-plugins: Defines basic plugins for common features. Examples: making hyperlinks, pasting HTML content, inserting inline images.
-
roosterjs-editor-types: Defines public interfaces and enumerations.
There are also some extension packages to provide additional functionalities.
-
roosterjs-color-utils: Provide color transformation utility to make editor work under dark mode.
-
roosterjs-react: Provide a React wrapper of roosterjs so it can be easily used with React.
-
roosterjs-editor-types-compatible: Provide types that are compatible with isolatedModules mode. When using isolatedModules mode, "const enum" will not work correctly, this package provides enums with prefix "Compatible" in their names and they have the same value with const enums in roosterjs-editor-types package
APIs
Rooster provides DOM level APIs (in roosterjs-editor-dom), core APIs (in roosterjs-editor-core), and formatting APIs
(in roosterjs-editor-api) to perform editing operations.
roosterjs-editor-dom provides several levels of DOM operations:
- Perform basic DOM operations such as
wrap(),unwrap(), ... - Wrap a given DOM node with
InlineElementorBlockElementand perform operations with DOM Walker API. - Perform DOM operations on a given scope using scopers.
- Travel among
InlineElementsandBlockElementswith scope using ContentTraverser API.
roosterjs-editor-core provides APIs for editor core. Editor class will call such
APIs to perform basic editor operations. These APIs are overridable by specifying
API overrides in Editor options when creating the editor.
roosterjs-editor-api provides APIs for scenario-based operations triggered by
user interaction.
Plugins
Rooster supports plugins. You can use built-in plugins or build your own. Plugins call APIs to communicate with the editor. When an operation is performed by the user or when content is changed by code, the editor will trigger events for the plugins to handle.
Here's a sample plugin which will show a dialog containing "Hello Rooster" when an "a" is typed in the editor:
class HelloRooster implements EditorPlugin {
    getName() {
        return 'HelloRooster';
    }

    initialize(editor: IEditor) {}

    dispose() {}

    onPluginEvent(e: PluginEvent) {
        if (e.eventType == PluginEventType.KeyPress && e.rawEvent.which == 65) {
            alert('Hello Rooster');
        }
    }
}
Installation
Install via NPM or Yarn:
yarn add roosterjs
You can also install sub packages separately:
yarn add roosterjs-editor-core
yarn add roosterjs-editor-api
...
In order to run the code below, you may also need to install webpack:
yarn add webpack -g
Usage
A quick start
- Create
editor.htmcontains a DIV with some styles, and a reference to a .js file:
<html>
    <body>
        <div
            id="editorDiv"
            style="width: 500px; height: 300px; overflow: auto;
        border: solid 1px black"
        ></div>
        <script src="editor.js"></script>
    </body>
</html>- Create
source.jsto import roosterjs and create an editor:
var roosterjs = require('roosterjs');
var editorDiv = document.getElementById('editorDiv');
var editor = roosterjs.createEditor(editorDiv);
editor.setContent('Welcome to <b>RoosterJs</b>!');- Compile the javascript file using webpack:
webpack source.js editor.js
- Navigate to editor.htm, you will see a editor shown in the page.
Add some format buttons
- Add some buttons into
editor.htm:
<html>
    <body>
        <div
            id="editorDiv"
            style="width: 500px; height: 300px; overflow: auto;
        border: solid 1px black"
        ></div>
        <button id="buttonB">B</button> <button id="buttonI">I</button>
        <button id="buttonU">U</button>
        <script src="editor.js"></script>
    </body>
</html>- Add code to
source.jsto handle click event of the buttons:
var roosterjs = require('roosterjs');
var editorDiv = document.getElementById('editorDiv');
var editor = roosterjs.createEditor(editorDiv);
editor.setContent('Welcome to <b>RoosterJs</b>!');

document.getElementById('buttonB').addEventListener('click', function () {
    roosterjs.toggleBold(editor);
});
document.getElementById('buttonI').addEventListener('click', function () {
    roosterjs.toggleItalic(editor);
});
document.getElementById('buttonU').addEventListener('click', function () {
    roosterjs.toggleUnderline(editor);
});- Compile the javascript file using webpack:
webpack source.js editor.js
- Navigate to editor.htm, you will see buttons with bold, italic, underline actions in the page.
Sample code
To view the sample site, please click here.
To build the sample site code yourself, follow these instructions:
-
Get dependencies using yarn or npm:
yarn
-
Build the source code, and start the sample editor:
yarn startor
npm start
Debugging
There are two options for debugging:
-
Debugging from VSCode
- Ensure the sample editor is running
- Set the breakpoints within VSCode
- Select "Debug app in Chrome" from the VSCode debugging configuration dropdown
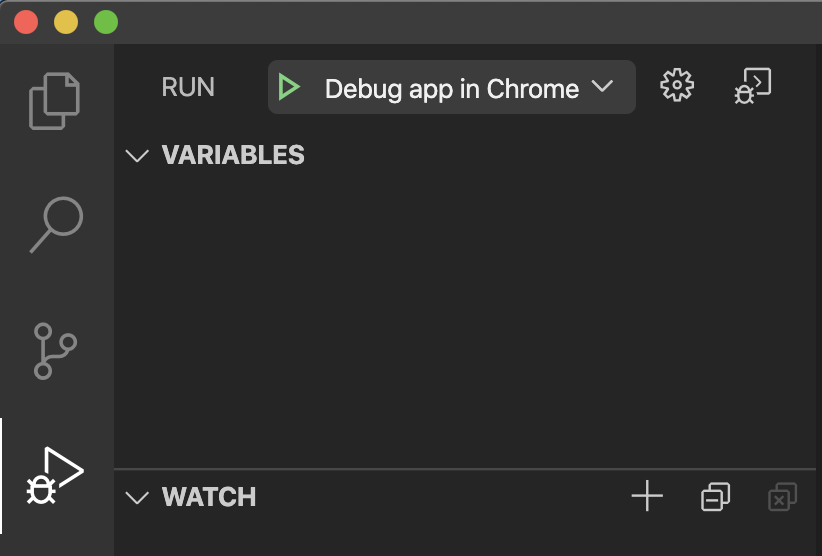
- Run the scenario that needs to be debugged
-
Debugging directly from the development tools within the web browser
- The directions for how to do this are specific to each web browser. By opening the developer tools for the web browser that Rooster is running on, you will be able to set breakpoints in the code and debug accordingly.

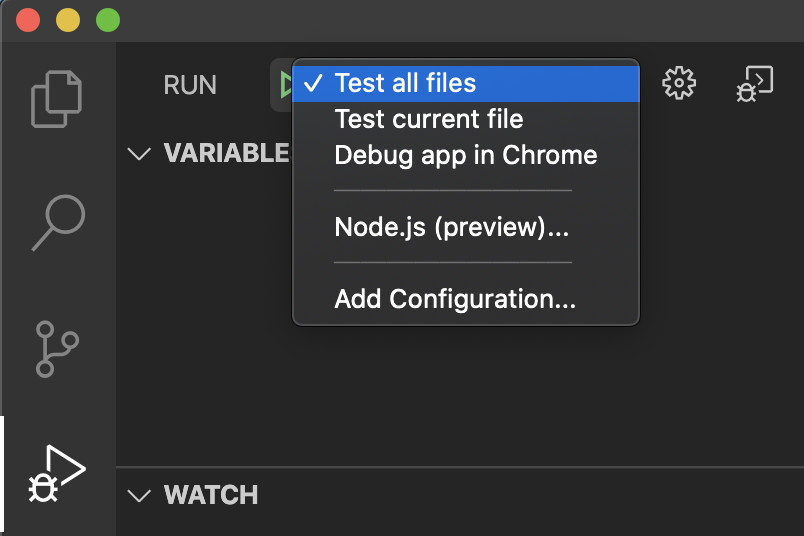
Running tests
There are two ways that tests can be run:
- Run all tests or a single test from VSCode
- (Skip if running all tests) Ensure the file that you want to test is selected (ie: toggleBold.ts or toggleBoldTest.ts)
- Select "Test all files" or "Test current file" from the VSCode debugging configuration dropdown
- Run all tests from command line
yarn test

Dependencies
As a NodeJs package, RoosterJs has dependencies for runtime (specified in package.json under each sub packages in "dependencies" section) and dependencies for build time (specified in package.json under root path in "devDependencies" section).
For runtime dependencies, there are two parts:
- Internal dependencies (a RoosterJs package depends on other RoosterJs packages)
- External dependencies (RoosterJs depends on other NPM packages)
Currently we have very few external dependencies. Before adding any new dependency, we need to check:
-
What's the value of the new dependency and the code using the dependency bring into roosterjs? If we add a new dependency and create our new API to just call into the dependency, that new API doesn't actually bring too much value, and people who uses roosterjs in their project can do this themselves in their code, and we should not add such dependency to people who don't really need it.
-
What's the dependency tree of the dependency? If we introduce a new dependency which has a deep dependency tree, we need to be careful since it means we are actually adding a lot of new dependencies and our code size may be increased a lot.
-
How much functionalities do we need from the dependency? If the dependency provides a lot of functionalities but we actually only need a small piece of them, we may need to consider other solutions, such as find another smaller one, or do it ourselves.
-
What's the license of the dependency? A dependency package under MIT license is good to be used for RoosterJs. For other licenses, we need to review and see if we can take it as a dependency.
If you still feel a new dependency is required after checking these questions, we can review it and finally decide whether we should add the new dependency.
For build time dependencies, it is more flexable to add new dependencies since it won't increase runtime code size or dependencies.
More documentation
We are still working on more documentation in roosterjs wiki and API reference.
License - MIT
License Copyright (c) Microsoft Corporation. All rights reserved.
Licensed under the MIT License.