

A high-performance TensorFlow Lite library for React Native.
- 🔥 Powered by JSI
- 💨 Zero-copy ArrayBuffers
- 🔧 Uses the low-level C/C++ TensorFlow Lite core API for direct memory access
- 🔄 Supports swapping out TensorFlow Models at runtime
- 🖥️ Supports GPU-accelerated delegates (CoreML/Metal/OpenGL)
- 📸 Easy VisionCamera integration
Installation
- Add the npm package
yarn add react-native-fast-tflite
- In
metro.config.js, addtfliteas a supported asset extension:This allows you to dropmodule.exports = { // ... resolver: { assetExts: ['tflite', // ... // ...
.tflitefiles into your app and swap them out at runtime without having to rebuild anything! 🔥 - (Optional) If you want to enable the GPU Delegate, see "Using GPU Delegates" down below.
- Run your app (
yarn android/npx pod-install && yarn ios)
Usage
- Find a TensorFlow Lite (
.tflite) model you want to use. There's thousands of public models on tfhub.dev. - Drag your TensorFlow Lite model into your React Native app's asset folder (e.g.
src/assets/my-model.tflite) - Load the Model:
// Option A: Standalone Function
const model = await loadTensorflowModel(require('assets/my-model.tflite'))

// Option B: Hook in a Function Component
const plugin = useTensorflowModel(require('assets/my-model.tflite'))
- Call the Model:
const inputData = ...
const outputData = await model.run(inputData)
console.log(outputData)
Loading Models
Models can be loaded either from the React Native bundle using a require(..) statement, or any kind of URI/URL (http://.. or file://..):
// Asset from React Native Bundle
loadTensorflowModel(require('assets/my-model.tflite'))
// File on the local filesystem
loadTensorflowModel('file:///var/mobile/.../my-model.tflite')
// Remote URL
loadTensorflowModel('https://tfhub.dev/google/lite-model/object_detection_v1.tflite')
Loading a Model is asynchronous since Buffers need to be allocated. Make sure to check for any potential errors when loading a Model.
Input and Output data
TensorFlow uses tensors as input and output formats. Since TensorFlow Lite is optimized to run on fixed array sized byte buffers, you are responsible for interpreting the raw data yourself.
To inspect the input and output tensors on your TensorFlow Lite model, open it in Netron.
For example, the object_detection_mobile_object_localizer_v1_1_default_1.tflite model I found on tfhub.dev has 1 input tensor and 4 output tensors:

In the description on tfhub.dev we can find the description of all tensors:

From that we now know that we need a 192 x 192 input image with 3 bytes per pixel (meaning RGB).
Usage (VisionCamera)
If you were to use this model with a VisionCamera Frame Processor, you would need to convert the Frame to a 192 x 192 x 3 byte array. To do the conversion, use vision-camera-resize-plugin:
const objectDetection = useTensorflowModel(require('object_detection.tflite'))
const model = objectDetection.state === "loaded" ? objectDetection.model : undefined

const { resize } = useResizePlugin()

const frameProcessor = useFrameProcessor((frame) => {
    'worklet'
    if (model == null) return

    // 1. Resize 4k Frame to 192x192x3 using vision-camera-resize-plugin
    const data = resize(frame, {
        size: {
            width: 192,
            height: 192,
        },
        pixelFormat: 'rgb-uint8'
    })

    // 2. Run model with given input buffer synchronously
    const input = new Uint8Array(data)
    const outputs = model.runSync([input])

    // 3. Interpret outputs accordingly
    const detection_boxes = outputs[0]
    const detection_classes = outputs[1]
    const detection_scores = outputs[2]
    const num_detections = outputs[3]
    console.log(`Detected ${num_detections[0]} objects!`)

    for (let i = 0; i < detection_boxes.length; i += 4) {
        const confidence = detection_scores[i / 4]
        if (confidence > 0.7) {
            // 4. Draw a red box around the detected object!
            const left = detection_boxes[i]
            const top = detection_boxes[i + 1]
            const right = detection_boxes[i + 2]
            const bottom = detection_boxes[i + 3]
            const rect = SkRect.Make(left, top, right, bottom)
            canvas.drawRect(rect, SkColors.Red)
        }
    }
}, [model])

return (
    <Camera frameProcessor={frameProcessor} {...otherProps} />
)
Using GPU Delegates
GPU Delegates offer faster, GPU accelerated computation. There's multiple different GPU delegates which you can enable:
CoreML (iOS)
To enable the CoreML Delegate, you must configure react-native-fast-tflite to include it in the build.
Expo
For Expo, just use the config plugin in your expo config (app.json, app.config.json or app.config.js):
{
  "name": "my app",
  "plugins": [
    [
      "react-native-fast-tflite",
      {
        "enableCoreMLDelegate": true
      }
    ]
  ]
}
Bare React Native
If you are on bare React Native, you need to include the CoreML/Metal code in your project:
- Set
$EnableCoreMLDelegateto true in yourPodfile:$EnableCoreMLDelegate=true # rest of your podfile...
- Open your iOS project in Xcode and add the
CoreMLframework to your project: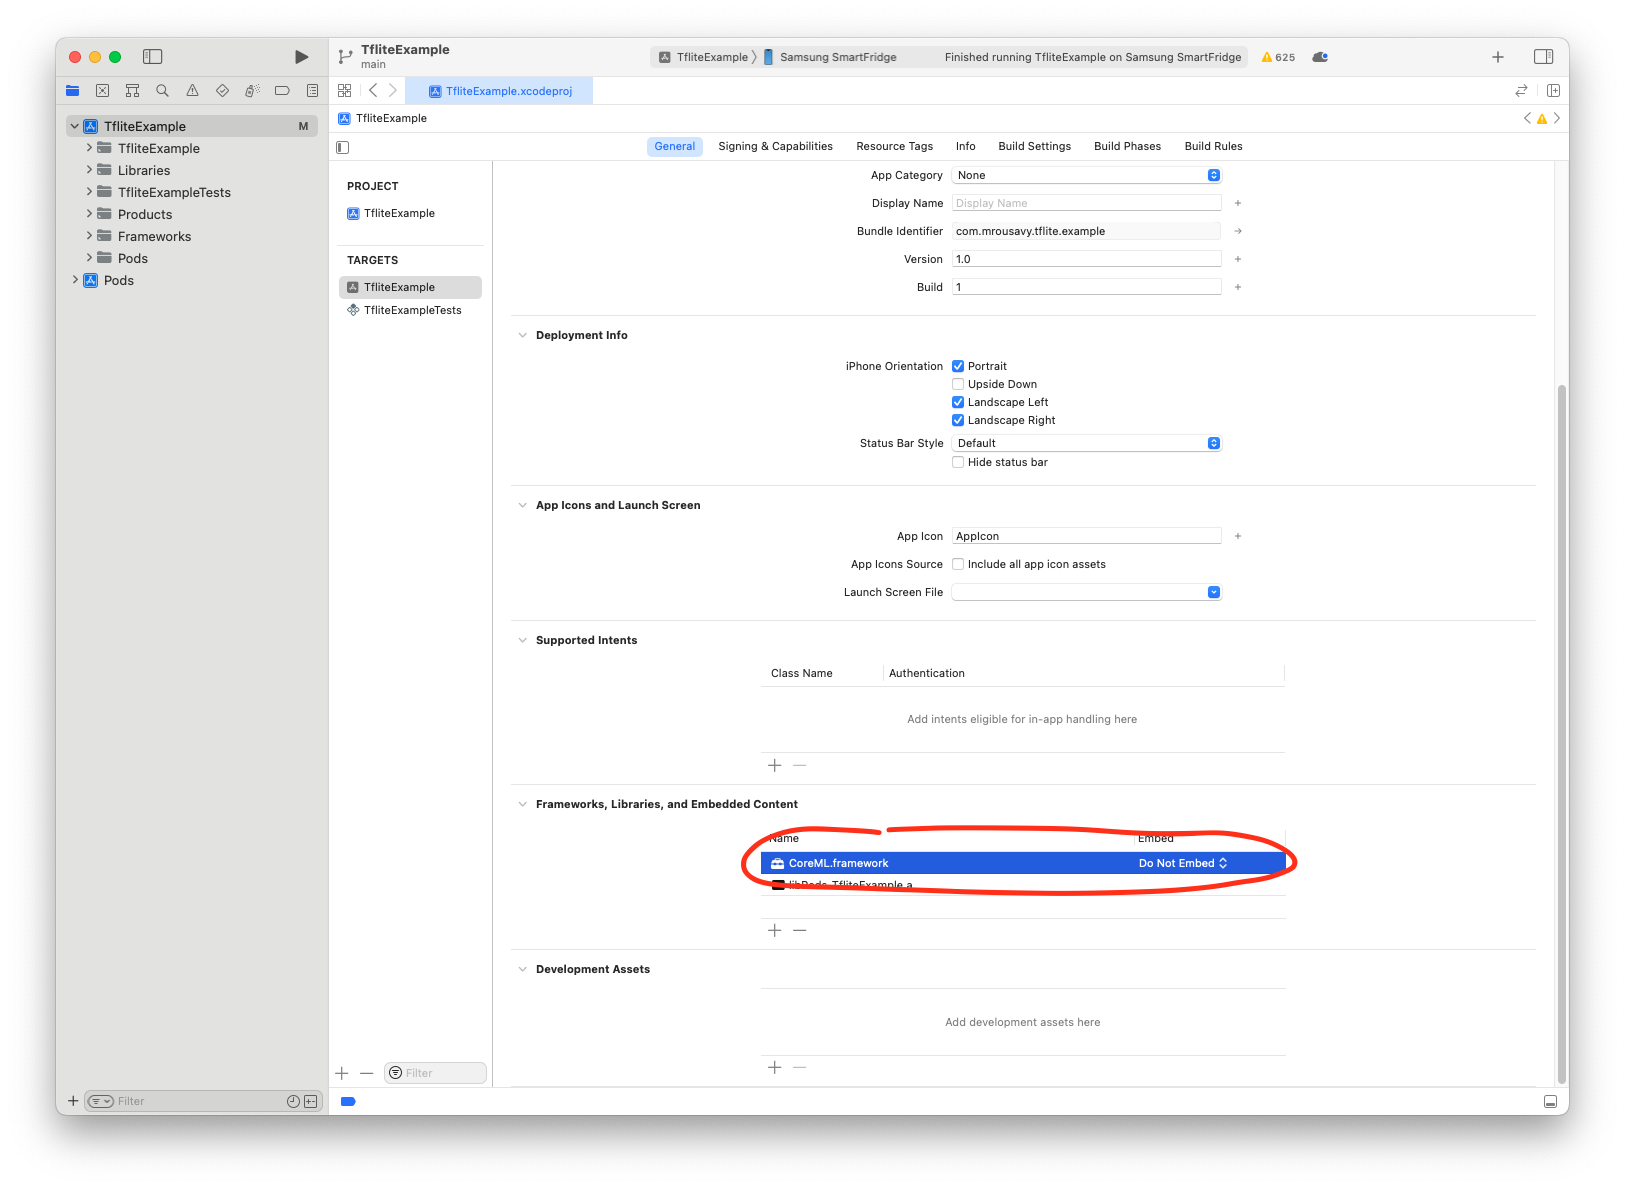
- Re-install Pods and build your app:
cd ios && pod install && cd ..
yarn ios
- Use the CoreML Delegate:
const model = await loadTensorflowModel(require('assets/my-model.tflite'), 'core-ml')

[!NOTE] Since some operations aren't supported on the CoreML delegate, make sure your Model is able to use the CoreML GPU delegate.
Community Discord
Join the Margelo Community Discord to chat about react-native-fast-tflite or other Margelo libraries.
Adopting at scale

This library is provided as is, I work on it in my free time.
If you're integrating react-native-fast-tflite in a production app, consider funding this project and contact me to receive premium enterprise support, help with issues, prioritize bugfixes, request features, help at integrating react-native-fast-tflite and/or VisionCamera Frame Processors, and more.
Contributing
- Clone the repo
- Make sure you have installed Xcode CLI tools such as
gcc,cmakeandpython/python3. See the TensorFlow documentation on what you need exactly. - Run
yarn bootstrapand selecty(yes) on all iOS and Android related questions. - Open the Example app and start developing
- iOS:
example/ios/TfliteExample.xcworkspace - Android:
example/android
- iOS:
See the contributing guide to learn how to contribute to the repository and the development workflow.
License
MIT