This is an monorepo for E2E tests across ESW, leveraging WebdriverIO
Package structure
Tests are in packages ending in e2e. The other packages contain supporting code for the tests, with the e2e packages referencing one or more of these as necessary
Contents
Approach
The tests follow an approach of, as much as possible, separating the how from the what
Definition of "what, not how"
"What, not how" is a software development approach that emphasizes what a product (and in this case, test) will do, rather than how it does it.
Why? Whenever we focus primarily on writing the tests in terms of the UI (the how) (clicking buttons, enterting text into fields) it discourages maintainability and readability (Note: This also applies to API calls)
So how can we go about that in practical terms?
Separate workflows from interactions
Lets look at a real example
Scenario: Checking PUDO with exact postal code
    Given I ingest "E2E" "SG" order with "default data" for "Go Rev" brand
    When I open shopper portal for "Go Rev" brand
    When I enter order number and email from ingested order and navigate to order page
    Then Refund summary section is not displayed
    When I select item to return
    And I select return reason "Defective"
    Then Continue button is enabled
    When I continue return
    And I select "Drop off - Sing Post" return method
    When I fill postal code as "579837"
    When I check that search button is "enabled"
    And I click search button
    Then I can see List of addresses for PUDO
    Then I see the first address has postal code "579837"
    When I click on the first address in the list
    When I click "Continue" button on multiple returns page
    Then I navigate to return confirmation page
    And I see address panel on the page
You can see numerous instances of interactions with the UI (eg click continue), which are how interactions. However, when we create a worfklow (doReturn in the below example) that specifies what we want to do we'll end up with something more maintainable (if the Continue button above were to change, we'd have to update all instances in all tests), and more effectively communicates business intent. Further, by specifying workflows at this level, it becomes easier to swap out UI based workflows for API based workflows in tests
describe('Shopper portal', () => {
    const retailerName = 'Go Rev'
    const retailer = new Retailer(brandCode.get(retailerName), Country.Singapore)
    const order = new Order(retailer)
    const ingestOrderModel = new IngestOrderModelBuilder().withCountry(Country.Singapore).build()
    const itemName = ingestOrderModel.orderItems.first().productDescription

    it('Should be able to return ingested order by Drop off - DHL to address', async () => {
        await order.ingest(ingestOrderModel)

        const shopperPortal = new ShopperPortal()
        await shopperPortal.doReturn(order, [{ itemName }], {
            returnMethod: 'Drop off - Sing Post',
            toPostCode: '579837',
        })
        await expect(shopperPortal.confirmationPage.message).toHaveText('Thank You For Your Return!')

        const returnNumber = await shopperPortal.confirmationPage.orderNumber.getText()
        const cosmosOrderNumber = await Cosmos.returns.get(order.orderNumber)
        expect(returnNumber).toEqual(cosmosOrderNumber)
    })
})
Better page objects
Favour declarative over imperative (again, what vs how)
With declarative page object interfaces you tell the object what to do. With imperative interfaces you tell the object how to do it. Here is a super simple example:
Declarative:
LoginPage.logInAs(“test user”, “test-password”);
Imperative:
LoginPage.setUserName(“test user”);
LoginPage.setPassword(“test-password”)
LoginPage.clickSubmit();
One thing to notice is that declarative style almost always creates a higher level of abstraction, which segues nicely into our next topic.
Orchestration layer
One of the problems with page objects, especially for large user-journey style tests that require many steps, is that they can get quite long. The interface between the page object and the test is actually more granular than what the test really wants, and this creates tests overburdened by small, discrete steps. For example:
LoginPage.setUserName(“test user”);
LoginPage.setPassword(“test-password”);
LoginPage.clickSubmit();
LandingPage.searchForItem(“test-item”);
LandingPage.selectCurrentItem();
DetailsPage.selectSize(‘XL’);
DetailsPage.selectQuantity(1);
DetailsPage.selectColor(“white”);
DetailsPage.selectReoccuringPurchase(false);
DetailsPage.addToCart();
This example might look simple and easy to read, but this is just a few basic steps in what might be a much longer and more complex test. In a realistic user journey that leverages page objects exposing this granular of interface, the eventual test might be many hundreds of individual steps.
Not only does this make the test hard to read, it violates Chekhov’s Gun Principle, as while all the steps are necessary, many of them are probably not relevant. In the example above, we must select a size, color, and quantity, but these selections are not important for the test — we just need any valid selection.
As we discussed in the previous section, moving from an imperative to a declarative interface can significantly reduce the superfluous “noise” in a test. The example above would go from:
DetailsPage.selectSize(‘XL’);
DetailsPage.selectQuantity(1);
DetailsPage.selectColor(“white”);
DetailsPage.selectReoccuringPurchase(false);
DetailsPage.addToCart();
To:
DetailsPage.addValidItem();This collapses all the “how” steps of adding an item into a simple “what” step and significantly reduces test noise.
Unfortunately, if you have many* journey tests and many of them repeat the same basic set of steps (logging in, selecting a valid item, etc) then moving from an imperative to a declarative style interface might not be sufficient. What you really need is an even higher level of abstraction, one that actually spans page objects. This is covered in the next section
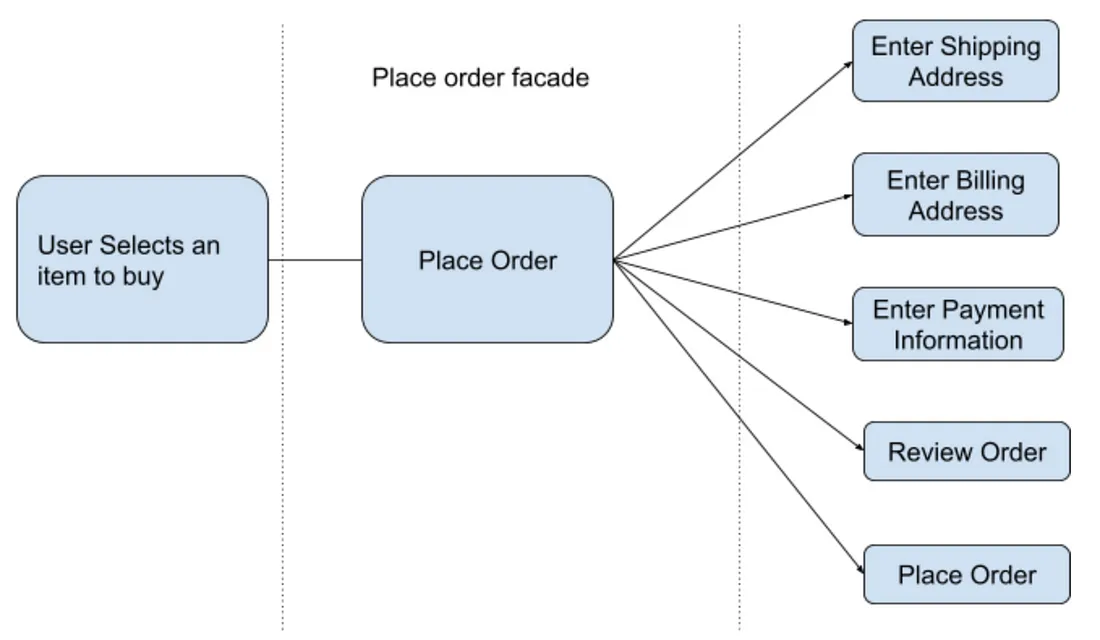
Facades
However, we can have business workflows, that transition across multiple pages, (eg doReturn in the example above). In this instance we would want to create a facade that can span multiple pages, but represents a business workflow. Note, we can do something similar for api calls
Page Objects vs Page Components
Page objects generally map to pages. However, most modern web applications are not built as a set of unique pages. Instead, pages are aggregated out of a set of reusable components. For example, a header component might exist at the top of every page, and a cart component might exist on the right side of most shopping related pages.It does not make sense to duplicate the knowledge of how to find elements in a header component across all page objects that include the header. Instead, create page components that map to smaller parts of pages (the header in this example).
What constitutes a component? It very much depends on the architecture and layout of your specific web application. UI frameworks like React are organized around reusable components, so oftentimes this is a great starting point. However, React components tend to be much more fine-grained than what you will want in your UI automation.
Here is an example of the Amazon.com search results page divided into three components: 1) the header component (green), the search filter component (blue), and the search results component (orange). This isn’t the only way you could create page components out of this page, but it’s probably a good start.
ESP specific approaches
Risk over Coverage
All Tests Are Not Created Equal
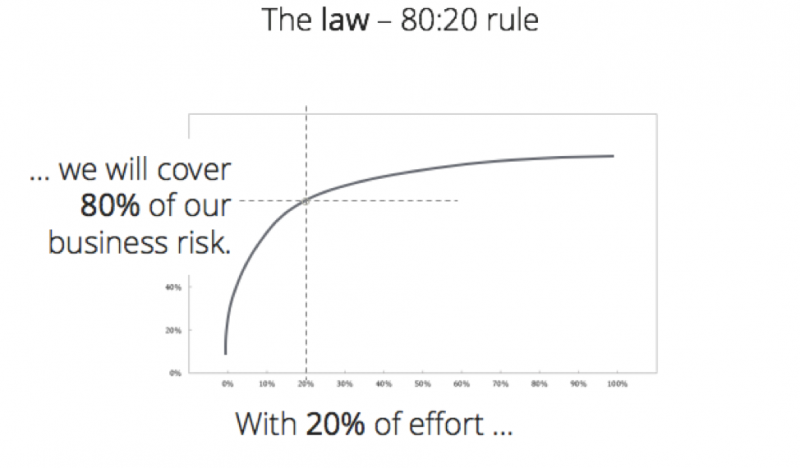
The reason traditional test results are such a poor predictor of release readiness boils down to the 80/20 rule, also known as the Pareto principle. Most commonly, this refers to the idea that 20% of the effort creates 80% of the value.
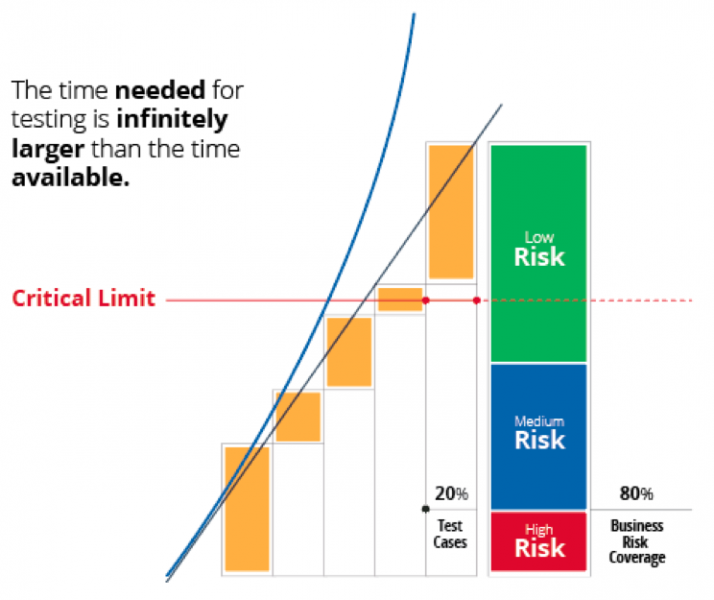
We all know hat some functionality is more important to the business - but we can get lost in chasing coverage, and quickly approach the “critical limit”: the point where the time required to execute the tests exceeds the time available for test execution.
If we have a focus on business risk, we can cover those risks more effectively and effeciently, which will translate to a test suite that’s faster to create and execute, as well as less work to maintain.
What should we focus on then?
> Visual validation (with care)What should we not focus on then?
Basic UI logic (these should be covered by component tests, or we simply accept the risk)
Info
You'll need node version v18.x.x to run tests
The tests using WebdriverIO V8 using ESM, which requires importing local files with .js, even though it's typescript
Performing assertions
Please note the webdriver.io approach and syntax for doing assertions - https://webdriver.io/docs/api/expect-webdriverio/
We have also added custom matchers toEventuallyEqual, toEventuallyContain being the two mainly in use. This allows us to poll for an expected state, for an example of an API, similar to how webdriver.io does it.
Finding elements
Webdriver.io simplifies finding elements, please use this over the standard selenium approach - https://webdriver.io/docs/selectors/
Auto waiting
https://webdriver.io/docs/autowait
Install
Authorisation to the EVO feed
Run vsts-npm-auth to get an Azure Artifacts token added to your user-level .npmrc file
vsts-npm-auth -config .npmrc
Note: You don't need to do this every time. npm will give you a 401 Unauthorized error when you need to run it again.
npm installLinting
For analyzing code with ESLint
npm run lintBut we also use Prettier pre-commit hook to lint and perform other formatting before commit
Running tests
NODE_ENV is set to test by default
Tests will run in chrome HEADED locally by default. Otherwise you can specify running locally as follows
BROWSER_ENV=chrome-headless@localTo run in browserstack
BROWSER_ENV=chrome-windows@bstackCurrent options are:
    case 'chrome-windows@bstack': capability = browserstack.chrome.windows; break
    case 'edge-windows@bstack': capability = browserstack.edge.windows; break
    case 'firefox-windows@bstack': capability = browserstack.firefox.windows; break
    case 'firefox-osx@bstack': capability = browserstack.firefox.osx; break
    case 'safari-osx@bstack': capability = browserstack.safari.osx; break
    case 'safari-iphone-14@bstack': capability = browserstack.safari.iphone14; break
    case 'chrome@local': capability = local.chrome.headed; break
    case 'chrome-headless@local': capability = local.chrome.headless; break
    case 'edge@local': capability = local.edge.headed; break
    case 'edge-headless@local': capability = local.edge.headless; break
    case 'firefox@local': capability = local.firefox.headed; break
    case 'firefox-headless@local': capability = local.firefox.headless; break
to the start of the command
To run all tests in a package
npm run test --workspace=packages/<package name>To run specific test in a package
npm run test --workspace=packages/<package name> -- --spec <test name>For example
npm run test --workspace=packages/security-mfe-e2e -- --spec um-group-create_access.spec.tsBrowser specific capabilites
Not all features work on all devices / browsers
https://webdriver.io/docs/mocksandspies/ works on chrome and edge only, including on browserstack. It will not work on mobile devices and on firefox and safari at this time.
Debugging
Add
await browser.debug();at the point you wish to debug. You can then use REPL to interact with the app
Optionally, if using VSCode, follow the below steps:
-
Press CMD + Shift + P (Linux and Macos) or CTRL + Shift + P (Windows)
-
Type "attach" into the input field
-
Select "Debug: Toggle Auto Attach"
-
Select "Only With Flag"
-
Open a JavaScript Debug Terminal in the editor
-
Add
DEBUG=trueto the test run script
Running retailer capability driven tests
We have certain tests that need run on different combinations of retailer and / or country. Pass RETAILER env variable to run these tests
For example:
NODE_ENV=test BROWSER_ENV=chrome-headless@local RETAILER=diftes npm run test --workspace=packages/checkout-e2e -- --spec tests/order.spec.tsReporting
Allure Framework is used for reporting. To generate reports locally you will need Java installed
To generate the report
npm run reportRunning tests in deployment pipeline
To run tests in a deployment pipeline (UI or API), you will pass an object to a e2eTests parameter, something like this, in either the ui-release-stage template, or the api-release-stage template
parameters:
  - name: enableAutoTests
    displayName: Enable Autotests
    type: boolean
    default: true

- template: src/ui/ui-release-stages.yml@templates
  parameters:
    e2eTests:
      enableAutoTests: ${{ parameters.enableAutoTests }}
      package: "esp-e2e"
      testsList: [
        "brand-settings:chrome-headless@local",
        "admin-tools:chrome-headless@local",
        ]
      testsEnvironment: "test"
Here is real example usage of the above
package is the package where the tests are defined
testsLists is an array, accepting a combination of suite as defined in your packages wdio.conf.ts file:
sharedConfig.suites = {
    'admin-tools': ['./tests/admin-tools/**/*.spec.ts'],
    'brand-settings':  ['./tests/brand-settings/**/*.spec.ts']
}
and a browser_env, possible options are listed above
testsEnvironment refers to which environment the tests should actually run in - right now this can only be test


