1Password App Extension
Welcome! With just a few lines of code, your app can add 1Password support, enabling your users to:
- Access their 1Password Logins to automatically fill your login page.
- Use the Strong Password Generator to create unique passwords during registration, and save the new Login within 1Password.
- Quickly fill 1Password Logins, Credit Cards and Identities directly into web views.
Empowering your users to use strong, unique passwords has never been easier. Let's get started!
App Extension in Action

Just Give Me the Code (TL;DR)
You might be looking at this 22 KB README and think integrating with 1Password is very complicated. Nothing could be further from the truth!
If you're the type that just wants the code, here it is:
Simply include these two files in your project, add a button with a 1Password login image on it to your view, set the button's action to call the appropriate OnePasswordExtension method, and you're all set!
Running the Sample Apps
Adding 1Password support to your app is easy. To demonstrate how it works, we have two sample apps for iOS that showcase all of the 1Password features.
Step 1: Download the Source Code and Sample Apps
To get started, download the zip version of the1Password App Extension API project or clone it from GitHub.
Inside the downloaded folder, you'll find the resources needed to integrate with 1Password, such as images and sample code. The sample code includes two apps from ACME Corporation: one that demonstrates how to integrate the 1Password Login and Registration features, as well as a web browser that showcases the web view Filling feature.
The 1Password App Extension API is also available via CocoaPods, simply add pod '1PasswordExtension', '~> 1.6.3' (for the latest stable release) or pod '1PasswordExtension', :git => 'https://github.com/AgileBits/onepassword-app-extension.git', :branch => 'master' (for the latest nightly) to your Podfile, run pod install from your project directory and you're ready to go.
The 1Password App Extension API is available via Carthage as well. Simply add github "AgileBits/onepassword-extension" "add-framework-support" to your Cartfile, then run carthage update and add it to your project.
Step 2: Install the Latest versions of 1Password & Xcode
The sample project depends upon having the latest version of Xcode, as well as the latest version of 1Password installed on your iOS device.
To install 1Password, you will need to download it from the App Store.
Let us know that you're an app developer and planning to add 1Password support by emailing us to support+appex@agilebits.com.
Step 3: Run the Apps
Open 1Password Extension Demos Xcode workspace from within the Demos folder with Xcode, and then select the ACME target and set it to run your iOS device:
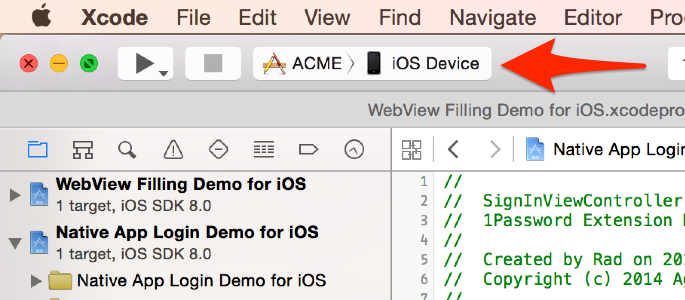
Since you will not have 1Password running within your iOS Simulator, it is important that you run on your device.
If all goes well, The ACME app will launch and you'll be able to test the 1Password App Extension. The first time you attempt to access the 1Password extension you will need to enable it by tapping on the More button in the share sheet and then enable the 1Password item in the Activities list. If the 1Password icons are missing, it likely means you do not have 1Password installed.
Back in Xcode you can change the scheme to ACME Browser to test the web view filling feature.
Integrating 1Password With Your App
Once you've verified your setup by testing the sample applications, it is time to get your hands dirty and see exactly how to add 1Password into your app.
Be forewarned, however, that there is not much code to get dirty with. If you were looking for an SDK to spend days of your life on, you'll be sorely disappointed.
Add 1Password Files to Your Project
Add the OnePasswordExtension.h, OnePasswordExtension.m, and 1Password.xcassets to your project and import OnePasswordExtension.h in your view contoller that implements the action for the 1Password button.

Use Case #1: Native App Login
In this use case we'll learn how to enable your existing users to fill their credentials into your native app's login form. If your application is using a web view to login (i.e. OAuth), you'll want to follow the web view integration steps in Use Case #4: Web View Filling.
The first step is to add a UIButton to your login page. Use an existing 1Password image from the 1Password.xcassets catalog so users recognize the button.
You'll need to hide this button (or educate users on the benefits of strong, unique passwords) if no password manager is installed. You can use isAppExtensionAvailable to determine availability and hide the button if it isn't. For example:
-(void)viewDidLoad Note that isAppExtensionAvailable looks to see if any app is installed that supports the generic org-appextension-feature-password-management feature. Any application that supports password management actions can be used.
Important: isAppExtensionAvailable uses - [UIApplication canOpenURL:]. Since iOS 9 it is recommended that you add the custom URL scheme, org-appextension-feature-password-management, in your target's info.plist as follows:

For more information about URL schemes in iOS 9, please refer to the Privacy and Your Apps session from WWDC 2015 at around the the 9th minute mark.
Next we need to wire up the action for this button to this method in your UIViewController:
- (IBAction)findLoginFrom1Password:(id)sender This code is pretty straight forward:
- Provide a
URLStringthat uniquely identifies your service. For example, if your app required a Twitter login, you would pass in@"https://twitter.com". See Best Practices for details. - Pass in the
UIViewControllerthat you want the share sheet to be presented upon. - Provide a completion block that will be called when the user finishes their selection. This block is guaranteed to be called on the main thread.
- Extract the needed information from the login dictionary and update your UI elements.
Use Case #2: New User Registration
Allow your users to access 1Password directly from your registration page so they can generate strong, unique passwords. 1Password will also save the login for future use, allowing users to easily log into your app on their other devices. The newly saved login and generated password are returned to you so you can update your UI and complete the registration.
Adding 1Password to your registration screen is very similar to adding 1Password to your login screen. In this case you'll wire the 1Password button to an action like this:
- (IBAction)saveLoginTo1Password:(id)sender You'll notice that we're passing a lot more information into 1Password than just the URLString key used in the sign in example. This is because at the end of the password generation process, 1Password will create a brand new login and save it. It's not possible for 1Password to ask your app for additional information later on, so we pass in everything we can before showing the password generator screen.
An important thing to notice is that the URLString is set to the exact same value we used in the login scenario. This allows users to quickly find the login they saved for your app the next time they need to sign in.
Use Case #3: Change Password
Allow your users to easily change passwords for saved logins in 1Password directly from your change password page. The updated login along with the old and the newly generated are returned to you so you can update your UI and complete the password change process. If no matching login is found in 1Password, the user will be prompted to save a new login instead.
Adding 1Password to your change password screen is very similar to adding 1Password to your login and registration screens. In this case you'll wire the 1Password button to an action like this:
- (IBAction)changePasswordIn1Password:(id)sender Use Case #4: Web View Filling
The 1Password App Extension is not limited to filling native UIs. With just a little bit of extra effort, users can fill UIWebViews and WKWebViews within your application as well.
Simply add a button to your UI with its action assigned to this method in your web view's UIViewController:
- (IBAction)fillUsing1Password:(id)sender 1Password will take care of all the details of collecting information about the currently displayed page, allow the user to select the desired login, and then fill the web form details within the page.
If you use a web view to login (i.e. OAuth) and you do not want other activities to show up in the share sheet and other item categories (Credit Cards and Identities) to show up in the 1Password Extension, you need to pass YES for showOnlyLogins.
Projects supporting iOS 7.1 and earlier
If your project's Deployment Target is earlier than iOS 8.0, please make sure that you link to the WebKit framework.
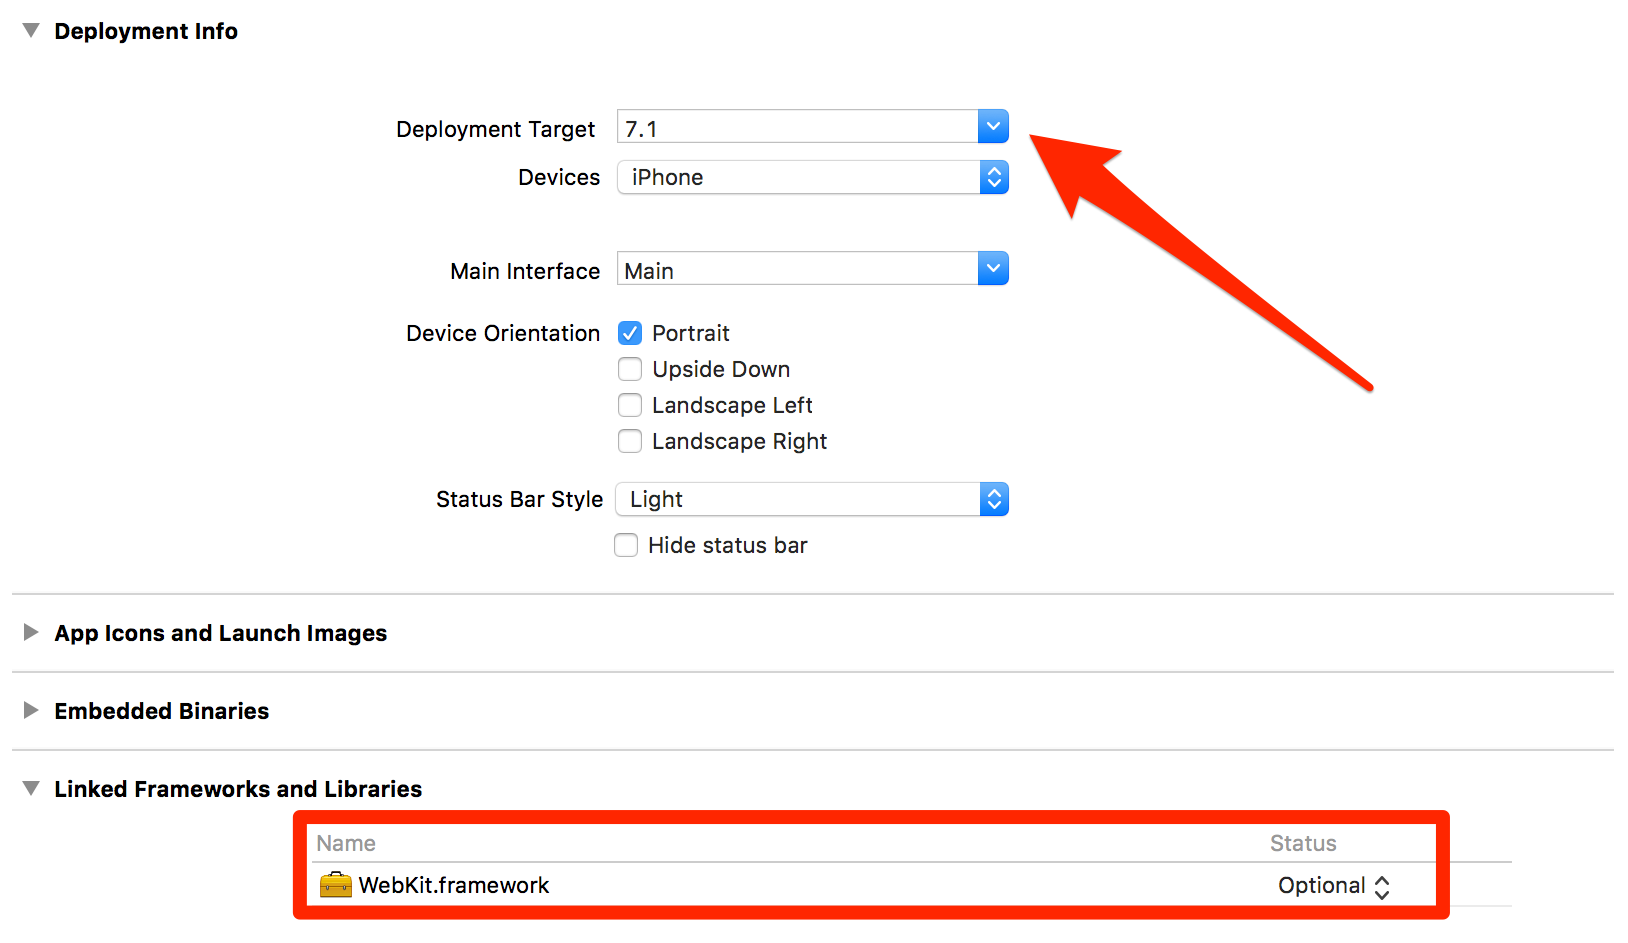
WKWebView support for projects with iOS 7.1 or earler as the Deployment Target
If the Deployment Target is 7.1 or earlier in your project or target and you are using WKWebViews (runtime checks for iOS 8 deveices), you simply need to add ONE_PASSWORD_EXTENSION_ENABLE_WK_WEB_VIEW=1 to your Preprocessor Macros.

Best Practices
- Use the same
URLStringduring Registration and Login. - Ensure your
URLStringis set to your actual service so your users can easily find their logins within the main 1Password app. - You should only ask for the login information of your own service or one specific to your app. Giving a URL for a service which you do not own or support may seriously break the customer's trust in your service/app.
- If you don't have a website for your app you should specify your bundle identifier as the
URLString, like so:app://bundleIdentifier(e.g.app://com.acme.awesome-app). - Send us an icon to use for our Rich Icon service so the user can see your lovely icon while creating new items.
- Use the icons provided in the
1Password.xcassetsasset catalog so users are familiar with what it will do. Contact us if you'd like additional sizes or have other special requirements. - Enable users to set 1Password as their default browser for external web links.
- On your registration page, pre-validate fields before calling 1Password. For example, display a message if the username is not available so the user can fix it before calling the 1Password extension.
References
If you open up OnePasswordExtension.m and start poking around, you'll be interested in these references.
- Apple Extension Guide
- NSItemProvider, NSExtensionItem, and UIActivityViewController class references.
Contact Us
Contact us, please! We'd love to hear from you about how you integrated 1Password within your app, how we can further improve things, and add your app to apps that integrate with 1Password.
You can reach us at support+appex@agilebits.com, or if you prefer, @1Password on Twitter.
You can also subscribe to our 1Password App Extension Developers newsletter. We’ll send you an occasional newsletter containing 1Password App Extension news, updates, and tricks, to help you realize the full potential of the 1Password Extension API in your iOS apps.