
This repo is aimed to describe the process of creating a custom NPM package/module with React.JS components. It will guide you through the steps of setting up your development environment, writing and exporting your components, and publishing your package to the NPM registry[Optional]. Additionally, it will provide tips and best practices for maintaining and updating your package.
Step 1: Make a directory and initialize npm.
  mkdir custom-npm-package
  npm init
Add the necessary fields. After the successfull walkthrough a package.json will created and looks like below.
{
  "name": "gittuts",
  "version": "1.0.0",
  "description": "",
  "main": "index.js",
  "scripts": {
    "test": "echo \"Error: no test specified\" && exit 1"
  },
  "author": "",
  "license": "ISC"
}
Step 2: Create a src folder in the root add a index.js/index.ts in it also create a component folder and creates some components in it.
src
├── components
│   ├── Component1
│   │   └── index.tsx
│   ├── Component2
│   │   └── index.tsx
│   └── Component3
│       └── index.tsx
└── index.ts
Step 3: Now, Add react and react-dom as peer-dependencies and dev-dependencies.
  yarn add react react-dom --dev

  or

  npm install react react-dom --dev
The final package.json may looks like below.
  {
  "name": "custom-npm-package",
  "version": "1.0.0",
  "description": "react custom npm module",
  "main": "index.js",
  "scripts": {
    "test": "echo \"Error: no test specified\" && exit 1",
    "build": "npx babel src --out-file index.js --extensions .ts,.tsx"
  },
  "author": "Anandhu",
  "license": "ISC",
  "peerDependencies": {
    "react": "^18.2.0",
    "react-dom": "^18.2.0"
  },
  "devDependencies": {
    "@types/react": "^18.0.34",
    "react": "^18.2.0",
    "react-dom": "^18.2.0",
    "typescript": "^5.0.4"
  }
}
Since it is Typescript. I've also installed typescript, typescript react with it.
Step 4: Its time to bundle the code. Install rollup.js
npm install --save react rollupYou will also need to install the Rollup plugins for Babel, CommonJS, and Node Resolve by running
npm install --save-dev @rollup/plugin-babel @rollup/plugin-commonjs @rollup/plugin-node-resolve rollup-plugin-terser
Step 5: Configure Rollup
Create a rollup.config.mjs or rollup.config.js file in the root of your project. In this file, configure Rollup to bundle your React component by specifying the input file, output format, and plugins to use. Here is an example configuration:
import babel from 'rollup-plugin-babel';
import resolve from '@rollup/plugin-node-resolve';
import external from 'rollup-plugin-peer-deps-external';
import { terser } from 'rollup-plugin-terser';
import typescript from "rollup-plugin-typescript2"; // For Typescript

export default [
  {
    input: './src/index.ts',
    output: [
      {
        file: 'dist/index.js',
        format: 'cjs',
      },
      {
        file: 'dist/index.es.js',
        format: 'es',
        exports: 'named',
      }
    ],
    plugins: [
      babel({
        exclude: 'node_modules/**',
        presets: ['@babel/preset-react']
      }),
      external({
        includeDependencies: true
      }),
      resolve(),
      terser(),
      typescript({ useTsconfigDeclarationDir: true }),
    ]
  }
];
To our package.json, let's add this as build command so that we won't have to type it repeatedly. Under "scripts" in package.json add the following.
  "scripts": {
    "test": "echo \"Error: no test specified\" && exit 1",
    "build": "npx rollup -c"
  }
now we can simply use npm run build or yarn build to bundle the code.
If it compiled without any error you may see two new folders dist and build generated in the root folder.
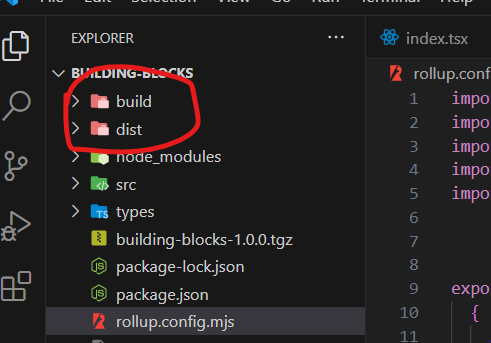
image: bundled output
Note: that if you're using a build tool like Webpack, you may not need to use npx babel at all. Instead, you can use a TypeScript loader like ts-loader or awesome-typescript-loader that will transpile and transform your TypeScript files as part of the build process.
Step 6: Lets pack it so we can use/test it in other projects. Run the following command from the root folder.
npm packThis will generate a .tgz file that we can use to install the package locally in other projects.
Alternatively, you can link the package for testing purpose(Recommended).
Using npm link in your package's root directory, create a global symlink of your package. A shortcut that directs your system to another directory or file is known as a "symlink," short for symbolic link.
Now, create an another application and tell the application to use the global symlink with npm link your-package-name. This way, we could save a lot of time.
Step 7: Navigate to your other project's directory and install your package using npm install . For example:
npm i 'path_to_the_packed_file'Step 8: In your host project's code you can import and use your component as follows:
  import logo from "./logo.svg";
  import "./App.css";
  import TextInput from "my_npm_package"; // Importing from the package
  import { useState } from "react";

  function App() {
    const [value, setValue] = useState('');
    console.log(value)

    function handleChange(e) {
      setValue(e.target.value);
    }

    return (
      <div className="App">
        <header className="App-header">
          <img src={logo} className="App-logo" alt="logo" />
          <p>Custom npm module.</p>
          <TextInput label="Name" value={value} onChange={handleChange} />
        </header>
      </div>
    );
  }

  export default App;
Additionally we can use packages like storybook.js to build UI components and pages in isolation and by doing so we could see the changes that happens to our components without the need of installing it in a host application. You could find the documention for implementing story book here.
Step 9: Publishing our package to NPM Registry
To publish a package to the npm registry, we need to follow these steps:
- Create an npm account on npmjs.com.
- Sign in to npm from your terminal using the
npm logincommand. - Prepare your package for publishing.
- Publish the package from the terminal using the
npm publishcommand.