Monetize.js

![]()
![]()

![]()
Monetize.js is an Event-driven library that serves as a wrapper and simulator for Web Monetization API.
Features
- Flexible pointers management (Static and Dynamic).
- Promise-like syntax to watch events.
- Customizable cycle-through a list of pointers.
- Supports probabilistic cycle-through a list of pointers.
- Calculates the total amount grouped by currency.
- Powerful simulator that works without iframe or installed extension.
Installing Monetize.js
Using npm
npm install monetize

// Using it
const monetize = require('monetize');
Using unpkg CDN:
Examples
Multiple examples has been created using monetize.js you can find them in this examples folder.
Monetize.js API
As soon as you import Monetize.js it will start observing the head tag to see if there's a pointer to pick.
Watching Monetization events
You can simply start using static mode by manually adding the payment pointer to the head tag:
......Then in your code you can listen to the different event using
monetize; monetize;Note: This is not a promise.The chained then here will be called multiple time as long as the monetizationstart event is fired.
Event mapping
| Monetize.js event | Original event |
|---|---|
| start | monetizationstart |
| progress | monetizationprogress |
| pending | monetizationpending |
| stop | monetizationstop |
You can learn more about the event object passed to each event from the list by exploring Monetization Javascript API documentation.
Dynamic pointers
The library provide multiple ways for dynamic pointer configuration:
Single Pointer
// Encapsulated modeconst p = '$alice.example'; monetize; // Free modemonetize; monetize; monetize;if no pointer has been provided or the Monetization API is disabled an error will be thrown that you can catch via catch method:
monetize;Note: You can omit then and shortcut to catch directly.
Only add the meta tag
if you wish to change or just add a pointer to the meta tag without the extra encapsulation you can just call set method.
monetize;Note: this method won't perform any extra validation it will add the passed value as it is. Passing invalid value would interrupt the payment process.
Multiple Pointers
If you have a list of pointer to chose from you can use the `pluck' method to randomly pick a pointer from the list.
const pointers = '$alice.example' '$connie.example' '$bob.example'; // Randomly picking a pointer.monetize // Or using encapsulation.monetize // Error aware encapsulation.monetize;If you would like to assign a probabilty for each pointer you can do that by passing an object to pluck function like the example below:
// Probability for each pointer. Must sum to 1const pointers = '$alice.example': 06 '$bob.example': 005 '$connie.example': 030; // Randomly picking a pointer.monetize // Or using encapsulation.monetize // Error aware encapsulation.monetize;Cycle through Pointers
Sometimes picking a single pointer on page load isn't enough. For thing case, you may consider using cycle and probabilisticCycle to cycle through a list of pointers for a given timeout
Cycle
/** * Sequentially cycle through the given pointers. * @param * @param * @param * @returns */ ;the following example illustrate how to use it:
const pointers = '$wallet' '$wallet2' '$wallet3' ; // Simple usage. monetize; // Use `then` to listen for the first pointer `monetizationstart` event. monetize;probabilisticCycle
probabilisticCycle(pointers [, timeout])
the following example illustrate how to use it:
const pointers = '$alice.example': 06 '$bob.example': 005 '$connie.example': 030 ; // Simple usage. monetize; // Use `then` to listen for the first pointer `monetizationstart` event. monetize;⚠ Important
Only one cycle-through is allowed. Hence always the last list will be used.
Consider the following code in a single page:
monetize; monetize; monetize; monetize;The library will only cycle through pointers4 list.
Example
State checking
You can at any time check for the monetization status by calling:
| Method | Description |
|---|---|
| isEnabled() | Check if the Monetization API is supported by the current browser. |
| isSending() | Check if there's a monetization stream going on. |
| isStopped() | Check if the service is idle. |
| isPending() | Check if the service is waiting for the first payment. |
Add state classes
You can use monetize.js to add different classes to the body tag. To do so you need to use the setup method to override the default config and enable the classes.
monetize; // it's possible to chain it with other methodsmonetize;Available classes
| Class name | Description |
|---|---|
| js-monetization-disabled | Added when the API is not supported in the browser. |
| js-monetization-enabled | Added when the API is supported in the browser. |
| js-monetization-pending | Added when the state is pending |
| js-monetization-stopped | Added when the state is stopped |
| js-monetization-sending | Added when the state is started |
Override the default classes
To override the default classes you will need to send an extra property for the setup method:
const config = addClasses: true classes: disabled: 'js-monetization-disabled' enabled: 'js-monetization-enabled' pending: 'js-monetization-pending' stopped: 'js-monetization-stopped' sending: 'js-monetization-sending' monetize;Amount API
The monetize object leverage an extra API that keeps track of the streamed amount.
The following is basic example on how to get the total streamed amount and currency for a given pointer.
const pointer = '$example';// Get the Raw amount sent.const amount = monetizeamount;// => output: 5258 // Or get the Formatted amountconst amount = monetizeamount;// => output: 0.035 // Get the currencyconst currency = monetizeamount;Dealing with multiple pointers
If your page is using multiple pointers at the same time you can get the total streamed amount grouped by currency using total method:
// Raw totalconst total = monetizeamount // Formatted totalconst total = monetizeamount /*Example returned value.{ usd: 5825, XRP: 8875,}*/Note: if all pointers have the same currency the amount of that currency will be returned instead.
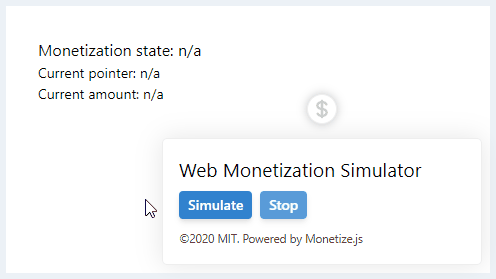
Simulator
Beside the core library, a powerful Web Monetization simulator is shipped. It does not require any extension installed or to be executed inside an iFrame.
An example for simulator in action.
How to use
If installed using npm
const monetize = ;const simulator = ;Or using a CDN
<!-- Core library --> <!-- Simulator --><!-- The simulator uses the core library hence it must be called after it. -->All what you need is calling the simulator script. It will take care of the rest.
Payment states
The simulator has 4 states showed in the dollar sign icon.
- Gray: Unknown state.
- Orange: Pending state.
- Green: Sending payments sate.
- Red: Stopped state.
How it work
The reason why the simulator it does not require a payment provider extension or be run in a iFrame is due the fact that it mock the Monetization API when it's not supported.
Contributing to Monetize.js
To contribute to Monetize.js, follow these steps:
- Fork this repository.
- Create a branch:
git checkout -b <branch_name>. - Install all the dependencies:
npm install - Make your changes and commit them:
npm run commit[ see below ] - Push the changes to your fork:
git push - Create the pull request.
Commits convention
The project uses semantic releases to automatically push new releases. Hence a set of convention has been established. Committing your changes through the npm run commit command will walk you through the commit content structure that you need to create.
Commit hooks
Before adding a commit two verification will take place:
- Linting using Eslint.
- Testing using Jest.
Both of them have to succeed in order to validate the commit.
License
This project is licensed under the MIT Licence.
Copyright (c) 2020 Mazen Touati