Experimental simulator for Mbed OS 5 applications
Demo: https://labs.mbed.com/simulator
While we have worked hard to improve embedded development tooling in Mbed (e.g. via the Online Compiler), the development for microcontrollers is still very similar to how it was in the 90s. Compilation is slow, and flashing is even slower. When fixing a bug, you need to get the device into the exact state as before encountering the bug. This makes for a very slow feedback loop, which hinders productivity and often pulls you out of the zone.
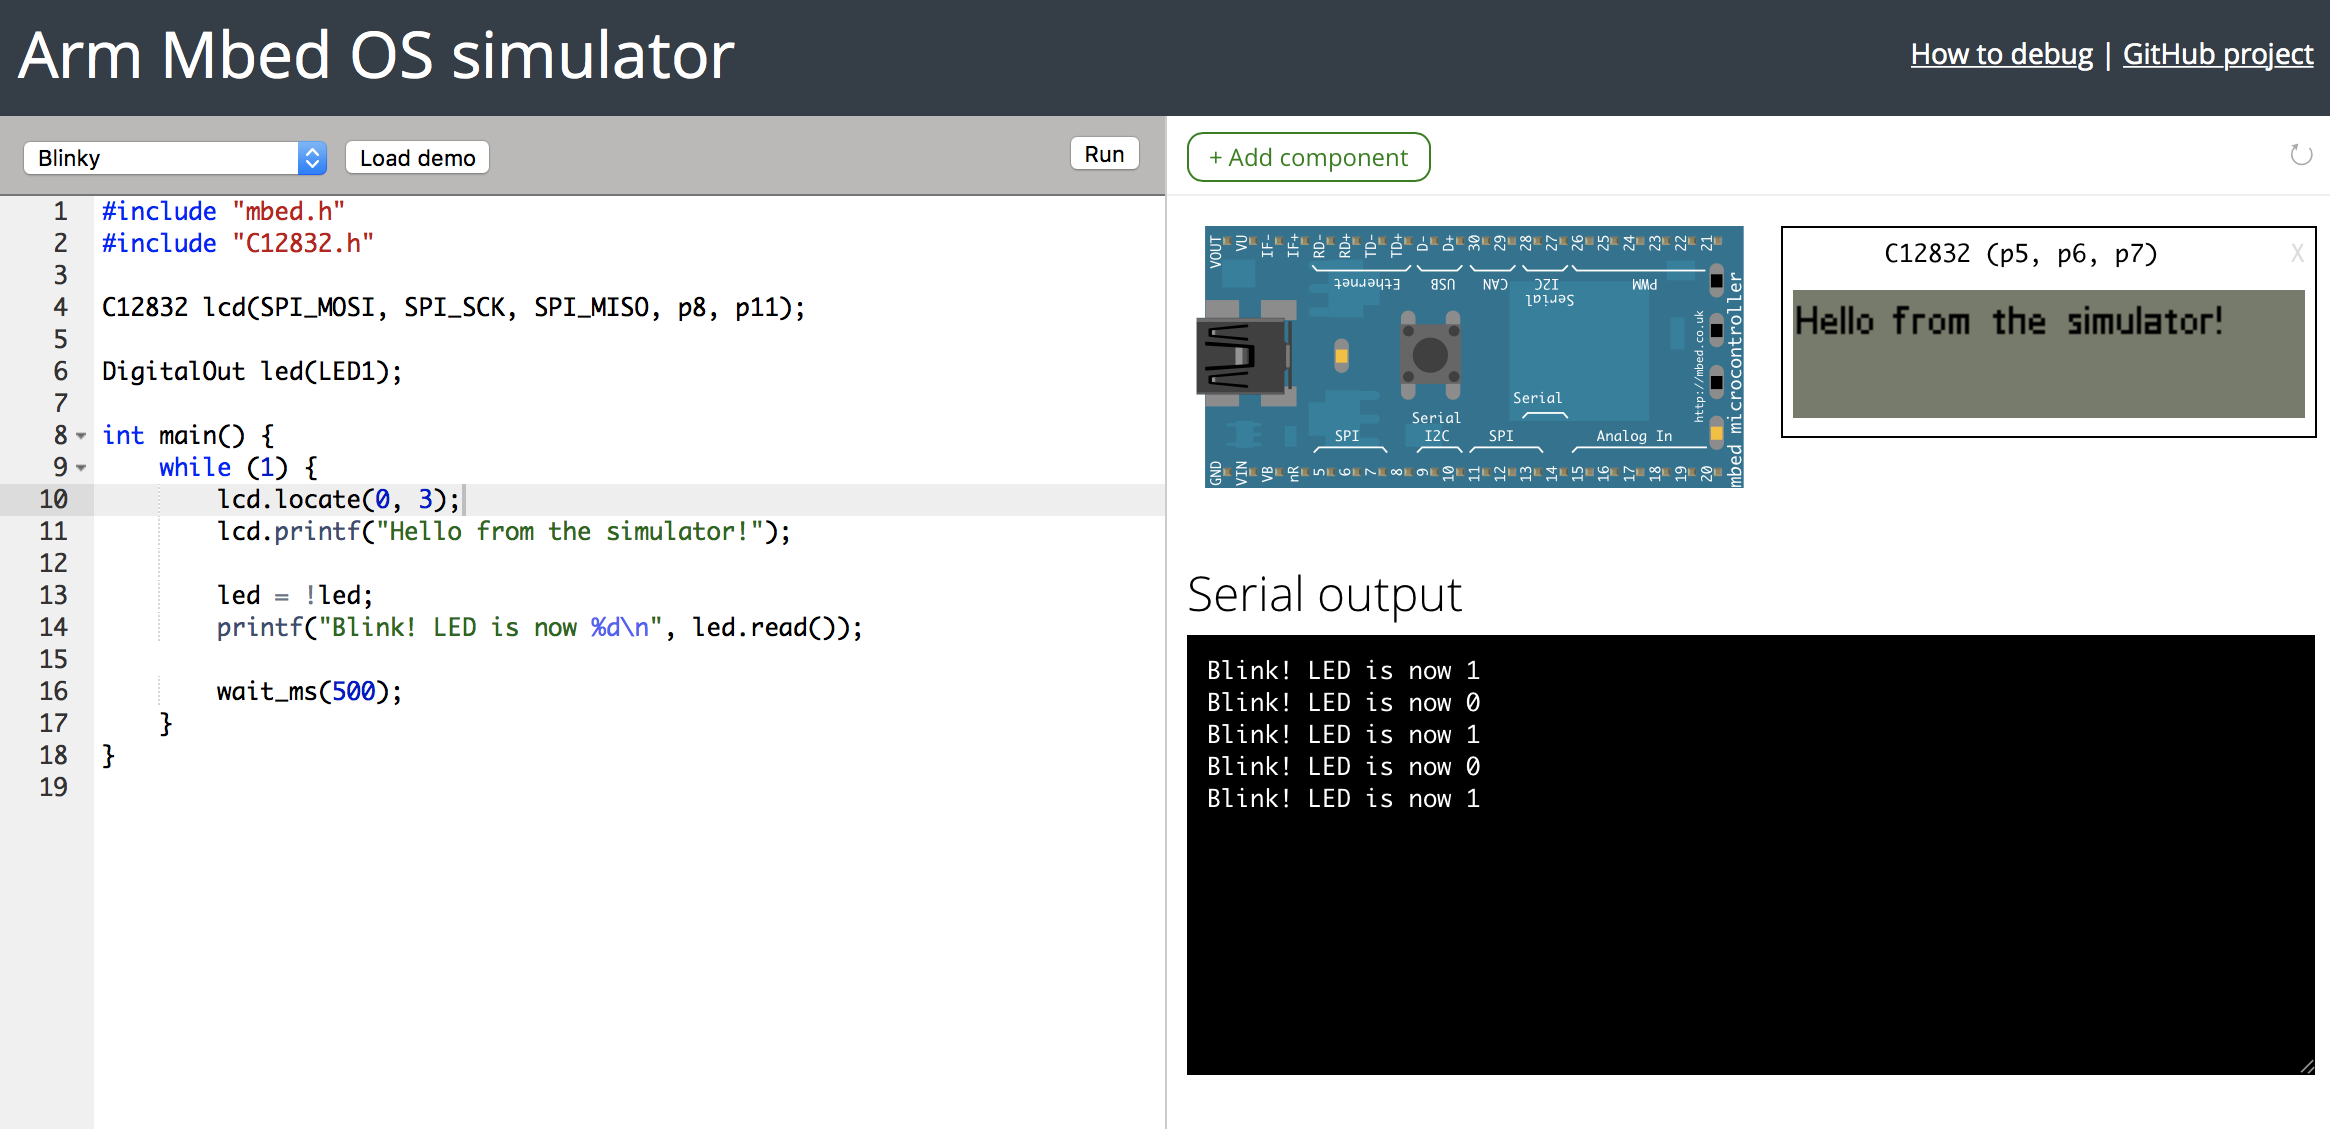
To make this feedback loop much shorter, we're releasing an alpha version of the Mbed Simulator. The simulator allows you to run your Mbed OS 5 applications directly on your computer, so that you can quickly test and verify applications without flashing them on a real board. This is a valuable learning tool, as you quickly learn how Mbed works. It is also very useful for developing complex applications. Within Arm, we have been using the simulator for work on mbed-http, the Mbed LoRaWAN stack and uTensor.
Note: The Mbed Simulator is part of Mbed Labs. The Mbed Labs projects showcase interesting side projects developed by Mbed engineers. However, these projects are not actively supported by Arm, and may be added, removed or break at any time.
More information in the introductionary blog post
Docs
- Installation, see below.
- Configuration and compiler options
- Peripherals
- File systems and block devices
- Pelion Device Management
- Debugging
- Architecture
Installation
Prerequisites
- Install Mbed CLI.
- Install Python 2.7 - not Python 3!.
- Install Git.
- Install Mercurial.
- Install Node.js v8 or higher.
Make sure that all of these are in your PATH. Verify this by opening a command prompt or terminal, and running:
$ where mbed
C:\Python27\Scripts\mbed.exe

$ where node
C:\Program Files\nodejs2\node.exe

$ where git
C:\Program Files\Git\cmd\git.exe

$ where hg
C:\Program Files\TortoiseHg\hg.exe
On Linux and macOS use which instead of where.
If one of the where / which commands does not yield a path, the utility is not in your PATH.
Installing Emscripten
To install the Emscripten cross-compilation toolchain, open a command prompt and:
-
Clone the repository and install SDK version 1.38.21:
$ git clone https://github.com/emscripten-core/emsdk.git $ cd emsdk $ emsdk install sdk-1.38.21-64bit $ emsdk activate sdk-1.38.21-64bit # on Windows only: $ emsdk_env.bat --global -
Verify that the installation was successful:
$ emcc -v emcc (Emscripten gcc/clang-like replacement + linker emulating GNU ld) 1.38.21 -
Find the folder where emcc was installed:
Windows
$ where emcc
C:\simulator\emsdk\emscripten\1.38.21\emcc
macOS and Linux
$ which emcc ~/toolchains/emsdk/emscripten/1.38.21/emcc -
Add this folder to your PATH.
-
On Windows:
- Go to System Properties > Advanced > Environmental variables.
- Find
PATH. - Add the folder you found in the previous step, and add it prefixed by
;. E.g.:;C:\simulator\emsdk\emscripten\1.38.21\
-
On macOS / Linux:
- Open
~/.bash_profileor~/.bashrcand add:
PATH=$PATH:~/toolchains/emsdk/emscripten/1.38.21 - Open
-
-
Open a new command prompt and verify that
emcccan still be found by running:$ where emcc C:\simulator\emsdk\emscripten\1.38.21\emcc -
All set!
Installing the simulator through npm
Last, install the simulator. Easiest is through npm:
-
Install the simulator:
$ npm install mbed-simulator -g -
Clone an Mbed OS example program:
$ mbed import mbed-os-example-blinky $ cd mbed-os-example-blinky -
Run the simulator:
$ mbed-simulator .Note that this will download all dependencies (including Mbed OS) and will build the common
libmbedlibrary so this'll take some time.
Installing the simulator from source
-
Install the simulator through git:
$ git clone https://github.com/janjongboom/mbed-simulator.git $ cd mbed-simulator $ npm install $ npm install . -g -
Build your first example:
$ node cli.js -i demos\blinky -o out --launchNote that this will download all dependencies (including Mbed OS) and will build the common
libmbedlibrary so this'll take some time. -
Done! The Mbed Simulator should now launch in your default browser.
How to run the hosted version
-
Install all dependencies, and clone the repository from source (see above).
-
Run:
$ npm install # Windows $ build-demos.bat # macOS / Linux $ sh build-demos.sh -
Then, start a web server:
$ node server.js -
Open http://localhost:7829 in your browser.
-
Blinky runs!
CLI
The simulator comes with a CLI to run any Mbed OS 5 project under the simulator.
Running
To run an Mbed OS 5 project:
$ mbed-simulator .
The project will build and a web browser window will open for you.
To see if your program runs in the simulator, check the TARGET_SIMULATOR macro.
Running in headless mode
You can also run the simulator in headless mode, which is great for automated testing. All output (through printf and traces) will be routed to your terminal. To run in headless mode, add the --launch-headless option. You might also want to limit the amount of logging the server does through --disable-runtime-logs to keep the output clean.
Changing mbed-simulator-hal
After changing anything in the simulator HAL, you need to recompile the libmbed library:
-
Run:
$ rm mbed-simulator-hal/libmbed.bc -
Rebuild your application. libmbed will automatically be generated.
Updating demo's
In the out folder a number of pre-built demos are listed. To upgrade them:
macOS and Linux
$ sh build-demos.sh
Windows
$ build-demos.bat
Attribution
viewer/img/controller_mbed.svg- created by Fritzing, licensed under Creative Commons Attribution-ShareALike 3.0 Unported.- Thermometer by https://codepen.io/mirceageorgescu/pen/Ceylz. Licensed under MIT.
- LED icons from https://pixabay.com/en/led-icon-logo-business-light-1715226/, Licensed under CC0 Creative Commons.