![]() BETA
BETA
LyriQL (pronounced "lyrical") is an alternative to GraphQL designed to make nested data processing easier, faster, and more intuitive.
Note: Version 0.1.0 is essentially a re-write that introduces major breaking changes.

In terms of usage it is very similar to GraphQL but it also contains a few key differences. This readme assumes you have never used GraphQL before and does not make comparisons between LyriQL and GraphQL.
How it works
Graph Syntax
With LyriQL, you do not "make queries." Instead, you "post graphs" (although, yes, you are still essentially just querying). Graphs are requests made from the front-end (or elsewhere) that describe the shape of the data you want to return from the server, no convoluted API endpoints or DSL required! A single graph can contain one or many queries, all customized to your specific needs.
Let's say you want to grab data for a particular user. In a simple case, you might post the following graph:
"user" id: 123 "name" "email"Assuming the backend is already set up, this graph will locate a user record with the ID of 123 and return an object containing only that record's name and email fields.
The way the graph breaks down is as follows...
- First item: The name of the data being requested. The example assumes that we've already defined an allowed query by this name on the server side.
- Second item when this item is an object: A collection of arguments sent along for the query to use.
- Remaining items: Names of specific fields to include in the result.
Using array syntax for our graphs means that we can query data using valid JSON. This is great because it allows us to avoid having to parse and interpret a DSL on the server side, while still letting us keep our request syntax small.
Nested Data
Commonly, you will need to dig a level or two deeper into nested data. In those cases, you can use nested graphs to describe how nested data should be returned. In the following example, we expect our user to have a list of friends, all of whom are also users. We can grab data about them like this:
"user" id: 123 "name" "email" "friends" "id" "name" "email" And the result will look something like this:
data: user: name: "Bob" email: "bob@example.com" friends: id: 234 name: "Sally" email: "sally@example.com" id: 345 name: "Alex" email: "alex@example.com" Note that the top-level object contains a data property that houses all of the data. If the request had failed, we would instead have an errors property explaining what went wrong.
Sometimes the request is mostly successful, but a part of it fails. In the above example, we can imagine a scenario where the function that gives us emails temporarily glitches out for whatever reason and throws an error when trying to give us Bob's email address. In that case, the offending data will come back null and our result will contain both a data property and an errors property. Like so:
data: user: name: "Bob" email: null friends: ... ... // you get the idea errors: "email" "Email service returned a 404" This allows you to make decisions about whether to completely shut down your app if something goes wrong, or perhaps engage in specific behaviors depending on what went wrong, while still functioning mostly as normal.
Metagraphs
Metagraphs are special graphs that give you extra control over how your data should be presented. As of now there are two metagraphs you can use. Thier names are ::compose and ::when.
::compose
This metagraph allows you to post multiple graphs simultaneously. In this case, your data will come back in the form of an array containing the result of each graph posted. For example:
"::compose" "user" id: 123 "name" "email" "user" id: 234 "name" "email"...yields the following output:
data: user: name: "Bob" email: "bob@example.com" user: name: "Sally" email: "sally@example.com" ::when
This metagraph allows you to include additional fields in the returned data based on some condition about the rest of the data at that level. For example, perhaps we have some admin users and some non-admin users in our data. In the following example, we will add the createdAt field to the graph only when a given user is an admin.
"user" id: 123 "email" "isAdmin" "::when" truthy: "isAdmin" "createdAt" In this case we would get the following data for each type of user:
// Non-admin email: "bob@example.com" isAdmin: false // Admin email: "sally@example.com" isAdmin: true createdAt: <some date>The ::when metagraph takes an object filled with as many conditions as you want at position 1. If they all resolve truthily, then all of its children will be included in the results.
Each condition takes the form of a one-or-two-item array where the first item is the name of a requested value (as shown in the above example) and the second item is a serializable value to match against. Examples of each of your current options are as follows:
eql: ["someValue", 4]- Resolves true whensomeValue=== 4.nql: ["someValue", 4]- Resolves true whensomeValue!== 4.lt: ["someValue", 4]- Resolves true whensomeValue< 4.lte: ["someValue", 4]- Resolves true whensomeValue<= 4.gt: ["someValue", 4]- Resolves true whensomeValue> 4.gte: ["someValue", 4]- Resolves true whensomeValue>= 4.truthy: ["someValue"]- Resolves true whensomeValueis truthy.falsy: ["someValue"]- Resolves true whensomeValueis falsy.match: ["someValue", /foo/]- Resolves true when /foo/ matchessomeValue.contains: ["someValue", "foo"]- Resolves true whensomeValueis a string or array that contains the value "foo".
Posting Graphs
To post a graph, you'll have to set up LyriQL on the server and make sure you have a route allocated to receive LyriQL requests. By convention, we normally use //your-url.com/lyriql.
You don't need special handlers for all the possible REST request types since all the data you need is specified in the graph itself. Instead, we normally default to intercepting the POST method (hence, "posting graphs"), although there is nothing wrong with handling the GET method as well if you'd like. If you use the LyriQL middleware for Express, it handles both GET and POST requests.
Once you have the backend set up, you can fire off your graph to the server using whatever tool you want:
const graph = "user" id: 123 "name" "email" const response = await await response // { data: { ... } }On the server side, you'll import LyriQL and funnel POST requests on this route to it:
YOUR_ROUTEROr, if you're using the Express middleware, there's less to think about:
const app = app appLyriQL will process the request, execute the specified query (which we'll discuss momentarily), check data against your defined types, and hand you back a Promise that resolves with the requested data. When everything goes well, the result has a data property (for example, { data: <RESPONSE_DATA> }). If something goes wrong, it will instead have an errors property (for example, { errors: [<ERROR_TEXT>] }).
Note: If you're using the Express middleware and you opt for the GET request method, you'll need to attach your query string to the graph parameter:
Setting Up the Backend
Of course, LyriQL isn't magic. In order for your graph requests to work, you have to define what the front-end is allowed to ask for. This is done via a queries object.
A queries object defines the calls that incoming connections are allowed to make. It enforces data types and contains functions that begin the process of fetching and processing the requested data.
The name in the zeroth position of every graph you post should correspond to a key in your queries object. Here's an example:
const queries = user: type: "Object" resolve: async db In this example, we describe what happens when the frontend makes the user query. Specifically, we fetch the user record from the database and return it. Notice that the type field is set to "Object". This means that if the resolve function returns data that isn't in the form of an object, we'll get an error.
Unfortunatly, "Object" is a native data type and you can't actually query for specific fields on native types. So what we really need to do is define a special type called User, and use that type to describe how to return data for each queriable field:
const queries = user: type: "User" resolve: async db const types = User: id: type: "Number!" resolve: async dataid name: type: "String!" resolve: async ` ` email: type: "String!" resolve: async dataemail In this case, when the user query returns a user record, LyriQL will notice that it is supposed to take the form of the User type. It will then locate this type in your types object and use the definitions there to generate each field requested in the graph. The raw user record is passed to each of these functions as data, and the value the function returns is checked against the associated type specification.
Note that some types in our examples use the
!symbol and others do not. When we don't use a!, it means that the valuenullis allowed to pass the type check. If the!is there, it means we must have data and it must be of the right type.
This implicit filtering through types applies regardless of how deeply nested or recursive your data is:
const types = User: id: type: "Number!" resolve: async dataid name: type: "String!" resolve: async ` ` email: type: "String!" resolve: async dataemail friends: type: "User" resolve: async { const friends = await PromisealldatafriendIDs return friends } In this case, our friends field must return an array of User objects. To handle that, first we map our theoretical list of friend IDs and grab each one from the database. Then we just return the list. Because the type specification knows that this is supposed to be a list of Users, each one of those records will also be automatically filtered through the User type.
Argument Type Checking
Optionally, you can enforce types on the "args" objects sent within your graphs. To do this, just add an expect property to a query or type description. For example:
const queries = user: type: "User!" expect: id: "Number!" resolve: async db or...
const types = User: friends: type: "User" expect: startIndex: "Number" endIndex: "Number" resolve: async { const friends = await datafriendIds friends return friends } Digging deeper
Testing your spec
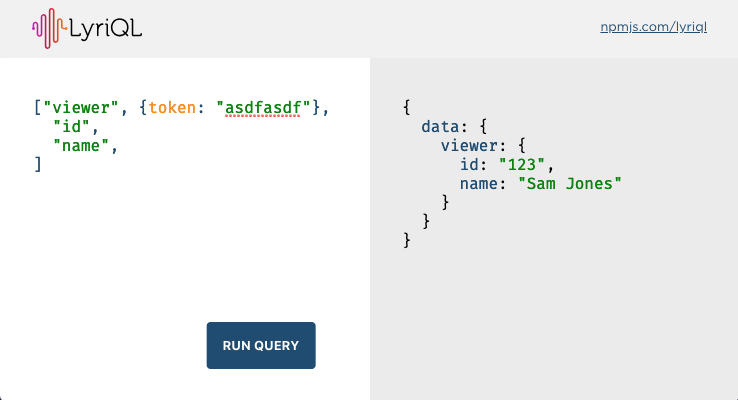
If you are using the Express middleware, you have the option of enabling a graphical interface that will allow you to interact with your server setup. You can turn it on like so:
appHaving done this, if you visit your-url.com/lyriql/ui, you'll be given a simple, clean interface where you can write a graph on the left, hit the "run" button, and see your result on the right.
You can also manually enable the UI if you are not using Express middleware:
YOUR_ROUTERModifying data
So far we've only talked about posting graphs that ask for data, so it may not be immediately obvious how you would handle sending new updates to the server. Fortunately, there's nothing crazy here. Here's an example that updates user data:
// graph"updateUser" id: 123 changes: name: "Sam" email: "sam@example.com" // queries updateUser: type: "String!" resolve: async { await db return 'Success!' } In this case, we haven't changed anything at all about our graph syntax. The only new piece we've added is the actual update to a user record in the database. And we did that entirely from data in the args object!
Authentication
At this point you should be pretty comfortable with passing arguments to LyriQL, so the idea of authenticating a user should be pretty straightforward. Where it might start to get tricky is when you need to hold on to context as data gets passed through your various resolver functions. Fortunately, LyriQL has your back.
Here's an example of an authentication workflow that should get you everything you need:
Step 1: Authenticate
// a graph"authenticate" email: "foo@example.com" password: "Password1" // a queryauthenticate: type: "String" resolve: async { const user = await db return user ? : null }This example gets us a token. Great. But now we want to use that token to fetch some data that only admin users get to access. Here's how we do it:
Step 2: Retain Context
// a graph// `billingData` will only be viewable for admins"teamData" token "members" "billingData" // queries authenticate: <Authenticate Spec Here> teamData: type: "Team" resolve: async { const user = await const team = await contextviewer = user return team } // types Team: members: type: "User" resolve: async { const members = await return members } billingData: type: "BillingData" resolve: async { if !contextviewerisAdmin return null else return databillingData } Person: <Person Spec Here> BillingData: <BillingData Spec Here>The key here comes in recognizing that each resolver function actually provides access to lots of stuff. In this example we use args which carries any arguments provided to the graph, data which carries the raw data being filtered through a type, and context which is a singleton object that gets passed to every resolver throughout the entire request process.
This made holding on to an authenticated user easy. In the teamData function, we added the authenticated user's record to the context and called it viewer. Then, in the billingData function, we were able to access the viewer context and return null if the viewer was not an admin.
Pagination
A topic that often comes up when working with graphed data is pagination. LyriQL isn't super opinionated so it doesn't provide a pre-built magic bullet right out of the box. However, you can use the tools provided to put together your own solution without a lot of hassle. The basic idea is, use arguments to determine which items to load upon any given query!
// a graph"getStuff" begin: 5 end: 10 ...fields // a querygetStuff: type: "Thing" resolve: async { const items = await return items } // a typeThing: // ...field types and resolversAs long as you keep track of your state on the front end, you can re-use your graph as many times as you want just changing out the args each time. Simple pagination :)