inputloop
InputLoop() is a light and easy to use javascript class to implement a input loop for console application. It implemets a dispatcher for sending console input events to differnt handlers, that are defined in a JSON. It is less then 200 lines of code and require only the readline module.
Table of Contents
- Motivation
- Description
- API
- Installation
- License
Motivation
I needed somethig to controll a game via node.js console. So I started with the "Tiny CLI" example in node.js readline documetation. It is verry handy, bad it would not be a good idea to call my game out of the "on line" callback. I also found a verry good package Inquirer.js to do this. It's feature is to make a linear list of questions with a lot of validating options. But I found it to heavy for my little app that is not to ask a list of questions.
When I imagine my app as a "Finite-state machine" (FSM) then I need
- some like the "Tiny CLI" example to start the line input loop
- a status to decide for what the readline event is used for
- for each status a function that handles the input and changes the status
- a table of functions for each status
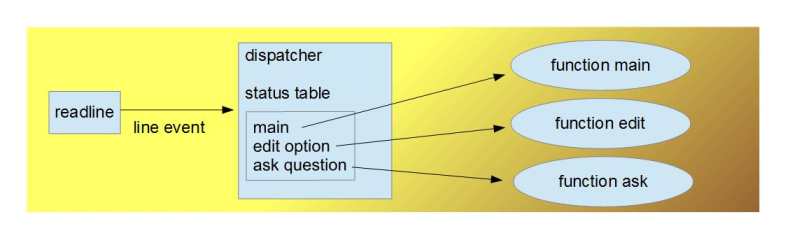
The result is a tiny javascript class InputLoop()
Description
Basic Usage
- Import module inputloop
- create a new InputLoop object
- add a status with name and properties
- call start()
const InputLoop = ; var loop = ; loop start; { console; process; }; When you run this, console waits for input. Type for example "ddd" and your session will looks like this

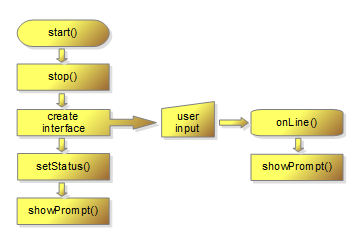
When you call loop.start(), loop will look in it's context and set it's status to the first status in the list. In this case it is only the one status 'simple', which was inserted with addStatus(). Then it checks the status properties. Most important is property onLine, it is the funtion to handle the input line event. Other properties can be a message or a special prompt.
The loop will show a optional message and a prompt on console and wait for user input. When the user press Enter key, it will call function onLoop( this ) and gives a reference to it's self as parameter. So you have full access to the object in your handling function. As you can see in the example, you can retrieve loop.line. This is what the user typed into console. The other interesting property is loop.firstChar, it is the first char of the input text in lower case.
In this example we will kill the process after the first line. If we did not, then we have a endless input loop. Usually we use the handling function to change the status in term of the user input. That can be done with:
loop.setStatus('other status');
Ok it's easy, but not very useful. Let's take a more complex example.
Example 2
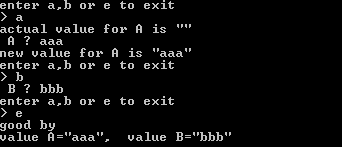
There is an app that can change two variables value_a and value_b. The app starts with status main. This status will display a message and have a function to handle the line input event. That function checks the user input and knows four options.
- input is 'a' => change status to 'sub a'
- input is 'b' => change status to 'sub b'
- input is 'e' => change status to 'exit'
- all other input will display a error message. status will not be changed.
In javascript it is:
message: 'enter a,b or e to exit' { }The complete app context can be defined in one object and assigned with InputLoop.set(Context).
Here is the code for this example, you find it in test.js
const InputLoop = ; // variables for the app var value_a = ''; var value_b = ''; // define a app1 const app1 = "main": message: 'enter a,b or e to exit' { } "sub a": message: 'enter a value for A' prompt: ' A ? ' { if loopline value_a = loopline; loop; } { console; } { console; } "sub b": message: 'enter a value for B' prompt: ' B ? ' { if loopline value_b = loopline; loop; } "exit": message: '' { console; console; loop; process; } ; var loop = ; loop start; Example using generators
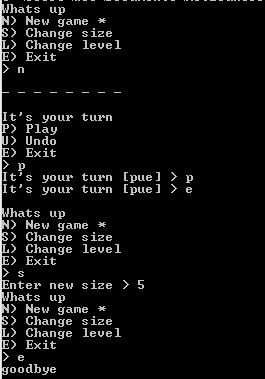
/* * console-game.js * */ const InputLoop StatusContext_Input StatusContext_Menu SelectItems = ; module { var size = x:4y:4; var level = 1; var game = sizelevel; // create menues // Main var mainMenu = message: 'Whats up' isMenu: true isKeyPress: true items: key: 'N' text: 'New game' value: 'userplaystart' isDefault: true key: 'S' text: 'Change size' value: 'setsize' key: 'L' text: 'Change level' value: 'setlevel' key: 'E' text: 'Exit' value: 'exit' ; // Set Size var setSize = message: 'Enter new size' { if loopline === '' return true; var s = ; return Number; } { if loopline !== '' var s = ; if Number size = x:sy:s; loop; } // onStatusEnter: (loop) => {console.log(loop.context['setsize']);} ; // Set Level var setLevel = message: 'Select Level' isMenu: false isKeyPress: true items: key: '0' text: 'Dummy' key: '1' text: 'Normal' key: '2' text: 'Good' { setLevel; } { var s = ; if Number if s >= 0 && s <= 2 level = s; loop; } ; var playMenu = message: "It's your turn" isMenu: true isKeyPress: true items: key: 'P' text: 'Play' value: 'userplay' key: 'U' text: 'Undo' value: 'undo' key: 'E' text: 'Exit' value: 'exitgame' onStatusEnter: showBoard { playMenuisShortPrompt = true; loop; } { playMenuisShortPrompt = false; } ; // define app var app = 'main': mainMenucontext 'setsize': setSizecontext 'setlevel': setLevelcontext 'exit': { console; process; } 'userplaystart': isKeyPress: true { console; console; console; game = sizelevel; loop; } 'userplay': playMenucontext 'showboard': {; loop; } 'undo': { ; loop; } 'exitgame': { console; loop; } ; // create app loop var loop = ; loopstart; // =========================================== // dummy functions {} {} // do some thing {} {} }; Sample session:
API
class InputLoop
Class implementation of the input loop.
var loop = ;Class Properties
context
All status definitions. This will define the whole app flow.
loopcontext = "main": message: 'Welcome' onLine: onLineMain "sub a": message: 'enter a value for A' prompt: ' A ? ' { if loopline value_a = loopline; loop; } "sub b": message: 'enter a value for B' prompt: ' B ? ' onLine: onLineSubB ; You can also use function setContext(myApp) if you like to chain function calls.
loop.setContext(myApp).setStatus('main').start();
line
Actual user input. When the user type text and press enter, the line event is fiered and the typed text will be stored here.
if loopline === 'hello' console;lineLo
A helper to get the user input in lower case. It is a class getter, so do not use brackets.
if looplineLo === 'hello' console;firstChar
A helper to get the first char of user input in lower case. It is a class getter, so do not use brackets.
if loopfirstChar === 'h' console;status
The name of the actual status. Use function _setStatus(newStatus) to change status.
if loopstatus === 'menu1' ;statusContext
Object of the actual status. This is mainly used internally.
prompt
The prompt will be displayed before user input. Default is '%m\n> '. Place holder %m inserts message. The prompt will be overwritten by the prompt in status context, if exists.
Class Methodes
Class methodes are used to controll the InputLoop. All methodes returns this and can be chained.
loop.setContext(myApp).setStatus('main').start();
setContext( value )
Where value is a object, it will set the application flow. You can also use property context.
addStatus( name, status )
Add a status definition into context. parameters are the name of this status and a status context property.
loop;start()
Starts the input loop. No parameter needed.
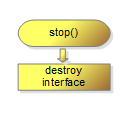
stop()
Stops the input loop.
showPrompt()
showPrompt() can be called to display the prompt on console.
setStatus( status = this.status )
Call setStatus('new status') to change the app status to 'new status'.
A call without parameter will refresh the actual status.

writeInput (str, key)
This function simulates user input. It uses note.js readline write(data,key). str is the text to write. key is a alternative paramter for a key sequence.
Context Object
Each status contect is a object. Here is an example where all properties are set.
var test_status = message: 'Hello' prompt: '%m world >' {console; loop;} {console;} {console;} isKeyPress: false ; var loop = test: test_statusstart; 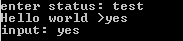
message
This message will be displayed together with prompt. It can be a string or a function to suport internationalisation.
prompt
prompt will override the default prompt. You can use place holder %m to insert the context message. It can be a string or a function to suport internationalisation.
onLine()
onLine will be fiered when user type return key. It has one parameter with a reference to the calling InputLoop and do not expect a return value.
{ if loopfirstChar === 'b' loop; else loop;}onStatusEnter()
onStatusEnter(loop) will be fiered by setStatus() after status is set.
onStatusExit()
onStatusExit(loop) will be fiered by setStatus() before status is set.
isKeyPress
Set isKeyPress = true to return user input after the first charackter was typed.
User do not have to type Return. isKeypress works only when stdin is a TTY.
Context Generator
Most input issues are always the same coding.
There are two classes to implement a line input with validation (StatusContext_Input) and a select list or menue (StatusContext_Menu). Both of them can be configured to return a status context to be used in app context.
Here is a example of a selection list with fruits
// select a fruit example var menu = message: 'Select a fruit' isMenu: false items: 'apple''pear''banana''cherry' isKeyPress: true { console; loop; process; } ; loop = start;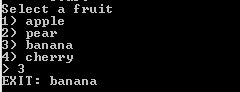
class StatusContext
This is an abstract class, not for usage. It is the base class for context generators.
Properties
- message
string or function for context message - prompt
optional string or function for context message - isKeyPress
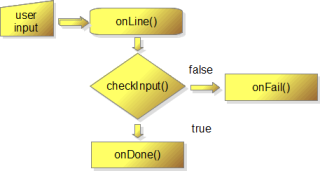
optional boolean for context isKeyPress - onLine()
implementation of context onLine() - onStatusEnter()
implementation of context onStatusEnter() - onStatusExit()
implementation of context onStatusExit() - onDone()
will be called when input is OK - onFail()
will be called on wrong input - checkInput()
optional implementation of input validation
class StatusContext_Input
Generate a contetex for any text input.
loop; class StatusContext_Menu
Generate a context for a selection list. Most important property is items a array of select options. Each item has the properties
- key
this is what user have to type to select the item. - text
item description. - value
this will be returned in line after item is selected. It is optional, if not defined key will be the result. You can overwrite getDoneValue() - isDefault
onFail() will return the item that has isDefault=true. (optional)
Other properties of StatusContext Menu are
- isMenu
when true then loop.status will be set to value in onDone() - isShortPrompt
select alternative prompt - getDoneValue
optional function to handle return value
var mainMenu = message: 'Whats up' isMenu: true isKeyPress: true items: key: 'N' text: 'New game' value: 'userplaystart' isDefault: true key: 'S' text: 'Change size' value: 'setsize' key: 'L' text: 'Change level' value: 'setlevel' key: 'E' text: 'Exit' value: 'exit' ; // if a array of string is used then strings will used as text and key will be set automatically var selectFruit = message: 'Select a fruit' items: 'apple''pear''banana''cherry' ; Installation
npm install inputloop
const {InputLoop, StatusContext_Input, StatusContext_Menu, SelectItems} = require('inputloop');
License
(c) 2018 by Willi Commer
Permission is hereby granted, free of charge, to any person obtaining a copy of this software and associated documentation files (the "Software"), to deal in the Software without restriction, including without limitation the rights to use, copy, modify, merge, publish, distribute, sublicense, and/or sell copies of the Software, and to permit persons to whom the Software is furnished to do so, subject to the following conditions:
The above copyright notice and this permission notice shall be included in all copies or substantial portions of the Software.
THE SOFTWARE IS PROVIDED "AS IS", WITHOUT WARRANTY OF ANY KIND, EXPRESS OR IMPLIED, INCLUDING BUT NOT LIMITED TO THE WARRANTIES OF MERCHANTABILITY, FITNESS FOR A PARTICULAR PURPOSE AND NONINFRINGEMENT. IN NO EVENT SHALL THE AUTHORS OR COPYRIGHT HOLDERS BE LIABLE FOR ANY CLAIM, DAMAGES OR OTHER LIABILITY, WHETHER IN AN ACTION OF CONTRACT, TORT OR OTHERWISE, ARISING FROM, OUT OF OR IN CONNECTION WITH THE SOFTWARE OR THE USE OR OTHER DEALINGS IN THE SOFTWARE.