IconeJz


I'm an icon system based purely on HTML, CSS and Javascript, I have the functionality of begin able to style my icons through specific attributes, as well as being able to change one icon for another.
Index 🔎
-
Gratitude
💌 -
Pre-Requirements
📝 -
CDN
⭐ -
Instalation
📩 -
Use
🔎 -
Warnings
👀 -
Javascript API
🃏 -
Importing custom icons
👻 -
Tools
🔧 -
Documentation
📚 -
Version
📌 -
Changelog
⏳ -
Author
🦉 -
Support
🤝 -
License
📃
Gratitude 💌
First of all, I want to thank God for helping me at all times and when I need it most and my family for supporting me and motivating me when decided to study this career.
💚 Also, I would like to thank... read more
Atte: OWLjz18
Pre-Requirements 📝
All the pre-requisites mentioned here are not necessary, only the one you choose to install, unless you prefer to use the CDN.
CDN ⭐
To use the CDN and thus not have to install me, you must link the following in each HTML document where you are going to implement me.
<link rel="stylesheet" href="https://cdn.jsdelivr.net/npm/iconejz@2.0.0/src/iconejz.css">
<script src="https://cdn.jsdelivr.net/npm/iconejz@2.0.0/src/iconejz.js" type="module"></script>
Or if you always want to have the latest version, you can use it like this:
<link rel="stylesheet" href="https://cdn.jsdelivr.net/npm/iconejz@latest/src/iconejz.css">
<script src="https://cdn.jsdelivr.net/npm/iconejz@latest/src/iconejz.js" type="module"></script>
Note: To use a specific version, they just change the version number. And the attribute type="module" is required.
Instalation 📩
Go to the folder of the project in which you want to install me, open its command line and execute the command corresponding to the option you have chosen in the pre-requisites section:
Git
git clone 'https://github.com/OWLjz18/iconejz.git'Or as a submodule:
git submodule add 'https://github.com/OWLjz18/iconejz.git'NPM
npm install iconejzAfter downloading, they must connect the style sheet and the script in each HTML document where they are going to implement me.
For example, assuming I'm at the root of your project just like the HTML document, it would look like this:
<link rel="stylesheet" href="./iconejz/src/iconejz.css">
<script src="./iconejz/src/iconejz.js" type="module"></script>
Use 🔎
After having both resources linked, we proceed to choose an icon, either from the file "iconejz.txt" which is in the "src" folder that I contain or my website.
For the example we will use the icon of a hamburger menu, in this case, the following would be its code:
<icone-jz is="menu"></icone-jz>And this would be the result:

Here is a list with all the available attributes to style my icons or render icon:
- bg => Set the icon background color.
- c => Set the color for the icon content.
- s => Set the size of the icon.
- bd => Set the border-radius of the icon.
- m => Set the margin for the icon.
- p => Set the padding for the icon.
- o => Set the opacity of the icon.
- t => Set a background color for icons that cannot have a completely transparent background, please read warnings for more information.
- is => Specifies which icon should be rendered.
One thing I would like to mention to you is that if you go to the "iconejz.css" file at the very beginning you will see the variables that are available to style the icons, however, there is one variable that is not found mentioned there, which is --iconejz-t, by using it you can do the same as when you apply the t attribute to an icon.
Warnings 👀
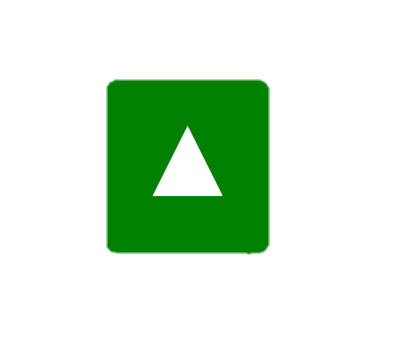
Please note that some icons such as "warning" cannot have a fully transparent background, as such icons have elements inside that appear to be a hole.
Let's see an example with the icon mentioned above to understand it better, at first glance we notice that the "warning" icon has an exclamation mark in the middle, which simulates a "hole" inside, but suppose we have a container with a green background, so if we give it bg="transparent" this will happen:
But if we add the attribute t with the value of the background color, if it would look as expected, here is an example with the attribute t="green":
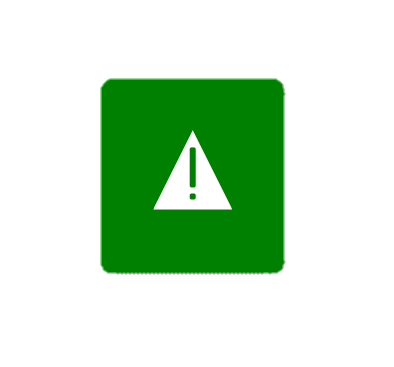
It is worth mentioning that you can get the same result using the variable --iconejz-t in CSS, here is an example assuming your icon has a class called "icon-warning":
.icon-warning {
  --iconejz-t: green;
}
Now let's talk a bit about web components, created from the HTMLElement class and with a shadow DOM.
For tose who may not have used it or read about it, I mean those created by: customElements.define(component-name, ComponentClass); with this.attachShadow({ mode: 'open' }).
Now that we're in context, I'll tell you that each icon is a web component like the one I described above, so by having a shadow DOM, they won't be able to read the styles of the light DOM.
Because of this, each icon will see if it is inside a shadow DOM and if it is true, it will automatically export its parts, and if that father element is also within another shadow DOM, the parts of the icon will be exported to that element, the entire process will be done automatically. I comment to take it into account.
Finally, I remind you again that the type="module" attribute is required. While the async attribute can lead to strange behavior.
To give an example of such strange behavior; suppose we have a script that wants to interact with the IconeJz JS API:
<link rel="stylesheet" href="https://cdn.jsdelivr.net/npm/iconejz@2.0.0/src/iconejz.css">
<script src="https://cdn.jsdelivr.net/npm/iconejz@2.0.0/src/iconejz.js" type="module" async></script>
<!-- Some files... -->
<script src="./something.js" defer></script>
And in said script we select the icon of our interest:
// file: something.js
const icon = document.querySelector('icone-jz');

icon.changeContentFor('x');
By simply adding the async attribute to the IconeJz script, the above code could (and most likely will) throw a console error: icon.changeContentFor() is not a function. And this is probably because the IconeJz script has not finished loading before "something.js" file.
So personally, I recommend you not add it to him.
Javascript API 🃏
Regarding the functionalities of an icon in javascript, I have the following methods:
-
changeContentFor(iconName[, { asyncMode }])=> Changes the current content of the icon to that specified in "iconName". This would not be the same as usingicon.setAttribute('is', iconName), since it would change the value of the "is" attribute, whereas "changeContentFor" always keeps the same "is" attribute and only changes its contents. TheasyncModewill specify whether or not this method should return a promise. -
undoContentChange()=> Undoes the change(s) made by the "changeContentFor" method, which returns the icon to its initial content, which points to its first render. -
toggleContent(iconName, { asyncMode })=> Alternate the content of the icon by the one specified in "iconName". TheasyncModewill specify whether or not this method should return a promise.
The asyncMode was created to avoid certain asynchronous problems that the "import custom icons" could bring with it.
Using it is as simple as in the following example, we will take as reference the menu icon that we created earlier and the extra ship--e icon from the "Importing Custom Icons To IconeJz" section.
const icon = document.querySelector('icone-jz[is="menu"]');

// Without async mode:
icon.changeContentFor('ship--e');
console.log(icon.contentName); // menu

// With async mode, promises:
icon.changeContentFor('ship--e', { asyncMode: true })
  .then(() => console.log(icon.contentName)); // ship--e

// With async mode, async/await:
await icon.changeContentFor('ship--e', { asyncMode: true });
console.log(icon.contentName); // ship--e
And one getter:
-
contentName=> returns the name of the icon's content, which is not the same as the value of the "is" attribute. For example:
const icon = document.querySelector('[is="menu"]');
console.log(icon.contentName); // menu

icon.changeContentFor('x');
console.log(icon.contentName); // x
Importing custom icons to IconeJz 👻
From v2.0.0 onwards you can import your own custom icons! I explain how:
To import your own icons will be as simple as having the following structure in the root of your static files:
/iconejz-extras/
  iconejz.extras.js
iconejz.extras.cssNote: Remember that as I work with JS on the web side, if I make a /something request, I will be accessing the root of the static files that are being dispatched. So it's very important to keep that in mind. But if your website's files are in a different path than your site's domain, like Github Page does (for example), I'll need to add the data-ijz-url-subdir attribute to my script and as a value, add the subdirectory in which the extra files will be found. Here you can see an example of what it would look like with my own website:
<script src="https://cdn.jsdelivr.net/npm/iconejz@2.0.2/src/iconejz.js" type="module" data-ijz-url-subdir="/IconeJzDoc"></script>The structure of the “iconejz.extras.js” file must be as follows. Something important to note is that the name ends in --e and this is so to avoid conflicts with the internal icons. I recommend that you add that to the name when writing your icons, otherwise when I import your icons, if their names do not end in --e I will be forced to throw an error.
export default [
  {
    name: 'icon-name--e',
    content: 'Content icon...'
  }
];
Note: And just in case you're wondering --e, is short for --extra. Now let's just look at an example of this in action:
For this example, our iconejz.extras.js will have this content:
export default [
  {
    name: 'ship--e',
    content: `
      <div part="jz flexjz">
        <div part="jz jz-ship-sg"></div>
      </div>
    `
  }
];
And in the iconejz.extras.css file we will have this:
::part(jz-ship-sg) {
  width: 60%;
  height: 60%;
  clip-path: polygon(8% 100%, 0% 82%, 17% 70%, 17% 23%, 33% 23%, 33% 0%, 66% 0%, 66% 23%, 60% 23%, 60% 7%, 39% 7%, 39% 23%, 82% 23%, 82% 70%, 75% 65%, 75% 32%, 24% 32%, 24% 65%, 50% 46.5%, 100% 82%, 92% 100%, 83.5% 100%, 90% 85%, 52.5% 58%, 52.5% 100%, 46% 100%, 46% 58%, 9% 85%, 16% 100%);
  background-color: var(--iconejz-c);
}
And just like that, they will have imported their first icon! Now they just have to go to the HTML document and use it like any other:
<icone-jz is="ship--e"></icone-jz>Tools 🔧
Snippets for Emmet ✨
The first thing they need to do is create a "snippets.json" file. And I won't go into much detail here, because the way to do it varies depending on the editor you use.
But since I have seen that the most used is VSCode and I use Neovim, I will leave the link to both, plus the link to the official documentation of emmet.
For VSCode, the emmet-vim plugin I use in Neovim and the official Emmet documentation.
After you already have your "snippets.json" file (or whatever you want to call it), you can add the following:
{
  "html": {
    "snippets": {
      "ijz": "icone-jz[is=${cursor}]",
      "ijz-cdn-css": "link[rel=stylesheet][href=https://cdn.jsdelivr.net/npm/iconejz@${cursor}/src/iconejz.css]",
      "ijz-cdn-js": "script[src=https://cdn.jsdelivr.net/npm/iconejz@${cursor}/src/iconejz.js][type=module]",
      "ijz-cdn-all": "link[rel=stylesheet][href=https://cdn.jsdelivr.net/npm/iconejz@latest/src/iconejz.css]+script[src=https://cdn.jsdelivr.net/npm/iconejz@latest/src/iconejz.js][type=module]",
    }
  },
  "css": {
    "ijzs": "--iconejz-s:${cursor};",
    "ijzc": "--iconejz-c:${cursor};",
    "ijzbg": "--iconejz-bg:${cursor};",
    "ijzbd": "--iconejz-bd:${cursor};",
    "ijzm": "--iconejz-m:${cursor};",
    "ijzp": "--iconejz-p:${cursor};",
    "ijzo": "--iconejz-o:${cursor};",
    "ijzt": "--iconejz-t:${cursor};",
    "ijzcursor": "--iconejz-cursor:${cursor};"
  }
}
Documentation 📚
You can get more information and more examples by visiting my website.
Version 📌
You can quickly tell which version of IconeJz you are using just by adding the "version" attribute to any of my icons, that will output a message similar to this on the console: "IconeJz v2.0.0".
<icone-jz is="menu" version></icone-jz> Changelog ⏳
You can see all the changes in the changelog.
Author 🦉
-
José Zambrano (OWLjz18) => Project Creator.
- Email => owl.jz18@gmail.com
- Instagram => @owljz18
Support 🤝
If you like the project you can tell other people about it and give us a star.
And if you want to make a donation to monetarily contribute your grain of sand, I can do it via Paypal by clicking here.
I also have a Telegram Channel where information is sent about new versions and possibly one or another survey. In addition to a Chat, where they can ask about any questions they have.
License 📃
This project is licensed under an MIT license, please visit the LICENSE.md file for more information about it.