Cordova Plugin for IBM Bluemix Mobile Services Core SDK
Before you begin
Make sure you install the following tools and libraries.
-
You should already have Node.js/npm and the Cordova package installed. If you don't, you can download and install Node from https://nodejs.org/en/download/.
-
The Cordova CLI tool is also required to use this plugin. You can find instructions to install Cordova and set up your Cordova app at https://cordova.apache.org/#getstarted.
To create a Cordova application, use the Cordova Plugin for the IBM Bluemix Mobile Services Core SDK:
- Create a Cordova application
- Add Cordova platforms
- Add Cordova plugin
- Configure your platform
Video tutorials
The following videos demonstrate how to install and use the Cordova Plugin for the IBM Bluemix Mobile Services Core SDK in iOS and Android applications.

Installing the Cordova Plugin for Bluemix Mobile Services Core SDK
1. Creating a Cordova application
-
Run the following commands to create a new Cordova application. Alternatively you can use an existing application as well.
$ cordova create {appName} $ cd {appName} -
Edit
config.xmlfile and set the desired application name in the<name>element instead of a default HelloCordova. -
Continue editing
config.xml.
iOS
For iOS, update the <platform name="ios"> element with a deployment target declaration as shown in the code snippet below.
```XML
<platform name="ios">
	<preference name="deployment-target" value="8.0" />
	<!-- add deployment target declaration -->
</platform>
```
Android
For Android, update the <platform name="android"> element with a minimum and target SDK versions as shown in the code snippet below.
```XML
<platform name="android">
	<preference name="android-minSdkVersion" value="15" />
	<preference name="android-targetSdkVersion" value="23" />
	<!-- add minimum and target Android API level declaration -->
</platform>
```

> The minSdkVersion should be above 15.

> The targetSdkVersion should always reflect the latest Android SDK available from Google.
2. Adding Cordova platforms
Run the following commands for the platforms that you want to add to your Cordova application
cordova platform add ios cordova platform add android3. Adding Cordova plugin
Run the following command from your Cordova application's root directory to add the ibm-mfp-core plugin:
cordova plugin add ibm-mfp-coreYou can check if the plugin installed successfully by running the following command, which lists your installed Cordova plugins:
cordova plugin list4. Configuring your platform
Configuring Your iOS Environment
Note: Before you begin, make sure that you are using the latest version of Xcode.
-
Open your
[your-app-name].xcodeprojfile in[your-app-name]/platforms/iosdirectory with XcodeIf confronted with an alert asking to “Convert to Latest Swift Syntax”, click Cancel.
-
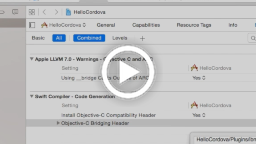
Add the Bridging Header. Go to
Build settings>Swift Compiler - Code Generation>Objective-C Bridging Headerand add the following path:[your-project-name]/Plugins/ibm-mfp-core/Bridging-Header.h -
Add the Frameworks parameter. Go to
Build Settings>Linking>Runpath Search Pathsand add the following parameter@executable_path/Frameworks -
Build and run your application with Xcode or by running the following command:
cordova build iosConfiguring Your Android Environment
- Build your Android project by running the following command:
cordova build androidImportant: Before opening your project in Android Studio, you must first build your Cordova application through the Cordova commmand-line interface (CLI). Otherwise, you will encounter build errors.
Using the Cordova Plugin
BMSClient
The BMSClient class allows you to initialize the SDK. By initializing the SDK, you can connect to the server app that you created in the Bluemix dashboard. Initializing the BMSClient instance is required before sending requests.
- Initialize the BMSClient by copying and pasting the following code snippet into your main JavaScript file.
BMSClient.initialize("Route", "appGUID");Note: If you have created a Cordova app using the cordova CLI, for example, cordova create app-name command with the Cordova command-line, put this Javascript code in the index.js file, within the onDeviceReady function to initialize the BMS client.
onDeviceReady: function() { BMSClient.initialize("Route", "appGUID");},- Modify the code snippet to use your Bluemix Route and appGUID parameters. To get these parameters, click the Mobile Options link in your Bluemix Application Dashboard to get the application route and application GUID. Use the Route and App GUID values as your parameters in your BMSClient.initialize code snippet.
API reference
| Javascript Function | Description |
|---|---|
| initialize(bluemixRoute, bluemixAppGUID) | Sets the base URL for the authorization server. This method should be called before you send the first request that requires authorization. |
| getBluemixAppRoute(callback) | Return the Bluemix app route. |
| getBluemixAppGUID(callback) | Return the Bluemix app GUID. |
| registerAuthenticationListener(realm, authenticationListener) | Registers authentication callback for the specified realm. |
| unregisterAuthenticationListener(realm) | Unregisters the authentication callback for the specified realm. |
MFPRequest
After initializing the client you may create a new MFPRequest instance, used to send a request to a specified URL.
You can specify a path relative to your Bluemix app route
var request = new MFPRequest("/myapp/API/action", MFPRequest.GET);or you can specify a full URL path:
var request = new MFPRequest("http://www.example.com", MFPRequest.GET);Following HTTP verbs are supported by MFPRequest
| Method |
|---|
| MFPRequest.GET |
| MFPRequest.PUT |
| MFPRequest.POST |
| MFPRequest.DELETE |
| MFPRequest.TRACE |
| MFPRequest.HEAD |
| MFPRequest.OPTIONS |
Following methods are available for MFPRequest objects
| Javascript Function | Description |
|---|---|
| setHeaders(jsonObj) | Set the headers for the request object in JSON format. |
| getHeaders | Return the headers object for the request object. |
| getUrl | Return the url for this request. |
| getMethod | Return the HTTP method for this request. |
| getTimeout | Return the timeout (in ms) for this request. |
| setQueryParameters(jsonObj) | Return the queryParameters object for this request. |
| getQueryParameters | Set the Query Parameters for the request object in JSON format. |
| send(success, failure) | Send this resource request asynchronously. You must supply success and failure callback functions, and optionally a body parameter. |
| send(body, success, failure) | With optional body text parameter. |
| send(json, success, failure) | With optional JSON object parameter. |
Success and failure callbacks of the MFPRequest.send() receive a response object as an argument (see Examples section). The following properties are available for the response object:
| Property | Info |
|---|---|
| status | The response status as an integer. |
| responseText | Return response text as null or string. |
| headers | Return response headers in JSON format. |
| errorCode | Return response error code as integer. |
| errorDescription | Return response error description as null or string. |
See the Examples section for more samples how to use BMSClient and MFPRequest.
MFPLogger
MFPLogger is used for logging messages. In addition to printing log messages to respective log console it can persist logs to file. When you call the send() function it will send the persisted logs to the Mobile Client Access Service.
You can create an instance of MFPLogger using:
MFPLogger.getInstance("myLogger");Example of sending a specific log message using your logger instance:
myLogger.debug(message);Following static methods are exposed by the MFPLogger
| Javascript Function | Description |
|---|---|
| getInstance(name) | Return a named logger instance. |
| getCapture(success, failure) | Get the current setting for determining if log data should be saved persistently. |
| setCapture(enabled) | Global setting: turn on or off the persisting of the log data that is passed to the log methods of this class. |
| getFilters(success, failure) | Retrieve the filters that are used to determine which log messages are persisted. |
| setFilters(filters) | Set the filters that are used to determine which log messages are persisted. Each key defines a name and each value defines a logging level. |
| getMaxStoreSize(success, failure) | Gets the current setting for the maximum storage size threshold. |
| setMaxStoreSize(size) | Set the maximum size of the local persistent storage for queuing log data. When the maximum storage size is reached, no more data is queued. This content of the storage is sent to a server. |
| getLevel(success, failure) | Get the currently configured Log Level. |
| setLevel(logLevel) | Set the level from which log messages must be saved and printed. For example, passing MFPLogger.INFO logs INFO, WARN, and ERROR. |
| isUncaughtExceptionDetected(success, failure) | Indicates that an uncaught exception was detected. The indicator is cleared on successful send. |
| send(success, failure) | Send the log file when the log store exists and is not empty. If the send fails, the local store is preserved. If the send succeeds, the local store is deleted. |
Log levels available:
| Level |
|---|
| FATAL |
| ERROR |
| WARN |
| INFO |
| DEBUG |
The following instance methods are available for the logger instances to send a specific log message:
| Function |
|---|
| debug(message) |
| info(message) |
| warn(message) |
| error(message) |
| fatal(message) |
See below for more Examples of how to use MFPLogger.
MFPAnalytics
MFPAnalytics is used for sending operational analytics information to the Mobile Client Access Service.
MFPAnalytics methods:
| Javascript Function | Description |
|---|---|
| enable() | Turn on the global setting for persisting of the analytics data. |
| disable() | Turn off the global setting for persisting of the analytics data. |
| isEnabled(success, failure) | Get the current setting for determining if log data should be saved persistently. |
| send(success, failure) | Send the analytics log file when the log store exists and is not empty. If the send fails, the local store is preserved. If the send succeeds, the local store is deleted. |
See below for Examples of how to use MFPAnalytics.
MFPAuthorizationManager
MFPAuthorizationManager is used for obtaining authorization tokens from Mobile Client Access service and providing user, device and application identities.
| Javascript Function | Description |
|---|---|
| initialize(tenantId) | Sets the base URL for the authorization server to use the MCA service tenantId. This method should be called before you send the first request that requires authorization. |
| obtainAuthorizationHeader(success, failure) | Start a process of obtaining an authorization header. Mobile Client Access Service might require client to authenticate as a part of this process. |
| isAuthorizationRequired(statusCode, responseAuthHeader, success, failure) | Checks if supplied status code and Authorization header from an HTTP response were sent by Mobile Client Access Service |
| clearAuthorizationData() | Clears the locally persisted authorization data |
| getCachedAuthorizationHeader(success, failure) | Returns the locally persisted authorization header or null if it wasn't obtained yet |
| getAuthorizationPersistencePolicy(success, failure) | Returns current authorization persistence policy |
| setAuthorizationPersistencePolicy(policy) | Changes the state of the current authorization persistence policy |
| getUserIdentity(success, failure) | Return JSON object with authorized user identity |
| getAppIdentity(success, failure) | Return JSON object with application identity |
| getDeviceIdentity(success, failure) | Return JSON object with device identity |
MFPAuthenticationListener interface
Mobile Client Access Client SDK provides an Authentication Listener interface to implement custom authentication flows.Developer implementing Authentication Listener is expected to add three below methods that will be called in different phases of an authentication process.
| Method | Use |
|---|---|
| onAuthenticationChallengeReceived(authContext, challenge) | Triggered when authentication challenge was received |
| onAuthenticationSuccess(info) | Triggered when authentication succeeded |
| onAuthenticationFailure(info) | Triggered when authentication failed |
MFPAuthenticationContext
authenticationContext is supplied as an argument to the onAuthenticationChallengeReceived method of a custom Authentication Listener. It is developer's responsibility to collect credentials and use authenticationContext methods to either return credentials to Mobile Client Access Client SDK or report a failure. Use one of the below methods.
| Method | Use |
|---|---|
| submitAuthenticationChallengeAnswer(answer) | Submits authentication challenge response |
| submitAuthenticationFailure(info) | Informs client about failed authentication |
Examples
Using BMSClient, MFPAuthorizationManager and MFPRequest
Initializing BMSClient
The following JavaScript code is your entry point to the Bluemix Mobile Services. This method should be called before making a request. Your appRoute and appGUID can be found by going to your app's dashboard on Bluemix and clicking on "Mobile Options".
BMSClient.initialize("appRoute", "appGUID");Initializing MFPAuthorizationManager
The following JavaScript code initialize the MFPAuthorizationManager with the MCA service tenantId, the tenantId can be found under the service credentials by clicking on the show credentials button on the MCA service tile. This method should be called before making a request.
MFPAuthorizationManager.initialize("tenantId");Creating a request
After initializing the client you may create a new MFPRequest instance by specifiying a URL endpoint, request method, and an optional timeout value in milliseconds.
var request = new MFPRequest("/myapp/API/action", MFPRequest.GET, 20000);Setting headers for your request
var headers = { header1: "val1", header2: "val2"};request.setHeaders(headers);Setting your MFPRequest's query parameters
var queryParams = { param1: "val1", param2: "val2"};request.setQueryParameters(queryParams);The query parameters are parameters that are added to the request URL.
Sending the request
request.send("some body", function(successResponse){ console.log("text :: " + successResponse.text); console.log("status :: " + successResponse.status); console.log("headers :: " + successResponse.headers); }, function (failureResponse){ console.log("text :: " + failureResponse.text); console.log("errorCode:: " + failureResponse.errorCode); console.log("errorDescription :: " + failureResponse.errorDescription); });The successResponse and failureResponse parameters are JSON objects that will be passed to your callbacks with the following fields:
response.status => Integerresponse.responseText => Undefined or Stringresponse.headers => JSON object with key:value pairs of headersresponse.errorCode => Integer response.errorDescription => Undefined or StringUsing MFPLogger
Below are some examples of how to use the MFPLogger class.
var myPackageLogger = MFPLogger.getInstance("myPackage"); // Persist logs to a fileMFPLogger.setCapture(true); // Globally set the logging levelMFPLogger.setLevel(MFPLogger.WARN); // Log a message at FATAL levelmyPackageLogger.fatal("Fatal level message"); // Only use the logger specified here. // All others will be ignored, including Analytics.MFPLogger.setFilters( { "myPackage": MFPLogger.WARN} ); // Send the logs to the serverMFPLogger.send();Using MFPAnalytics
Below are some examples of how to use the MFPAnalytics class.
// Enable analytics loggingMFPAnalytics.enable(); // Send the analytics log to the server MFPAnalytics.send();Custom Authentication
var customAuthenticationListener = { onAuthenticationChallengeReceived: function(authenticationContext, challenge) { console.log("onAuthenticationChallengeReceived :: ", challenge); // In this sample the Authentication Listener immediatelly returns a hardcoded // set of credentials. In a real life scenario this is where developer would // show a login screen, collect credentials and invoke // authenticationContext.submitAuthenticationChallengeAnswer() API var challengeResponse = { username: "john.lennon", password: "12345" } authenticationContext.submitAuthenticationChallengeAnswer(challengeResponse); // In case there was a failure collecting credentials you need to report // it back to the authenticationContext. Otherwise Mobile Client // Access Client SDK will remain in a waiting-for-credentials state // forever }, onAuthenticationSuccess: function(info){ console.log("onAuthenticationSuccess :: ", info); }, onAuthenticationFailure: function(info){ console.log("onAuthenticationFailure :: ", info); }} // Once you create a custom Authentication Listener you need to register it // with BMSClient before you can start using it. // Use realmName you've specified when configuring custom authentication// in Mobile Client Access Dashboard BMSClient.registerAuthenticationListener(realmName, customAuthenticationListener);Release Notes
Copyrights
Copyright 2015 IBM Corp.
Licensed under the Apache License, Version 2.0 (the "License"); you may not use this file except in compliance with the License. You may obtain a copy of the License at
http://www.apache.org/licenses/LICENSE-2.0
Unless required by applicable law or agreed to in writing, software distributed under the License is distributed on an "AS IS" BASIS, WITHOUT WARRANTIES OR CONDITIONS OF ANY KIND, either express or implied. See the License for the specific language governing permissions and limitations under the License.