Remote IoT Access initiated from MQTT message, followed by tunnel opening
Gotthard allows to remote access a device that is not directly reachable publicly. For example, the device is behind a private network without having possibility to configure a DMZ, or the device accesses Internet through a 3G connection...
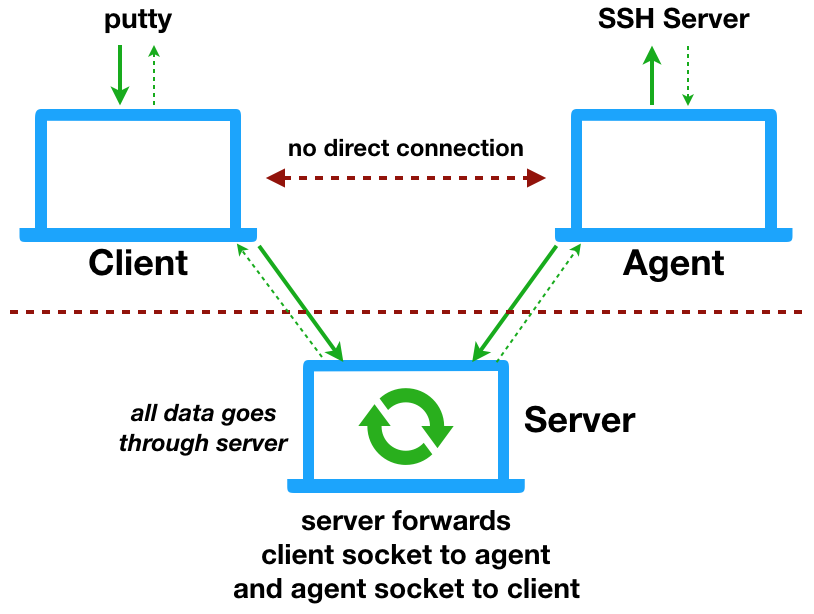
Gotthard's architecture typically involves three different kind of devices:
- An edge-device that we want to connect to
- A client : the machine that we connect from
- A server which is publicly available and acts as man in the middle to connect the two
When the edge device starts, it connects to our MQTT broker and listens for message on a given topic. At this stage the device remains unreachable to the Internet.

When a client wants to connect to a remote device, it also connects to the same MQTT queue and sends a message to connect to the edge-device. The edge-device receives this message, sends back an acknowledgment and connects to the server. The client, after receiving the acknowledgment also connects to the server.

Once the two are connected to the same server, a dedicated communication port is allocated for their communication and a ssh connection can be started.
Pre-requisites: because of some of its dependencies gotthard is for now only compatible with Node version >=8 and <=10.
In most cases, people would be primarily interested into setting up their workstation (aka client) to connect to remote devices. To do this, first install the software:
npm install -g gotthard
Then, you would need to get credentials (certificates) from AWS to connect to our MQTT broker. There is a convention on how we are naming the files:
- private.key: filename for the private key
- cert.pem: filename for the certificate
- ca.crt: filename for the ca
Place those three files named this way in the folder of your choice. Then set the following env variables:
export GOTTHARD_SERVER_HOST=[Remote server IP or name]
export GOTTHARD_SERVER_PORT=[Remote server port]
export GOTTHARD_CLIENT_PORT=[port that is forwarded to locally]
export GOTTHARD_CLIENT_NAME=[The name of your MQTT Client]
export GOTTHARD_CRYPT_KEY=[Key to connect to the remote server: contact your admin for more details]
export GOTTHARD_CRYPT_IV=[IV to connect to the remote server: contact your admin for more details]
export GOTTHARD_AWS_CERT_PATH=[the path where you put the three above files (private.key, cert.pem, ca.crt)]
export GOTTHARD_MQTT_ENDPOINT=[mqtt end point URL]
Once this is setup, you can connect to a remote device, just using its MQTT name. Here is an example:
gotthard connect GatewayOli
Here is an example of an output:
INFO: 2020-06-29T16:04:49.990Z Sending MQTT message for remote device to start tunnelling...
INFO: 2020-06-29T16:04:49.992Z Client listening on port 4444. Connecting to server...
INFO: 2020-06-29T16:04:50.478Z Connected to MQTT
INFO: 2020-06-29T16:04:51.002Z Remote device successfully started remote tunnel, now trying to connect
INFO: 2020-06-29T16:04:51.113Z Connection to server established, waiting for agent.
INFO: 2020-06-29T16:04:51.227Z End to end tunnel successfully established
INFO: 2020-06-29T16:04:51.227Z You can now ssh to the remote device using ssh user@localhost -p 4444
INFO: 2020-06-29T16:04:51.227Z To expose another service on the remote device, run ssh -L PORT:localhost:PORT user@localhost -p 4444
INFO: 2020-06-29T16:04:51.227Z Node-Red example: ssh -L 1880:localhost:1880 user@localhost -p 4444
INFO: 2020-06-29T16:04:51.227Z You can then take your browser to localhost:1880
The device is now exposed to your localhost. You can now connect to it using for example:
ssh root@localhost -p 4444
When you stop the tunnel using Ctrl+C, this should send a message for the remote device to close its connection to the server.
However, if for any reasons the device remains connected, you can use:
gotthard disconnect <REMOTE_MACHINE_ID>
The server needs to have the following packages installed:
- node, npm
- gcc
- g++
- make
Then you can install the software using sudo npm install -g gotthard2 --unsafe
The server needs to have the following env. variables set:
export GOTTHARD_SERVER_PORT=[Port that the server listens to]
export GOTTHARD_SERVER_PORTS_FROM=[Ports that the server can allocate for tunelling communication]
export GOTTHARD_SERVER_PORTS_TO=[Ports that the server can allocate for tunelling communication]
export GOTTHARD_CRYPT_KEY=[Key that client and Edge Device need to have]
export GOTTHARD_CRYPT_IV=[IV that client and Gateway need to have]
Then the server can be started using: gotthard server 2>&1 > ~/gotthard.log &
On the edge device, the software also needs to be installed using npm install -g gotthard.
The edge device also needs to be setup with some MQTT certificates with same names as what is used in the client: private.key, cert.pem, ca.crt
Finally, the following environment variables need to be setup
export GOTTHARD_SERVER_HOST=[Remote server IP or name]
export GOTTHARD_SERVER_PORT=[Remote server port]
export GOTTHARD_CRYPT_KEY=[Key to connect to the remote server: contact your admin for more details]
export GOTTHARD_CRYPT_IV=[IV to connect to the remote server: contact your admin for more details]
export GOTTHARD_AWS_CERT_PATH=[the path where you put the three above files (private.key, cert.pem, ca.crt)]
export GOTTHARD_MQTT_ENDPOINT=[mqtt end point URL]
export MACHINE_ID=[The machine ID as setup in AWS IoT device management]
export GOTTHARD_AGENT_DATA_HOST=localhost
export GOTTHARD_AGENT_DATA_PORT=[the port you want to expose, in most cases 22]
To start gotthard using the edge-device mode, just launch gotthard edge-device