GNaP Map plugin
Adds mapping functionality to the GNaP Angular framework. Manages layers of GeoJson data, independent of map API. Currently only Google Maps is publicly available, but you can create your own.
Contents
Overview
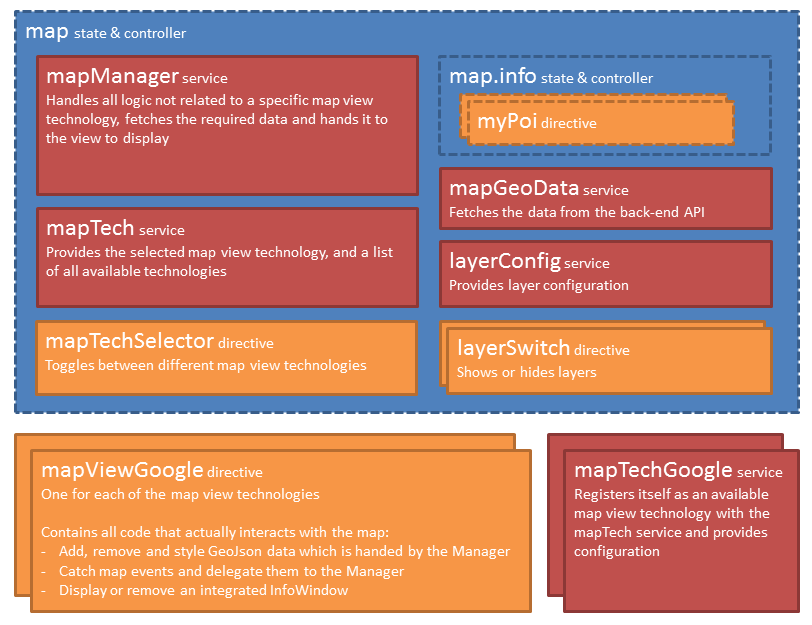
This library attempts to abstract away the visualization of GeoJson data: it can be used with multiple 'map views', like Google Maps or Bing Maps. New map views can be created with minimal effort, by implementing the expected functions. The user can even switch between different engines interactively, using an included 'map technology selector' directive.
The GeoJson data should come from a REST endpoint. Both fetching all data at once, or only fetching data in the requested bounds (viewport) are supported. The library ensures optimal performance by only rendering items which are in the current viewport once, and only fetching new data when necessary.
The library makes it easy to create and configure new layers of data, when they should be shown, and how they should be displayed. This can be configured during the Angular config phase, or in a run block in case other services must be referenced.
Who this library is for
This library can only be used together with the GNaP framework because it relies on components, packages and style used therein. It only makes sense to use this library if you primarily use at least one, but probably multiple (toggleable) layers of GeoJson data from a REST endpoint.
Don't use this library if you need to do entirely different things with a map, like only showing one or a couple of locations.
Getting started
Installation
First, install this package using npm in your web project folder:
$ npm install gnap-map --save
Along with at least one map technology, for instance gnap-map-google. Don't forget to follow the installation instructions there.
$ npm install gnap-map-google --save
Note: When installing the Google Maps technology, be sure to follow the instructions on referencing the Google Maps Javascript API in your index file.
Next, reference the required js and css files right after the gnap js and css files:
<!-- build:css(.) vendor/css/vendor-gnap.css --><!-- endbuild --><!-- build:js(.) vendor/js/vendor.js --> <!-- ... other GNaP scripts ... --> <!-- endbuild -->Note: The GNaP Map plugin depends on the ui-select library too, which is not included in GNaP.
Finally, load the gnapMap module in your application's module definition (in the GNaP template this is the app.module.js file by default), along with the chosen map technology module(s):
angular;Hello Worldmap
- If you hadn't already, create the state you wish to insert the map in, e.g.
main.map(if you pick another state, you should reflect that in the configuration). - Create a div with a height. Inside it, reference (one of) your installed map view directive(s), e.g.:
<div map-view-google style="width: 100%; height: 500px;"></div> - Optionally, if you have installed more than one map technology/view, you can also include the 'map tech selector' directive, in the main.html view, right before the
gnap-locale-selector, e.g.:<li map-tech-selector class="light-blue"></li>
Configuration
Configure the map manager, the layers to be used, and the geo data service. Check out the example.
As a bare minimum, you'll probably want to set the center and zoom level of your map, configure at least one layer along with its style, and the endpoint of your API.
Components
Map manager service
The map manager coordinates between all other components. Its main purpose is to keep track of which data in which bounds has already been fetched, and only request new data when required. It also keeps track of the currently selected item and triggers some events.
Configuring the Map manager
Configure these static settings directly on the mapManagerProvider, during the config phase of your module.
setMapState: Set the location of the basic map state; which is navigated back to when leaving the 'info' state. Default: main.mapsetMapInfoState: Set the location of the 'info' sub state; which is navigated to when clicking on a POI. Default: main.map.infosetTranslationLocationBase: Set the location which serves as the base for some translations, for e.g. layer names. Include the final dot. Default: main.common.
Anywhere in your application, you may set mapManager.settings.skipCache if you want to completely disable data layer caching and always fetch all data from the server.
Using the map manager
For regular usage, you should not need to call anything on the map manager: the map view will call fetchAllDataInBounds when required. However, you may want to force data for one or all layers to be refreshed, for instance after changing filters. For that, you can respectively call fetchDataInBounds for a specific layer or fetchAllDataInBounds for all layers. Similarly, you may want to manually call clearData or clearAllData. Check the docs in the code for a description of the parameters.
The currently selected item can and should be set on the selected property on the map manager, for instance on the state change to map.info.
Lastly, you can initiate several actions on the map view through the map manager, with the mapView property and its viewPort child property. If you want to check whether the map view supports the action, you can use the mapManager.mapFunctionIsSupported function and pass a reference to the desired function. Some commonly functions are viewPort.setCenter and viewPort.setZoomLevel. All functions are explained in detail in the Map View functions section in the wiki.
Events
The map manager can emit the following events. Register to these on the $rootScope to handle them.
custom-shape-created
Emited when a shape was drawn on the map view. Parameters:
event(object): Default Angular event object.wkt(string): The shape as WKT in the coordinate system of the map view.removeShapeFunction(function): After handling the event, if defined (if the map view supports this), call this function to remove the shape from the map view.
items-selected
When the map view supports multi-selection, this event is emited when the user has finished selecting items. Parameters:
event(object): Default Angular event object.selectedItems(object): An object with all the selected items, grouped by theiritemType. Each property on the object is an item type, which is again an object, with a propertyids, which is an array containing all the id's of the selected items of that type. Be sure to check whether all these properties exist.
Item details
The GNaP Map library allows (and even expects by default) each feature to have details which can be shown in an info window when clicked. The application's state (and hence, uri) will change to reflect this new state. This allows direct linking to the details of any item.
The only thing the map manager will do when an item is clicked, is that it will navigate towards the state that was configured through the setInfoState provider function (main.map.info by default), with two state parameters: the data layer's type and the item's id.
Note that if the feature id contains an underscore, the map manager assumes the format of ''. In this case, the prefix is stripped from the id in the state parameter. If you want this included again later on, you must prepend it again.
It is then up to the info state's resolve function and/or the controller to:
- Fetch the desired data; optionally adding any other parameters
- Set the following properties on the mapManger:
mapManager.selection.id,mapManager.selection.typeandmapManager.selection.details - If the map view directive's proper tooltip should be displayed,
mapManager.mapView.showInfoWindow({lat, lng})should be called - In that case, the info controller should also close the info window again upon destruction:$scope;
If you have layers with items which don't have details, you must opt out of this behavior by setting the hasNoDetails layer property to true.
Layer config service
Used to configure and retrieve the GeoJson data layer configuration.
Configuring layers
Use setDataLayers(object) at config time on the layerConfigProvider or at run time on the layerConfig service to set data layer configuration. In both cases, the function takes one argument: an object where each property represents a layer. The property name is the key of the layer and should be the same as its itemType property. All layer properties are discussed in the wiki.
Any time you call layerConfig.setDataLayers(object) at run time, the passed object is merged recursively into the already existing data layer configuration object. If a property already existed, it is overridden.
Using the layers service
You can access the layer configuration at any time by calling layerConfig.getDataLayers() on the service. This returns a reference to the layer config object.
Note that any changes to the static properties will be stored on the object for the duration of the application.
Geo data service
Gets the GeoJson data for a specific layer from a REST endpoint. Either all data of the specified type (which can then be cached locally by the map manager), or only the data within the specified bounds.
Note that currently, the bounds should be passed as WGS 84 coordinates, but the returned GeoJson can be in any coordinate system as specified in the
mapTechspec.
Configuring the Geo data service
There are two types of configuration: config-phase configuration on the provider, and configuration set during the run-phase, which can include other services.
Config-time configuration
mapGeoDataProvider.setEndpointUri: Set the base endpoint which the service should retrieve its data from. Should include a trailing slash. After this, the resource's uri is appended.
Run-time configuration
-
mapGeoData.setConstructResourceUriFunction: Optionally specify a function which accepts two parameters: thedataLayer(object), and an optionalall(bool, optional, default false). Must return the uri which should be appended to theendPointUriwhich was configured in theconfigblock.
By default, the function returns thedataLayer'sresourceUriproperty. In caseallwas set totrue, it appends/allto the uri. -
mapGeoData.constructParamsFunction: Optionally specify a function which accepts adataLayerparameter and returns an object which should be set as theparamsoption in the$http.getrequest.
By default, this is an empty object.
Note, however, that the service will automatically add the following parameters:- WGS 84 bounds in the following format:
- If required (when different from the default wgs84), the expected output coordinate system in the following format:
Using the geo data service
You should normally not have to call anything on this service; the mapManager should automatically make the required calls. You may however call mapGeoData.getAll(dataLayer) or mapGeoData.getInBounds(dataLayer, bounds) manually.
GeoJson Requirements
The GeoJson returned by the REST API must meet a couple of requirements for the GNaP Map plugin to be able to work with it, and there are a couple of optional properties. These are discussed in detail in the wiki. Summarized, each feature must have a unique id, and a type property which corresponds to the data layer's itemType. In case the geometry of the Feature is a Polygon, it must also contain a center property.
Map tech service
Keeps track of registered map technologies.
In your application, you may want to check which map technology is currently selected. For this, you can use the mapTech.is(key) function. You may also want to retrieve the map technology's coordinate system, using mapTech.getCoordinateSystem().
Map tech selector directive
When using more than one map technology, you can let the user choose his preferred technology with this directive. Insert it right before the GNaP language selector:
Layer switch directive
This directive allows users to toggle on/off a single data layer. The directive has the following attributes:
layer: Required. TheitemTypeof the data layer to toggle on/off.hide-icon: Optional. Whether or not to hide the icon in front of the switch.hide-label: Optional. Whether or not to hide the label after the switch.always-enabled: Optional. Display the layer as being 'available', even if the current zoomlevel does not fall between the layer's minimum and maximum zoom levels.linked-layers: Optional. Comma-separated list ofitemTypes of layers which must also be refreshed when toggling this layer. Note that it does not necessarily toggle these linked layers on and off. Generally, this can be used in case the linked layers'shouldShowFunctionimplementations depend on this layer's visibility.
Auto-refresh layer switch directive
A specific type of layer switch which, when toggled on, will automatically refresh the data every interval milliseconds. It has the same properties as the normal layer switch, and these additional properties:
interval: The interval, in milliseconds, after which to refresh the layer.layer-refresh: Data from entire layer is cleared, fetched from the server, and drawn.layer-append: Data is fetched from the server and drawn (but not cleared first). Use this to either append new data, or redraw features with an already existing id while avoiding flickering (ie: moving features).linked-layers-refresh: Same aslayer-refreshbut for the linked layers.linked-layers-append: Same aslayer-appendbut for the linked layers.
Dependencies
Interesting map-related libraries
You might find these awesome open source libraries useful:
- If you're looking for map icons, I highly advise Nicolas Mollet's Map Icon Collection, containing 1000+ stylable icons, for free (licensed under CC BY SA 3.0). You can't hotlink them, but you're free to download them and host them yourself, for instance publicly on Dropbox.
- If you're looking for a way to convert GeoJson to KML, check out tmcw's tokml library.
Contributing and example
When contributing, you can test the library using the included example. First, run npm install in the main folder and in the example folder to install all required dependencies.
From then on, you can run the special grunt example task included in this library's main grunt file to launch the example application. This will:
- Perform the
grunt disttask, which concatenates and minifies the required files to thedistfolder, and copies them to the example'snode_modulesfolders. - Runs the client GNaP example application (on port 9002).
- Runs a tiny node server which returns some sample GeoJson (on port 9003).
Attention! Before publishing (and preferably, also before pushing), do not forget to run
grunt distto generate up-to-date script files in the dist folder!
License
This library and GNaP are licensed under BSD (3-Clause). Refer to LICENSE for more information.