gitlit

This project is a collection of modules that brings the power of git to structured documents by students Ian Hallam, Devon Timaeus, and Sydney Satchwill at Rose-Hulman Institute of Technology under the leadership of Associate Professor Sriram Mohan in addition to Wes Winham and Kyle Gibson of PolicyStat.
Currently HTML is the target language for development, with the posibility of later including XML, DOCX, and other structure document formats.
Getting Started
$ npm install gitlit
Usage: gitlit [options] [command] [arguments]
Options
- -h, (--help) output usage information
- -V, (--version) output the version number
- -v, (--versionFull) Print out all the version info for the CLI
- -l, (--libraries) Print out the versions of the libraries used
First, create a gitlit local repo
gitlit init <file> <outputPath> <repoName>
$ gitlit init homepage.html /gitlitRepos homepage
In this case, the output path is the directory that you want the repository to be made in. This means that for future commands that need the repository location the repository folder, NOT THE OUTPUT DIRECTORY, needs to be given
And change it back into html
gitlit write <directory> <outputFile>
$ gitlit write /gitlitRepos/homepage homepage.html
Note, that the output file is given as path; if the file is not given an extension (i.e. ".../example") it will be output as HTML, but won't be that filetype.
Make a new revision of the local repo given a new document
gitlit commit <file to make the new revision> <path to repo> <commit message>
$ gitlit commit homepagev2.html /gitlitRepos/homepage "My first commit"
Perform a diff for the last two revisions of a repo
gitlit diff <repoLocation> <outputLocation>
$ gitlit commit homepagev3.html /gitlitRepos/homepage "My second commit"

$ gitlit diff /gitlitRepos/homepage /diffResources
In diffResources will appear an object with diff data, and css and js for an html file to be opened in a browser for a visual diff display.
Merge from a diff file.
gitlit merge <mergeFile> <outputLocation>
$ gitlit merge /gitlitRepos/merge.json /diffResources/homepage.html
This will output an html file created from the diff decisions in the GUI.
por-ids : What are they?
They way that gitlit keeps track of the structure of documents for intelligent handling of sections is via a file structure. In the Git repository that is the version control underlying the project, the basic file structure looks like this:
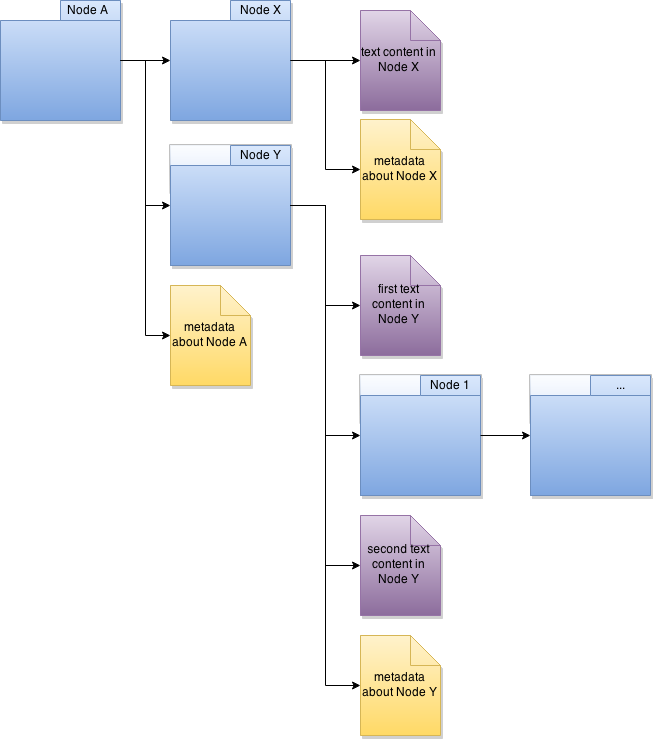
The idea, is that at each level, the directories and text files are given ID's that identify what they are. This is useful for tracking the movement of sections even if there are small changes in their children (e.g. text nodes). As such, the names of these directories need to be tracked, and each different element needs to have some sort of name to be able to tell them apart.
These names are the por-ids, which are 12 byte, hex-encoded strings. The information about the order each node is constructed is kept track of in the metadata.json files. In addition to this, the metadata.json files also track information like the tag of the current directory, and any information like attributes. This encodes all of the information in a simple yet robust manner.
This setup does come with a few caveats however.
Disclaimers:
Modifying por-ids can result in unexpected behavior
If por-ids are edited between revisions of a document, diff output can be strange, and difficult to read. To avoid this, try not to wholesale change or delete por-ids.
Some formatting may not be preserved
The goal of this project is to keep as much information and formatting of the file as possible.
However, unless we want to keep track of numerous files that are only whitespace, and increase
the possibility of changes being reported by diff, we need to ignore some whitespace.
Currently, we are using html for our pretty printing of output html. Another thing to note, is that there may be closing tags on the same line as the opening tag, this is because it is difficult know when it is alright to arbitrarily add an extra newline. So html doesn't, it only adds the newlines when it knows for certain it is safe to.
Missing tags (opening or closing) results in undefined behavior
If the html is missing starting or ending tags when used in any operations, then there are no guarantee that the interpretation of the HTML will be what the author intended. This is because missing tags can be interpreted in many ways, so the one selected may not be what the author intended.
To minimize this effect, be sure to include closing tags for each open tag, and vice versa.
Libraries Used
- parse5
- html
- commander.js
- mocha
- unit.js
- deasync
Version History
- 0.0.1
- Basic command line tool to accept inputs
- Help info for usage
- Added libraries
- 0.0.2
- Parsing of HTML files into DOM-like structure
- Filtering of information needed for creating directory structure
- Adding custom IDs to keep track of tags for tracking changes in sections
- 0.1.0
initfeature: Creation of file directory structure mean to represent a structured document- Naming for each file/directory from random byte array for uniqueness
- 0.1.1
- Parsing of File structure back into Javascript object format
- Unit tests for
initfeature
- 0.1.2
- Generation of HTML through reconstruction using Javascript object
- Command-line command for this feature
- 0.2.0
writefeature: Create an HTML file from the directory structure with IDs inserted into HTML- Unit tests for
writefeature
- 0.2.1
- Pre tag whitespace preservation
- Transition away from js-git to Git shell
- Setup & teardown for directory during
commit
- 0.2.2
- Make Git repository commit during
commit - Edge cases for
write&initfeature
- Make Git repository commit during
- 0.3.0
commitfeature: Given new file and a path to a repository directory, create a new version of the document with a commit message
- 0.3.1
- Updated project to be packaged on npm. Can be found here
- Set up project to work with Travis-CI
- Added support for comments in HTML files
- Added support for self-closing tags
- 0.3.2
- Added executable version for global install via npm
- Added Vagrantfile for Vagrant development support
- Began work on diff functionality for telling the difference between 2 revisions
- 0.4.0
- Renamed project: psychic-octo-robot -> gitlit
- Dropped Windows support in order to keep the project working easily in Linux
- 0.4.1
- Very basic diff support
- Additions
- Deletions
- Basic UI to display diff
- Very basic diff support
- 0.4.2
- Diff selection tool
- UI for selecting which changes to keep
- Merge Support
- Can merge results from the selections
- Diff selection tool
- 0.5.0
- Complex diff support
- Edits
- Text node moves
- Complex diff support
Development environment
Docker & Vagrant
For this project, we use Docker and/or Vagrant. We chose to go for 2 different development environments since it would get a bit more coverage for individual preferences.
Additionally, Vagrant seems to be just a bit easier if developing on Windows, since it works basically immediately out of the box, unlike Docker for Windows.
Docker
About Docker:
Docker is an OS agnostic way to create an identical development environment for every member
on a software team. The following steps will get you set up:
1. Download Docker:
(in ubuntu)
```curl -sSL https://get.docker.io/ubuntu/ | sudo sh```
2. Use Docker:
(in ubuntu)
cd /psycho-octo-robot
sudo docker build -t="psycho-octo-robot" .
sudo docker run -i -t psycho-octo-robot
or to run in the background:
sudo docker run -d psycho-octo-robot
Docker is now running in the terminal and files can be executed within the container to have access to all packages needed. Further documentation can be found here
Vagrant
First, just install Vagrant via an installer.
From there, when in the project directory, just run
vagrant up
The VM & Vagrant box will then provision themselves with the proper libraries and be ready for development
From there, just run vagrant ssh to ssh to the box for exploring the project in the environment.
Note: Vagrant syncs directories, so editing can still be done in the original directory, and Vagrant will pick up the changes.