
![]()
![]()
A tool for autogenerating Node.js endpoint tests
Easier testing, happier devs :sunglasses:
Why Use Battletest?
Modern web APIs must be built to handle requests with any data type, including invalid ones. For instance, if a client sends a request with an extremely long string or -1 in the "ticker" field that should only contain a short string, will the server process fail?
Battletest.js will take in the shape of the intended request object, and generate many test requests that vary each field of the request object by a single unexpected value. By testing the backend as such, the developer can easily determine if there are any random test requests that might make the web API backend fail.
Built for Express.js & OpenAPI v3.03 ❤️
Battletest will read a configuration file ( battletest.config.js ) containing the shape of the expected HTTP request for each endpoint/method, and output for each endpoint/method a testing suite that leverages Mocha, Chai & Supertest to test how the server handles requests containing unexpected data types.
Battletest can also parse a express-js server file or a OpenAPI v3.03 document to prepopulate most (express-js server file) or all (OpenAPI document) of battletest.config.js .
Table of Content
Installation
$ npm install -g battletest

$ npm install --save-dev battletest
Install with the --save-dev flag in place of the -g flag for a local project-specific installation.
Getting Started
Initialize battletest.config.js
$ battletest init

$ battletest init <server.js>
$ battletest init <petstore.yaml>
$ battletest init <petstore.json>
This creates a new battletest.config.js in your project's root directory.
Battletest can optionally parse either an Express-js server.js file or OpenAPI specification to create a prepopulated battletest.config.js . If a file path is not specified, a skeleton configuration file will be created.
battletest.config.js generally follows OpenAPI v3.03 to define endpoints, methods and expected data type.
-
serverLocation: Path to the server.js file from the project's root directory. This path will be used for setup & teardown of the server during the test execution, as provided in
testSetup.js. -
expectedStatusCode: This is the status code the server should return if the server has correctly processed the client's malformed request, i.e. 400.
-
paths: This is an object that contains each Path available on the server as the key.
-
Operation: Each Path has one or more operation (or method) available to it, e.g., "get", "put", "post", etc. It contains a Parameters object and a RequestBody object.
-
Parameters: Array of objects, each specifying a parameter and a location. Possible locations are "path", "query", "get" and "cookie".
-
parameters:name: "petID" // <-- field keyin: "path" // <-- field locationschema:type: "integer"name: "lastVisitedDate"in: "cookie" // <-- field locationschema:type: "string"
- RequestBody: Object describing the body of a single request. It may have multiple Content-Types as keys. Only content-type "application-json" is currently supported.
requestBody:"application/json":schema:type: "object"properties:name:type: "string"petType:type: "string"favoriteFoods:type: "array"items:type: "string""text/html":schema:type: "string"
Specifying Data Types
Possible data types include "array", "object", "integer", "number" and "string".
- String, Integer, Number: These types can be specified as below.
username:type: "string"userid:type: "integer"zipcode:type: "number"
- Object: Object type needs to have the sibling key properties that specify the object's keys and the expected data type for each. Nested objects and arrays are permitted.
// Specifying that request field "family" is an object, containing keys "mom"family:type: "object"properties:mom:type: "string"dad:type: "string"siblings:type: "object"properties:sisters:type: "array"items:type: "string"brothers:type: "array"items:type: "string"
- Array: Array type needs to specify the data type of items as well. Array of nested objects is permitted.
// Specifying that request field "favoriteFoods" expects propertyfavoriteFoods:type: "array"items:type: "string"
Sample battletest.config.js
moduleexports =serverLocation: "server.js"serverURL: "http://localhost:8000"authorization_cookie: nullexpectedStatusCode: 400paths:"/pet/:petID":GET: // <-- Operationparameters:name: "petID"in: "path"schema:type: "integer"name: "lastVisitedDate"in: "cookie"schema:type: "string"
For more sample battletest.config.js files, please see here.
Using Express-js server file
Express-js server file must export "app" and "server" separately in order for Battletest's parsing logic to introspect the server code.
moduleexports =appserver;
Resulting battletest.config.js will show the full shape of the request, with expected data types noted as "null". User needs to specify the expected data type for each request field, along with serverLocation and serverURL. Please see sample output here.
// sample Path object from battletest.config.js outputed from expressParser moduleexports = serverLocation: null // <-- user to specify serverURL: null // <-- user to specify authorization_cookie: null // <-- user to specify expectedStatusCode: 400 paths: "/postMessage": post: requestBody: "application/json": schema: type: "object" properties: post_message: type: null // <-- user to specify post_password: type: null // <-- user to specify Using an OpenAPI Document
Battletest uses SwaggerParser to validate & parse OpenAPI v3.03 documents. As OpenAPI documents specify the expected data type for each request field, resulting battletest.config.js will have been completedly populated other than serverLocation and serverURL for the dev server. Please see sample output here. Battletest does not currently support OpenAPI v2.0 documents.
// sample battletest.config.js output from an OpenAPI v.3.03 Document moduleexports = serverLocation: null // <-- user to specify serverURL: null // <-- user to specify authorization_cookie: null // <-- user to specify expectedStatusCode: 400 paths: "/pets": get: parameters: name: "tags" in: "query" description: "tags to filter by" required: false style: "form" schema: type: "array" items: type: "string" name: "limit" in: "query" description: "maximum number of results to return" required: false schema: type: "integer" format: "int32" Generate Test Files
$ battletest generate

$ battletest generate <endpoint-name>
This will parse the newly created battletest.config.js and generate test files under __battletest__ in your project's directory. To only generate tests for a particular endpoint, pass in the endpoint name as an argument.
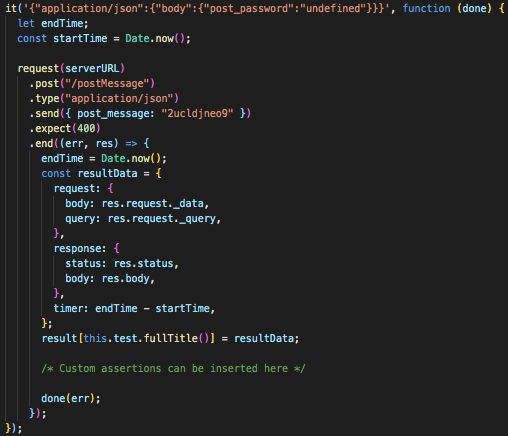
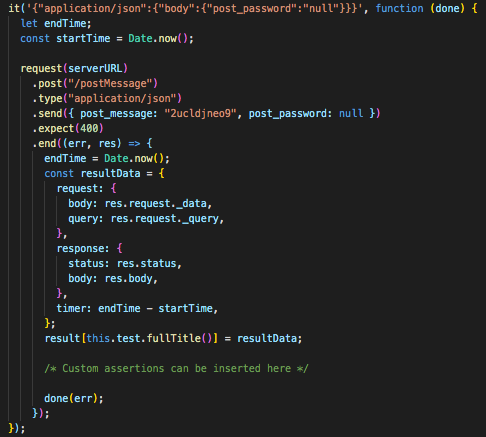
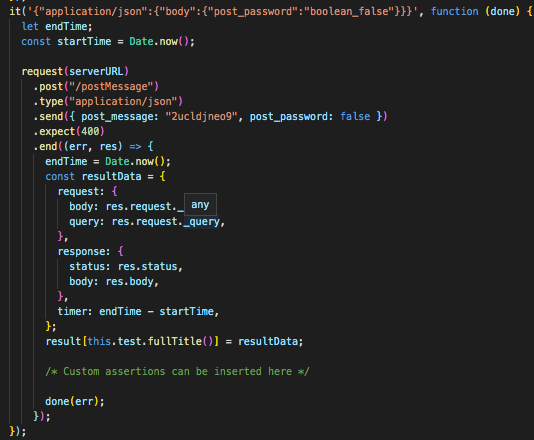
Sample test cases are as below:
-
Request where body.post_password is "undefined".
-
Request where body.post_password is "null".
-
Request where body.post_password is "false".
For sample test files, please see here.
Running Tests
$ battletest start

$ battletest start <test-file-name>
Please ensure that your server file exports the server using module.exports = { server } . This ensures that testSetup.js can launch and close the server.
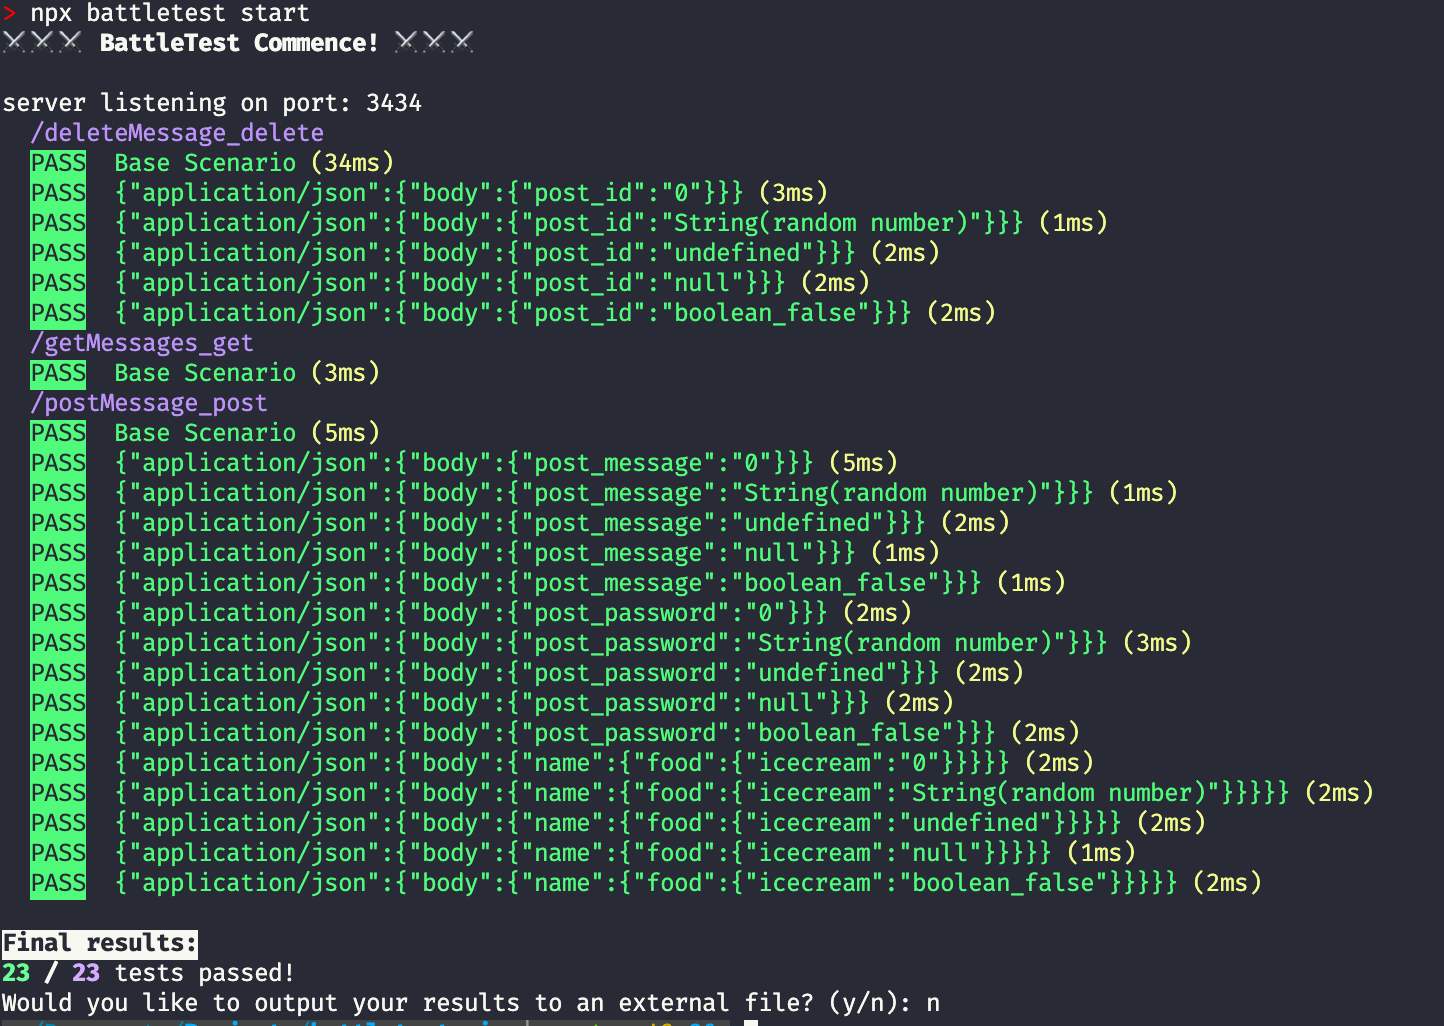
This will instruct Mocha to run all tests contained in __battletest__ folder. To run a specific test file only, pass the test file path as an argument.
A .json file containing the result of each testing suite will be saved to __battletest__/__result__ once a test file has run. Each .json file will contain information on:
- Full details of the request that was sent to the test server
- Full details of the response that was received from the server
- Whether the test passed or failed -- boolean
- Time taken for the request-response cycle to complete
View Test Results
To Be Updated
How the Test Data is Generated
For each endpoint/operation, battletest will generate (i) base scenario that contains data that conform to proper data types, and (ii) other test scenarios that replace a single field in a base scenario with invalid data type or random data.
For instance, invalid data to be tested for a number field includes, among others:
- null
- 0
- undefined
- false
- empty string
- empty object
- empty array
- positive infinity
- negative infinity
- random string
For details on how the random test data is generated, please see the relevant code here.
Testing
We use Travis-CI to run our testing suites. In a local machine, please use npm run test to execute the testing suite.
Contributing
Pull requests are welcome. For major changes, please open an issue first to discuss what you would like to change. For an overview diagram for the codebase, please see here. For full API documentation, please see here
Credits
Binta Kinteh @BintaKinteh | Duygu Yigitsoy @dyigitsoy | Kevin Luo @LuoKevin | Soobin Kim @soobinkim1 | Yula Ko @yulako