React Native Azure Notification Hub
React Native module to support Azure Notification Hub push notifications on Android, iOS, and Windows.
Quick Links
Prerequisites
Android
The documentation that follows assumes you have generated a React Native Android project using the react-native-cli, i.e.:
react-native init myapp
In addition to the standard React Native requirements, you will also need to install the following Android SDK components with your prefered SDK management tools:
- Google Play services
Windows
The documentation that follows assumes you have generated a React Native Windows project using the react-native-cli and rnpm-plugin-windows, i.e.:
react-native init myapp
cd myapp
npm i --save-dev rnpm-plugin-windows
react-native windows
It also assumes you have Visual Studio 2015 installed (Visual Studio Community is fine).
iOS
The documentation that follows assumes you have generated a React Native iOS project using the react-native-cli, i.e.:
react-native init myapp
In addition to the standard React Native requirements, you will also need the following:
- An iOS 8 (or later version)-capable device (simulator doesn't work with push notifications)
- Apple Developer Program membership
Getting Started
npm install react-native-azurenotificationhub
Create a Notification Hub
- Log on to the Azure Portal and create a new Notification Hub.

Android Installation
Register app with Notification Hub
- Log in to the Firebase console and create a new Firebase project if you don't already have one.
- After your project is created click Add Firebase to your Android app and folow the instructions provided.
 .
.
- In the Firebase Console, click the cog for your project and then click Project Settings

-
Click the Cloud Messaging tab in your project settings and copy the value of the Server key and Sender ID. The former will be used to configure the Notification Hub Access Policy and and the latter for your React Native module registration.
-
Back on the Azure Portal page for your notification hub, select Settings > Notification Services > Google (GCM). Enter the FCM Server key you copied from the Firebase console and click Save.

Merging of icon resources
In android/app/src/main/AndroidManifest.xml
    <application
      xmlns:tools="http://schemas.android.com/tools"
      tools:replace="android:icon"
      ...>
    </application>
This resolves the error caused by the manifest merger tool for gradle.
Export React Native Module from app
In android/settings.gradle
...

include ':react-native-azurenotificationhub'
project(':react-native-azurenotificationhub').projectDir = file('../node_modules/react-native-azurenotificationhub/android')
In android/app/build.gradle
...
dependencies {
    ...

    compile project(':react-native-azurenotificationhub')
    compile 'com.google.android.gms:play-services-gcm:9.4.0'
    compile 'com.google.firebase:firebase-messaging:9.4.0'
}
In android/app/src/main/AndroidManifest.xml
    ...

    <uses-permission android:name="android.permission.INTERNET"/>
    <uses-permission android:name="android.permission.GET_ACCOUNTS"/>
    <uses-permission android:name="com.google.android.c2dm.permission.RECEIVE" />

    <application ...>
      ...
      <service
        android:name="com.azure.reactnative.notificationhub.ReactNativeRegistrationIntentService"
        android:exported="false">
      </service>
      <receiver android:name="com.microsoft.windowsazure.notifications.NotificationsBroadcastReceiver"
        android:permission="com.google.android.c2dm.permission.SEND">
        <intent-filter>
          <action android:name="com.google.android.c2dm.intent.RECEIVE" />
        </intent-filter>
      </receiver>
    ...
Register the module package in MainApplication.java
import com.azure.reactnative.notificationhub.ReactNativeNotificationHubPackage;

public class MainApplication extends Application implements ReactApplication {

  private final ReactNativeHost mReactNativeHost = new ReactNativeHost(this) {
    @Override
    protected boolean getUseDeveloperSupport() {
      return BuildConfig.DEBUG;
    }

    @Override
    protected List<ReactPackage> getPackages() {
      return Arrays.<ReactPackage>asList(
          new MainReactPackage(),
          new ReactNativeNotificationHubPackage() // <-- Add this package
      );
    }
  };

  ...
}
Windows Installation
Associate your app with the Windows Store
- Open your Visual Studio .sln (generally ./windows/[app name].sln) file in Visual Studio 2015.
- In Solution Explorer, right-click the Windows Store app project, click Store, and then click Associate App with the Store...

- Follow the instructions to login, reserve an app name, associate the app with the app name, and automatically configure the required Windows Store registration in the application manifest.
Register app with Notification Hub
- On the Windows Dev Center page for your new app, click Services, click Push notifications, and then click Live Services site under Windows Push Notification Services (WNS) and Microsoft Azure Mobile Apps.

- On the registration page for your app, make a note of the Application Secret password and the Package security identifier (SID) located in the Windows Store platform settings.

- Back on the Azure Portal page for your notification hub, select Settings > Notification Services > Windows (WNS). Then enter the Application Secret password in the Security Key field. Enter your Package SID value that you obtained from WNS in the previous section, and then click Save.

Export React Native Module from app
- In Solution Explorer of your open .sln in Visual Studio 2015, right-click the Solution, click Add > Existing Project....

- Assuming you've already installed
react-native-azurenotificationhubwith NPM, find and selectReactWindowsAzureNotificationHub.csprojin.\node_modules\react-native-azurenotificationhub\windows\ReactWindowsAzureNotificationHub. - Right-click the Windows Store app project, click ** Add > Reference**, and check
ReactWindowsAzureNotificationHubfrom Projects > Solution.

- In MainPage.cs of your Windows Store app, add the the
ReactAzureNotificationHubPacakgeto your configured set of packages:
using ReactWindowsAzureNotificationHub;

namespace ...
{
    public class MainPage : ReactPage
    {
        ...

        public override List<IReactPackage> Packages
        {
            get
            {
                new List<IReactPackage>
                {
                    new MainReactPackage(),
                    new ReactAzureNotificationHubPackage(), // <-- Add this package
                }
            }
        }

        ...
    }
}
iOS Installation
Generate the Certificate Signing Request file
-
On your Mac, run the Keychain Access tool. It can be opened from the Utilities folder or the Other folder on the launch pad.
-
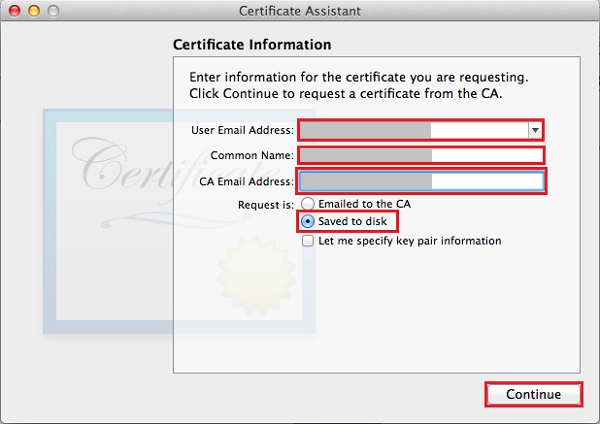
Click Keychain Access, expand Certificate Assistant, then click Request a Certificate from a Certificate Authority....

-
Select your User Email Address and Common Name , make sure that Saved to disk is selected, and then click Continue. Leave the CA Email Address field blank as it is not required.
-
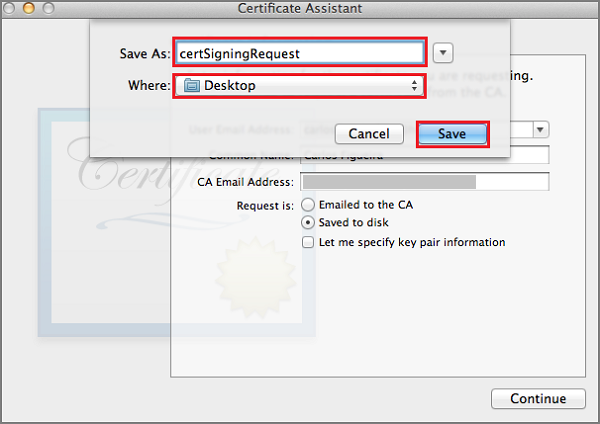
Type a name for the Certificate Signing Request (CSR) file in Save As, select the location in Where, then click Save.


Register your app for push notifications
- If you have not already registered your app, navigate to the iOS Provisioning Portal at the Apple Developer Center, log on with your Apple ID, click Identifiers, then click App IDs, and finally click on the + sign to register a new app.

-
Update the following three fields for your new app and then click Continue:
-
Name: Type a descriptive name for your app in the Name field in the App ID Description section.
-
Bundle Identifier: Under the Explicit App ID section, enter a Bundle Identifier in the form
<Organization Identifier>.<Product Name>as mentioned in the App Distribution Guide. The Organization Identifier and Product Name you use must match the organization identifier and product name you will use when you create your XCode project. In the screeshot below NotificationHubs is used as a organization idenitifier and GetStarted is used as the product name. Making sure this matches the values you will use in your XCode project will allow you to use the correct publishing profile with XCode. -
Push Notifications: Check the Push Notifications option in the App Services section, .
-

-
This generates your App ID and requests you to confirm the information. Click Register to confirm the new App ID.
-
Once you click Register, you will see the Registration complete screen, as shown below. Click Done.

- In the Developer Center, under App IDs, locate the app ID that you just created, and click on its row.

-
Clicking on the app ID will display the app details. Click the Edit button at the bottom.
-
Scroll to the bottom of the screen, and click the Create Certificate... button under the section Development Push SSL Certificate.

- Click Choose File, browse to the location where you saved the CSR file that you created in the first task, then click Generate.

- After the certificate is created by the portal, click the Download button, and click Done.

- Double-click the downloaded push certificate aps_development.cer.

- In Keychain Access, right-click the new push certificate that you created in the Certificates category. Click Export, name the file, select the .p12 format, and then click Save.

Create a provisioning profile for the app
- Back in the iOS Provisioning Portal, select Provisioning Profiles, select All, and then click the + button to create a new profile. This launches the Add iOS Provisioning Profile Wizard

-
Select iOS App Development under Development as the provisiong profile type, and click Continue.
-
Next, select the app ID you just created from the App ID drop-down list, and click Continue

- In the Select certificates screen, select your usual development certificate used for code signing, and click Continue. This is not the push certificate you just created.

- Next, select the Devices to use for testing, and click Continue

- Finally, pick a name for the profile in Profile Name, click Generate.

- When the new provisioning profile is created click to download it and install it on your Xcode development machine. Then click Done.

Configure your Notification Hub for iOS push notifications
-
Back on the Azure Portal page for your notification hub, select Settings > Notification Services > Apple (APNS). Click on Upload Certificate and select the .p12 file that you exported earlier. Make sure you also specify the correct password.
-
Make sure to select Sandbox mode since this is for development. Only use the Production if you want to send push notifications to users who purchased your app from the store.

Connect your iOS app to Notification Hubs
-
Make sure to use the same Product Name and Organization Identifier that you used when you previously set the bundle ID on the Apple Developer portal, i.e.:
- Product Name: myapp
- Organization Identifier: org.reactjs.native.example
-
Remember to set Provisioning Profile to the provisioning profile that you created previously.

- Drag node_modules/react-native-azurenotificationhub/ios/RCTAzureNotificationHubManager.xcodeproj and node_modules/react-native-azurenotificationhub/ios/WindowsAzureMessaging.xcodeproj to your project on Xcode (usually under the Libraries group on Xcode).

- Click on your main project file (the one that represents the .xcodeproj), select Build Phases and drag the static libraries from the Products folder inside the libraries you are importing to Link Binary With Libraries

- Add $(SRCROOT)/../node_modules/react-native-azurenotificationhub/ios to Header Search Paths and select recursive

- To enable support for notification and register events you need to augment your AppDelegate. At the top of your AppDelegate.m:
#import "RCTAzureNotificationHubManager.h"- And then add the following code in the same file:
// Required to register for notifications
- (void)application:(UIApplication *)application didRegisterUserNotificationSettings:(UIUserNotificationSettings *)notificationSettings
{
    [RCTAzureNotificationHubManager didRegisterUserNotificationSettings:notificationSettings];
}

// Required for the register event.
- (void)application:(UIApplication *)application didRegisterForRemoteNotificationsWithDeviceToken:(NSData *)deviceToken
{
    [RCTAzureNotificationHubManager didRegisterForRemoteNotificationsWithDeviceToken:deviceToken];
}

// Required for the registrationError event.
- (void)application:(UIApplication *)application didFailToRegisterForRemoteNotificationsWithError:(NSError *)error
{
    [RCTAzureNotificationHubManager didFailToRegisterForRemoteNotificationsWithError:error];
}

// Required for the notification event.
- (void)application:(UIApplication *)application didReceiveRemoteNotification:(NSDictionary *)notification
{
    [RCTAzureNotificationHubManager didReceiveRemoteNotification:notification];
}

// Required for the localNotification event.
- (void)application:(UIApplication *)application didReceiveLocalNotification:(UILocalNotification *)notification
{
    [RCTAzureNotificationHubManager didReceiveLocalNotification:notification];
}
XCode 8 changes
With XCode 8, the entitlements are set from your local entitlements file rather than from the provisioning profile you created on the Apple Developer Portal. The entitlements will now need to be added to your Xcode build under Capabilities in addition to in your provisioning profile.

JavaScript Configuration
On the Azure Portal page for your notification hub, copy a connection string from Settings > Access Policies.

The example below shows how you can register and unregister from Azure Notification Hub in your React component.
Windows
const NotificationHub = require('react-native-azurenotificationhub');

const connectionString = '...'; // The Notification Hub connection string
const hubName = '...';          // The Notification Hub name
const senderID = '...';         // The Sender ID from the Cloud Messaging tab of the Firebase console
const tags = [ ... ];           // The set of tags to subscribe to

class myapp extends Component {
  register() {
    NotificationHub.register({connectionString, hubName, senderID, tags})
      .catch(reason => console.warn(reason));
  }

  unregister() {
    NotificationHub.unregister()
      .catch(reason => console.warn(reason));
  }

  render() {
    return (
      <View style={styles.container}>
        <TouchableOpacity onPress={this.register.bind(this)}>
         <View style={styles.button}>
           <Text style={styles.buttonText}>
             Register
           </Text>
         </View>
       </TouchableOpacity>
       <TouchableOpacity onPress={this.unregister.bind(this)}>
         <View style={styles.button}>
           <Text style={styles.buttonText}>
             Unregister
           </Text>
         </View>
       </TouchableOpacity>
      </View>
    );
  }
Android
const NotificationHub = require('react-native-azurenotificationhub');
const PushNotificationEmitter = new NativeEventEmitter(NotificationHub);

const NOTIF_REGISTER_AZURE_HUB_EVENT = 'azureNotificationHubRegistered';
const NOTIF_AZURE_HUB_REGISTRATION_ERROR_EVENT = 'azureNotificationHubRegistrationError';
const DEVICE_NOTIF_EVENT = 'remoteNotificationReceived';

const connectionString = '...'; // The Notification Hub connection string
const hubName = '...';          // The Notification Hub name
const senderID = '...';         // The Sender ID from the Cloud Messaging tab of the Firebase console
const tags = [ ... ];           // The set of tags to subscribe to

class myapp extends Component {
  constructor(props) {
    super(props);
    PushNotificationEmitter.addListener(DEVICE_NOTIF_EVENT, this._onRemoteNotification);
  }

  register() {
    PushNotificationEmitter.addListener(NOTIF_REGISTER_AZURE_HUB_EVENT, this._onAzureNotificationHubRegistered);
    PushNotificationEmitter.addListener(NOTIF_AZURE_HUB_REGISTRATION_ERROR_EVENT, this._onAzureNotificationHubRegistrationError);

    NotificationHub.register({connectionString, hubName, senderID, tags})
      .catch(reason => console.warn(reason));
  }

  unregister() {
    NotificationHub.unregister()
      .catch(reason => console.warn(reason));
  }

  render() {
    return (
      <View style={styles.container}>
        <TouchableOpacity onPress={this.register.bind(this)}>
         <View style={styles.button}>
           <Text style={styles.buttonText}>
             Register
           </Text>
         </View>
       </TouchableOpacity>
       <TouchableOpacity onPress={this.unregister.bind(this)}>
         <View style={styles.button}>
           <Text style={styles.buttonText}>
             Unregister
           </Text>
         </View>
       </TouchableOpacity>
      </View>
    );
  }

  _onAzureNotificationHubRegistered(registrationID) {
    console.warn('RegistrationID: ' + registrationID);
  }

  _onAzureNotificationHubRegistrationError(error) {
    console.warn('Error: ' + error);
  }

  _onRemoteNotification(notification) {
    console.warn('Notification received: ' + notification);
  }
iOS
const NotificationHub = require('react-native-azurenotificationhub/index.ios');

const connectionString = '...'; // The Notification Hub connection string
const hubName = '...';          // The Notification Hub name
const senderID = '...';         // The Sender ID from the Cloud Messaging tab of the Firebase console
const tags = [ ... ];           // The set of tags to subscribe to

var remoteNotificationsDeviceToken = '';  // The device token registered with APNS

class myapp extends Component {
  requestPermissions() {
    NotificationHub.addEventListener('register', this._onRegistered);
    NotificationHub.addEventListener('registrationError', this._onRegistrationError);
    NotificationHub.addEventListener('registerAzureNotificationHub', this._onAzureNotificationHubRegistered);
    NotificationHub.addEventListener('azureNotificationHubRegistrationError', this._onAzureNotificationHubRegistrationError);
    NotificationHub.addEventListener('notification', this._onRemoteNotification);
    NotificationHub.addEventListener('localNotification', this._onLocalNotification);

    NotificationHub.requestPermissions();
  }

  register() {
    NotificationHub.register(remoteNotificationsDeviceToken, {connectionString, hubName, senderID, tags});
  }

  unregister() {
    NotificationHub.unregister();
  }

  render() {
    return (
      <View style={styles.container}>
        <TouchableOpacity onPress={this.requestPermissions.bind(this)}>
         <View style={styles.button}>
           <Text style={styles.buttonText}>
             Request permission
           </Text>
         </View>
       </TouchableOpacity>
       <TouchableOpacity onPress={this.register.bind(this)}>
         <View style={styles.button}>
           <Text style={styles.buttonText}>
             Register
           </Text>
         </View>
       </TouchableOpacity>
       <TouchableOpacity onPress={this.unregister.bind(this)}>
         <View style={styles.button}>
           <Text style={styles.buttonText}>
             Unregister
           </Text>
         </View>
       </TouchableOpacity>
      </View>
    );
  }

  _onRegistered(deviceToken) {
    remoteNotificationsDeviceToken = deviceToken;
    AlertIOS.alert(
      'Registered For Remote Push',
      `Device Token: ${deviceToken}`,
      [{
        text: 'Dismiss',
        onPress: null,
      }]
    );
  }

  _onRegistrationError(error) {
    AlertIOS.alert(
      'Failed To Register For Remote Push',
      `Error (${error.code}): ${error.message}`,
      [{
        text: 'Dismiss',
        onPress: null,
      }]
    );
  }

  _onRemoteNotification(notification) {
    AlertIOS.alert(
      'Push Notification Received',
      'Alert message: ' + notification.getMessage(),
      [{
        text: 'Dismiss',
        onPress: null,
      }]
    );
  }

  _onAzureNotificationHubRegistered(registrationInfo) {
    AlertIOS.alert('Registered For Azure notification hub',
      'Registered For Azure notification hub'
      [{
        text: 'Dismiss',
        onPress: null,
      }]
    );
  }

  _onAzureNotificationHubRegistrationError(error) {
    AlertIOS.alert(
      'Failed To Register For Azure Notification Hub',
      `Error (${error.code}): ${error.message}`,
      [{
        text: 'Dismiss',
        onPress: null,
      }]
    );
  }

  _onLocalNotification(notification){
    AlertIOS.alert(
      'Local Notification Received',
      'Alert message: ' + notification.getMessage(),
      [{
        text: 'Dismiss',
        onPress: null,
      }]
    );
  }
}
Publishing Notifications
Coming soon.
License
The React Native Azure Notification Hub plugin is provided under the MIT License.
Code of Conduct
This project has adopted the Microsoft Open Source Code of Conduct. For more information see the Code of Conduct FAQ or contact opencode@microsoft.com with any additional questions or comments.