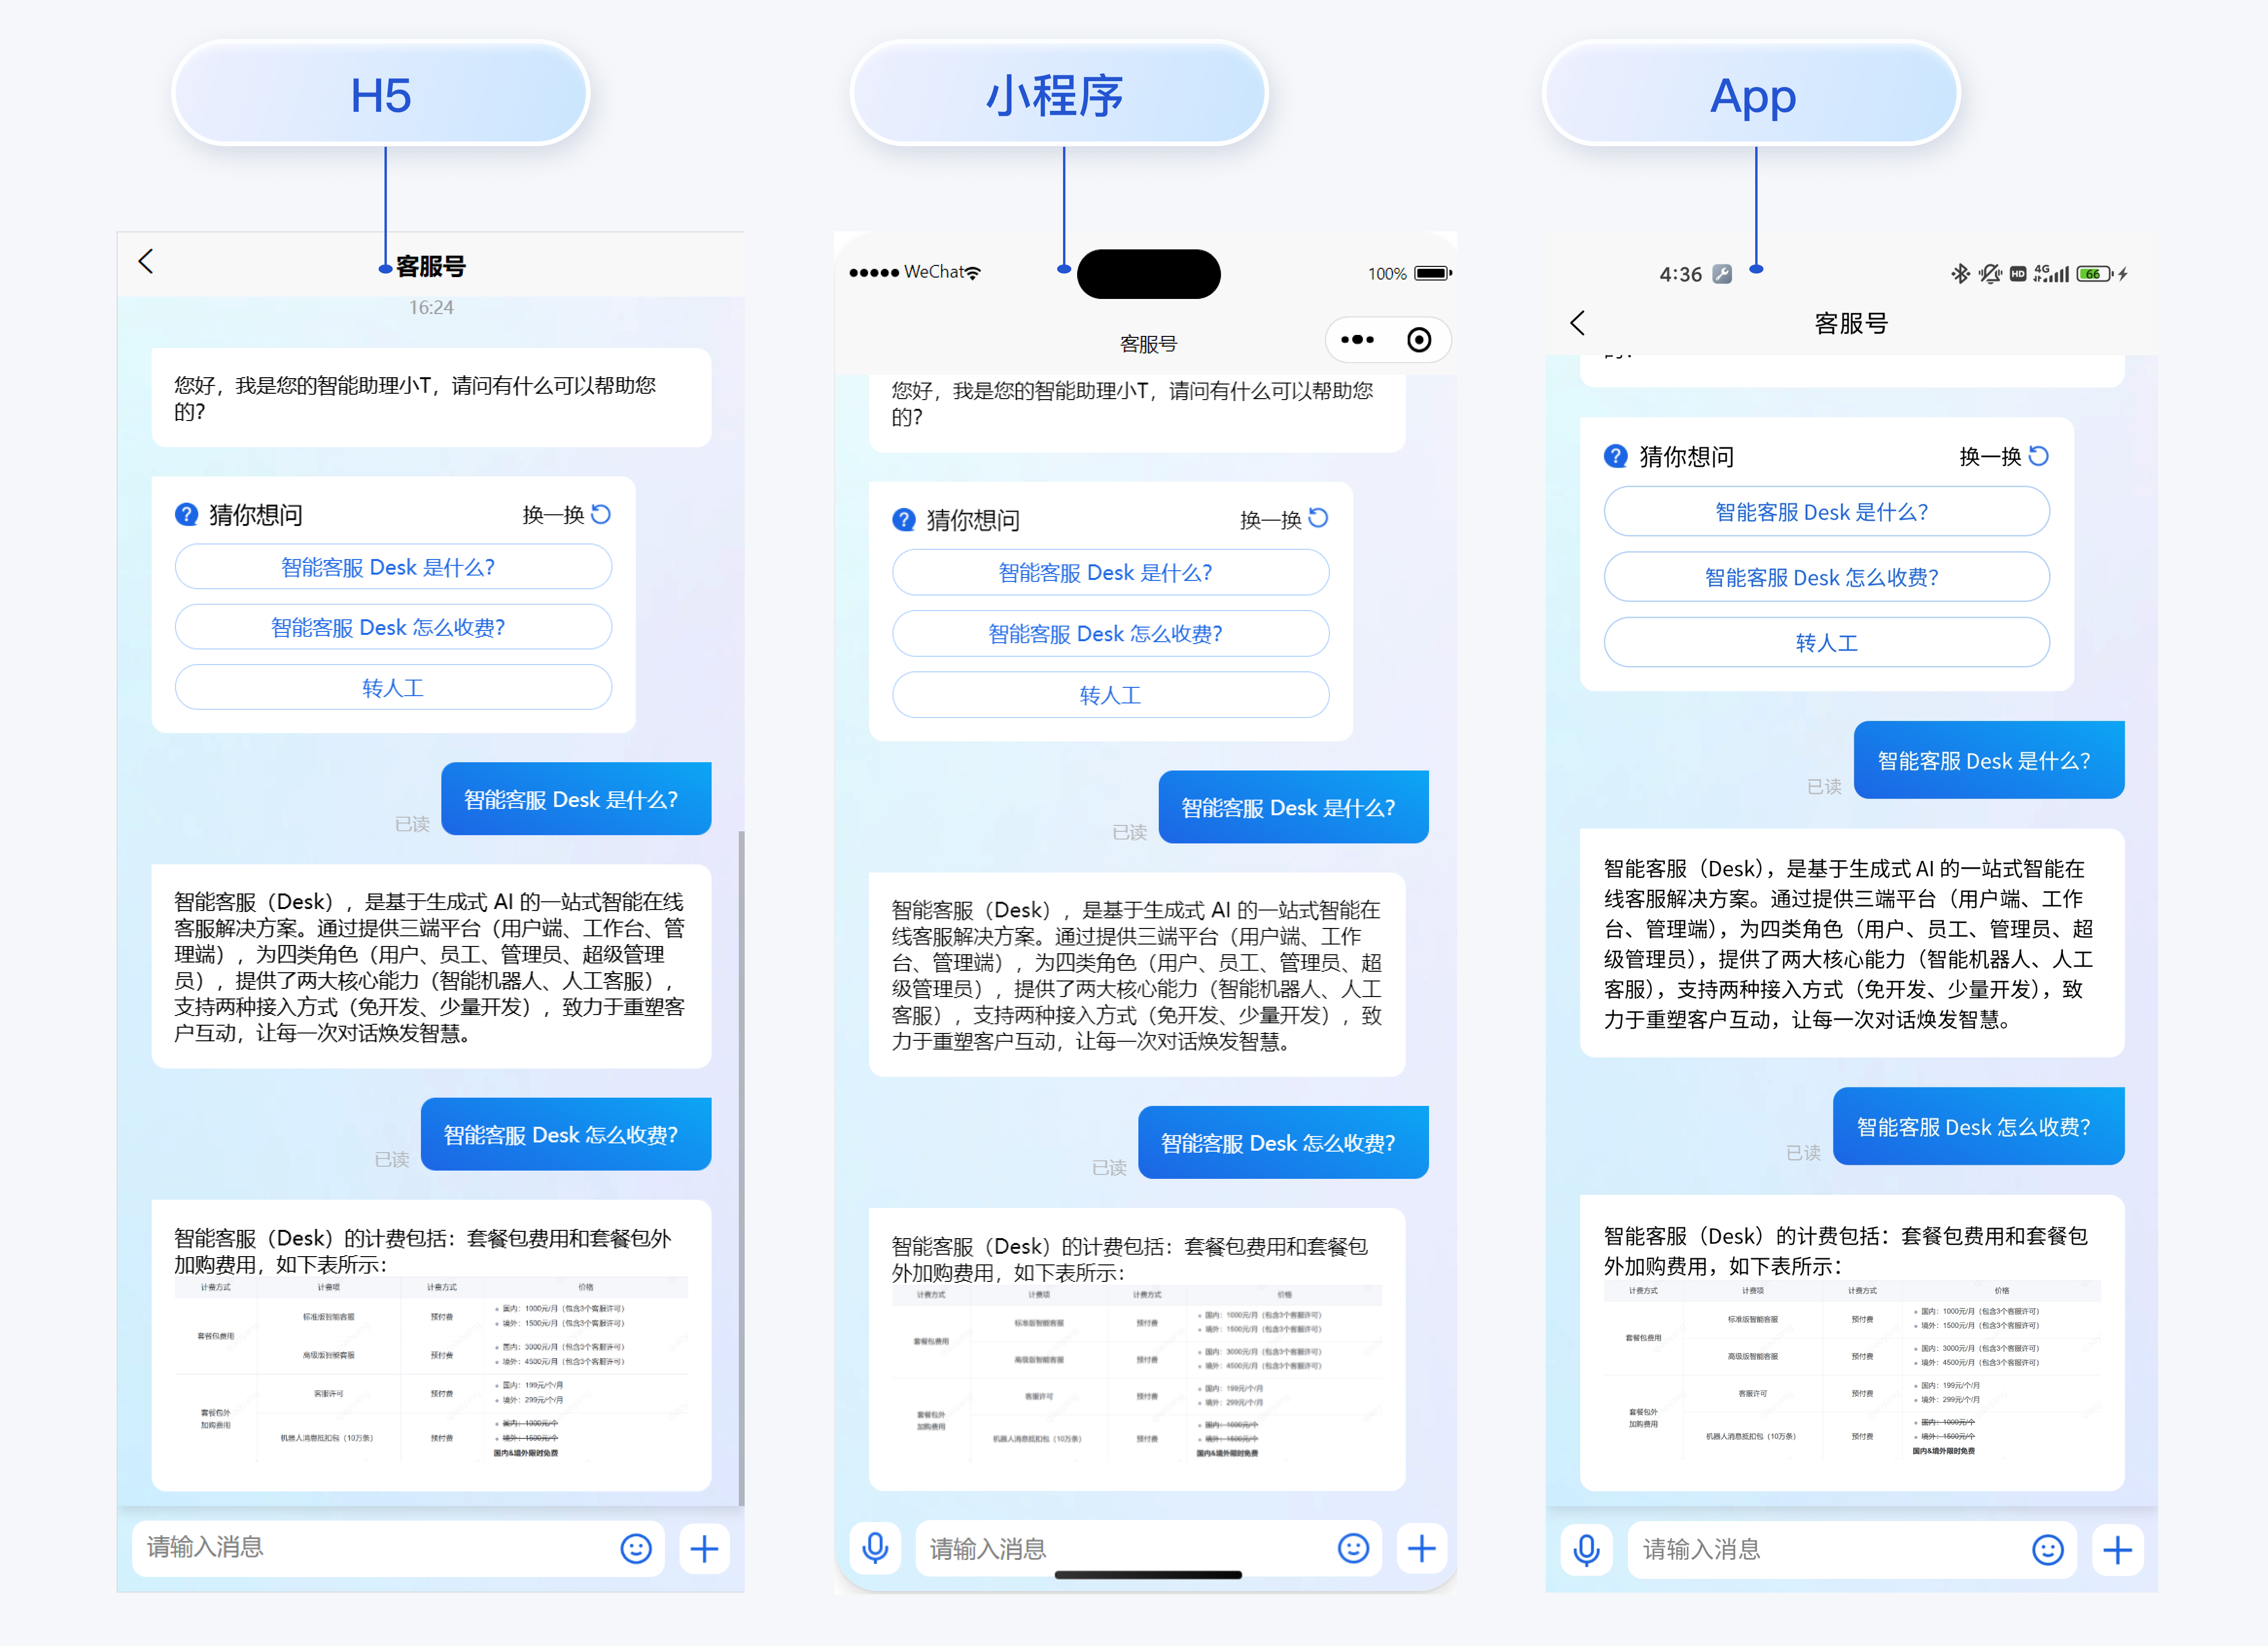
智能客服用户端 uni-app UIKit。使用此 UIKit,您可以在一天内将智能客服的能力集成到您的 Web、小程序、App 项目。极简接入,一套代码多端运行,且体验一致,用 AI 为您的产品增收提效。
-
HBuilderX 升级到最新版本
-
TypeScript / JavaScript (UIKit 使用 ts 语言开发,支持在 js 或者 ts 项目中集成)
-
Vue2 / Vue3
-
sass(sass-loader 版本 ≤ 10.1.1)
-
node(12.13.0 ≤ node 版本 ≤ 17.0.0, 推荐使用 Node.js 官方 LTS 版本 16.17.0)
-
npm(版本请与 node 版本匹配)
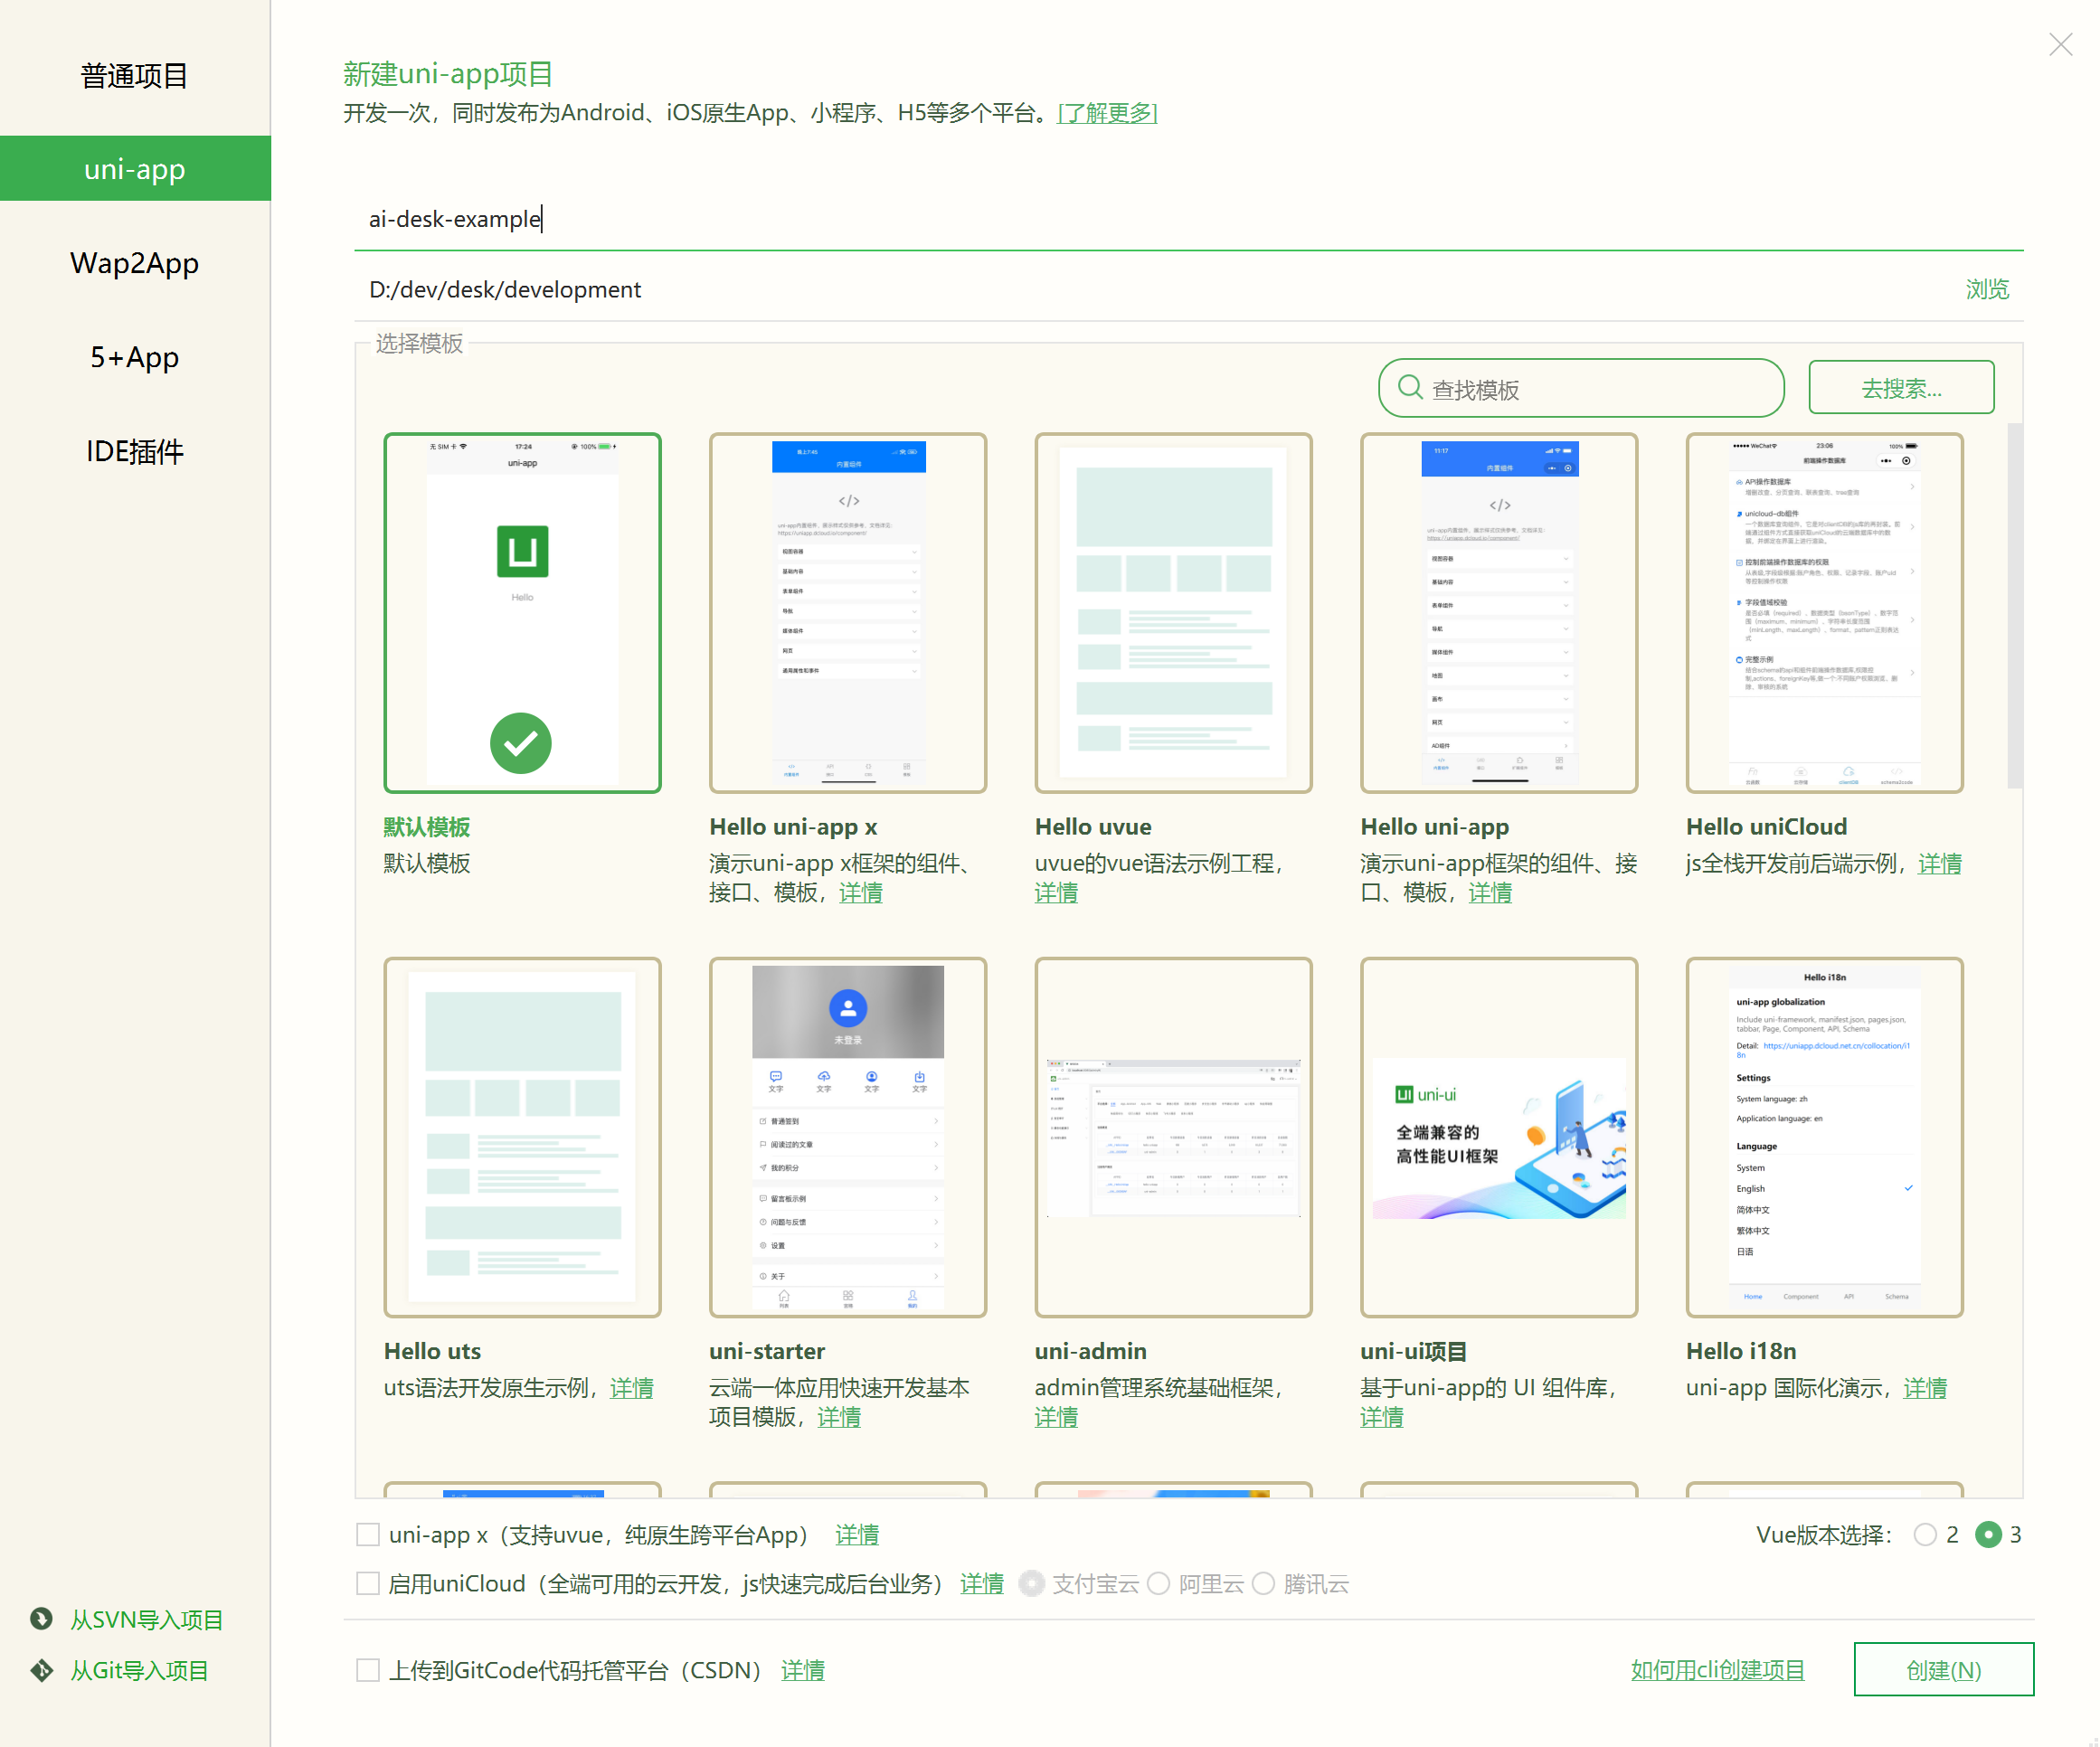
打开 HbuilderX,在菜单栏中选择 “文件-新建-项目”,创建一个名为 ai-desk-example 的 uni-app 项目。Vue 版本选择推荐 3。
-
HBuilderX 创建项目时默认不会创建
package.json文件,请在项目根目录下执行以下命令创建package.json文件:npm init -y
-
通过 NPM 方式下载 UIKit。
npm i @tencentcloud/ai-desk-customer-uniapp@latest unplugin-vue2-script-setup
-
为了方便您对 UI 进行扩展,请在项目的根目录下执行以下命令,将 UIKit 源码复制到项目中。
【macOS 端】
mkdir -p ./ai-desk-customer-uniapp &&
rsync -av --exclude={'node_modules','excluded-list.txt'} ./node_modules/@tencentcloud/ai-desk-customer-uniapp/ ai-desk-customer-uniapp/
【Windows 端】
xcopy .\node_modules\@tencentcloud\ai-desk-customer-uniapp .\ai-desk-customer-uniapp /i /e /exclude:.\node_modules\@tencentcloud\ai-desk-customer-uniapp\excluded-list.txt【manifest.json 文件】
在 manifest.json 文件的源码视图中开启小程序分包 subPackages 和关闭 H5 treeShaking 选项。
// weixin miniProgram
"mp-weixin" : {
    "appid" : "",
    "optimization" : {
        "subPackages" : true
    }
},
// H5: close treeshaking to solve the problem of uni[methond]() is not a function
"h5" : {
    "optimization" : {
        "treeShaking" : {
            "enable" : false
        }
    }
},
注意:
小程序默认使用分包集成,打包小程序时
manifest.json不要配置 lazyCodeLoading 选项。
【vue.config.js(Vue2 项目请修改;Vue3 项目无需修改)】
Vue2 项目必须在根目录下创建或修改 vue.config.js 。
const ScriptSetup = require('unplugin-vue2-script-setup/webpack').default;

module.exports = {
  parallel: false,
  configureWebpack: {
    plugins: [
      ScriptSetup({
        /* options */
      }),
    ],
  },
  chainWebpack(config) {
    // disable type check and let `vue-tsc` handles it
    config.plugins.delete('fork-ts-checker');
  },
};为了规避小程序主包体积超限问题,我们建议您将客服 UIKit 放入分包。假设您的主包页面是 pages/index/index.vue,分包页面是 pages-ai-desk/index/index.vue,主包页面有一个咨询客服的入口,用户点击后跳转至分包的智能客服页面。项目的目录结构如下所示:
----YOUR-UNI-APP-PROJECT
----ai-desk-customer-uniapp
----pages
--------index
------------index.vue
----pages-ai-desk
--------index
------------index.vue
----App.vue
----manifest.json
----pages.json
请将以下内容复制到项目对应的文件中。
【App.vue 文件】
<script>
export default {
	onLaunch: function() {
		console.log('App Launch')
	},
	onShow: function() {
		console.log('App Show')
	},
	onHide: function() {
		console.log('App Hide')
	}
}
</script>
<style>
uni-page-body,
html,
body,
page {
  width: 100% !important;
  height: 100% !important;
  overflow: hidden;
}
#app {
  height: 100% !important;
}
</style>
【pages.json 文件】
{
	"pages": [
		{
			"path": "pages/index/index",
			"style": {
				"navigationBarTitleText": "uni-app"
			}
		}
	],
	"subPackages": [{
		"root": "pages-ai-desk",
		"pages": [{
			"path": "index/index",
			"style": {
				"navigationBarTitleText": "智能客服",
				"navigationStyle": "default"
			}
		}]
	}],
	"globalStyle": {
		"navigationBarTextStyle": "black",
		"navigationBarTitleText": "uni-app",
		"navigationBarBackgroundColor": "#F8F8F8",
		"backgroundColor": "#F8F8F8"
	},
	"uniIdRouter": {},
	"condition": { //模式配置,仅开发期间生效
		"current": 0, //当前激活的模式(list 的索引项)
		"list": [{
			"name": "", //模式名称
			"path": "", //启动页面,必选
			"query": "" //启动参数,在页面的onLoad函数里面得到
		}]
	}
}
【main.js(Vue2 项目请修改;Vue3 项目无需修改)】
如果您是 Vue2 项目,请在 main.js 中引入组合式API,防止环境变量 isPC 等无法使用。
// #ifndef VUE3
import VueCompositionAPI from '@vue/composition-api';
Vue.use(VueCompositionAPI);
// #endif【主包 pages/index/index.vue】
<template>
	<div class="chat">
		<button @click="getSupport">咨询客服</button>
	</div>
</template>
<script>
	export default {
		methods: {
			getSupport() {
				uni.navigateTo({
					url: "/pages-ai-desk/index/index"
				})
			}
		}
	}
</script>
<style lang="scss" scoped>
	.chat {
		height: 100%;
		overflow: hidden;
		display: flex;
		align-items: center;
		justify-content: center;
	}
</style>
【分包 pages-ai-desk/index/index.vue】
<template>
    <CustomerServiceChat style="height: 100%;"
    />
</template>
<script>
import TUICustomerServer from '../../ai-desk-customer-uniapp';
import CustomerServiceChat from '../../ai-desk-customer-uniapp/components/CustomerServiceChat/index-uniapp.vue';

export default {
    components: {
	    CustomerServiceChat
	},
	data() {
	},
	onLoad() {
		this.$nextTick(() => {
            // SDKAppID/userID/userSig 的获取请参考步骤4
            const SDKAppID = 0; // Your SDKAppID,即开通了智能客服 Desk 的应用 ID
            const userID = ''; // Your userID,可复用您 app 的账号体系,或随机生成
            const userSig = ''; // Your userSig,接入阶段可控制台生成,生产阶段请务必由服务端生成
		    TUICustomerServer.init(SDKAppID, userID, userSig);
		});
	}
}
</script>
<style scoped lang="scss">
</style>设置pages-ai-desk/index/index.vue中的 SDKAppID、userID、userSig 。
-
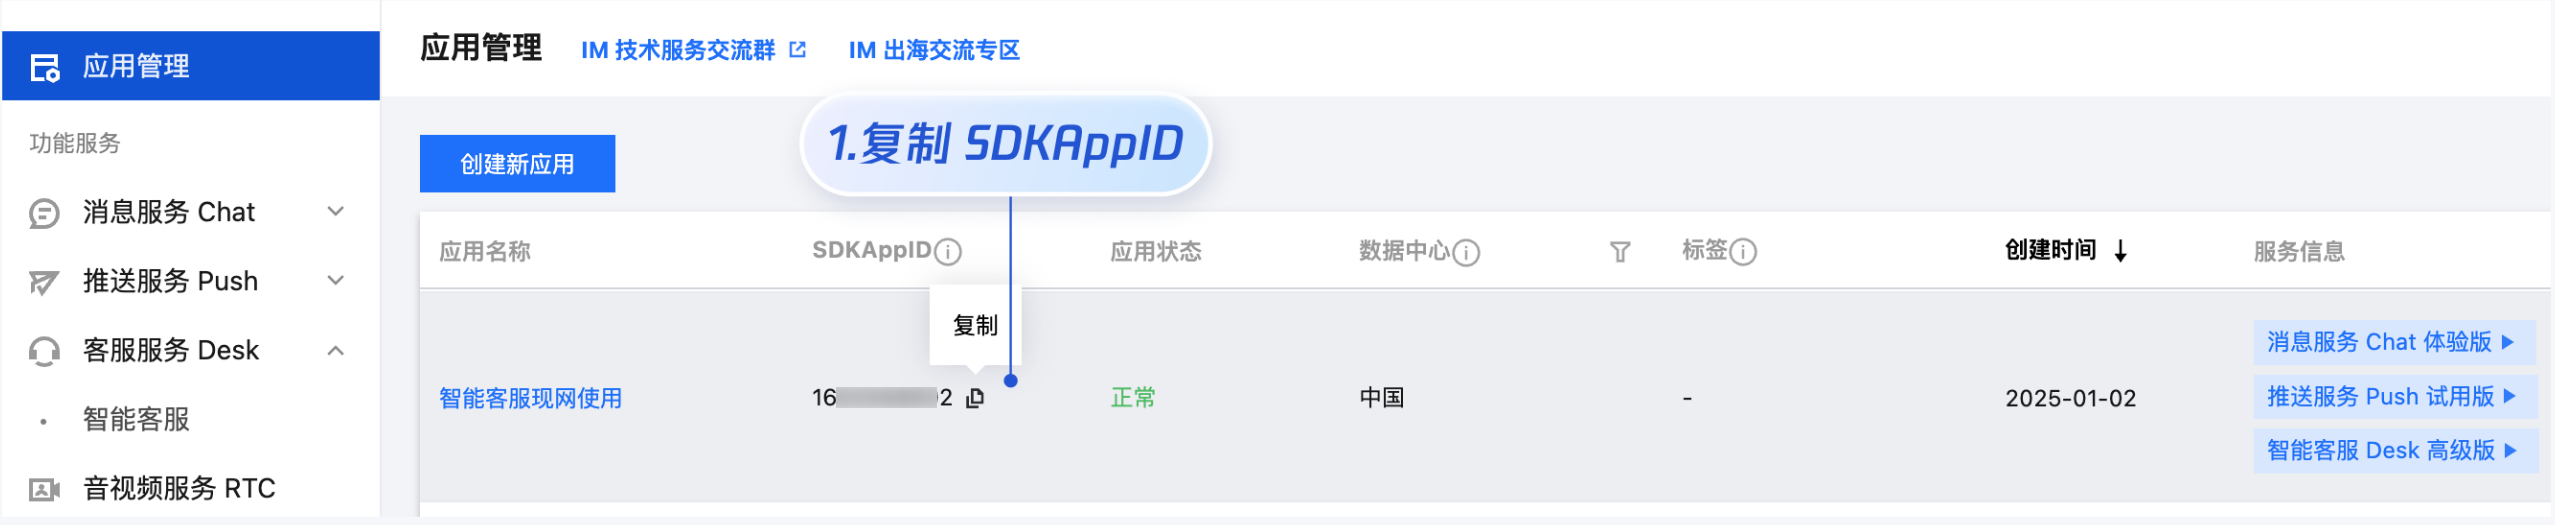
SDKAppID 信息,可在 即时通信 IM 控制台 单击应用管理 > 创建新应用,并选择客服服务 Desk > 智能客服, 开通智能客服 后获取。
-
userID 信息,可本地生成一个随机的字符串,例如 test-1234。
-
userSig 信息,可单击 即时通信 IM 控制台 > UserSig生成校验,填写创建的 userID,即可生成 userSig。


-
使用 HBuilderX 启动该项目,单击运行,可选择运行到浏览器,或者手机,或者小程序模拟器。
-
如果您选择了运行到微信开发者工具,但 HBuilderX 没有自动拉起微信开发者工具,请使用微信开发者工具手动打开编译后的项目,目录地址:
unpackage/dist/dev/mp-weixin。 -
小程序开发环境,请选择 详情 > **本地设置 **中勾选 不校验合法域名、web-view(业务域名)、TLS版本以及 HTTPS 证书。上线前请在微信公众平台 > 开发 > 开发管理 > 开发设置 > 服务器域名中进行域名配置,域名配置详见:小程序合法域名。
从 v1.0.0 起,UIKit 支持以下界面语言:
说明:
小程序暂不支持国际化。
| 语言代码(userLang) | 语言 |
| zh_cn | 简体中文 |
| en | 英文 |
| zh_tw | 繁体中文 |
| ja | 日语 |
| id | 印尼语 |
| ms | 马来语 |
| vi | 越南语 |
| th | 泰语 |
| fil | 菲律宾语 |
| ru | 俄语 |
如果您的业务需要出海,且用户语言以英语为主,可在引入智能客服时设置userLang="en"。如果您不指定userLang, UIKit 会使用浏览器或 App 设置的语言。
<template>
    <CustomerServiceChat style="height: 100%;"
        userLang="en"
    />
</template>如果您需要支持动态切换用户语言,可使用TUICustomerServer.changeLanguage接口,并通过切换 页面/组件 key 的方式,实现语言动态修改与展示。
<template>
    <CustomerServiceChat style="height: 100%;"
        :key="locale"
        :userLang="locale"
    />
</template>
<script>
import CustomerServiceChat from '../../ai-desk-customer-uniapp/components/CustomerServiceChat/index-uniapp.vue';
import TUICustomerServer  from '../../ai-desk-customer-uniapp';

export default {
  components: {
    CustomerServiceChat,
  },
  data() {
    let locale = 'en';
    return {
      locale
    }
  },
  methods: {
    changeLanguage(language) {
       TUICustomerServer.changeLanguage(language).then(() => {
         this.locale = language;
       });
    }
  }
}
</script>
<style scoped lang="scss">
</style>如果您想实现输入框上方增加快捷 button,方便用户使用,比如增加“人工客服”,“发送订单消息”等,可在引入智能客服时设置 toolbarButtonList。效果如下所示:
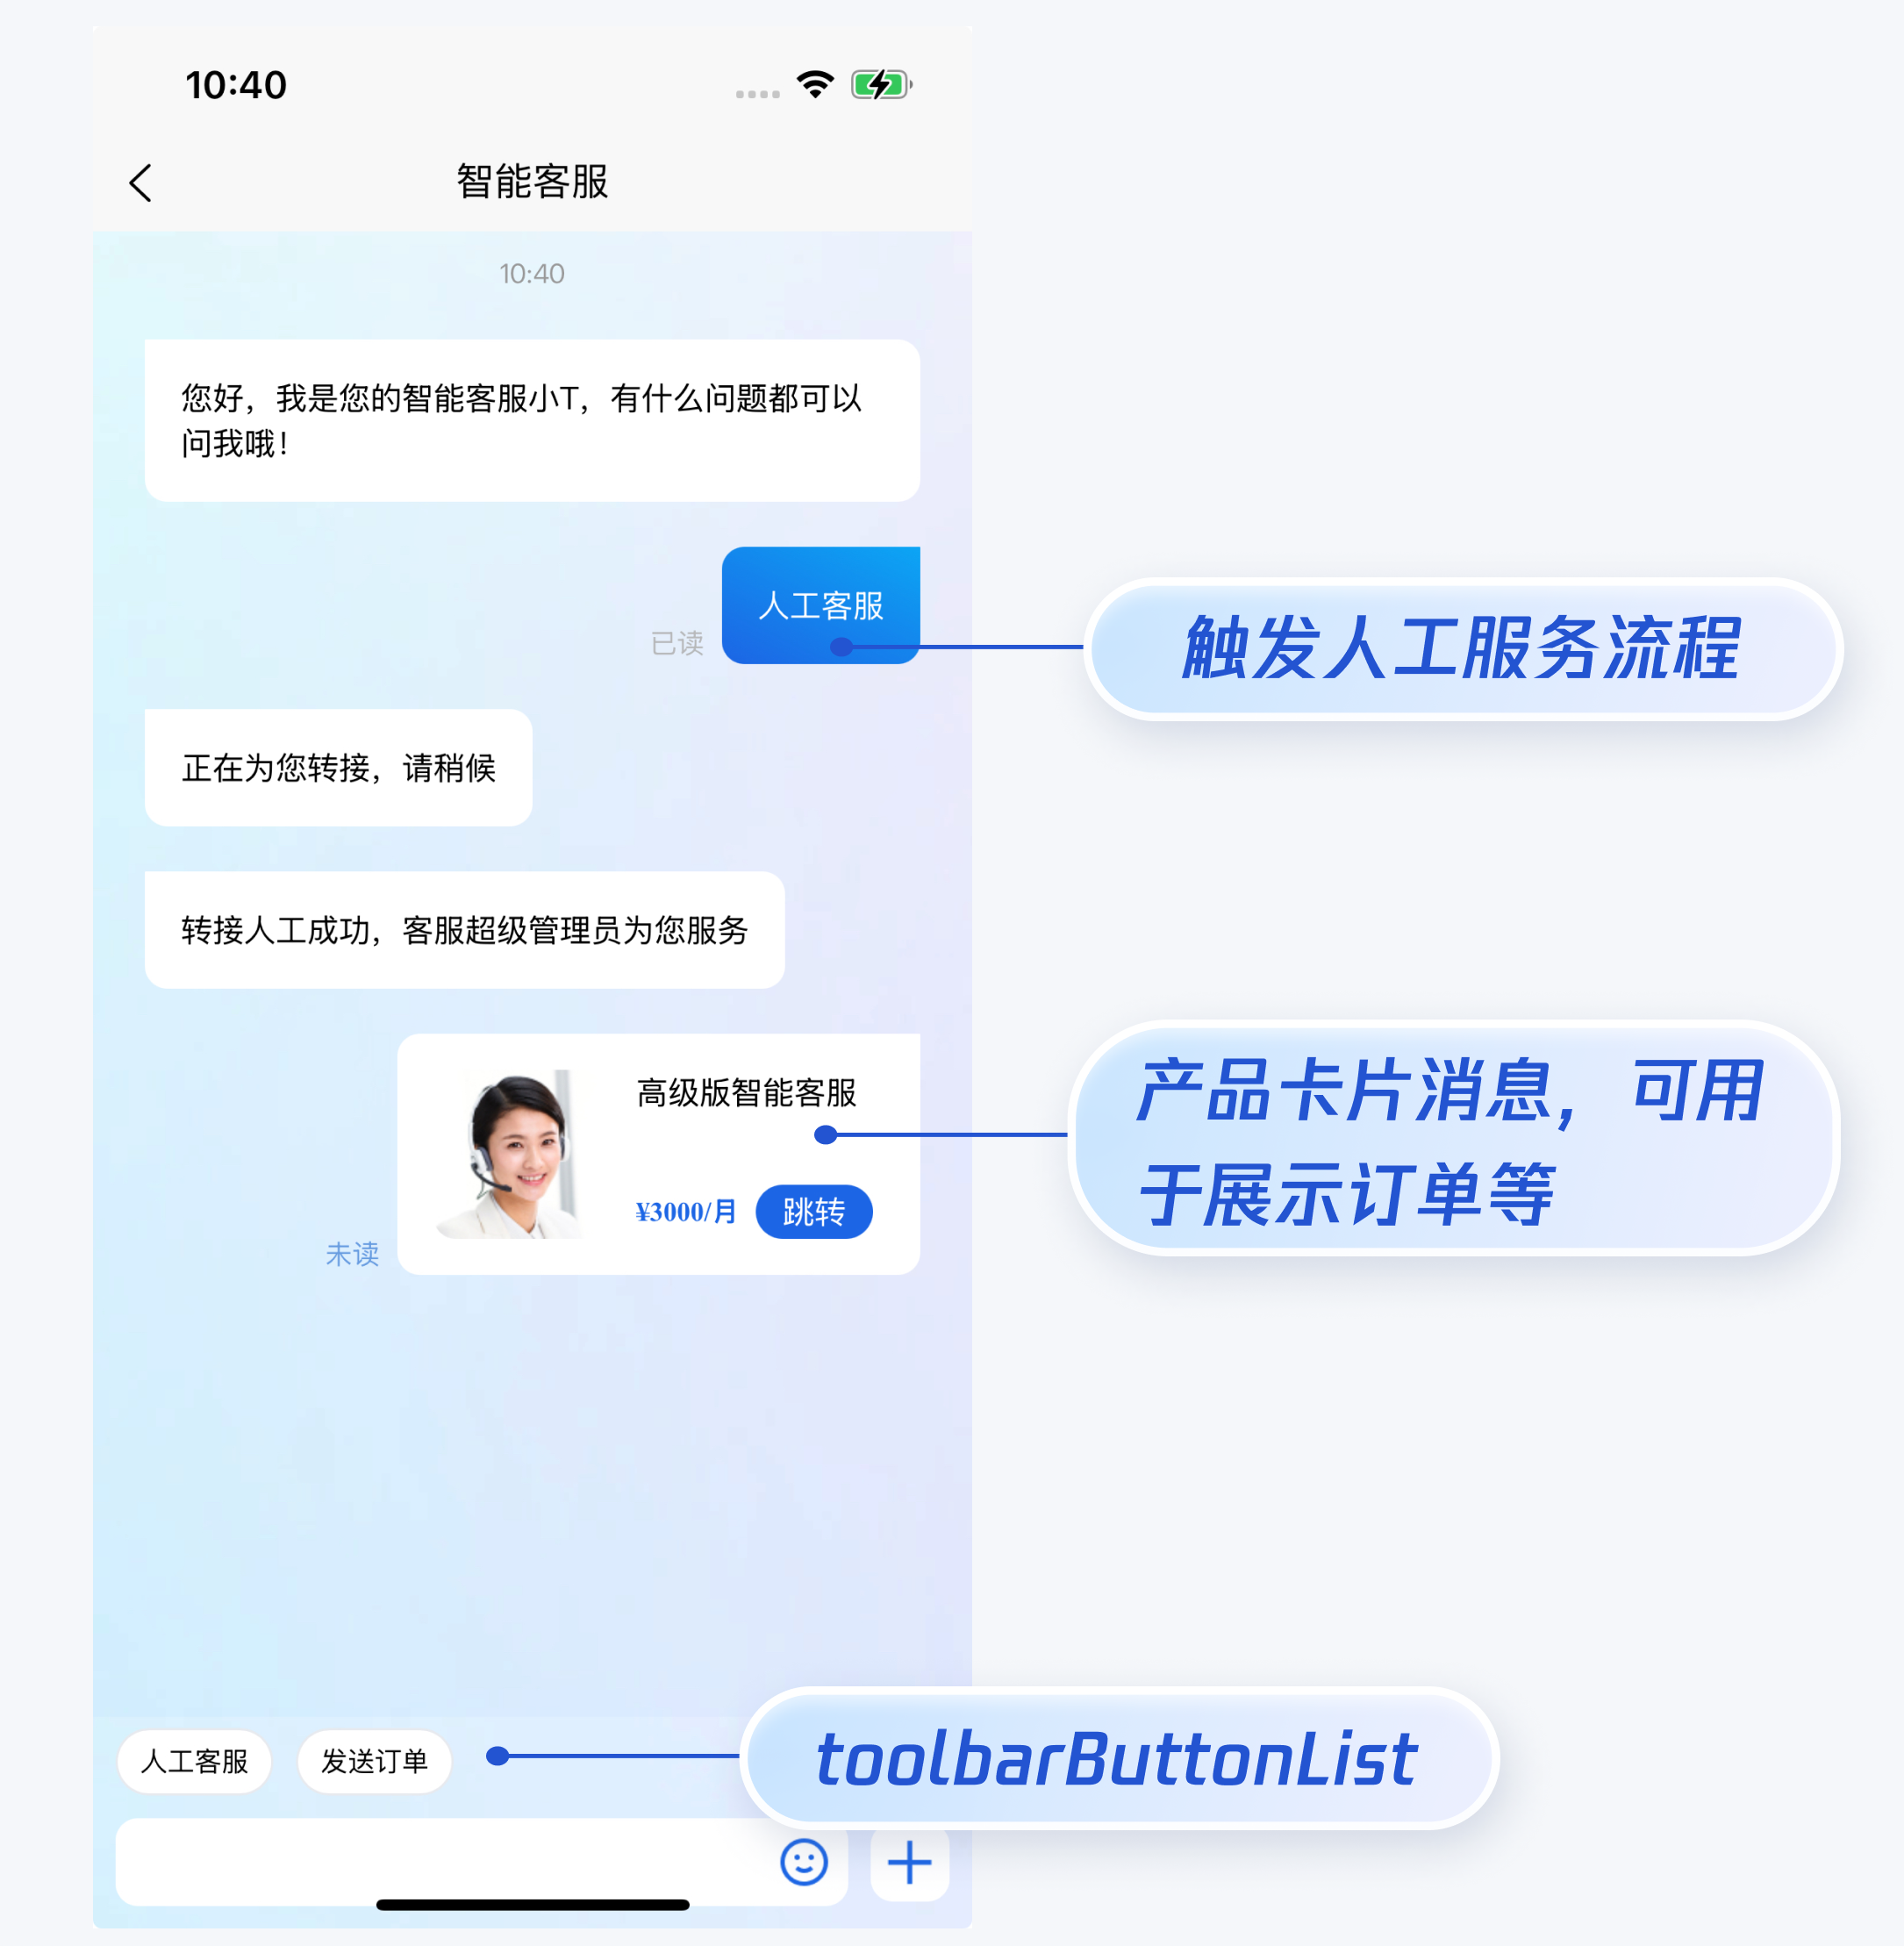
<template>
    <CustomerServiceChat style="height: 100%;"
        :toolbarButtonList="toolbarButtonList"
    />
</template>
<script>
import CustomerServiceChat from '../../ai-desk-customer-uniapp/components/CustomerServiceChat/index-uniapp.vue';
import TUICustomerServer  from '../../ai-desk-customer-uniapp';

export default {
  components: {
    CustomerServiceChat,
  },
  data() {
    const toolbarButtonList = [
      {
        title: '人工客服',
        renderCondition: () => {
          return true;
        },
        clickEvent: () => {
          // 点击 button 后的回调
          TUICustomerServer.sendTextMessage({
            to: '@customer_service_account',
            conversationType: 'C2C',
            payload: {
              text: '人工客服'
            }
          });
        }
      },
      {
        title: '发送订单',
        renderCondition: () => {
          return true;
        },
        clickEvent: () => {
          // 点击 button 后的回调
          TUICustomerServer.sendCustomMessage({
            to: '@customer_service_account',
            conversationType: 'C2C',
            payload: {
              data: JSON.stringify({
                src: '22',
                customerServicePlugin: 0,
                content: {
                  // 产品卡片消息描述
                  desc: "¥3000/月",
                  // 产品卡片消息标题
                  header: "高级版智能客服",
                  // 产品卡片消息的小图片
                  pic: "https://cloudcache.tencent-cloud.com/qcloud/portal/kit/images/presale.a4955999.jpeg",
                  // 点击产品卡片消息后跳转的地址
                  url: "https://www.qcloud.com/"
                }
              }),
            }
          });
        }
      },
    ];

    return {
      toolbarButtonList,
    }
  }
}
</script>
<style scoped lang="scss">
</style>说明:
UIKit 中默认没有集成 TencentCloud-TIMPush 推送插件。TencentCloud-TIMPush 是腾讯云即时通信 IM Push 插件。目前推送支持小米、华为、荣耀、OPPO、vivo、魅族、APNs、一加、realme、iQOO 和 苹果等厂商通道。
如果您需要在 App 中集成离线推送能力,请参见 uni-app 推送 实现。

UserSig 是用户登录即时通信 IM 的密码,其本质是对 UserID 等信息加密后得到的密文。
UserSig 签发方式是将 UserSig 的计算代码集成到您的服务端,并提供面向项目的接口,在需要 UserSig 时由您的项目向业务服务器发起请求获取动态 UserSig。更多详情请参见 服务端生成 UserSig。
如果您打包 App / H5,需要在 pages.json 中配置 tabBar。请参考 uni-app 官网 tabBar 配置 自实现。
如果您打包小程序,因为主包体积限制,小程序默认是分包集成,如果您的 tabBar 需要自定义实现。请参考 uni-app 官网 自定义 tabBar。
请在 微信公众平台 > 开发 > 开发管理 > 开发设置 > 服务器域名 中进行域名配置。域名配置详见:小程序合法域名。
点此进入 IM 社群,享有专业工程师的支持,解决您的难题。