
![]()


This is a loopback4 component for scheduling events in calendar (scheduler/calendar server).
Various features of Scheduler Service:
-
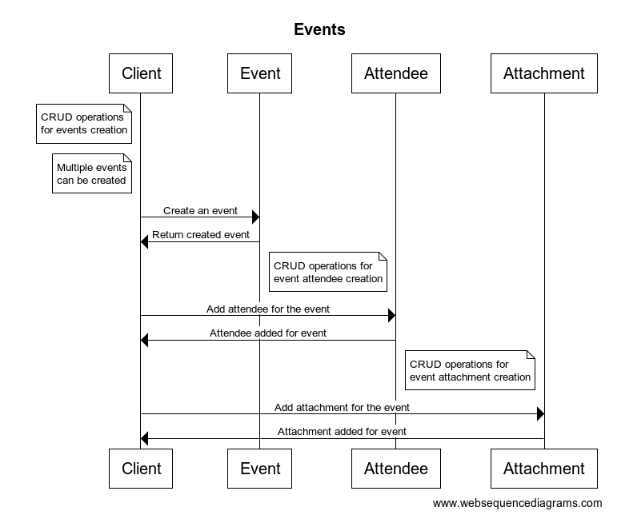
CRUD feature: Basic add/edit/delete Event/Invitation in calendar. (As a REST API)
-
Reminder Feature: Support or provide integration with notification/reminder service, which has the option of sending email/popup and SMS notification.
-
Importing Calendar: The Scheduler supports exporting all its event data to iCal format, and it supports importing events from an iCal file into the Scheduler.
-
Third party calendar support: Provide a way to import events information from third party components like : Outlook and Google Calendar.
Main feature set:
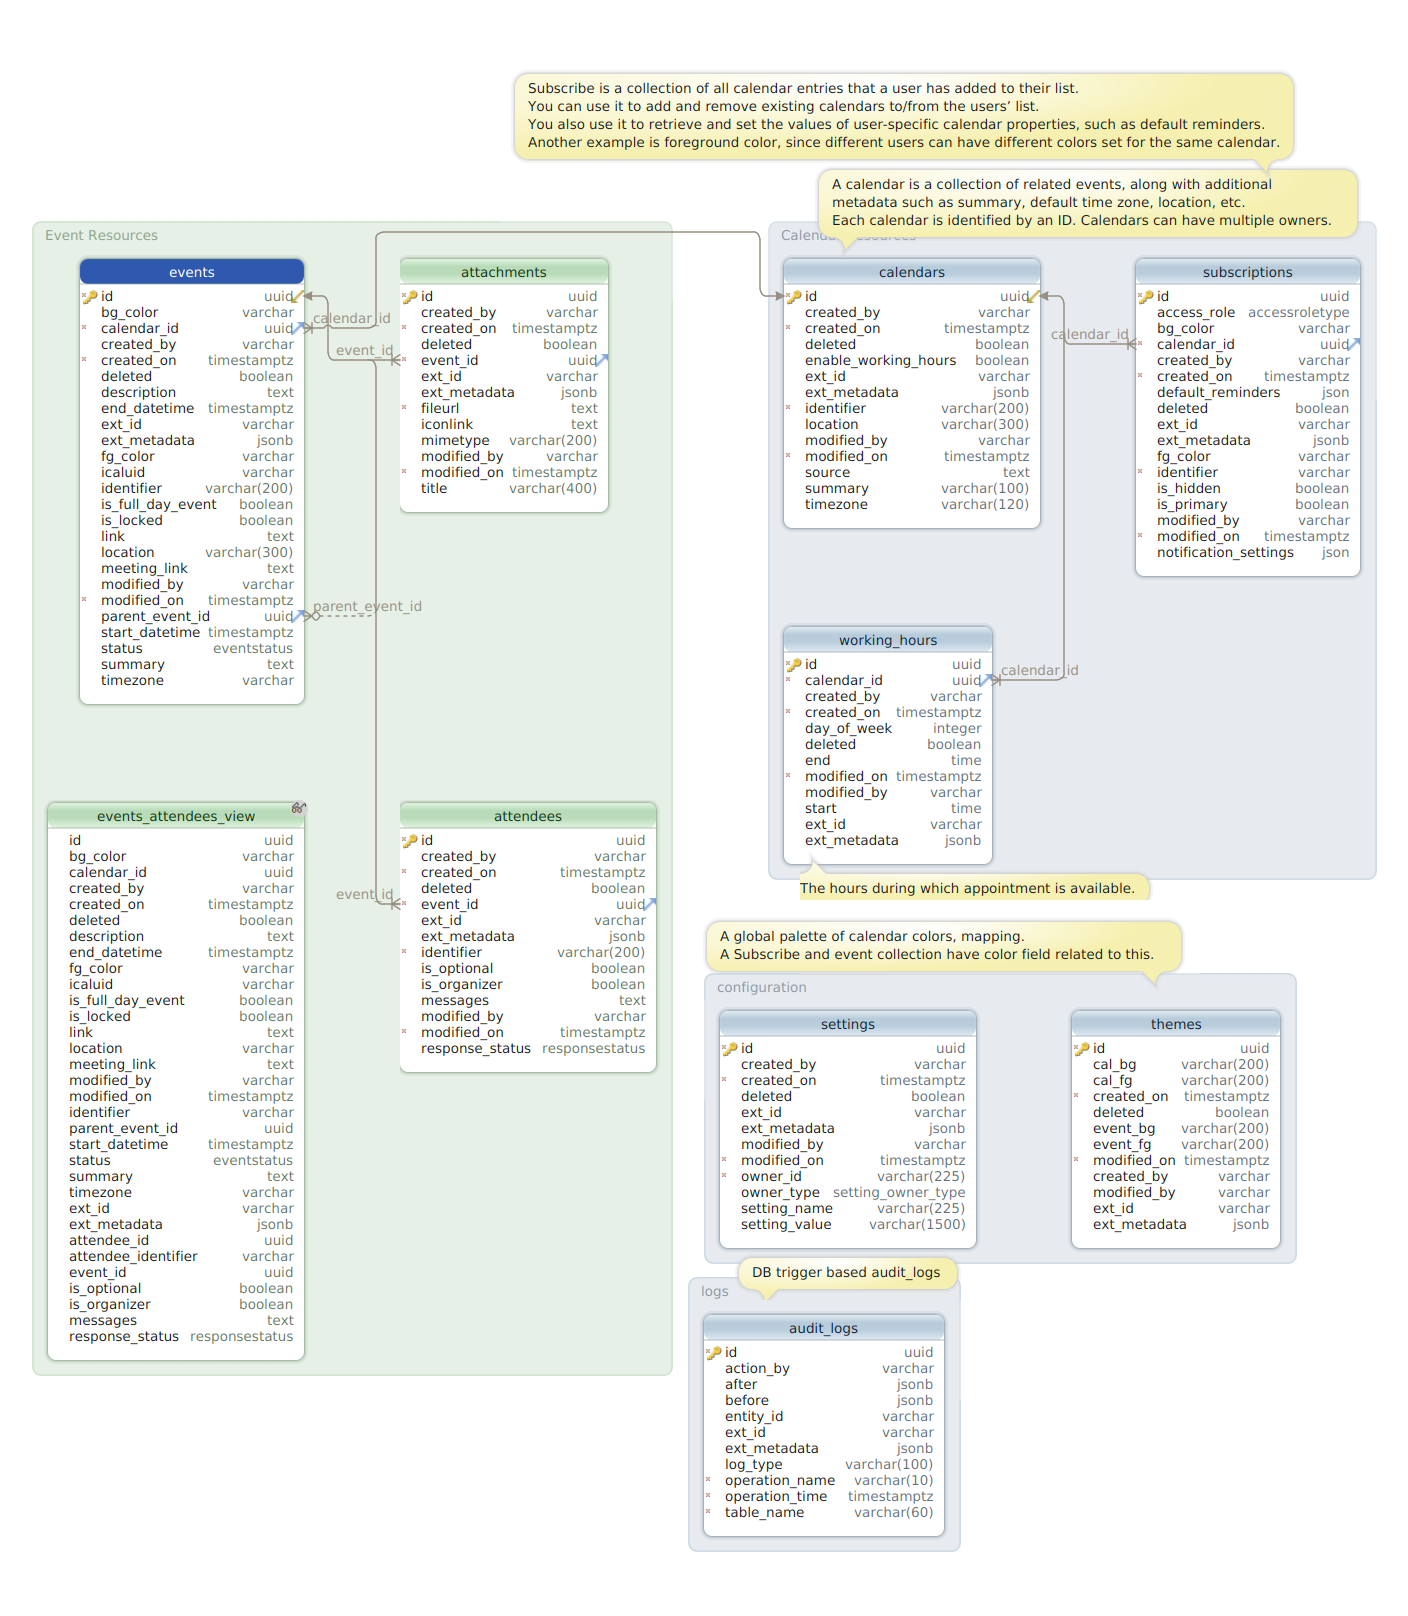
- Calendar
- Calendar Subscription
- Working Hours
- Events
- Event Attendee
- Event Attachment
You can see the database schema here.
To get started with a basic implementation of this service, see /sandbox/scheduler-example.
npm install @sourceloop/scheduler-service
-
Create a new Loopback4 Application (If you don't have one already)
lb4 testapp -
Install the scheduler service
npm i @sourceloop/scheduler-service -
Set the environment variables.
-
Run the migrations.
-
Bind the Scheduler Config to
SchedulerBindings.Configkey-this.bind(SchedulerBindings.Config).to({ jwtIssuer: process.env.JWT_ISSUER; jwtSecret: process.env.JWT_SECRET; });
-
Add the
SchedulerComponentto your Loopback4 Application (inapplication.ts)// import the SchedulerComponent import {SchedulerComponent} from '@sourceloop/scheduler-service'; ... // add Component for SchedulerComponent this.component(SchedulerComponent); ...
-
Set up a Loopback4 Datasource with
dataSourceNameproperty set toSchedulerDatasourceName. You can see an example datasource here. -
Set up a Loopback4 Datasource with
dataSourceNameproperty set toAuthCacheDatasourceName. You can see an example datasource here. -
Audit Logs
To generate audit logs for video conferencing service, you'll have to set the env var
ADD_AUDIT_LOG_MIXINtotrueand configure a datasource for it like below:import {inject, lifeCycleObserver, LifeCycleObserver} from '@loopback/core'; import {juggler} from '@loopback/repository'; import {AuditDbSourceName} from '@sourceloop/audit-log'; const config = { name: 'audit', connector: 'postgresql', url: '', host: '', port: 0, user: '', password: '', database: '', }; @lifeCycleObserver('datasource') export class AuditDataSource extends juggler.DataSource implements LifeCycleObserver { static dataSourceName = AuditDbSourceName; static readonly defaultConfig = config; constructor( @inject('datasources.config.audit', {optional: true}) dsConfig: object = config, ) { const auditEnvConfig = { host: process.env.AUDIT_DB_HOST, port: process.env.AUDIT_DB_PORT, user: process.env.AUDIT_DB_USER, password: process.env.AUDIT_DB_PASSWORD, database: process.env.AUDIT_DB_DATABASE, schema: process.env.AUDIT_DB_SCHEMA, }; Object.assign(dsConfig, auditEnvConfig); super(dsConfig); } }
Configure .env of application in index.ts before exporting application like follows
import * as dotenv from 'dotenv';
dotenv.config();

import {ApplicationConfig, SchedulerExampleApplication} from './application';
export * from './application';
//...
-
Using with Sequelize
This service supports Sequelize as the underlying ORM using @loopback/sequelize extension. And in order to use it, you'll need to do following changes.
- To use Sequelize in your application, add following to application.ts:
this.bind(CoreSchedulerBindings.Config).to({
  useCustomSequence: false,
  useSequelize: true,
});
- Use the
SequelizeDataSourcein your datasource as the parent class. Refer this for more.
-
Start the application
npm start
If you are using asymmetric token signing and verification, you need to create a datasource for auth database. Example datasource file for auth:-
import {inject, lifeCycleObserver, LifeCycleObserver} from '@loopback/core';
import {juggler} from '@loopback/repository';
import {AuthDbSourceName} from '@sourceloop/core';
const DEFAULT_MAX_CONNECTIONS = 25;
const DEFAULT_DB_IDLE_TIMEOUT_MILLIS = 60000;
const DEFAULT_DB_CONNECTION_TIMEOUT_MILLIS = 2000;

const config = {
  name: 'auth',
  connector: 'postgresql',
  host: process.env.DB_HOST,
  port: process.env.DB_PORT,
  user: process.env.DB_USER,
  schema: process.env.DB_SCHEMA,
  password: process.env.DB_PASSWORD,
  database: process.env.AUTH_DB,
};

// Observe application's life cycle to disconnect the datasource when
// application is stopped. This allows the application to be shut down
// gracefully. The `stop()` method is inherited from `juggler.DataSource`.
// Learn more at https://loopback.io/doc/en/lb4/Life-cycle.html
@lifeCycleObserver('datasource')
export class AuthDataSource
  extends juggler.DataSource
  implements LifeCycleObserver
{
  static dataSourceName = AuthDbSourceName;

  static readonly defaultConfig = config;

  constructor(
    @inject('datasources.config.auth', {optional: true})
    dsConfig: object = config,
  ) {
    if (!!+(process.env.ENABLE_DB_CONNECTION_POOLING ?? 0)) {
      const dbPool = {
        max: +(process.env.DB_MAX_CONNECTIONS ?? DEFAULT_MAX_CONNECTIONS),
        idleTimeoutMillis: +(
          process.env.DB_IDLE_TIMEOUT_MILLIS ?? DEFAULT_DB_IDLE_TIMEOUT_MILLIS
        ),
        connectionTimeoutMillis: +(
          process.env.DB_CONNECTION_TIMEOUT_MILLIS ??
          DEFAULT_DB_CONNECTION_TIMEOUT_MILLIS
        ),
      };

      dsConfig = {...dsConfig, ...dbPool};
    }

    super(dsConfig);
  }
}Do not forget to set Environment variables. The examples below show a common configuration for a PostgreSQL Database and Redis Database running locally.
NODE_ENV=dev
LOG_LEVEL=DEBUG
HOST=0.0.0.0
PORT=3000
DB_HOST=localhost
DB_PORT=5432
DB_USER=pg_service_user
DB_PASSWORD=pg_service_user_password
DB_DATABASE=schedular_db
DB_SCHEMA=public
REDIS_HOST=localhost
REDIS_PORT=6379
REDIS_URL=redis_url
REDIS_PASSWORD=redis_service_user_password
REDIS_DATABASE=redis_schedular_db
JWT_SECRET=super_secret_string
JWT_ISSUER=https://authentication.service
| Name | Required | Default Value | Description |
|---|---|---|---|
NODE_ENV |
Y | Node environment value, i.e. dev, test, prod
|
|
LOG_LEVEL |
Y | Log level value, i.e. error, warn, info, verbose, debug
|
|
HOST |
Y | Host for the service to run under, i.e. 0.0.0.0
|
|
PORT |
Y | 3000 |
Port for the service to listen on. |
DB_HOST |
Y | Hostname for the database server. | |
DB_PORT |
Y | Port for the database server. | |
DB_USER |
Y | User for the database. | |
DB_PASSWORD |
Y | Password for the database user. | |
DB_DATABASE |
Y | Database to connect to on the database server. | |
DB_SCHEMA |
Y | public |
Database schema used for the data source. In PostgreSQL, this will be public unless a schema is made explicitly for the service. |
REDIS_HOST |
Y | Hostname for the Redis server. | |
REDIS_PORT |
Y | Port to connect to redis server. | |
REDIS_URL |
Y | Fully composed URL for Redis connection. Used | |
| instead of other settings if set. | |||
REDIS_PASSWORD |
Y | Password for the redis user. | |
REDIS_DATABASE |
Y | Database to connect to on the redis server. | |
JWT_SECRET |
Y | Symmetric signing key of the JWT token. | |
JWT_ISSUER |
Y | Issuer of the JWT token. |
Here is a sample Implementation DataSource implementation using environment variables and PostgreSQL as the data source.
import {inject, lifeCycleObserver, LifeCycleObserver} from '@loopback/core';
import {juggler} from '@loopback/repository';
import {SchedulerDatasourceName} from '@sourceloop/scheduler-service';

const config = {
  name: SchedulerDatasourceName,
  connector: 'postgresql',
  host: process.env.DB_HOST,
  port: process.env.DB_PORT,
  user: process.env.DB_USER,
  password: process.env.DB_PASSWORD,
  database: process.env.DB_DATABASE,
  schema: process.env.DB_SCHEMA,
};

@lifeCycleObserver('datasource')
export class SchedulerDataSource
  extends juggler.DataSource
  implements LifeCycleObserver
{
  static dataSourceName = SchedulerDatasourceName;
  static readonly defaultConfig = config;

  constructor(
    @inject(`datasources.config.${SchedulerDatasourceName}`, {optional: true})
    dsConfig: object = config,
  ) {
    super(dsConfig);
  }
}
Here is a sample Implementation Cache DataSource implementation using environment variables and Redis as the data source.
import {inject, lifeCycleObserver, LifeCycleObserver} from '@loopback/core';
import {juggler} from '@loopback/repository';

const config = {
  name: 'AuthCache',
  connector: 'kv-redis',
  url: '',
  host: process.env.REDIS_HOST,
  port: process.env.REDIS_PORT,
  password: process.env.REDIS_PASSWORD,
  db: process.env.REDIS_DB,
};

@lifeCycleObserver('datasource')
export class AuthCacheDataSource
  extends juggler.DataSource
  implements LifeCycleObserver
{
  static dataSourceName = 'AuthCache';
  static readonly defaultConfig = config;

  constructor(
    @inject('datasources.config.AuthCache', {optional: true})
    dsConfig: object = config,
  ) {
    super(dsConfig);
  }
}The migrations required for this service are processed during the installation automatically if you set the SCHEDULER_MIGRATION or SOURCELOOP_MIGRATION env variable. The migrations use db-migrate with db-migrate-pg driver for migrations, so you will have to install these packages to use auto-migration. Please note that if you are using some pre-existing migrations or databases, they may be affected. In such a scenario, it is advised that you copy the migration files in your project root, using the SCHEDULER_MIGRATION_COPY or SOURCELOOP_MIGRATION_COPY env variables. You can customize or cherry-pick the migrations in the copied files according to your specific requirements and then apply them to the DB.
This migration script supports both MySQL and PostgreSQL databases, controlled by environment variables. By setting MYSQL_MIGRATION to 'true', the script runs migrations using MySQL configuration files; otherwise, it defaults to PostgreSQL. .
Additionally, there is now an option to choose between SQL migration or PostgreSQL migration. NOTE : For @sourceloop/cli users, this choice can be specified during the scaffolding process by selecting the "type of datasource" option.
Visit the OpenAPI spec docs
If you've noticed a bug or have a question or have a feature request, search the issue tracker to see if someone else in the community has already created a ticket. If not, go ahead and make one! All feature requests are welcome. Implementation time may vary. Feel free to contribute the same, if you can. If you think this extension is useful, please star it. Appreciation really helps in keeping this project alive.
Please read CONTRIBUTING.md for details on the process for submitting pull requests to us.
Code of conduct guidelines here.