
A conversational prompting and programming language.
Convo-lang is a mixture between a procedural programming language, prompting template system and conversation state management system. You can execute convo-lang in Javascript, Python, from the command line or directly in VSCode.
Convo-lang aims to provided a uniform prompting syntax that is LLM agnostic and allows you to store both prompts, metadata and tradition programming logic in a single file or template string.
The convo-lang syntax supports advanced features such as function calling, tool usage and vision. The Convo-lang ecosystem consists of a parser, interpreter, Typescript/Javascript/Python libraries, a CLI, and a vscode extension for syntax highlighting and in-editor script execution.
- 0.5.10
- Started adding release notes 😅
-
Breaking change - The CLI and vscode extension no longer enable vision support by default.
Use the
@enableVisiontag or add vision to the list capabilities in you config file. - Capabilities can be enabled directly in convo scripts by using the
@capabilitytag at the root of a convo script.@enableVisionis shorthand for@capability vision - Added command mode to CLI. This allows the python package and other tools more easily to interactively communicate with the CLI.
- Conversations can now dynamically invoke extern functions via the
dynamicFunctionCallbackproperty - Added embedded string template highlighting in Python
- @iyio/convo-lang - Contains the convo-lang parser, runtime, and a Typescript/Javascript library to use convo-lang in your application.
- @iyio/convo-lang-cli - A CLI interface that allows you to execute and parse convo-lang files.
- @iyio/convo-lang-tools - Contains the convo-lang vscode extension, which includes syntax highlighting, in-editor script execution, script parsing, and other helpful tools for working with convo-lang. In most cases, you will not install this package but instead install the vscode convo-lang extension.
- (pypi) convo-lang - Python package for executing convo-lang
For use in an application install the @iyio/convo-lang package
npm i @iyio/convo-lang

# To use OpenAI as a completion provider you will need to install @iyio/ai-complete and @iyio/ai-complete-openai as well
npm i @iyio/ai-complete @iyio/ai-complete-openai
For use on the command line install the @iyio/convo-lang-cli package
npm i @iyio/convo-lang-cli -gFor use in python projects
python -m pip install convo-langYou will also probably want to install the vscode extension for syntax highlighting and other developer niceties. You can install the vscode extension by searching for "convo-lang" in the vscode extension tab.
https://marketplace.visualstudio.com/items?itemName=IYIO.convo-lang-tools
When using convo-lang in a javascript application, you will primarily interact with Conversation objects. Conversation objects store the messages of a convo script and allow new messages to be appended and LLMs to respond to messages from the user.
import { Conversation } from '@iyio/convo-lang';
import { initRootScope, EnvParams } from '@iyio/common';
import { aiCompleteConvoModule } from '@iyio/ai-complete';
import { openAiModule } from '@iyio/ai-complete-openai';

// initRootScope is used to configure services and configuration variables
initRootScope(reg=>{

    // register OpenAI configuration variables. These variates could also be stored as environment
    // variables and loaded using reg.addParams(new EnvParams()).
    reg.addParams({
        "openAiApiKey":"YOUR_OPEN_AI_KEY",
        "openAiChatModel":"gpt-4-1106-preview",
        "openAiVisionModel":"gpt-4-vision-preview",
        "openAiAudioModel":"whisper-1",
        "openAiImageModel":"dall-e-3"
    })

    // EnvParams can optionally be used to load configuration variables from process.env
    reg.addParams(new EnvParams());

    // Registers the AiComplete module that is used to relay messages to LLMs
    reg.use(aiCompleteConvoModule);

    // Registers the OpenAI module that will relay messages to OpenAI
    reg.use(openAiModule);

    // aiCompleteLambdaModule can be used to relay messages to a lambda function for use in the browser
    //reg.use(aiCompleteLambdaModule);
})

const main=async ()=>{
    const convo=new Conversation();

    // adding /*convo*/ before a template literal will give you convo syntax highlighting when you have
    // the convo-lang vscode extension installed.

    convo.append(/*convo*/`
        > system
        You are a friendly and very skilled fisherman. Taking a group of tourist on a fishing expedition
        off the coast of Maine.

        > user
        What kind of clothes should I wear?
    `);

    // Calling completeAsync will answer the user's question using the configured LLM
    await convo.completeAsync();


    // The convo property of the Conversation object will be updated with the answer from the LLM
    console.log(convo.convo)

    // You can get a flatted view of the conversation by calling flattenAsync. The flatted version
    // of the conversation contains messages with all templates populated and is suitable to be
    // used to render a view of the conversation to the user.
    const flat=await convo.flattenAsync();
    console.log('flat',flat.messages);
}

main();When using convo-lang in a Python application, you will primarily interact with Conversation objects. Internally the Python package uses the convo-lang CLI and requires NodeJs to be installed for the CLI to function.
from datetime import datetime
from convo_lang import Conversation

convo=Conversation({
    # Can be omitted when using an apiBaseUrl that does not require an API key
    "apiKey":"YOUR_OPEN_AI_KEY",

    # Can be used to connect to OpenAi compatible APIs such as LMStudio - https://lmstudio.ai/
    #"apiBaseUrl":"http://localhost:1234/v1",

    # Sets the models that are allowed to be used. The first model will be the default
    "chatModel":"gpt-4-1106-preview,gpt-3.5-turbo-1106,gpt-3.5-turbo",

    # Sets the model that will be used for audio tasks. The first model will be the default.
    "audioModel":"whisper-1",

    # Sets the model that will be used to image generation. The first model will be the default.
    "imageModel":"dall-e-3",

    # Sets the model that will be used to implement vision capabilities. The first model will be the default.
    "visionModel":"gpt-4-vision-preview"
})


def setPinHigh(state):

    print('Setting pin state to ',state)

    # do some io stuff here

    return {
        "state":"on" if state else "off",
        "time":str(datetime.now())
    }

# adding setPinHigh to the conversation's callbacks allows setPinHigh to be called by functions
# defined in convo-lang
convo.callbacks['setPinHigh']=setPinHigh

convo.append(
"""*convo*
> define
//__model='gpt-3.5-turbo-1106'
__trackModel=true

# Turn the lights in the user's house on or off
> turnOnOffLights(
    # The state to set the lights to
    state: enum("on" "off")
) -> (

    // setPinHigh will call the setPinHigh function defined in python
    return(setPinHigh(eq(state "on")))
)

> system
You are a home automation assistant. please assistant the user to the best or your ability.

The current date and time is {{dateTime()}}

> user
It's time for bed, can you turn off the lights

""")

resultMessage=convo.completeAsync()

print('------ convo ------')
print(convo.convo)

print('\n\n------ messages ------')
print(convo.messages)

print('\n\n------ state ------')
print(convo.state)

print('\n\n------ syntaxMessages ------')
print(convo.syntaxMessages)

print('\n\n------ result ------')
print(resultMessage['content'])With the convo vscode extension installed, you can execute convo scripts directly in vscode. Just press (CMD+R) to run a script.
You can also run snippets of convo scripts that are embedded in other document types. Just highlight the convo code you want to run, open the command palette, and search for "Complete Convo Conversation" and press enter. Then the snippet will be opened in a new convo file and completed. This is great for quick prototyping and testing prompts in your application without having to start your full application.
The convo CLI can be used to execute convo scripts from the command line
# install the convo cli
npm install -g @iyio/convo-cli

# Results will be printed to stdout
convo talky-time.convo

# Results will be written to a new file named something-happened.convo
convo talky-time.convo --out something.convo

# Result will be written to the source input file. This allows you to have a continuous conversation
convo talky-time.convo --out .
There is currently only one way to configure the convo cli and vscode extension. This will be extended soon to include reading configuration files from your current workspace.
To allow convo to access OpenAI, create a JSON file called ~/.config/convo/convo.json and add the following contents. Remember to replace the API key with your OpenAI api key.
{
    "env":{
        "openAiApiKey":"YOUR_OPEN_AI_KEY",
        "openAiChatModel":"gpt-4-1106-preview",
        "openAiVisionModel":"gpt-4-vision-preview",
        "openAiAudioModel":"whisper-1",
        "openAiImageModel":"dall-e-3"

    }
}
Vision capabilities can be added to any LLM that supports function calling. When vision is enabled the convo-lang runtime will add the queryImage function to the current conversation and inject instructions on how to use the function into the system prompt.
When the queryImage function is called an model with vision support is prompted and the result is returned back to the non-vision capable model.
Vision capabilities must be enabled. In the example below visible is both enabled in the
constructor the Conversation and in the prompt using the @enableVision, but in practice only
one method of enabled vision is required.
const convo=new Conversation({capabilities:['vision']});(note - the image in the example below is the cover of Abbey Road by The Beatles)
// the @enableVision tag enables vision in the conversation
@enableVision
> user
Tell me a joke about this image

@toolId call_QuwU683taTBW7nsZNMNHPrmm
> call queryImage(
"query": "Tell me a joke about this image",
"imageUrls": [
"https://raw.githubusercontent.com/iyioio/common/main/assets/convo/lXwM70CjMOa6EC3PXBbJ.jpg"
]
)
> result
__return={"result":"Why did The Beatles cross the road? Because they knew it was the only way to get to the other side of their Abbey Road album cover!"}
> assistant
Why did The Beatles cross the road? Because they knew it was the only way to get to the other side of their Abbey Road album cover!
The convo-lang syntax is designed to be easily readable and follows a chat-like message structure. A convo-lang script consists of a series of messages, which can be text-based messages, functions, or a set of top-level statements. All messages start with a header that defines the message's type.
All message headers start with the (>) character followed by a role, keyword, or identifier.
Text-based messages start with a header that defines the message's role. The role can be any identifier, with the exception of top-level keyword identifiers.
Text message can include template variables
// text based message
> user
message content
Top-level statements allow you to define variables and execute statements without calling a function. Top-level statements must use one of the following keywords as their identifier:
- do - Used to define variables and execute statements.
- result - Used to store the result value of a function call. Result messages are typically created by the runtime and automatically added to conversations. In most cases, you will not directly create result messages.
- define - Used to define variables and types. Define messages are not allowed to call functions.
- debug - Used to write debug information. In most cases, you will not directly create debug messages.
- end - Explicitly ends a message and can be used to set variables related to the ended message.
// top-level statement
> define
someVar=77
Function messages start with an identifier followed by a parameter definition and optionally a function body.
// function
> goFast(
    speed: int
    direction: enum("left" "right")
)
// function with a body
> goFast(
    speed: int
    direction: enum("left" "right")
) -> (
    print('I\'m going {{speed}} mile per hour and about to turn {{direction}}')

    // reportStatus would be defined outside of convo and implemented in your language of choice.
    reportStatus(speed direction)

    return(switch(gt(speed 100) "I'm going Fast" "I'm driving like a grandma"))
)
To allow convo-lang to communicate with the rest of your application, you can register extern functions that can be called at runtime by your convo scripts.
const convo=new Conversation();

convo.defineFunction({
    name:'turnOnOffLights',
    description:'Turn the lights in the user\'s house on or off',
    // parameter types are defined using a Zod object
    paramsType:z.object({
        state:z.enum(['on','off']).describe('The state to set the lights to')
    }),
    callback:async ({state})=>{
        const result=await fetch(`http://192.168.1.100:8888/api/lights/${state}`);
        return {newState:result.state}
    }
})

convo.append(/*convo*/`
    > system
    You are a home automation assistant. please assistant the user to the best or your ability
`);

// the turnOnOffLights function will be called with a state of "off"
await convo.completeAsync(/*convo*/`
    > user
    It's time for bed, can you turn off the lights
`);When the last message in a conversation is tagged with the @json tag json mode is enabled for the
next completion. Custom user types can be used to define the scheme of the json that should
be returned by setting the value of the @json tag to the name of the desired type - @json TypeName
The json response can also be assigned to a variable by using the @responseAssign tag.
@json
@responseAssign planets
> user
List the planets in our solar system as a json array

@format json
@assign planets
> assistant
{
    "planets": [
        "Mercury",
        "Venus",
        "Earth",
        "Mars",
        "Jupiter",
        "Saturn",
        "Uranus",
        "Neptune"
    ]
}
> define

Planet = struct(
    name:string
    milesFromSun:number
    moonCount:number
)

@json Planet[]
@responseAssign planets
> user
List the planets in our solar system as a json array

@format json
@assign planets
> assistant
[
    {
        "name": "Mercury",
        "milesFromSun": 35980000,
        "moonCount": 0
    },
    {
        "name": "Venus",
        "milesFromSun": 67240000,
        "moonCount": 0
    },
    {
        "name": "Earth",
        "milesFromSun": 92960000,
        "moonCount": 1
    },
    {
        "name": "Mars",
        "milesFromSun": 141600000,
        "moonCount": 2
    },
    {
        "name": "Jupiter",
        "milesFromSun": 483800000,
        "moonCount": 79
    },
    {
        "name": "Saturn",
        "milesFromSun": 890800000,
        "moonCount": 83
    },
    {
        "name": "Uranus",
        "milesFromSun": 1784000000,
        "moonCount": 27
    },
    {
        "name": "Neptune",
        "milesFromSun": 2795000000,
        "moonCount": 14
    }
]
As you can see, using custom user types gives you very fine tune control over the structure of the returned json.
Json mode can also be combined with vision messages
@enableVision
> define
Person = struct(
name?:string
description?:string
)
@json Person[]
@responseAssign dudes
> user
Describe each person in this picture.

@toolId call_dfpKG4bnDRA3UTBjspQr2O4s
> call queryImage(
"query": "describe each person in this picture",
"imageUrls": [
"https://raw.githubusercontent.com/iyioio/common/main/assets/convo/abbey-road.jpg"
]
)
> result
__return={
"result": "The image shows four individuals crossing the street in single file on a zebra crossing. They are all adult males, and they appear to be dressed in distinct styles:\n\n1. The first person, walking from right to left, has long hair and is wearing a white suit. He is barefoot and steps off with his right foot onto the crossing.\n\n2. The second individual has darker hair and is wearing a black suit with a white shirt and no tie. He is also stepping off with his right foot, wearing black shoes.\n\n3. The third man is wearing a suit as well, looking somewhat casually dressed compared to the second person. He has a beard and long hair and is wearing an open neck shirt with a black suit, and he is mid-step onto the zebra with his left foot forward, wearing black shoes.\n\n4. The fourth man brings up the rear and is dressed most casually. He wears a denim jacket and jeans with a white shirt underneath. He has shoulder-length hair and is taking a step with his right foot, wearing dark-colored shoes.\n\nThe setting appears to be a quiet, tree-lined street with cars parked on either side, and there is a white Volkswagen Beetle and a black car visible behind them, among other vehicles. The architecture in the background suggests this might be a residential area. The image has a calm, orderly feel, indicative of an everyday urban scene albeit with a touch of timeless style."
}
@format json
@assign dudes
> assistant
[
{
"name": "first person",
"description": "The first person, walking from right to left, has long hair and is wearing a white suit. He is barefoot and steps off with his right foot onto the crossing."
},
{
"name": "second person",
"description": "The second individual has darker hair and is wearing a black suit with a white shirt and no tie. He is also stepping off with his right foot, wearing black shoes."
},
{
"name": "third person",
"description": "The third man is wearing a suit as well, looking somewhat casually dressed compared to the second person. He has a beard and long hair and is wearing an open neck shirt with a black suit, and he is mid-step onto the zebra with his left foot forward, wearing black shoes."
},
{
"name": "fourth person",
"description": "The fourth man brings up the rear and is dressed most casually. He wears a denim jacket and jeans with a white shirt underneath. He has shoulder-length hair and is taking a step with his right foot, wearing dark-colored shoes."
}
]
Comments start with either a pound character (#) or two forward slashes (//). Comments starting with a pound symbol are captured and available at runtime as part of type definitions. Comments starting with two forward slashes are non-capturing.
// This is a non documenting comment and will not be available at run time

# This is a documenting comment and will be available at run time and will be used as the
# description for the function below
> meFunc() -> (
    print('👋')
)
Tags start with the (@) character followed by a name and an optional value. Tags allow you to store metadata in the syntax tree of convo that is available at runtime and some special tags control the behavior of convo-lang.
@owner me
> meFunc() -> (

    // the shared tag is a special tag that allows variables in functions to be defined in
    // the shared variable scope instead of the local function scope.
    @shared
    somethingWeAllShouldKnow="Fish are cool"
)

@responseFormat json
> user
How many fish are in the sea
- @disableAutoComplete - When applied to a function the return value of the function will not be used to generate a new assistant message.
- @edge - Used to indicate that a message should be evaluated at the edge of a conversation with the latest state. @edge is most commonly used with system message to ensure that all injected values are updated with the latest state of the conversation.
- @time - Used to track the time messages are created.
- @tokenUsage - Used to track the number of tokens a message used
- @model - Used to track the model used to generate completions
- @responseModel - Sets the requested model to complete a message with
- @endpoint - Used to track the endpoint to generate completions
- @responseEndpoint - Sets the requested endpoint to complete a message with
- @responseFormat - Sets the format as message should be responded to with.
- @responseAssign - Causes the response of the tagged message to be assigned to a variable
- @json - When used with a message the json tag is short and for
@responseFormat json - @format - The format of a message
- @assign - Used to assign the content or jsonValue of a message to a variable
- @capability - Used to enable capabilities. The capability tag can only be used on the first message of the conversation if used on any other message it is ignored. Multiple capability tags can be applied to a message and multiple capabilities can be specified by separating them with a comma.
- @enableVision - Shorthand for
@capability vision
There are 3 types of string in convo.
Double quote strings are the simplest strings in convo, they start and end with a double quote character. To include a double quote character in a double quote string escape it with a back slash. Double quote strings can span multiple lines.
> define
var1="here is a double quote string"
var2="Here is a double quote string with a (\") double quote character"
var3="Here is a string with a newline
in it"
Single quote strings are similar to double quote but also support embedded statements. Embedded statements are surrounded with double curly bracket pairs and contain any valid convo statement
> define
name="Ricky Bobby"
var0='I need to tell you something {{name}}. You can walk.'

var1='here is a single quote string'
var2='Here is a single quote string with a (\') single quote character'
var3='Here is a string with a newline
in it'
Heredoc strings begin and end with 3 dashes and the contents of the string are highlighted with the convo-lang syntax highlighter but are not. They are useful when defining strings with conversation messages in them.
> define
var1=---
Here is a heredoc string with an conversation in it

> user
Tell me a joke about airplanes

> assistant
Why don't airlines ever play hide and seek?

Because good luck hiding a plane!
---
Many of the configuration options of convo can be configure at runtime in directly in a convo file, including debugging and metadata information.
- __debug - Causes extra debugging information to be printed as comments
- __trackTime - Causes the @time tag to be added to messages with the date the message was appended
- __trackTokenUsage - Causes the @tokenUsage tag to be added to messages that consume tokens
- __trackModel - Causes the @model tag to be added to generated message with the model used to generate the message
- __endpoint - Sets the default completion endpoint
- __cwd - In environments that have access to the filesystem __cwd defines the current working directory.
- __model - Sets the default completion model
- __visionSystemMessage - When defined __visionSystemMessage will be injected into the system message of conversations with vision capabilities. __visionSystemMessage will override the default vision system message.
- __visionServiceSystemMessage - The default system message used for completing vision requests. Vision requests are typically completed in a separate conversation that supports vision messages. By default the system message of the conversation that triggered the vision request will be used.
- __defaultVisionResponse - Response used with the system is not able to generate a vision response.
The example below enables debugging and all trackers
> user
Tell me a joke about airplanes

> define
__debug=true
__trackTime=true
__trackTokenUsage=true
__trackModel=true


> debug
// snd > OpenAi.ChatCompletionCreateParams
// { .... raw api message .... }

> debug
// rec < OpenAi.ChatCompletionCreateParams
// { .... raw api message .... }

@time 2023-12-11T01:31:13-05:00
@tokenUsage 139 / 33 / $0.00238
@model gpt-4-1106-preview
> assistant
Sure, here's a light-hearted airplane joke for you:

Why don't airplanes ever get tired?

Because they always have plenty of rest in the hangar!


> user
Convo supports simple duck typing and allows for user-defined types. User-defined types are created using the struct function. Each labeled parameter passed to the struct function will define a property. At runtime, types are validated using Zod. User-defined types must start with an uppercase letter.
Car = struct(
    color: string
    engine: struct(
        hp: number
        torque: number
        fuel: enum( "gas" "diesel" "jp-7" )
    )
    owners: array(struct(
        name: string
        // address is optional
        address?: string
    ))
)
Variables are either scoped to the function in which they are defined or shared. Shared variables are visible to all functions and top-level statements. Top-level statements can only define shared variables. To define a shared variable in a function, tag an assignment statement with the @shared tag.
JSON-style values can be used in place of the map and array functions.
// obj1 and obj2 are the same

obj1 = map(
    go: "fast"
    turn: "left"
    times: 1000
)

obj2 = {
    "go": "fast",
    "turn": "left",
    "times" 1000
}
Text-based messages in convo support a subset of the markdown syntax, and the markdown structure is available at compile time.
- string - String type object
- number - Number type object
- int - Integer type object
- time - Time type object. The time type is represented as an integer timestamp
- void - Void type object.
- boolean - Boolean type object.
- any - Any time object
- true - True constant
- false - False constant
- null - Null constant
- undefined - Undefined constant
- convo - A reference to the current conversation. This is equivalent to window in Javascript.
- __args - A reference to the parameters passed the the current function as any object.
- __return - A reference to the last return value of a function called by a call message
- __error - A reference to the last error
Pipes the value of each argument received to the argument to its right.
Defines a user defined type
Car = struct(
    color: string
    engine: struct(
        hp: number
        torque: number
        fuel: enum( "gas" "diesel" "jp-7" )
    )
    owners: array(struct(
        name: string
        // address is optional
        address?: string
    ))
)
Defines an enumeration
Size = enum( "sm" "md" "lg" )
Checks if all of the parameters left of the last parameter are of the type of the last parameter
num = 7

// true
is(num number)

// false
is(num string)

str = "lo"

// true
is(str string)

// false
is(str number)

// false
is(str num number)

// true
is(str num any)

Person = struct(
    name: string
    age: number
)

user1 = map(
    name: "Jeff"
    age: 22
)

user2 = map(
    name: "Max"
    age: 12
)

// true
is(user1 Person)

// true
is(user1 user2 Person)

// false
is(user1 user2 num Person)
Creates an object
// meObj has 2 properties, name and age
meObj = map(
    name: "Jeff"
    age: 22
)
Creates an array
meAry = array( 1 2 3 "a" "b" "c" )
Used internally to implement JSON object syntax support. At compile time JSON objects are converted to standard convo function calls.
jsonStyle = {
    "go": "fast",
    "turn": "left",
    "times" 1000
}

convoStyle = obj1 = jsonMap(
    go: "fast"
    turn: "left"
    times: 1000
)
Used internally to implement JSON array syntax support. At compile time JSON arrays are converted to standard convo function calls.
jsonStyle = [ 1, 2, 3, "a", "b", "c" ]

convoStyle = array( 1 2 3 "a" "b" "c" )
Returns true if all given arguments are truthy.
// true
and( 1 )

// false
and( 0 )

// true
and( 1 2 )

// false
and( 0 1 )

// true
and( eq(1 1) eq(2 2) )

// false
and( eq(1 1) eq(2 1) )
Returns the first truthy value or the last non truthy value if no truthy values are given. If no values are given undefined is returned.
// 1
or( 1 )

// 0
or( 0 )

// 1
or( 1 2 )

// 2
or( 0 2 )

// true
or( eq(1 1) eq(2 2) )

// true
or( eq(1 1) eq(2 1) )

// false
or( eq(1 3) eq(2 1) )
Returns true if all given arguments are falsy.
// false
or( true )

// true
or( false )

// false
or( 1 )

// true
or( 0 )

// false
or( 1 2 )

// false
or( 0 1 )

// true
or( 0 false )

// false
or( eq(1 1))

// true
or( eq(1 2) )
If condition is truthy then the statement directly after the if statement will be executed otherwise the statement directly after if is skipped
age = 36

if( gte( age 21 ) ) then (
    print( "You can buy beer in the US" )
) elif (lt( age 16 )) then(
    print( "You're not even close" )
) else (
    print( '{{sub(21 age)}} years until you can buy beer in the US' )
)
While condition is truthy then the statement directly after the while statement will be executed otherwise the statement directly after if is skipped and the while loop will exit.
lap = 0

while( lt( lap 500 ) ) do (
    print("go fast")
    print("turn left")

    // increment by 1
    inc(lap)
)
Executes the next statement for each item returned by the passed in iterator.
total = 0
foreach( num=in(array(1 2 3 4 )) ) do (
    total = add( num total )
)

// 10
print(total)
Iterates of the values of an array
Breaks out of loops either not arguments are passed or if any of the passed arguments are truthy
lap = 0

while( true ) do (
    print("go fast")
    print("turn left")

    // increment by 1
    inc(lap)

    if( eq( lap 500 ) ) then (
        break()
    )
)
Executes all given statements and returns the value of the last statement. Do is commonly used with loop statements, but it can also be useful in other situations on its own such as doing inline calculations. (note) The do keyword is also used to define top level statement when do is used as a message name.
n = 0
while( lt( n 10 ) ) do (
    // increment by 1
    inc(lap)
)

// 22
print( add( 5 do(
    sum = mul(n 2)
    sum = sub( sum 3 )
)) )
Returns a value from the current function
> customMath(
    a: number
    b: number
) -> (
    return mul( add(a b) b )
)

> do

value = customMath(a:4 b:3)

// 21
print(value)
Returns true if all given values are equal. Object equality is checked by by reference. Values must be of the same type to be equal. ( a === b )
// true
eq( 1 1 )

// false
eq( 1 "1" )
Returns true if a is grater then b. ( a > b )
Returns true if a is grater then or equal to b. ( a >= b )
Returns true if a is less then b. ( a < b )
Returns true if a is less then or equal to b. ( a <= b )
Adds all arguments together and returns the result. Strings are concatenated. (a + b )
Subtracts a from b and returns the result. (a - b )
Multiplies a and b and returns the result. (a * b )
Divides a and b and returns the result. (a / b )
Raises a by b and returns the result. Math.pow(a, b )
Increments the value of the given variable by 1 or the value of the second argument. ( a++ ) or ( a+= byValue )
Decrements the value of the given variable by 1 or the value of the second argument. ( a-- ) or ( a-= byValue )
Prints all values to stdout
Switch can be used as either and switch statement or a ternary. When the switch function has exactly 3 arguments and non of the is a case or default statement then switch acts as a ternary.
// can be 0 to 9
value = rand(9)

// can be 20 to 29
value2 = add(20 rand(9))


switch(

    // Sets the current match value of the switch. The match value of a switch statement can be
    // changed further down the switch
    value

    case(0) print("Lowest")

    case(1) do(
        print("Value is 1")
    )

    case(2) do(
        print("Number two")
    )

    case(3) do(
        print("Tree or three")
    )

    // change the value to a value in ary
    value2

    case(20) do(
        print("2 zero")
    )

    test(lt(value2 28)) do(
        print("less than 28")
    )

    default() print("Fall back to default")

)


// values matched by switches are returned and the value can be assigned to a variable
str = "two"
value = switch(
    str

    case("one") 1
    case("two") 2
    case("three") 3
)

// 2
print(value)


// switches can also be used as a ternary

// yes
print( switch(true "yes" "no") )

// no
print( switch(false "yes" "no") )
Returns the current date time as a timestamp. now uses Date.now() to get the current timestamp.
Returns the current or given date as a formatted string. The default value format string is "yyyy-MM-dd'T'HH:mm:ssxxx" which is an ISO 8601 date and results in formatted dates that look like 2023-12-08T21:05:08-01:00. Invalid date formats will fallback to using the default date format. Formatting is done using date-fns - https://date-fns.org/v2.16.1/docs/format
Suspends execution for the given number of milliseconds
Returns a random number. Is the max parameters is passed then a random whole number with a maximum of max will be returned otherwise a random number from 0 to 1 will be returned.
Performs an http GET request and returns the parsed JSON result. Results with a 404 status or a Content-Type not equal to application/json are returned as undefined.
Performs an http GET request and returns the result as a string.
Performs an http POST request and returns the parsed JSON result. Results with a 404 status or a Content-Type not equal to application/json are returned as undefined.
Performs an http PATCH request and returns the parsed JSON result. Results with a 404 status or a Content-Type not equal to application/json are returned as undefined.
Performs an http PUT request and returns the parsed JSON result. Results with a 404 status or a Content-Type not equal to application/json are returned as undefined.
Performs an http DELETE request and returns the parsed JSON result. Results with a 404 status or a Content-Type not equal to application/json are returned as undefined.
Returns the value encoded as an URI
Returns the value encoded as an URI component
Concatenates all passed in values and formats the values as markdown. Recursive objects are limited to a depth of 5.
formats the value as markdown and allows the configuration of recursive object depth.
Formats the given value as json
Formats the given value as json and closes the value in a markdown json code block.
Prints a struct as a JSON scheme.
Prints an array of values a as CSV.
Prints an array of values a as CSV inside of a markdown code block.
Merges all passed in parameters into a single object. merge is similar to Javascript's spread operator.
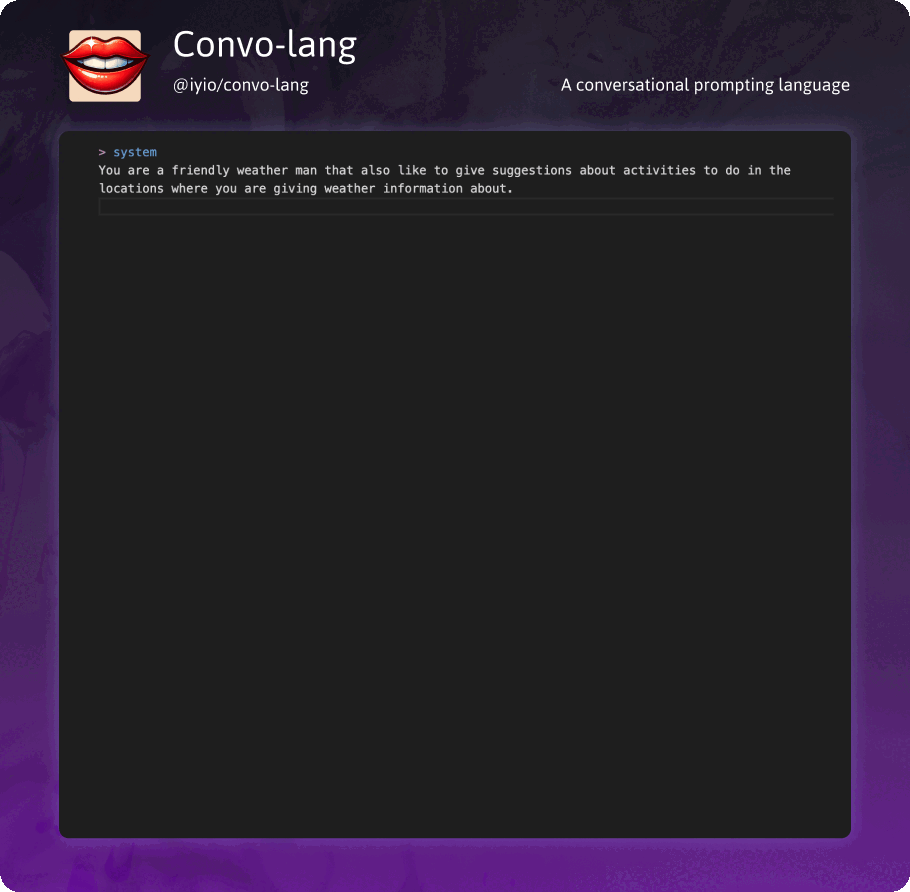
Since NPM and GitHub do not support custom syntax highlighters the examples below include both the code for each example and an image showing syntax highlighting.
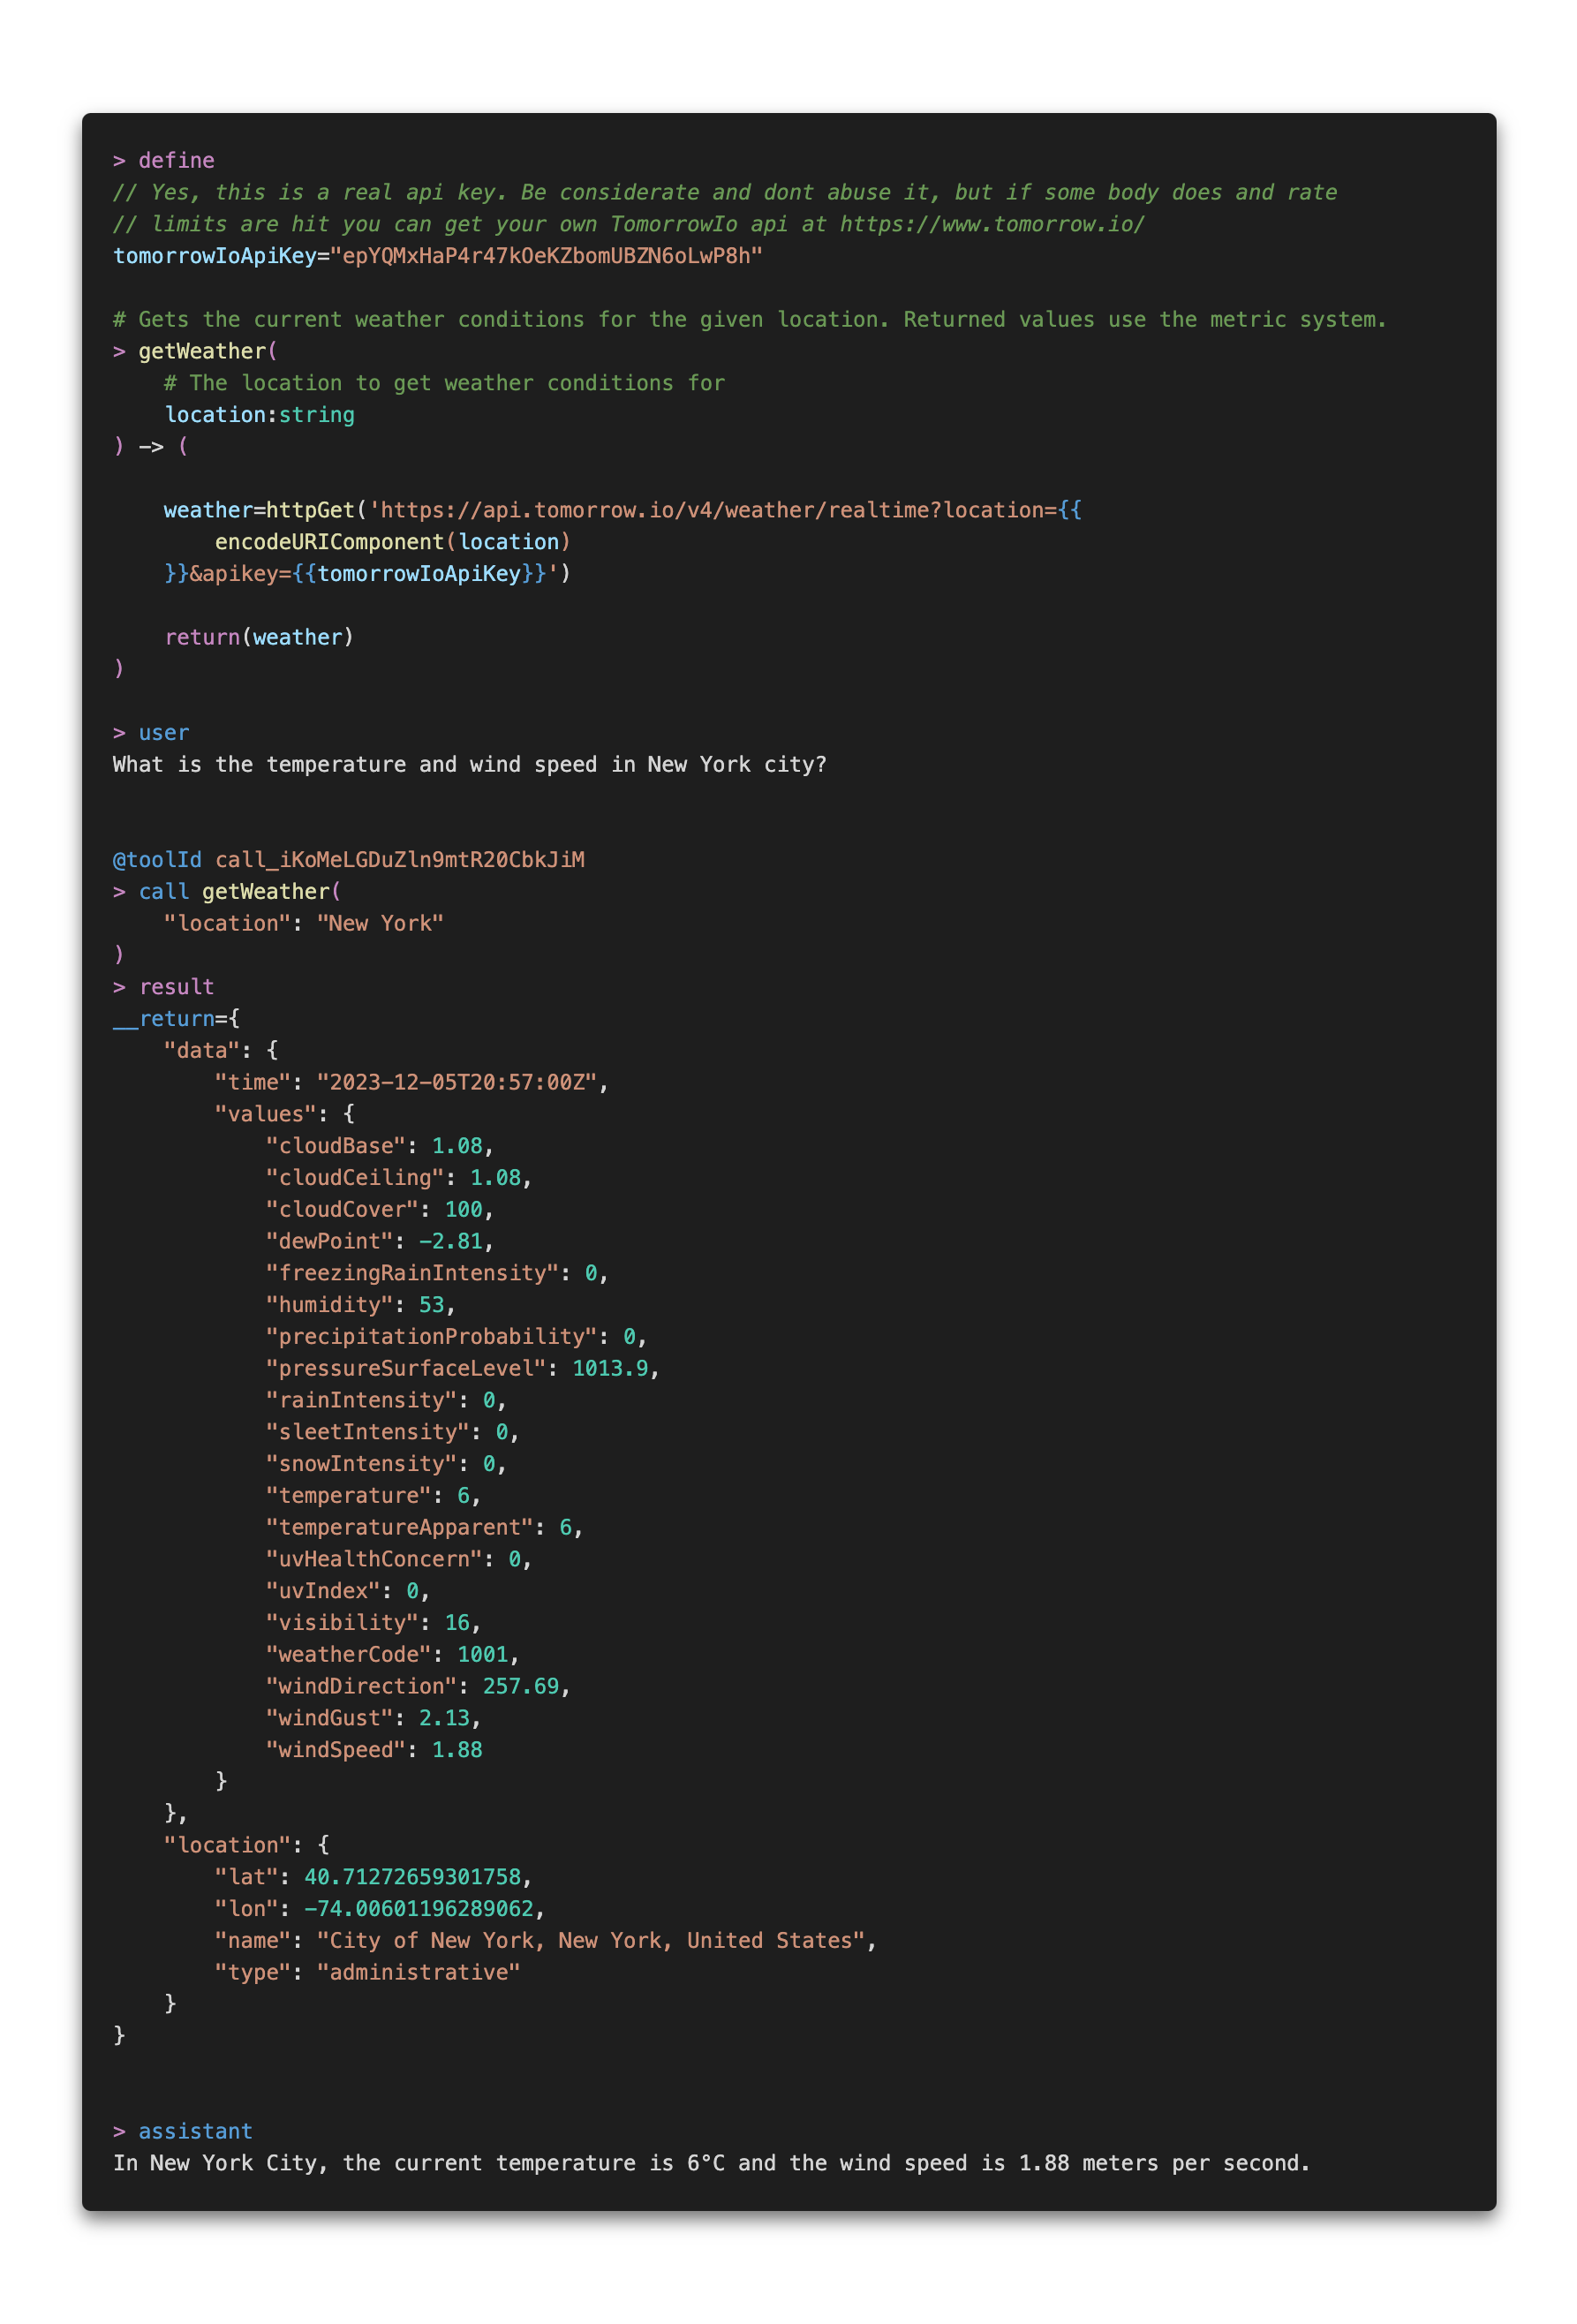
> define
// Yes, this is a real api key. Be considerate and dont abuse it, but if some body does and rate
// limits are hit you can get your own TomorrowIo api at https://www.tomorrow.io/
tomorrowIoApiKey="epYQMxHaP4r47kOeKZbomUBZN6oLwP8h"

# Gets the current weather conditions for the given location. Returned values use the metric system.
> getWeather(
    # The location to get weather conditions for
    location:string
) -> (

    weather=httpGet('https://api.tomorrow.io/v4/weather/realtime?location={{
        encodeURIComponent(location)
    }}&apikey={{tomorrowIoApiKey}}')

    return(weather)
)

> user
What is the temperature and wind speed in New York city?


@toolId call_iKoMeLGDuZln9mtR20CbkJiM
> call getWeather(
    "location": "New York"
)
> result
__return={
    "data": {
        "time": "2023-12-05T20:57:00Z",
        "values": {
            "cloudBase": 1.08,
            "cloudCeiling": 1.08,
            "cloudCover": 100,
            "dewPoint": -2.81,
            "freezingRainIntensity": 0,
            "humidity": 53,
            "precipitationProbability": 0,
            "pressureSurfaceLevel": 1013.9,
            "rainIntensity": 0,
            "sleetIntensity": 0,
            "snowIntensity": 0,
            "temperature": 6,
            "temperatureApparent": 6,
            "uvHealthConcern": 0,
            "uvIndex": 0,
            "visibility": 16,
            "weatherCode": 1001,
            "windDirection": 257.69,
            "windGust": 2.13,
            "windSpeed": 1.88
        }
    },
    "location": {
        "lat": 40.71272659301758,
        "lon": -74.00601196289062,
        "name": "City of New York, New York, United States",
        "type": "administrative"
    }
}


> assistant
In New York City, the current temperature is 6°C and the wind speed is 1.88 meters per second.
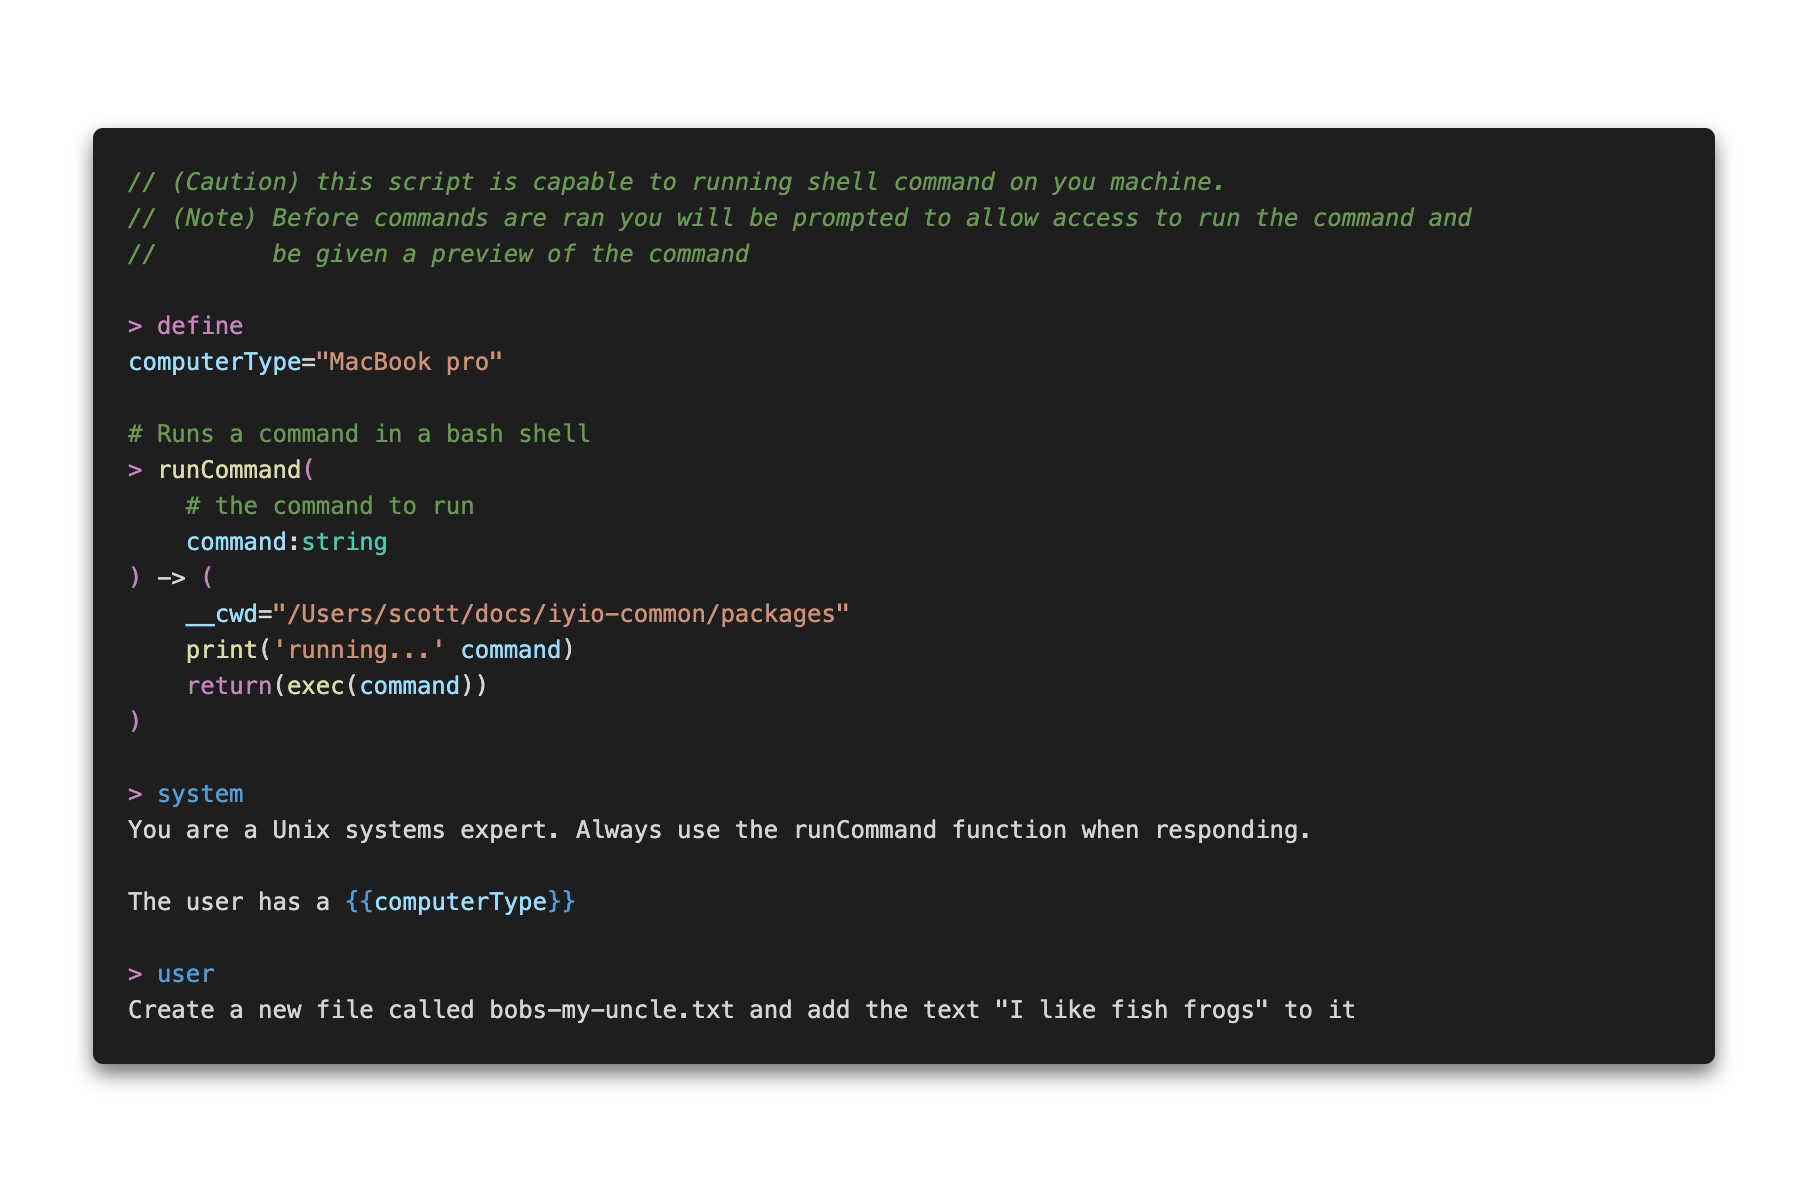
// (Caution) this script is capable to running shell command on you machine.
// (Note) Before commands are ran you will be prompted to allow access to run the command and
//        be given a preview of the command

> define
computerType="MacBook pro"

# Runs a command in a bash shell
> runCommand(
    # the command to run
    command:string
) -> (
    __cwd="/Users/scott/docs/iyio-common/packages"
    print('running...' command)
    return(exec(command))
)

> system
You are a Unix systems expert. Always use the runCommand function when responding.

The user has a {{computerType}}

> user
Create a new file called bobs-my-uncle.txt and add the text "I like fish frogs" to it
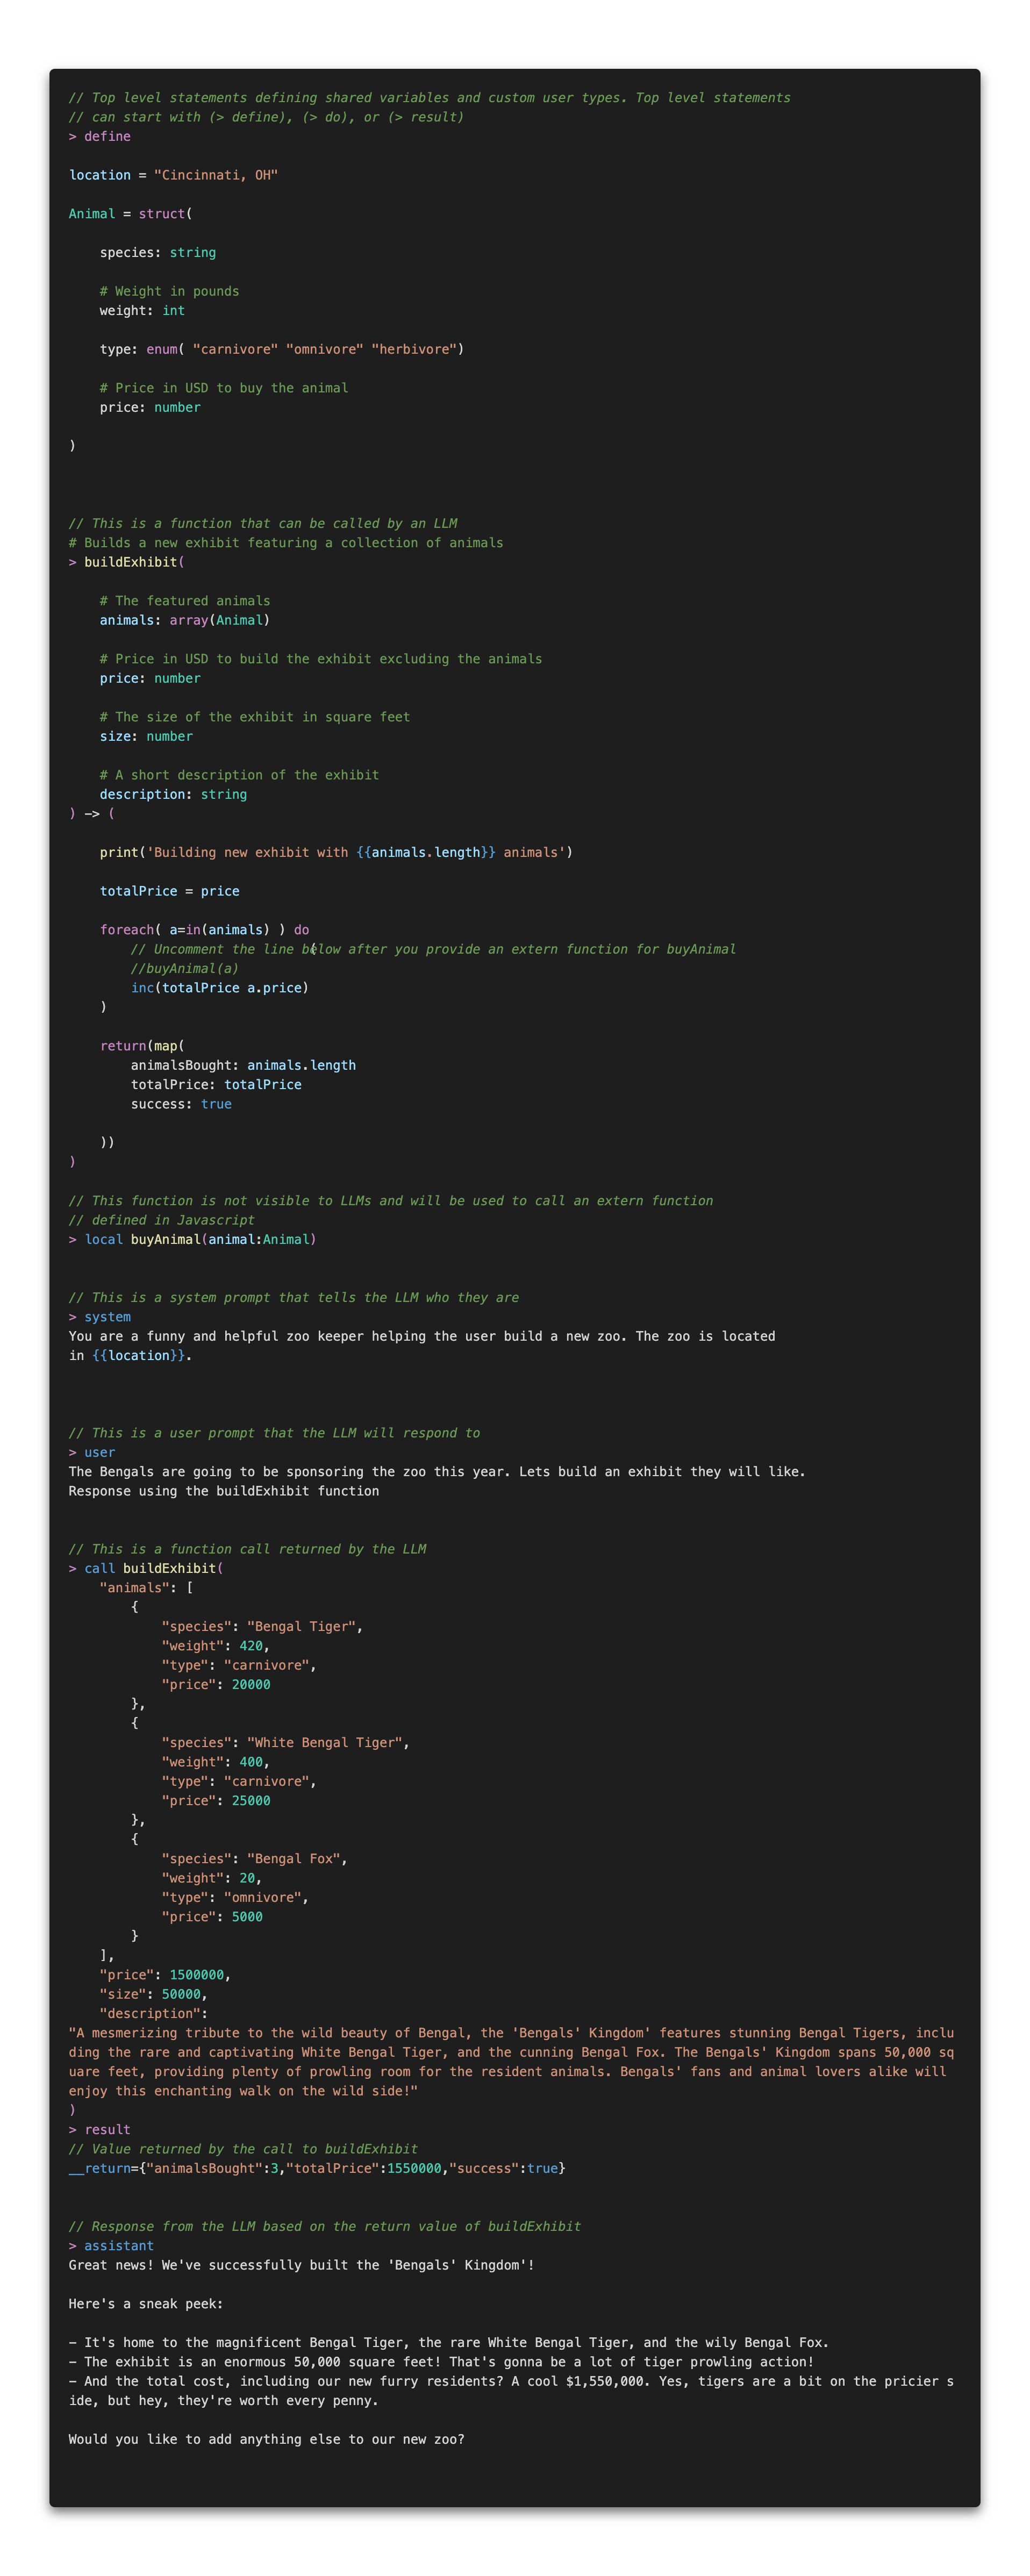
// Top level statements defining shared variables and custom user types. Top level statements
// start with (> define),  (> do) or  (> result)
> define

location = "Cincinnati, OH"

Animal = struct(

    species: string

    # Weight in pounds
    weight: int

    type: enum( "carnivore" "omnivore" "herbivore")

    # Price in USD to buy the animal
    price: number

)


// This is a function that can be called by an LLM

# Builds a new exhibit featuring a collection of animals
> buildExhibit(

    # The featured animals
    animals: array(Animal)

    # Price in USD to build the exhibit excluding the animals
    price: number

    # The size of the exhibit in square feet
    size: number

    # A short description of the exhibit
    description: string
) -> (

    print('Building new exhibit with {{animals.length}} animals')

    totalPrice = price

    foreach( a=in(animals) ) do (
        // Uncomment the line below after you provide an extern function for buyAnimal
        //buyAnimal(a)
        inc(totalPrice a.price)
    )

    return(map(
        animalsBought: animals.length
        totalPrice: totalPrice
        success: true

    ))
)

// This function is not visible to LLMs and will be used to call an extern function
// defined in Javascript
> local buyAnimal(animal:Animal)


// This is a system prompt that tells the LLM who they are
> system
You are a funny and helpful zoo keeper helping the user build a new zoo. The zoo is located
in {{location}}.


// This is a user prompt that the LLM will respond to
> user
The Bengals are going to be sponsoring the zoo this year. Lets build an exhibit they will like.
Response using the buildExhibit function


// This is a function call return by the LLM
> call buildExhibit(
    "animals": [
        {
            "species": "Bengal Tiger",
            "weight": 420,
            "type": "carnivore",
            "price": 20000
        },
        {
            "species": "White Bengal Tiger",
            "weight": 400,
            "type": "carnivore",
            "price": 25000
        },
        {
            "species": "Bengal Fox",
            "weight": 20,
            "type": "omnivore",
            "price": 5000
        }
    ],
    "price": 1500000,
    "size": 50000,
    "description": "A mesmerizing tribute to the wild beauty of Bengal, the 'Bengals' Kingdom' features stunning Bengal Tigers, including the rare and captivating White Bengal Tiger, and the cunning Bengal Fox. The Bengals' Kingdom spans 50,000 square feet, providing plenty of prowling room for the resident animals. Bengals' fans and animal lovers alike will enjoy this enchanting walk on the wild side!"
)
> result
// Value return by the call to buildExhibit
__return={"animalsBought":3,"totalPrice":1550000,"success":true}


// Response from the LLM based on the return value of buildExhibit
> assistant
Great news! We've successfully built the 'Bengals' Kingdom'!

Here's a sneak peek:

- It's home to the magnificent Bengal Tiger, the rare White Bengal Tiger, and the wily Bengal Fox.
- The exhibit is an enormous 50,000 square feet! That's gonna be a lot of tiger prowling action!
- And the total cost, including our new furry residents? A cool $1,550,000. Yes, tigers are a bit on the pricier side, but hey, they're worth every penny.

Would you like to add anything else to our new zoo?
More examples can be found at https://github.com/iyioio/common/tree/main/packages/convo-lang-tools/examples