
The easiest way to connect to Didit protocol
Didit-SDK is a library that makes it easy to add wallet connection to your dapp.
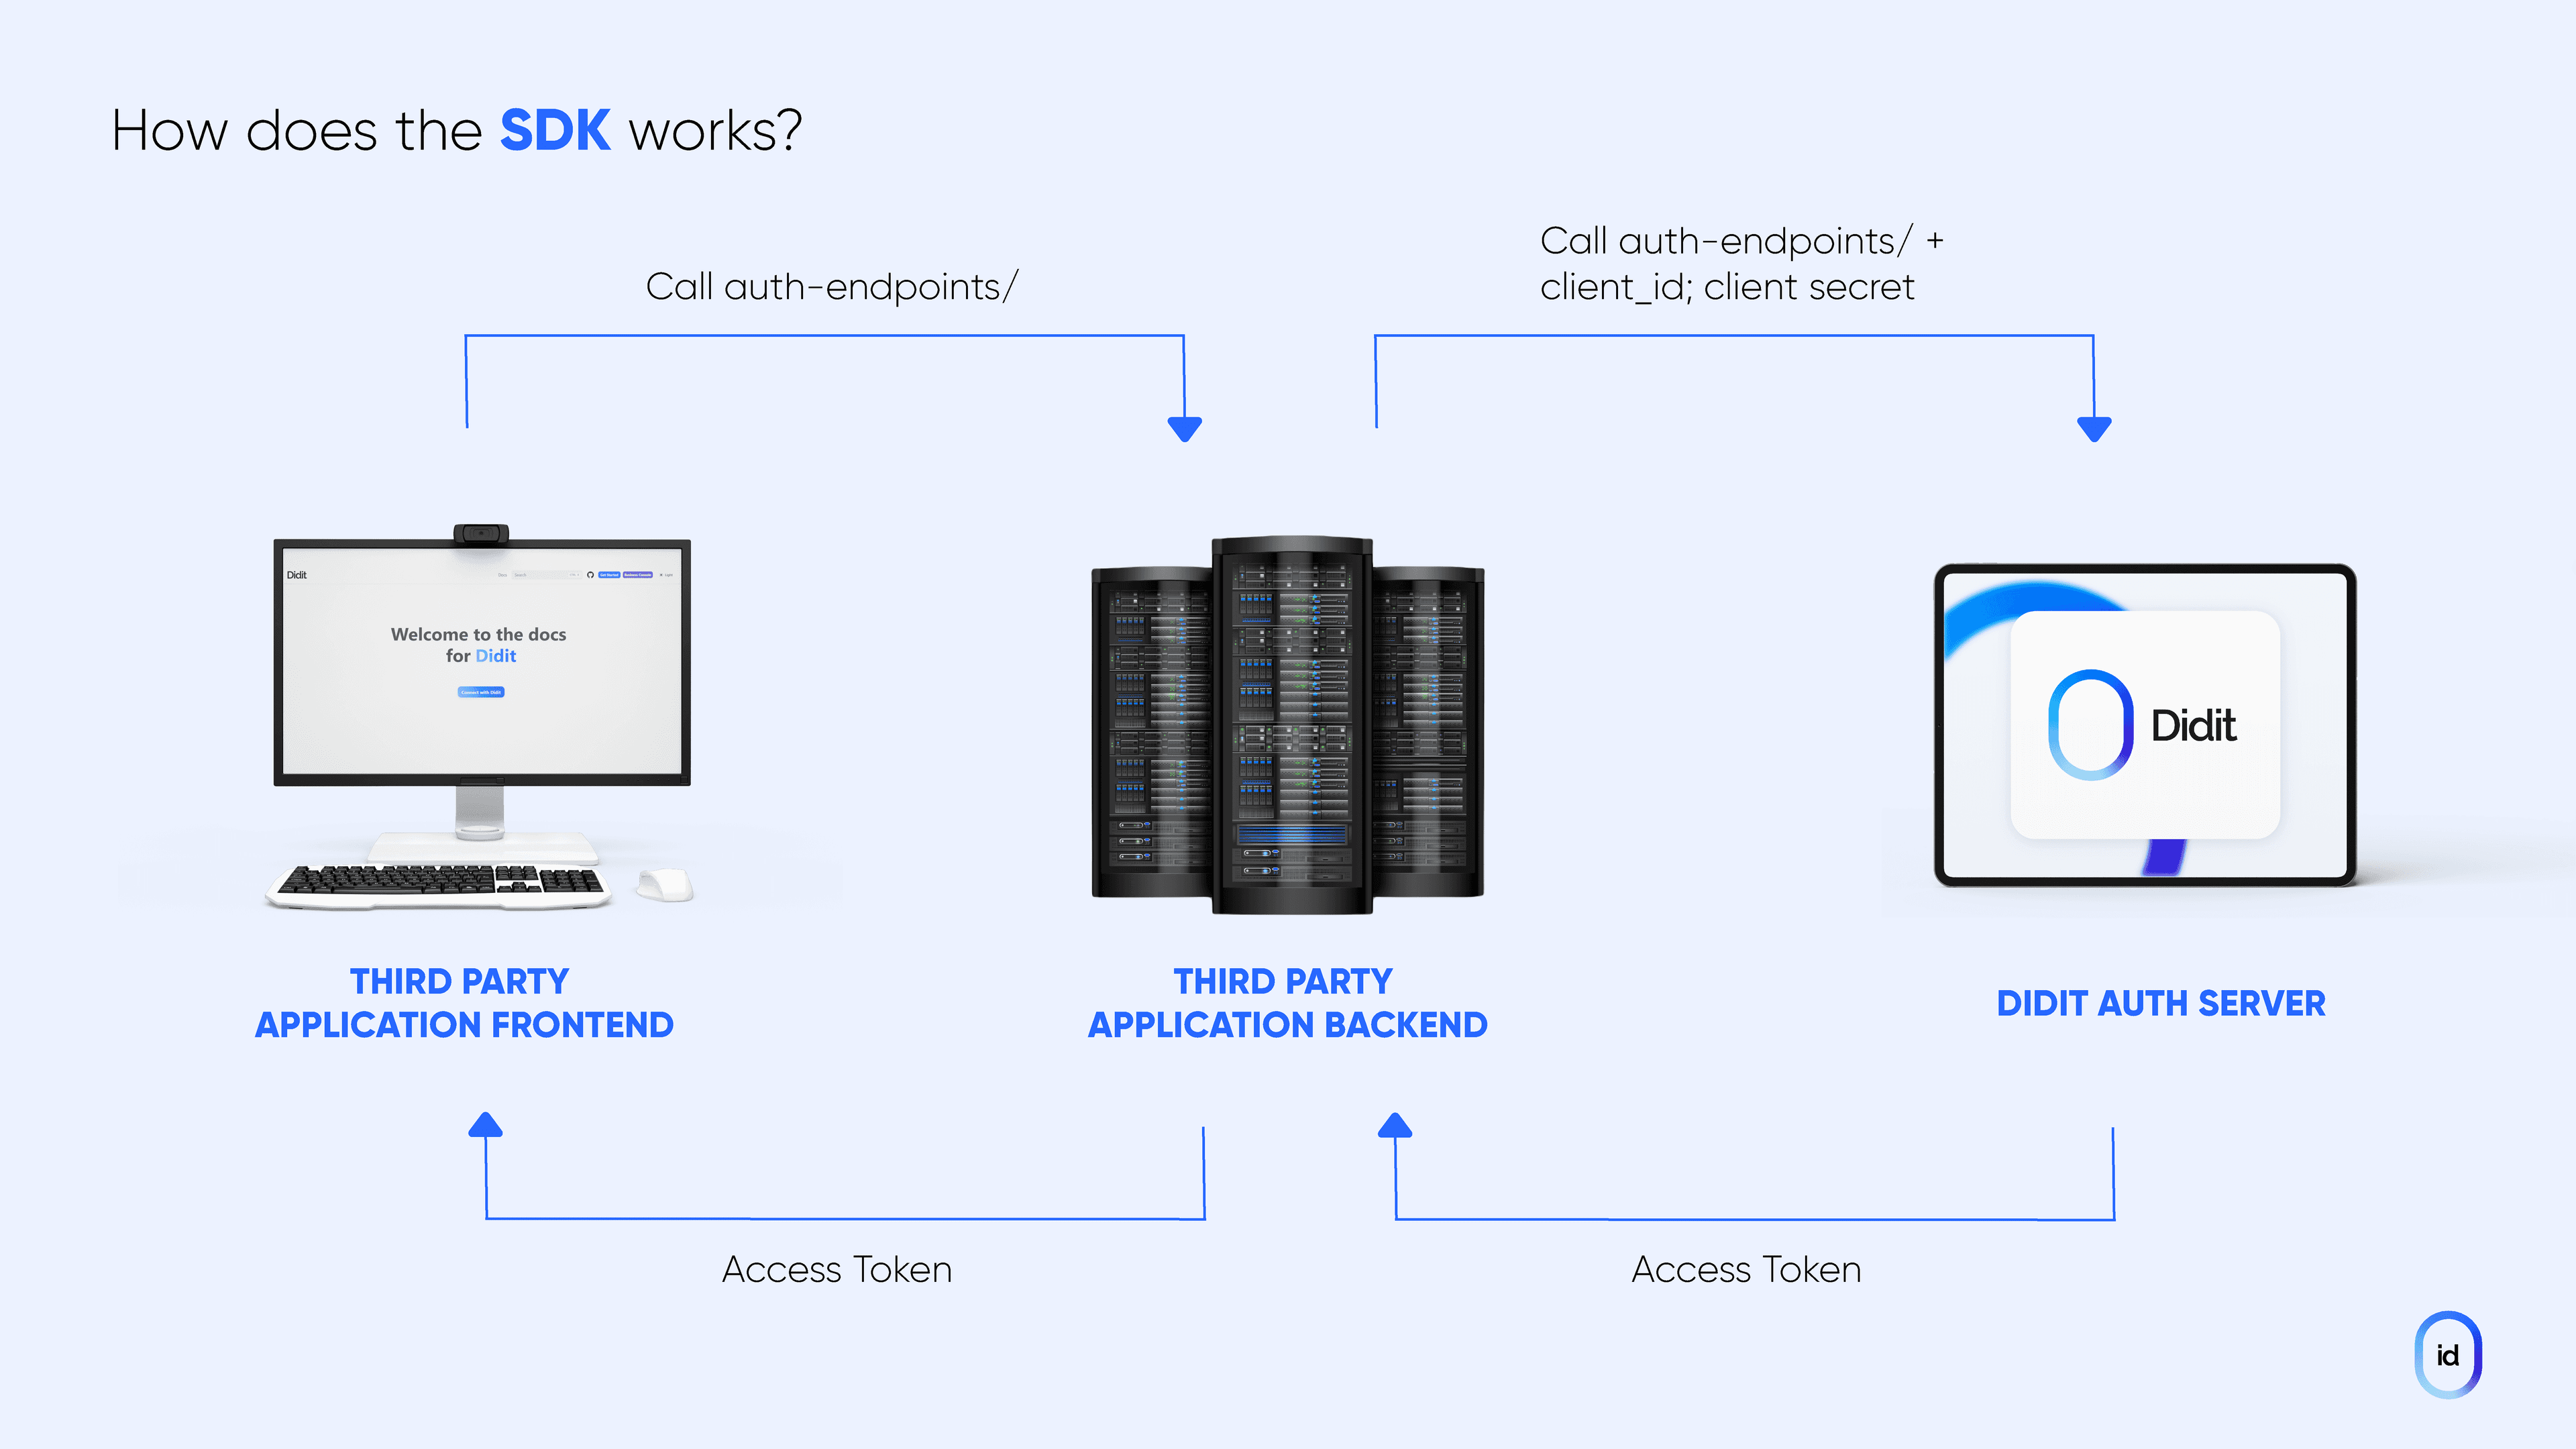
- ✅ Didit User Authentication flow
- 🎉 Support for multiple frameworks. Easily integrate with React and vanilla JavaScript. Vue and Svelte are comming soon...
- 🔥 Out-of-the-box wallet management
- 🚀 EIP-6963. support for browser extension wallets.
- 🎨 Easily customizable UI. light/dark or make it match your brand
- 🦄 Built on top of wagmi
Didit SDK Github Repo
You can use the CodeSandbox links below try out Didit Sdk:
-
with js // TODO: setup example on codesandbox
-
with react // TODO: setup example on codesandbox
-
with nextjs // TODO: setup example on codesandbox
install didit-sdk and its peer dependencies, wagmi, viem and @tanstack/react-query
npm i @didit-sdk/react wagmi viem @tanstack/react-queryCreate an app at Business Console and obtain your clientid and client secret
For a quick integration you can use defaultWagmiConfig function which wraps Wagmi's createConfig function with a predefined configuration. This includes WalletConnect, Coinbase and Injected connectors In your main.ts file set up the following configuration.
On top of your app set up the following configuration, making sure that all functions are called outside any React component to avoid unwanted rerenders.
import { arbitrum, mainnet } from 'wagmi/chains'
import { defaultWagmiConfig, createDiditSdk } from '@didit-sdk/react'
import { QueryClient, QueryClientProvider } from '@tanstack/react-query'
import { WagmiProvider } from 'wagmi'

// Get cleintId from https://business.didit.me
const clientId = process.env.DIDI_CLIENT_ID

// 1. Setup queryClient
const queryClient = new QueryClient()

// 2. Create wagmiConfig
const metadata = {
  name: 'React Example',
  url: 'https://react-example.me'
}

const wagmiConfig = defaultWagmiConfig({
  chains: [mainnet, arbitrum],
  metadata
})

// 3. creat didit sdk
createDiditSdk({
  wagmiConfig,
  clientId,
  metadata
})

export default function DiditSdkProvider({ children }) {
  return (
    <WagmiProvider config={wagmiConfig}>
      <QueryClientProvider client={queryClient}>{children}</QueryClientProvider>
    </WagmiProvider>
  )
}
<didit-callback>component is essential for socials auth to work check components for more
Create a new file for your Wagmi configuration, since we are going to be calling this function on the client and the server it cannot live inside a file with the 'use client' directive.
For this example we will create a file called config/index.tsx outside our app directory and set up the following configuration
import { arbitrum, mainnet } from 'wagmi/chains'
import { defaultWagmiConfig } from '@didit-sdk/react'
import { cookieStorage, createStorage } from 'wagmi'

// Get cleintId from https://business.didit.me
const clientId = process.env.NEXT_PUBLIC_DIDI_CLIENT_ID

// 2. Create wagmiConfig
const metadata = {
  name: 'React Example',
  url: 'https://react-example.me'
}

const wagmiConfig = defaultWagmiConfig({
  chains: [mainnet, arbitrum],
  metadata,
  ssr: true,
  storage: createStorage({
    storage: cookieStorage
  })
})
→ Notice that we are using here the [recommended configuration from Wagmi for SSR.](https://wagmi.sh/react/guides/ssr)
→ Using cookies is completely optional and by default Wagmi will use `localStorage` instead if the `storage` param is not defined.
→ The `ssr` flag will delay the hydration of the Wagmi's store to avoid hydration mismatch errors.
Let's create now a context provider that will wrap our application and initialized DiditSdk (createDiditSdk needs to be called inside a React Client Component file).
In this example we will create a file called context/index.tsx outside our app directory and set up the following configuration
use client'

import React, { ReactNode } from 'react'
import { config, clientId, metadata } from '@/config'

import { createDiditSdk } from '@didit-sdk/react'

import { QueryClient, QueryClientProvider } from '@tanstack/react-query'

import { State, WagmiProvider } from 'wagmi'

// Setup queryClient
const queryClient = new QueryClient()

// Create sdk instance
createDiditSdk({
  wagmiConfig: config,
  clientId,
  metadata,
})

export default function DiditSdkProvider({
  children,
  initialState
}: {
  children: ReactNode
  initialState?: State
}) {
  return (
    <WagmiProvider config={config} initialState={initialState}>
      <QueryClientProvider client={queryClient}>{children}</QueryClientProvider>
    </WagmiProvider>
  )
}Next, in our app/layout.tsx file, we will import our DiditSdkProvider component and call the Wagmi's function cookieToInitialState.
The initialState returned by cookieToInitialState, contains the optimistic values that will populate the Wagmi's store both on the server and client.
Hooks are functions that will help you control the sdk modal, subscribe to user session.
import './globals.css'
import type { Metadata } from 'next'
import { headers } from 'next/headers'

import { cookieToInitialState } from 'wagmi'

import { config } from '@/config'
import DiditSdkProvider from '@/context'

export const metadata: Metadata = {
  title: 'Create Next App',
  description: 'Generated by create next app'
}

export default function RootLayout({
  children
}: Readonly<{
  children: React.ReactNode
}>) {
  const initialState = cookieToInitialState(config, headers().get('cookie'))
  return (
    <html lang="en">
      <body>
        <DiditSdkProvider initialState={initialState}>{children}</DiditSdkProvider>
      </body>
    </html>
  )
}OAuth authentication require a redirection to the client application. redirectUri in the config should be a page in our app.
Let's create app/callback/index.tsx and add <didit-callback> web component
export default function Page() {
  return <didit-callback></didit-callback>
}
Web components are global html elements that don't require importing.
To open DiditSdk modal you can use our web component or build your own button with DiditSdk hooks. In this example we are going to use the <didit-button> component.
Web components are global html elements that don't require importing.
export default function ConnectButton() { return <didit-button /> }To open DiditSdk modal you can use our web component or build your own button with DiditSdk hooks. In this example we are going to use the <didit-button> component.
Web components are global html elements that don't require importing.
export default function ConnectButton() { return <didit-button /> }Hooks are functions that will help you control the sdk modal, subscribe to user session.
Control the sdk modal with the useDiditSdk hook
import { useDiditSdk } from '@didit-sdk/react'

export default function Component() {
  const { isOpen, openModal, closeModal } = useDiditSdk()

  openModal()

  //...
}
DiditSdk state includes:
| Property | Description | Type |
|---|---|---|
| `isLoading` | Open state will be true when the modal is open and the user is authenticating | `boolean` |
| `isOpen` | Open state will be true when the modal is open and false when closed. | `boolean` |
import { useDiditSignOut } from '@didit-sdk/react'

const signOut = useDiditSignOut()get Didit session state
import { useDiditState } from '@didit-sdk/react'

const { user, status, isAuthenticated, authMethod, selectedNetworkName } = useDiditState()
Didit state is an object of the following properties:
| Property | Description | Type |
|---|---|---|
| `isAuthenticated` | Whether the user is authenticated or not. will be undefined when the user authenticating or when checking user session on page load | `boolean` | `undefined` |
| `status` | A string representation of the auth status `loading` | `authenticated` | `unauthenticated` | `DiditAuthStatus` |
| `authMethod` | The auth method used by the user if is authenticated: `wallet` | `apple` | `google` | `DiditAuthType` | `undefined` |
| `user` | The current conncted didit user | `DiditUser` | `undefined` |
| `accessToken` | The current **Didit** access token | `string` | `undefined` |
| `refreshToken` | The current **Didit** refresh token | `string` | `undefined` |
| `isWalletConnected` | A quick way to check if user connected with wallet address | `boolean` |
| `walletAddress` | The current connected wallet address if the user is authneticated with wallet address | `string` | `undefined` |
| `addressExplorerUrl` | Explorer url of the current connected wallet | `string` | `undefined` |
| `selectedNetworkId` | The current connected chain id example: 1 (Ethereum) | `number` | `undefined` |
| `selectedNetworkName` | The current connected chain name example: Ethereum (1) | `string` | `undefined` |
import { useDiditSdkTheme } from '@didit-sdk/react'

export default function Component() {
  const { setThemeMode, themeMode, setThemeVariables, themeVariables } = useDiditSdkTheme()

  setThemeMode('dark')

  setThemeVariables({
    primaryColor: '#00BB7F'
  })
}You can use Wagmi hooks to sign messages, interact with smart contracts, and much more.
Hook for signing messages with connected account.
import { useSignMessage } from 'wagmi'

function App() {
  const { signMessage } = useSignMessage()

  return <button onClick={() => signMessage({ message: 'hello world' })}>Sign message</button>
}
Check more on wagmi docs
For more readt Didit Sdk docs