
functions-toolkit
An NPM package that can be used for working with Chainlink Functions.
Up-to-date documentation on Chainlink Functions can be found here.
Table of Contents
- Table of Contents
- Prerequisites
Prerequisites
Install Node.js version 18.18.0 or higher and Deno version 1.36.0 or higher.
Chainlink Functions requires signing a terms of service agreement before creating a billing subscription. See this getting started section in the docs.
Functions Billing Subscription Management
The SubscriptionManager class is used to manage the Chainlink billing subscription used to pay for Functions requests.
Subscription Initialization
To create a SubscriptionManager you need an object with 3 inputs.
- An instance of the Ethers.js signer class. Ensure you have a provider connected so you can communicate with the blockchain. You can use Infura or Alchemy or another provider that provides access to blockchains that Chainlink Functions supports.
- The contract address for the LINK token for the corresponding blockchain network from here.
- The contract address for the Functions Router for the corresponding blockchain network contract from here.
Then create an instance of the SubscriptionManager by passing those 3 inputs.
const subscriptionManager = new SubscriptionManager({
  signer,
  linkTokenAddress,
  functionsRouterAddress,
})
After the class is instantiated, it must be initialized before it can be used. This is done by running the initialize async function as shown below:
await subscriptionManager.initialize()
Create Subscription
createSubscription() creates a new Functions billing subscription using the Functions Router contract and returns a promise which resolves to the subscription ID of type number. Optionally, a consumer contract address can also be passed to create a subscription and add an authorized consumer in a single transaction.
const subscriptionId: number = await subscriptionManager.createSubscription({
  consumerAddress,
})
Make a note of your subscription ID as it will contain your funds. You will also need to use the subscription ID as an input for many operations when using Chainlink Functions.
Fund Subscription
fundSubscription() is used to fund your subscription with LINK tokens. You must have a LINK balance for your subscription in order to pay for Functions requests. Furthermore, in order to upload DONHosted encrypted secrets, you must have a minimum balance in your subscription. Minimum subscription balance requirements for uploading encrypted secrets to the DON can be found at in the Chainlink Functions docs.
To fund the subscription with LINK, ensure the wallet that you have connected has sufficient LINK. You can get some testnet LINK from the faucet.
Note that all values are denominated in Juels. 1,000,000,000,000,000,000 (1e18) Juels are equal to 1 LINK. Do not use the JavaScript number type for calculations with Juels as the maximum safe JavaScript integer is only 2^54 - 1.
const juelsAmount:  BigInt | string = BigInt(2) * BigInt(10**18)
await subscriptionManager.fundSubscription({
  subscriptionId,
  juelsAmount,
})
fundSubscription() returns a promise which resolves to an Ethers.js TransactionReceipt
Adding/Removing Authorized Consumer Contracts
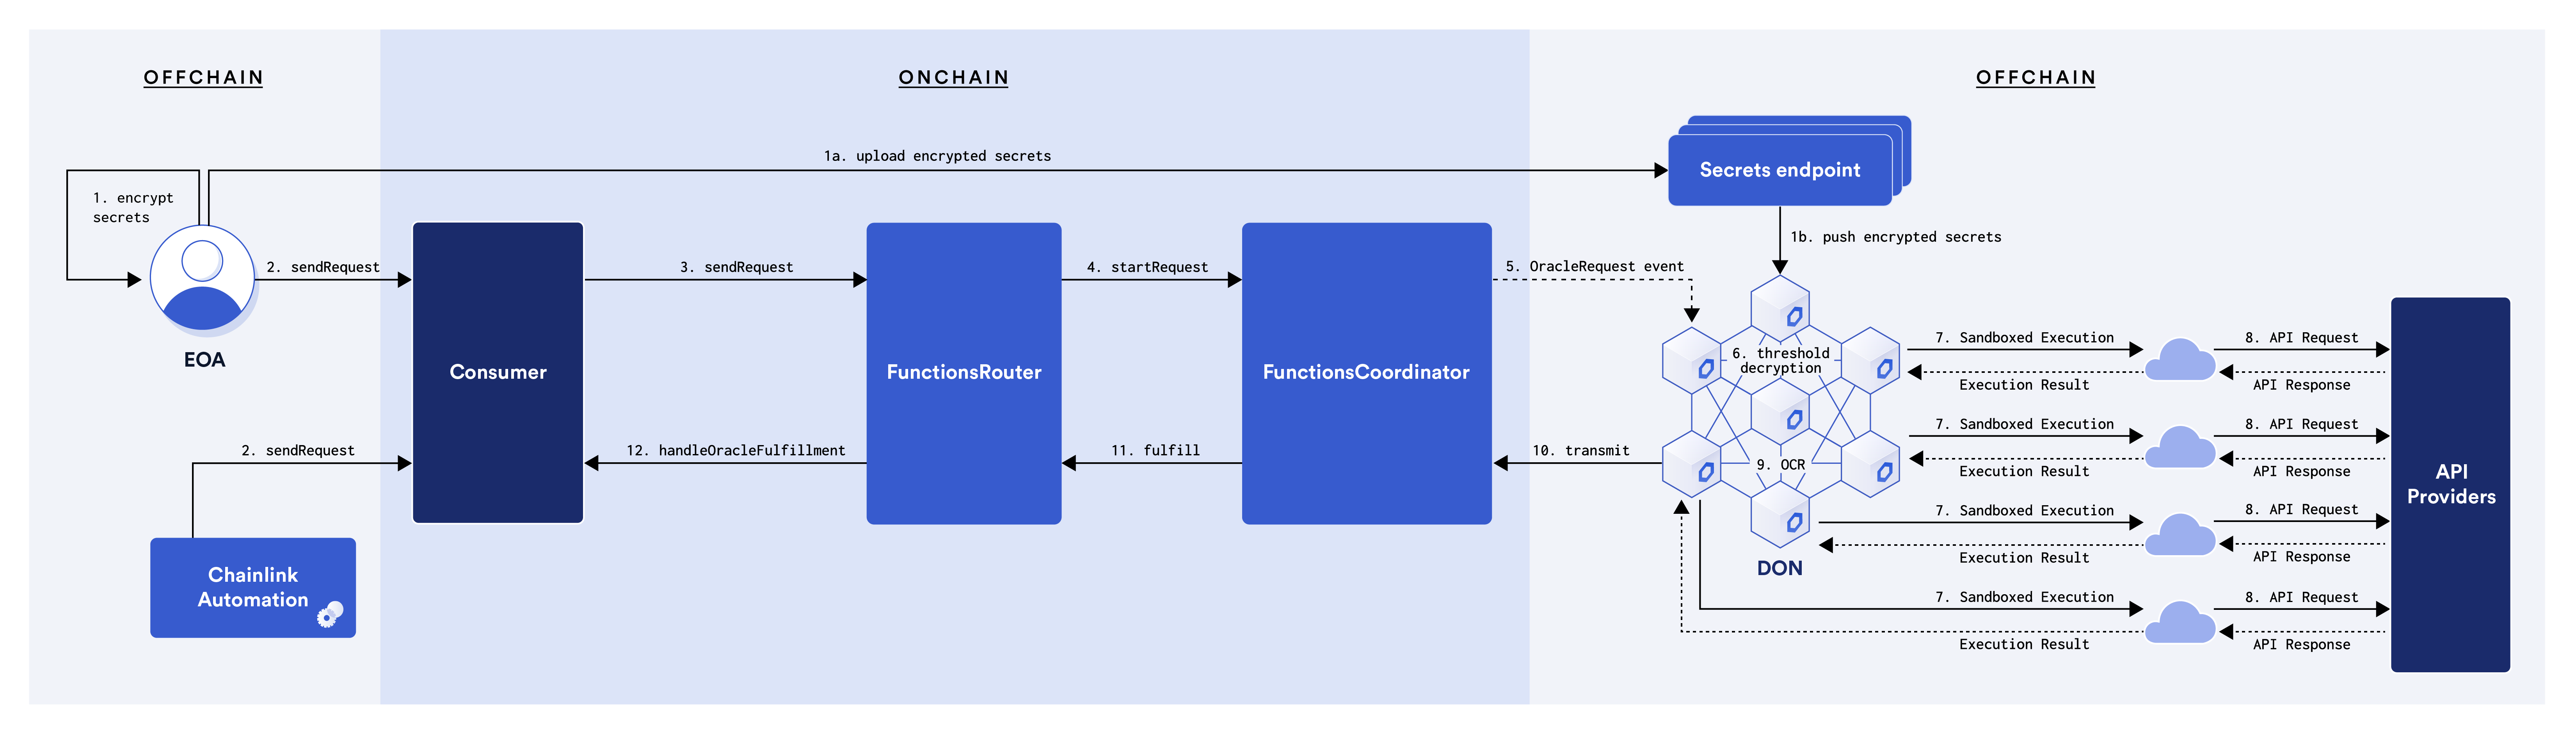
A Functions Consumer is the smart contract which can send Functions requests to the Chainlink Oracle Network and where the oracle network will return the results of your decentralized computation. A visualization of this request/response flow is below.
Each subscription can hold a limited number of authorized Functions Consumers. Refer to the service limits to view the maximum number of consumer contracts per subscription. These are the consumer contracts that are authorized to use your subscription's LINK balance to pay for requests.
const addConsumerTxReceipt = await subscriptionManager.addConsumer({
  subscriptionId,
  consumerAddress,
})
Similarly, you can remove an authorized consumer contract.
const removeConsumerTxReceipt = await subscriptionManager.removeConsumer({
  subscriptionId,
  consumerAddress,
})
Both addConsumer() and removeConsumer() return a promise which resolves to an EthersJS TransactionReceipt.
Cancelling Subscriptions
You can cancel subscriptions with cancelSubscription(). If there are any pending requests, you must first "time out" that pending request using the timeoutRequest() function before cancelling the subscription.
const cancelSubTxReceipt = await subscriptionManager.cancelSubscription({ subscriptionId })
cancelSubscription() takes a config object that has the following type definition. Optionally, you can specify a wallet address to which the subscription's LINK balance will be refunded. If unspecified, it will default to the subscription owner's address.
type SubCancelConfig = {
  subscriptionId: BigInt | number | string
  refundAddress?: string
  txOptions?: TransactionOptions
}
Transferring and Accepting Transfers of Subscriptions
Transferring subscriptions is a two-stage process. First, the subscription owner proposes the transfer with requestSubscriptionTransfer() and it is recorded on chain, but the ownership does not transfer until the transferee accepts by calling acceptTransfer().
const transferTxReceipt = await subscriptionManager.requestSubscriptionTransfer({
  subscriptionId,
  newOwner, // transferee wallet address
})
To accept the ownership transfer, the transferee will need to have their own SubscriptionManager instance which is connected to the wallet address denoted by newOwner. Then the transferee can call the acceptSubTransfer() method.
const acceptTransferTxReceipt = await transfereeSubManager.acceptSubTransfer({ subscriptionId })
Get subscription details
You can request details for a given subscription (on the network on which it has been created) using getSubscriptionInfo().
const subscriptionInfo = await getSubscriptionInfo(subscriptionId)
This is a read-only interaction with the blockchain.
The returned promise resolves to a value of type SubscriptionInfo and has the following structure:
type SubscriptionInfo = {
  balance: BigInt // Represented in Juels (1,000,000,000,000,000,000 (1e18) Juels are equal to 1 LINK)
  owner: string // Subscription owner's address
  blockedBalance: BigInt // Balance reserved to pay for in-flight requests represented in Juels
  proposedOwner: string // Address used for transferring subscriptions
  consumers: string[] // Addresses of consumer contracts allowed to use the subscription
  flags: string // Indicates resource limits for a given subscription (If the default limits are not enough for your use case, contact the Chainlink team by emailing support@chain.link to inquire about a potential increase.)
}
Timing out requests
In certain circumstances, such as when the cost of fulfillment exceeds the amount that was allocated when the request was initiated, pending requests may expire and must be manually timed out. This is because, when a request is in-flight, your LINK tokens that pay for that computation get locked up for the duration of the request's lifecycle. Calling timeoutRequest() unlocks those funds in the event a request expires without fulfillment.
Note that you cannot time out requests until they have expired. A request expires if it has not been fulfilled within 300 seconds after the request transaction was confirmed on-chain.
In order to time out a request, you must first fetch the request commitment which contains the request data that was emitted by the request transaction. This can be achieved using fetchRequestCommitment which returns a promise that resolves to a RequestCommitment object.
type RequestCommitment = {
  requestId: string
  coordinator: string
  estimatedTotalCostJuels: BigInt
  client: string
  subscriptionId: number
  callbackGasLimit: BigInt
  adminFee: BigInt
  donFee: BigInt
  gasOverheadBeforeCallback: BigInt
  gasOverheadAfterCallback: BigInt
  timeoutTimestamp: BigInt
}
Here is an example of using fetchRequestCommitment. The DON ID for each network can be found in the Chainlink Functions docs.
const provider: ethers.providers.JsonRpcProvider = new ethers.providers.JsonRpcProvider('http://YOUR_RPC_URL.com/')
const requestCommitment: RequestCommitment = await fetchRequestCommitment({
  requestId: '0xYOUR_REQUEST_ID',
  provider,
  functionsRouterAddress: '0xFUNCTIONS_ROUTER_ADDRESS'
  donId: 'DON_ID_FOR_NETWORK',
  toBlock: 100_000, // Optional value for ending block in range to search (defaults to latest block)
  pastBlocksToSearch: 2000, // Optional value for the number of blocks to search before the toBlock (defaults to 1000)
})
Now you can time out the request.
const timeoutRequestConfig: SubTimeoutConfig = {
  requestCommitments: [ requestCommitment ],
}
const timeoutReceipt: TransactionReceipt | void = await timeoutRequests(timeoutReqConfig)
Estimating request costs
The estimateFunctionsRequestCost() method can be used to estimate the cost of a Functions request. The DON ID for each network can be found in the Chainlink Functions docs.
const estimatedCostInJuels: BigInt = await subscriptionManager.estimateFunctionsRequestCost({
  donId, // ID of the DON to which the Functions request will be sent
  subscriptionId, // Subscription ID
  callbackGasLimit, // Total gas used by the consumer contract's callback
  gasPriceWei, // Gas price in wei
})
This method will return a promise which resolves to a BigInt with the estimated request cost in Juels (1,000,000,000,000,000,000 (1e18) Juels are equal to 1 LINK).
Adding transaction options
All SubscriptionManager class methods which write to the blockchain can take an optional TransactionOptions object that has the following shape.
export type TransactionOptions = {
  overrides?: Overrides
  confirmations?: number
}
Overrides are defined by Ethers.js for contract function calls. confirmations refers to the number of block confirmations to wait before proceeding.
Functions Encrypted Secrets Management
This class helps you encrypt and manage the secrets that your Functions source code uses. Secrets are sensitive values such as API keys or passwords that are typically stored as environment variables to avoid exposing these values in plaintext.
Functions secrets utilize threshold public key cryptography, requiring multiple nodes to participate in a decentralized decryption process such that no node can decrypt secrets without consensus from the rest of the DON.
Encrypted secrets are never stored directly on the blockchain, but instead can be either hosted by the DON (Location.DONHosted) or stored in a JSON file located at one or more URLs (Location.Remote). Then, the encrypted secrets can be referenced and used in a Functions request.
Initialize a SecretsManager instance
To create a SecretsManager you need an object with 3 inputs.
- An instance of the Ethers.js signer class. Ensure you have a Provider connected to communicate with the blockchain. You can use Infura or Alchemy or another similar provider that provides access to blockchains that Chainlink Functions supports.
- The contract address for the Functions Router smart contract from here here.
- The
donIdstring to reference the DON you would like to use, which can also be found here.
const secretsManager = new SecretsManager({
  signer,
  functionsRouterAddress,
  donId,
})
After the class is instantiated, it must be initialized before it can be used. This is done by running the initialize() async method.
await secretsManager.initialize()
Fetch public keys
You can fetch the public keys by querying the Functions Coordinator contract.
In most cases you will not need to call this method directly. The other methods in SecretsManager will automatically use this method.
const keys = await secretsManager.fetchKeys()
fetchKeys() returns a promise that resolves to an object with the following properties:
{
  thresholdPublicKey: ThresholdPublicKey
  donPublicKey: string
}
The threshold public key is an added layer of cryptographic protection for the security of your API secrets. Your secrets get encrypted twice - first with the donPublicKey and then with the thresholdPublicKey.
Encrypting with the thresholdPublicKey requires nodes to collaborate in order to decrypt secrets. This is because secrets cannot be decrypted with a single key; instead, each DON node has a decryption key shard and multiple nodes must come together in a decentralized process to decrypt the secrets. This improves security since no single DON node can decrypt secrets without collaborating with other DON nodes.
Encrypting Secrets
Secrets are encrypted by passing them in an object to the encryptSecrets() method.
Here are some important conditions you must satisfy when configuring your secrets for Chainlink Functions.
- Secrets are optional. You do not need to configure secrets if your custom Functions source code does not need to access any secret values.
- Your secrets must be passed in an object with string key/value pairs:
{
  testKey: 'testValue1',
  testKey2: 'testValue2',
  testKey3: 'testValue3',
}
const encryptedSecrets = await secretsManager.encryptSecrets({
  testKey: 'testValue0'
})
encryptSecrets() returns a promise that resolves to an object with a single property encryptedSecrets.
{
  encryptedSecrets: string
}
encryptedSecrets contains the string representation of your secrets, converted into bytes, and encrypted using the public keys.
DON Hosted Secrets
Encrypted secrets can be uploaded directly to the DON via gateway URLs such that they can be used when making an on-chain request. This is accomplished by sending a signed POST request to gateway URLs which are connected to the DON. The DON then maintains a decentralized database with eventual consistency such that the stored values will propagate to all DON nodes.
First, encrypt the secrets with encryptSecrets(). Then, pass the encryptedSecrets hex string in an object to the uploadEncryptedSecretsToDON() method as shown below. The slotId can be any integer value of zero or greater, however using a previously used slot ID will overwrite the existing data. After minutesUntilExpiration, the entry will be deleted from all DON nodes. Get the list of valid gateway URLs for each blockchain network from the Chainlink Functions documentation.
const encryptedSecretsObj = await secretsManager.encryptSecrets({ mySecret: 'secret' })
const mySlotIdNumber = 0
const myExpirationTimeInMinutes = 10

const {
  version, // Secrets version number (corresponds to timestamp when encrypted secrets were uploaded to DON)
  success, // Boolean value indicating if encrypted secrets were successfully uploaded to all nodes connected to the gateway
} = await secretsManager.uploadEncryptedSecretsToDON({
  encryptedSecretsHexstring: encryptedSecretsObj.encryptedSecrets,
  gatewayUrls: [ 'https://exampleGatewayUrl1.com/gateway', 'https://exampleGatewayUrl2.com/gateway', ... ],
  slotId: mySlotIdNumber,
  minutesUntilExpiration: myExpirationTimeInMinutes,
})
The uploadEncryptedSecretsToDON() method will return a promise that resolves to an object of the type shown below.
{
  version: number,
  success: boolean,
}
The version is a number which represents the version of the uploaded encrypted secrets; it is the POSIX time at which the uploadEncryptedSecretsToDON() method was initiated. This will be used when making a Functions request to ensure the latest version of the encrypted secrets are used. If the upload was unsuccessful for one or more nodes, a warning message will be printed and the success field will be false. If the upload was unsuccessful for all nodes, the method will throw an error.
const secretsEntriesForGateway = await secretsManager.listDONHostedEncryptedSecrets([ 'https://exampleGatewayUrl1.com/gateway', 'https://exampleGatewayUrl2.com/gateway', ... ])
listDONHostedEncryptedSecrets() will return an array with following shape or throw an error. If the method successfully returns, but the error field of the returned object is populated, it indicates that the request to list secrets was successful, but there is a discrepancy between the node responses.
{
  result: [
    {
      gatewayUrl: 'https://examplegatewayurl.com/gateway',
      nodeResponses: [
        {
          success: true,
          rows: [
            {
              slot_id: 0,
              version: 0,
              expiration: 100_000,
            },
            ...
          ],
        },
        ...
      ],
    },
    ...
  ],
  error: 'Possible error message <may be undefined>'
}
buildDONHostedEncryptedSecretsReference() can be used to construct the hex string which represents the encryptedSecretsReference bytes used to reference the DON hosted encrypted secrets when making an on-chain Functions request. To use DON hosted encrypted secrets in an on-chain request, also ensure that secretsLocation is set to Location.DONHosted (ie: 2).
const encryptedSecretsReference: string = secretsManager.buildDONHostedEncryptedSecretsReference({
  slotId: number,
  version: number
})
Off-chain Hosted Secrets
Encrypted secrets can also be stored off-chain in JSON file instead of being hosted on the DON, enabling more direct control over how the encrypted secrets data is stored. The DON nodes fetch this file from one or more URLs.
First encrypt the secrets with encryptSecrets() and then paste or upload the resulting object into a private Github Gist, cloud storage bucket or or any other location such that the encrypted secrets JSON object can be fetched by the DON via URL. These secrets are encrypted so even if the JSON file is hosted at a public URL, your secrets are not visible.
You can also use the gist uploader utility function to upload the encrypted secrets string to a JSON file in a Github Gist.
As an additional layer of security, the URLs pointing to your JSON file must also encrypted with the DON Public key before being used as the encryptedSecretsReference in an on-chain request. This is to prevent directly exposing the URL to anyone except DON members, mitigating risk of DDOS or other attack vectors. You can build the encrypted URLs encryptSecretsUrls().
const encryptedSecretsReference: string = await encryptSecretsUrls(secretsUrls: string[])
encryptSecretsUrls() returns a promise which resolves to a hex string representing the secrets URLs as an encrypted string of space-separated URLs.
The resulting encryptedSecretsReference can then be used as one of the parameters for constructing the Functions request.
Functions Response Listener
The ResponseListener class provides an easy way to listen for on-chain responses to Functions requests.
To create a Request Listener you need an object with 2 inputs.
- An instance of an Ethers.js provider. You can use Infura or Alchemy or another similar provider that provides access to blockchains that Chainlink Functions supports.
- The contract address for the Functions Router smart contract from here.
const responseListener = new ResponseListener({ provider, functionsRouterAddress, })
To listen for a response to a single Functions request, use the listenForResponseFromTransaction() method.
Optionally, you can provide:
- timeout after which the listener will throw an error indicating that the time limit was exceeded (default 5 minutes)
- number of block confirmations (default 2)
- frequency of checking if the request is already included on-chain (or if it got moved after a chain re-org) (default 2 seconds)
const response: FunctionsResponse = await responseListener.listenForResponseFromTransaction(
  txHash: string,
  timeout?: number,
  confirmations?: number,
  checkInterval?: number,
)
listenForResponseFromTransaction() returns a response with the following structure:
{
  requestId: string // Request ID of the fulfilled request represented as a bytes32 hex string
  subscriptionId: number // Subscription ID billed for request
  totalCostInJuels: bigint // Actual cost of request in Juels (1,000,000,000,000,000,000 (1e18) Juels are equal to 1 LINK)
  responseBytesHexstring: string // Response bytes sent to client contract represented as a hex string ("0x" if no response)
  errorString: string // Error sent to client contract interpreted as a UTF-8 string ("" if no error)
  returnDataBytesHexstring: string // Data returned by consumer contract's handleOracleFulfillment method represented as a hex string
  fulfillmentCode: FulfillmentCode // Indicates whether the request was fulfilled successfully or not
}
Alternatively, to listen using a request ID, use the listenForResponse() method.
Notes:
- Request ID can change during a chain re-org so it's less reliable than a request transaction hash.
- If the methods are called after the response is already on chain, it won't be returned correctly.
- Listening for multiple responses simultaneously is not supported by the above methods and will lead to undefined behavior.
const response: FunctionsResponse = await responseListener.listenForResponse(
  requestId: string,
  timeout?: number,
)
The FunctionsResponse will have the following shape.
{
  requestId: string // Request ID of the fulfilled request represented as a bytes32 hex string
  subscriptionId: number // Subscription ID billed for request
  totalCostInJuels: BigInt // Actual cost of request in Juels (1,000,000,000,000,000,000 (1e18) Juels are equal to 1 LINK)
  responseBytesHexstring: string // Response bytes sent to client contract represented as a hex string
  errorString: string // Error bytes sent to client contract represented as a hex string
  returnDataBytesHexstring: string // Data returned by consumer contract's handleOracleFulfillment method represented as a hex string
  fulfillmentCode: FulfillmentCode // Indicates whether the request was fulfilled successfully or not
}
The possible fulfillment codes are shown below.
{
  FULFILLED = 0, // Indicates that a Function was executed and calling the consumer contract's handleOracleFulfill method was successful
  USER_CALLBACK_ERROR = 1, // Indicates that the consumer contract's handleOracleFulfill method reverted
  // all other codes indicate internal errors
}
To listen for multiple Functions responses for a given subscription ID, use the listenForResponses() method. This method is particularly useful when Chainlink Automation is being used to trigger the sending of Functions requests. listenForResponses() takes the subscription ID and a callback as arguments. The callback will be given a FunctionsResponse as an argument.
Note: To avoid undefined behavior, ensure only one listener method is running at a time.
const callback = (response: FunctionsResponse) => { console.log(response) }
responseListener.listenForResponses(
  subscriptionId: number | string,
  callback,
)
When finished listening for responses, use the stopListeningForResponses method to stop the listener.
responseListener.stopListeningForResponses()
Functions Utilities
Local Functions Simulator
The local Functions JavaScript simulator requires Deno to be installed on your machine and accessible via the PATH environment variable (confirm this by ensuring the
deno --versioncommands). Visit deno.land/#installation for installation instructions.
The simulateScript function is used to simulate the execution of your custom Functions JavaScript source code on your machine. This means you can use the simulator during development to test your JavaScript code. This is useful for debugging especially since the simulateScript function returns captured terminal output which contains any console log messages or errors.
simulateScript takes an object as an argument with the following parameters shown below. Arguments can be accessed within the source code via the global variables args and bytesArgs which is are injected into the runtime. bytesArgs are useful for passing arbitrary non-string bytes values from your requesting contract; they will be represented as hex strings in the JavaScript runtime. You can also add API keys and other secrets using the secrets object that gets injected as a global variable in the runtime.
const result = await simulateScript({
  source: string // JavaScript source code
  args?: string[] // Array of string arguments accessible from the source code via the global variable `args`
  bytesArgs?: string[] // Array of bytes arguments, represented as hex strings, accessible from the source code via the global variable `bytesArgs`
  secrets?: Record<string, string> // Secret values represented as key-value pairs
  maxOnChainResponseBytes?: number // Maximum size of the returned value in bytes (defaults to 256)
  maxExecutionTimeMs?: number // Maximum execution duration (defaults to 10_000ms)
  maxMemoryUsageMb?: number // Maximum RAM usage (defaults to 128mb)
  numAllowedQueries?: number // Maximum number of HTTP requests (defaults to 5)
  maxQueryDurationMs?: number // Maximum duration of each HTTP request (defaults to 9_000ms)
  maxQueryUrlLength?: number // Maximum HTTP request URL length (defaults to 2048)
  maxQueryRequestBytes?: number // Maximum size of outgoing HTTP request payload (defaults to 2048 == 2 KB)
  maxQueryResponseBytes?: number // Maximum size of incoming HTTP response payload (defaults to 2_097_152 == 2 MB)
})
simulateScript returns a promise which resolves to an object as shown below.
{
  responseBytesHexstring?: string // Response bytes which would be returned on-chain, represented as a hex string
  errorString?: string // Error message that would be returned on-chain (either errorString or responseBytesHexstring will be defined)
  capturedTerminalOutput: string // stdout or stderr terminal output captured during simulated execution. Print this to view console.log messages.
}
Any 3rd party imports used in the JavaScript source code are loaded asynchronously at runtime. Therefore, to use 3rd party imports in the source code that is executed by the simulateScript function, you must use the async import function as shown in the examples below.
const { format } = await import("npm:date-fns");
return Functions.encodeString(format(new Date(), "yyyy-MM-dd"));
const { escape } = await import("https://deno.land/std/regexp/mod.ts");
return Functions.encodeString(escape("$hello*world?"));
NOTE: When running simulateScript, depending on your security settings, you may get a popup asking if you would like to accept incoming network connections. You can safely accept or ignore this popup and it should disappear when the simulation is complete.
NOTE: The simulateScript function is a debugging tool and hence is not a perfect representation of the actual Chainlink oracle execution environment. Therefore, it is important to make a Functions request on a supported testnet blockchain before mainnet usage.
Local Functions Testnet
For debugging smart contracts and the end-to-end request flow on your local machine, you can use the localFunctionsTestnet function. This creates a local testnet RPC node with a mock Chainlink Functions contracts. You can then deploy your own Functions consumer contract to this local network, create and manage subscriptions, and send requests. Request processing will simulate the behavior of an actual DON where the request is executed 4 times and the discrete median response is transmitted back to the consumer contract. (Note that Chainlink Functions uses the following calculation to select the discrete median response: const medianResponse = responses[responses.length - 1) / 2]).
The localFunctionsTestnet function takes the following values as arguments.
const localFunctionsTestnet = await startLocalFunctionsTestnet(
  simulationConfigPath?: string // Absolute path to config file which exports simulation config parameters
  options?: ServerOptions, // Ganache server options
  port?: number, // Defaults to 8545
)
Observe that localFunctionsTestnet takes in a simulationConfigPath string as an optional argument. The primary reason for this is because the local testnet does not have the ability to access or decrypt encrypted secrets provided within request transactions. Instead, you can export an object named secrets from a TypeScript or JavaScript file and provide the absolute path to that file as the simulationConfigPath argument. When the JavaScript code is executed during the request, secrets specified in that file will be made accessible within the JavaScript code regardless of the secretsLocation or encryptedSecretsReference values sent in the request transaction. This config file can also contain other simulation config parameters. An example of this config file is shown below.
export const secrets: { test: 'hello world' } // `secrets` object which can be accessed by the JavaScript code during request execution (can only contain string values)
export const maxOnChainResponseBytes = 256 // Maximum size of the returned value in bytes (defaults to 256)
export const maxExecutionTimeMs = 10000 // Maximum execution duration (defaults to 10_000ms)
export const maxMemoryUsageMb = 128 // Maximum RAM usage (defaults to 128mb)
export const numAllowedQueries = 5 // Maximum number of HTTP requests (defaults to 5)
export const maxQueryDurationMs = 9000// Maximum duration of each HTTP request (defaults to 9_000ms)
export const maxQueryUrlLength = 2048 // Maximum HTTP request URL length (defaults to 2048)
export const maxQueryRequestBytes = 2048 // Maximum size of outgoing HTTP request payload (defaults to 2048 == 2 KB)
export const maxQueryResponseBytes = 2097152 // Maximum size of incoming HTTP response payload (defaults to 2_097_152 == 2 MB)
localFunctionsTestnet returns a promise which resolves to the following type.
{
  server: Server // Ganache server
  adminWallet: { address: string, privateKey: string } // Funded admin wallet
  getFunds: (address: string, { weiAmount, juelsAmount }: { weiAmount?: BigInt | string; juelsAmount?: BigInt | string }) => Promise<void> // Method which can be called to send funds to any address
  close: () => Promise<void> // Method to close the server
  donId: string // DON ID for simulated DON
  // The following values are all Ethers.js contract types: https://docs.ethers.org/v5/api/contract/contract/
  linkTokenContract: Contract // Mock LINK token contract
  functionsRouterContract: Contract // Mock FunctionsRouter contract
}
Now you can connect to the local Functions testnet RPC node with your preferred blockchain tooling, deploy a FunctionsConsumer contract, instantiate and initialize theSubscriptionManager, create, add the consumer contract and fund the subscription, send requests, and use the ResponseListener to listen for responses all on your machine.
See an example of using the localFunctionsTestnet in the Functions HardHat starter kit.
NOTE: When simulating request executions, depending on your security settings, you may get multiple popups asking if you would like to accept incoming network connections. You can safely accept or ignore these popups and they should disappear when the executions are complete.
NOTE: Cost estimates and other configuration values may differ significantly from actual values on live testnet or mainnet chains.
NOTE: The localFunctionsTestnet function is a debugging tool and hence is not a perfect representation of the actual Chainlink oracle execution environment. Therefore, it is important to make a Functions request on a supported testnet blockchain before mainnet usage.
Decoding Response Bytes
On-chain responses are encoded as Solidity bytes which are usually displayed as hex strings. However, these hex strings often need to be decoded into a useable type. In order to decode hex strings into human-readable values, this package provides the decodeResult function. Currently, the decodeResult function supports decoding hex strings into uint256, int256 or string values.
const result: BigInt | string = decodeResult(
  resultHexString: string,
  expectedReturnType: ReturnType // 'uint256' | 'int256' | 'string'
)
Possible return values are also available in the ReturnType enum shown below.
export enum ReturnType {
  uint = 'uint256',
  uint256 = 'uint256',
  int = 'int256',
  int256 = 'int256',
  string = 'string',
  bytes = 'bytes',
}
Storing Encrypted Secrets in Gists
When describing the use of off-chain secrets, it was mentioned the encrypted secrets JSON file could be hosted at a URL instead of uploading to DON hosted storage. One example of this is storing the encrypted secrets JSON file in a private GitHub gist. To support this common hosting method, you can use the provided createGist() and deleteGist() utilities.
First, you need to create a Github Personal Access Token. Then, you can encrypt your secrets and create a gist.
const encryptedSecrets = await secretsManager.encryptSecrets({
  mySecret: 'secretValue'
})
The encrypted secrets object produced by encryptSecrets should look similar to the object shown below.
{
 "encryptedSecrets": '0x1234567890abcdef', // some long hex string
}
Now, you can stringify this object and use it to create a gist.
const gistURL = await createGist(githubApiToken: string, JSON.stringify(encryptedSecrets)) // encryptedSecrets must be a string, not an object.
The gistURL itself must then be encrypted by calling encryptSecretsUrls() in order to produce the encryptedSecretsReference used to make a Functions request.
You can also delete gists using deleteGist().
const success: boolean = await deleteGist(githubApiToken: string, gistURL: string)
This function will return a promise which resolves to true if deletion is successful, else it will throw an error.
Building Functions Request CBOR Bytes
Instead of performing the CBOR encoding for a Functions request on-chain in your Functions consumer contract, it is also possible to generate the CBOR encoding off-chain in order to save gas. Then, the resulting encoded CBOR bytes can be used when making an on-chain request. You can either store the encoded request in a bytes storage variable within your consumer contract, or initiate the Functions request by passing the CBOR-encoded request object bytes directly into the _sendRequest() method which is inherited from FunctionsClient.sol .
Note that when encoding a request off-chain, args or bytesArgs cannot be added to the request on-chain. This is a limitation of CBOR encoding due to its immutable structure.
To build the CBOR encoded Functions request bytes off-chain, use the buildRequestCBOR() function as shown below.
const functionsRequestBytesHexString: string = buildRequestCBOR({
  codeLocation: number  // Must be 0 for inline source code.  No other values are supported at this time.
  secretsLocation?: number // Must be 1 for Remote or 2 for DONHosted secrets.  No other values are supported at this time.
  codeLanguage: number // Must be 0 for JavaScript.  No other values are supported at this time.
  source: string // JavaScript source code
  encryptedSecretsReference?: string // Hex string representing an encrypted secrets URLs or DON hosted encrypted secrets reference
  args?: string[] // Array of string arguments
  bytesArgs?: string[] // Array of bytes arguments, represented as hex strings
})
Browser use
This package can also be used in most modern web browsers. You can import the package in your front-end application, and call the APIs as you would in a back end NodeJs/Deno environment.