Propaga offers B2B BNPL by embedding financing and flexible payment options at distributors' checkout.
By connecting to our API, you can implement our BNPL button (and flow!) directly into your React Native application and manage the entire loan service.
-
This package uses your internal unique ID to identify the corner store or user.
-
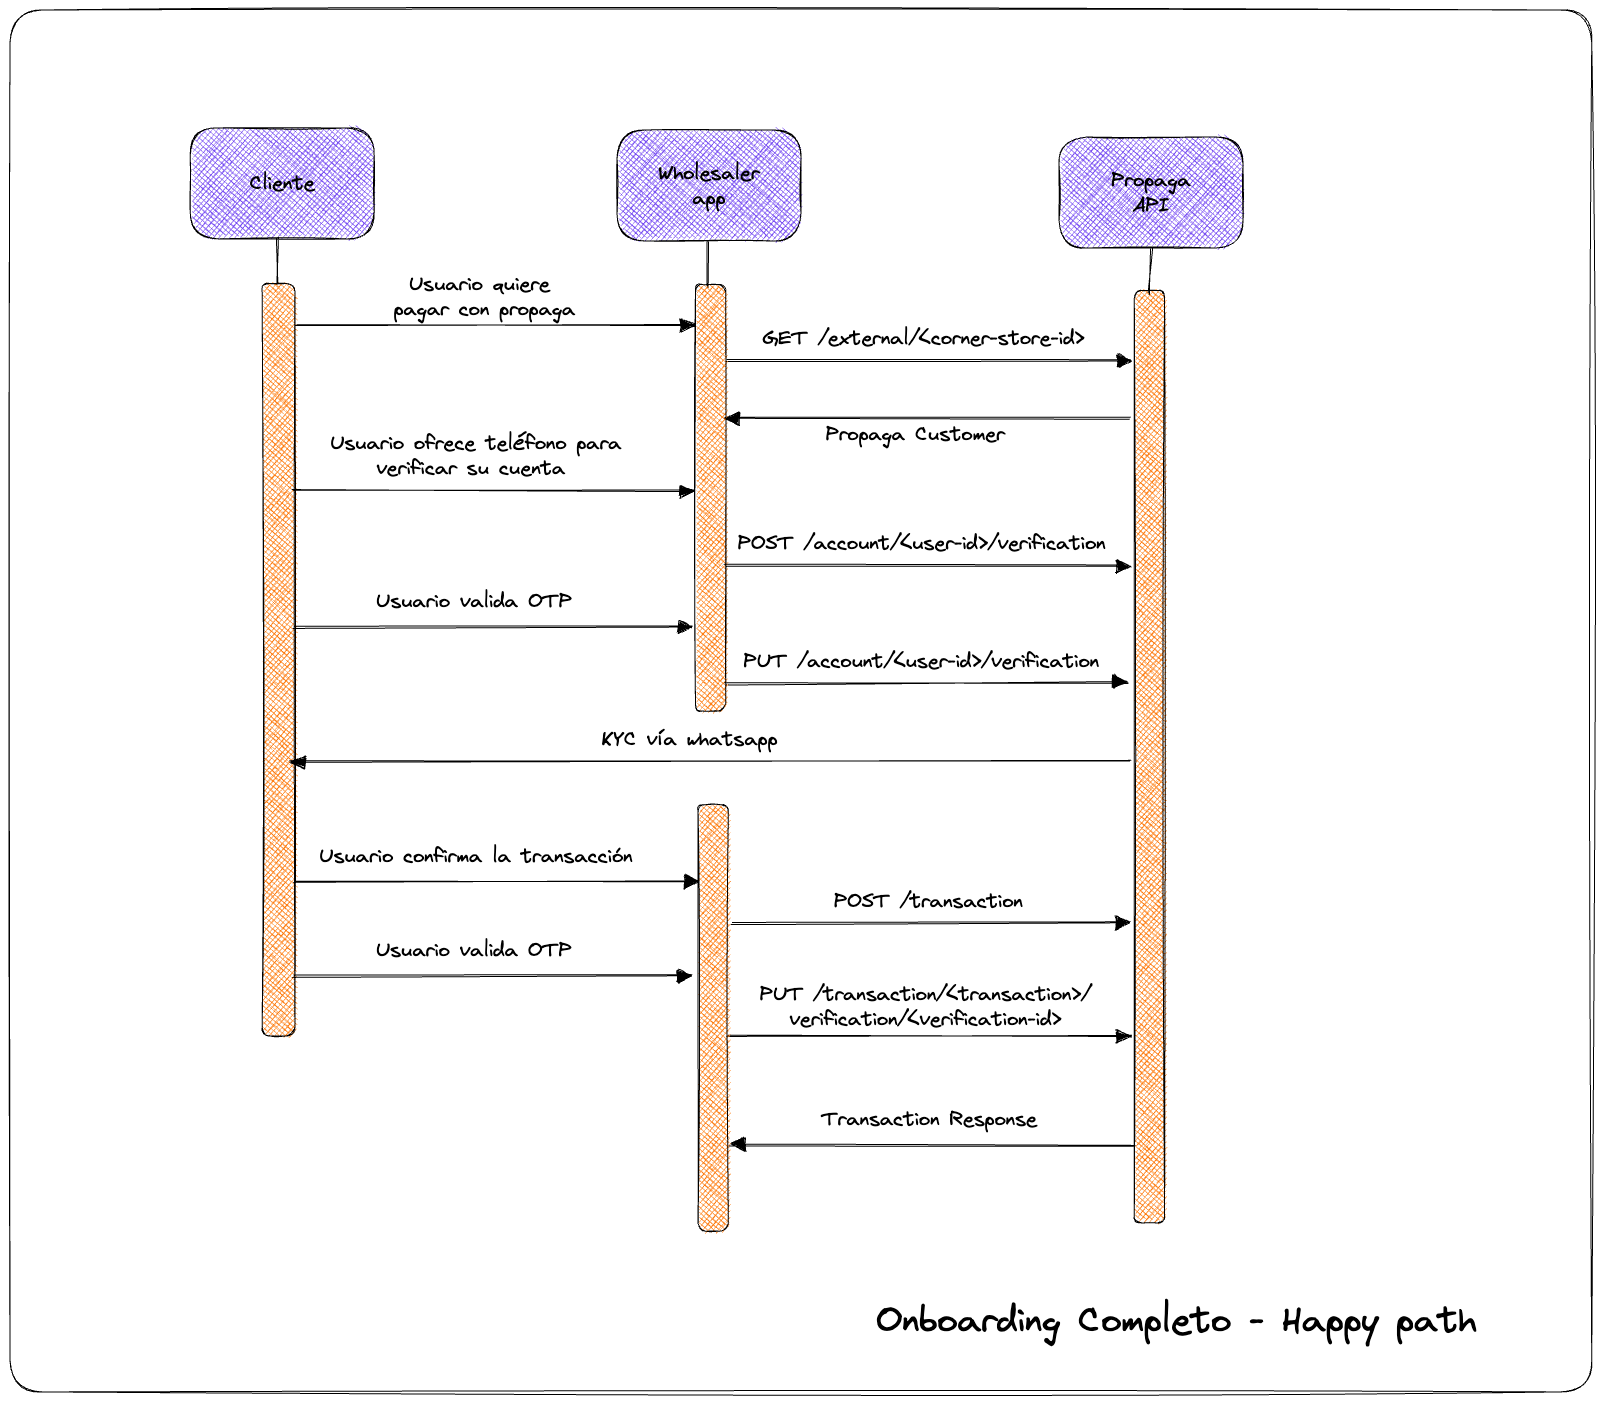
We validate corner stores with an external verification and an OTP.
-
As a distributor, you can accept a corner store's propaga credit as a form of payment.
To use the package, you just need to add this line to your pubspec.yaml file:
To begin, you need to import our PropagaSDK.
import { usePropaga } from '@propaga/react-native-sdk';
...
const {
    startPropaga,
    PropagaPaymentComponent,
    loaded,
    PropagaButton,
} = usePropaga();
Now, to implement the button, you can simply call it like in the following example:
<PropagaButton
	totalAmount={8000}
	isActive={isPropagaButtonActive}
	cornerStoreId={'14578'}
	token={'<your_awesome_token'}
	onPress={() => {}}
/>
For context
(1) cornerStoreID - refers to your internal ID for the user requesting credit
(2) TotalAmount - refers to the total amount of the order or the total amount of credit required to fulfill the order (e.g. $400, which makes up 2 cocacola boxes which was everything added to cart)
The button will display simple information to the user in the "payment method" section. The infomation can include:
-
pre-registration status
-
registration status
-
waitinglist status
-
credit limit exceeded status
-
minimum transaction status
If you want to call the complete flow, you can use the PropagaPaymentComponent as it follows:
<PropagaPaymentComponent
  transaction={{
    cornerStoreId: '14578',
    totalAmount: 8000,
    wholesalerTransactionId: 'TRAN-3245',
    products: [
      {
        externalSKU: 'C120',
        name: 'product_name',
        quantity: 1,
      },
    ],
  }}
  user={{
    phoneNumber: '6641039920',
    firstName: 'John',
    lastNames: 'Doe',
    latitude: '19.2956057',
    longitude: '-99.2131455',
  }}
  config={{
    token: '<your_awesome_token',
  }}
  onSuccessTransaction={(response) => console.log('onSuccess')}
  onErrorTransaction={(error) => console.log('onError')}
/>;
Here, onSuccessTransaction is a callback that you can use to get information if the transaction was successful. Similarly, if the transaction was unsuccessful, the onErrorTransaction callback returns an error map with the status code and error message.
The PropagaResponse follows the following interface:
PropagaResponse {
    transactionId: string,
    totalAmountWithInterests: number,
	cornerStoreId: string,
    paymentDate: Date
}
And for errors, PropagaError uses the following interface:
PropagaError {
	errorCode:  string;
	errorMessage:  string;
}
To implement the PropagaPaymentComponent you will need to call the usePropaga function as it shows bellow.
const { startPropaga, PropagaPaymentComponent } = usePropaga();The startPropaga function is used to start the payment flow, which includes the following steps:
-
The user clicks the
PropagaButtonto initiate the payment flow. -
The
startPropagafunction is called, passing in the necessary parameters toPropagaPaymentComponentcomponent, which contains information about the transaction and callbacks for handling success and error cases, also includes the screens for Propaga's flow. -
Propaga validates the transaction information and returns a response or error, depending on the outcome.
-
If the transaction is successful, the
onSuccessTransactioncallback is triggered and thePropagaResponseobject is returned. -
If the transaction is unsuccessful, the
onErrorTransactioncallback is triggered and thePropagaErrorobject is returned.
In conclusion, Propaga offers a simple and powerful solution for corner stores in LatAm to access financing with just a click of a button. Similarly, it enables distributors to increase GMV, enhance retention, and digitize payments. Furthermore, the PropagaButton and PropagaPaymentComponent components, along with the startPropaga function, simplify the process for developers to seamlessly embed Propaga's tool into their React Native applications.
Code featuring an implementation example.