Get Started | Full FlyBrainLab Install | Installation JupyterLab 3.x | Develop JupyterLab 3.x | Installation JupyterLab 2.x | Develop JupyterLab 2.x | Getting help
NeuroMynerva v2 - FlyBrainLab's JupyterLab Extension
NeuroMynerva V2 is currently in alpha, most main user-facing features have been implemented but we expect bug fixes and additional features to be incorporated in the near future. If you want to report a bug, please see Getting Help. To follow the latest developments on this project, follow the Fruit Fly Brain Observatory(FFBO) Twitter where we post weekly updates.
Get Started
Note: Following JupyterLab 3.0's new extension system, NeuroMynerva is now distributed on PyPI and can be installed using your python installer. Please follow installation instruction detailed in Installation section for details on how to install and/or develop NeuroMynerva.
Using NeuroMynerva and FlyBrainLab
The best way to get started with NeuroMynerva is to look at the instructions on the FlyBrainLab's page and the Wiki therein.
For developers interested in the technical aspects of the NeuroMynerva platform, you can refer to the NeuroMynerva Wiki.
Key Components
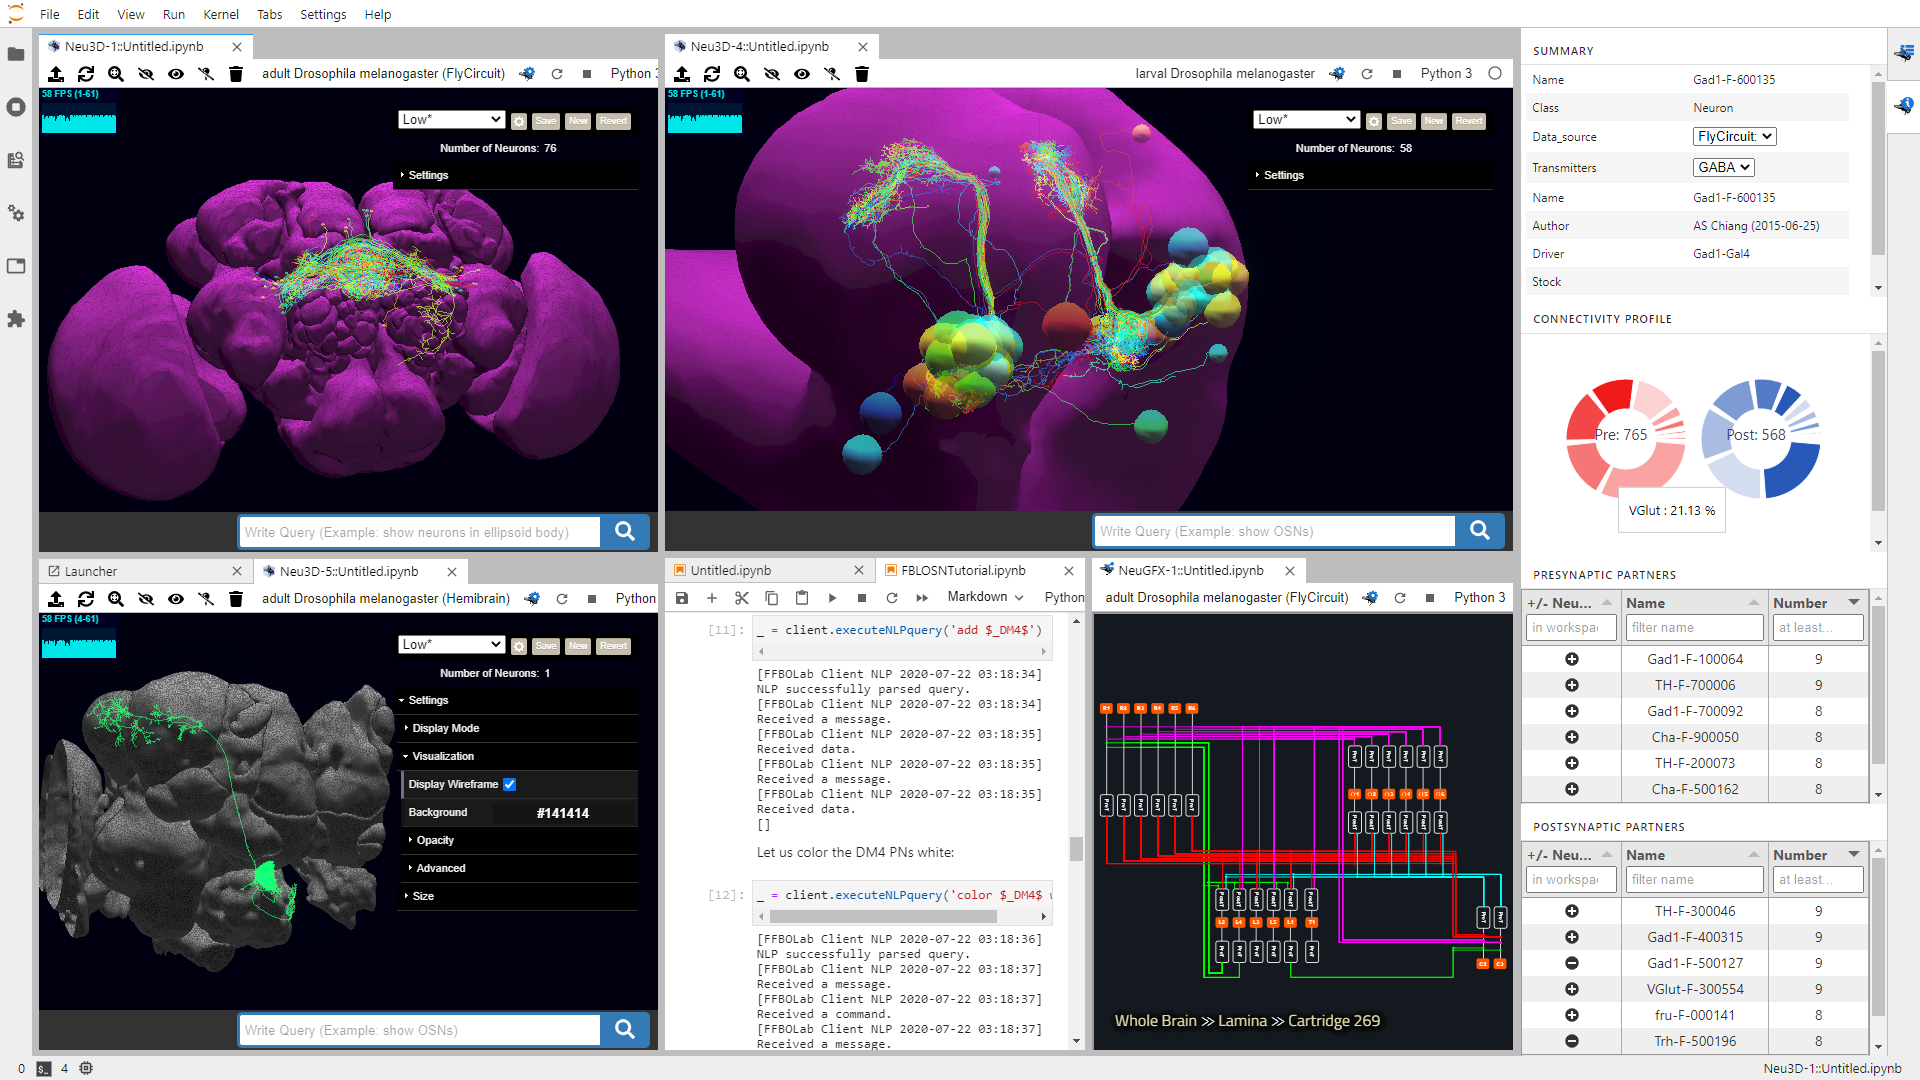
NeuroMynerva front-end currently includes 4 key components:
-
Neu3D-Widget: A neuron/synapse morphology visualization toolkit that supports 3D rendering of neuron skeletons and meshes. -
Info-Widget: A side panel widget that shows detailed neuron information (metadata, pre-/post- synaptic partners, etc.). Content updated by clicking on individual neurons inNeu3D-Widget. -
NeuGFX-Widget: A circuit visualization widget. -
Master-Widget: A side panel widget that keeps track of all currently running NeuroMynerva widgets.
Installation
Prerequisites
NeuroMynerva has the following requirements:
- Python Version 3.6+
- JupyterLab >= 2.2.0 or JupyterLab >= 3.0.0
- Packages:
- Neuroballad and packages required therein,
- flybrainlab and packages required therein.
1. Installation of Full FlyBrainLab Eco-System
Up-to-date installation instructions for the whole FlyBrainLab ecosystem (NeuroMynerva + FlyBrainLab User-side and Server-side Backends) are available at https://github.com/FlyBrainLab/FlyBrainLab#readme.
2. Install/Develop/Uninstall on JupyterLab 3.x
Installation of NeuroMynerva
JupyterLab 3.x supports installing NeuroMynerva as a python package. You can install NeuroMynerva directly from PyPI via command line as
pip install git+https://github.com/mkturkcan/autobahn-sync.git git+https://github.com/FlyBrainLab/Neuroballad.git git+https://github.com/palash1992/GEM.git git+https://github.com/mkturkcan/nxcontrol # flybrainlab requirements
pip install flybrainlab  # required package for communicating with backend
pip install neuromynerva # and refresh browser afterwards
Develop NeuroMynerva
We use Anaconda to manage development environment, you are encouraged to first create a Conda environment
# create conda environment and install python dependencies
conda create -n fbl python=3.7 nodejs scipy pandas cookiecutter git yarn -c conda-forge -y
conda activate fbl
You can then use the following script to setup the development environment.
# create conda environment and install python dependencies
pip install jupyter jupyterlab>=3
pip install txaio twisted autobahn crochet service_identity autobahn-sync matplotlib h5py seaborn fastcluster networkx msgpack jupyter-packaging

# if on Windows, execute the following:
# pip install pypiwin32

# Install flybrainlab package for communication with backend
pip install flybrainlab

# Alternative, you can download the source code for the inhouse packages as well
# git clone https://github.com/FlyBrainLab/Neuroballad.git
# git clone https://github.com/FlyBrainLab/FBLClient.git
# cd ./Neuroballad
# python setup.py develop
# cd ../FBLClient
# python setup.py develop
Next, we build the NeuroMynerva from source.
Note: You will need NodeJS to build the extension package.
The jlpm command is JupyterLab's pinned version of
yarn that is installed with JupyterLab. You may use
yarn or npm in lieu of jlpm below.
# assuming currently in FBLClient folder
cd ../  # go back to parent folder on the same level as FBLClient and NeuroBallad

# Clone the repo to your local environment
# Change directory to the neuromynerva directory
git clone https://github.com/FlyBrainLab/NeuroMynerva.git
cd ./NeuroMynerva

# Install package in development mode
pip install -e .
# Link your development version of the extension with JupyterLab
jupyter labextension develop . --overwrite
# Rebuild extension Typescript source after making changes
jlpm run build
You can watch the source directory and run JupyterLab at the same time in different terminals to watch for changes in the extension's source and automatically rebuild the extension.
# Watch the source directory in one terminal, automatically rebuilding when needed
jlpm run watch
# Run JupyterLab in another terminal
jupyter lab
With the watch command running, every saved change will immediately be built locally and available in your running JupyterLab. Refresh JupyterLab to load the change in your browser (you may need to wait several seconds for the extension to be rebuilt).
By default, the jlpm run build command generates the source maps for this extension to make it easier to debug using the browser dev tools. To also generate source maps for the JupyterLab core extensions, you can run the following command:
jupyter lab build --minimize=FalseUninstall
pip uninstall neuromynerva3. Install/Develop/Uninstall on JupyterLab 2.x
Installation of NeuroMynerva
JupyterLab 2.x requires installing NeuroMynerva as an NPM pacakge. You can install NeuroMynerva directly from NPM via command line as
pip install flybrainlab  # required package for communicating with backend
jupyter labextension install @flybrainlab/neuromynerva
Developing NeuroMynerva
We use Anaconda to manage development environment, you are encouraged to first create a Conda environment
# create conda environment and install python dependencies
conda create -n fbl python=3.7 nodejs scipy pandas cookiecutter git yarn -c conda-forge -y
conda activate fbl
You can then use the following script to setup the development environment.
# create conda environment and install python dependencies
pip install jupyter jupyterlab==2.2.9
pip install txaio twisted autobahn crochet service_identity autobahn-sync matplotlib h5py seaborn fastcluster networkx msgpack

# if on Windows, execute the following:
# pip install pypiwin32

# install inhouse packages and NeuroMynerva
git clone https://github.com/FlyBrainLab/NeuroMynerva.git
git clone https://github.com/FlyBrainLab/Neuroballad.git
git clone https://github.com/FlyBrainLab/FBLClient.git
cd ./Neuroballad
python setup.py develop
cd ../FBLClient
python setup.py develop
cd ../NeuroMynerva
jlpm
jupyter labextension link .

# # watch for source code changes in NeuroMynerva
jlpm run watch:src

# in a separate terminal
jupyter lab --watch
Uninstall
jupyter labextension uninstall @flybrainlab/neuromynervaGetting Help
The best way to get help right now is to submit an issue. You can also join our Gitter and ask us questions there.

