ROSMOD

![]()


![]()
This repository contains the implementation of ROSMOD - Journal of Electronics, built on WebGME.
ROSMOD is a web-based, collaborative, modeling and execution environment for distributed embedded applications built using ROS.
An example server running ROSMOD can be found on rosmod.collaborative-design.org.
Please see the WIKI for in-depth information about ROSMOD, how to use it, and links to various Youtube videos that walk through development and usage of ROSMOD.
Note: WebGME ROSMOD code generators have changed - they no longer
generate for rosmod-comm, please see Setting up target systems to
run ROSMOD to properly
install the new dependencies.
Contents
What is ROSMOD?
The Robot Operating System Model-driven development tool suite, (ROSMOD) an integrated development environment for rapid prototyping component-based software for the Robot Operating System (ROS) middleware.
ROSMOD consists of
- The ROSMOD Server (this repo), which provides collaborative model-driven development, and
- The ROSMOD Actor
(github), which is a
standardized
ros::Nodethat provides a well defined component execution model which helps reduce the complexity of writing multi-threaded code.
Motivation
Robotics is a discipline that involves integration between heterogeneous fields such as electronics, mechanics, computer science, control theory and artificial intelligence. During the design, development and deployment of robotic systems, the components that belong to the various sub-systems, e.g., image processing software, servo-motors, power distribution system, etc., must work congruously to achieve a common goal. As systems increase in complexity, software development platforms must enable the creation of such components in a rapid, reliable, and reusable manner while also providing systems-level design, analysis, and deployment.
In other similar systems, users are often tasked with developing the models, generating the code, and then manually touching the generated code to implement the business logic for the various operations their system needs to perform (e.g. periodic or event-triggered functions). The injection and management of this user-developed code inside the generated code can increase the learning curve for new users as it adds some extra file management and build-system overhead. Additionally, almost all other similar projects require installation on the users' computers, which means they may need to troubleshoot setting up the IDE, the compiler, and any other required libraries (e.g. catkin, python, ssh, etc.) which will increase the time it takes to configure their system and increase the number of failure points in their configuration process (not to mention increasing the platform and version control support nightmare).
To combat these issues, we wanted ROSMOD to act as a lightweight (from the users' perspectives) IDE which does not require any installation, and can be run cross-platform since it only relies on a web-browser (even smartPhones can act as interfaces!). In this way, the development of robotics with ROSMOD is done in a decentralized, collaborative, automatically versioned development , with centralized management of the infrastructure (including any compatibility, package version management, and build / deployment infrastructure management).
Implementation
ROSMOD is implemented as a web-based graphical interface to a versioned, git-like database of models with integrated code. Along with this database exist server-side plugins which enable the generation, compilation, and deployment of executable code. This executable code is fully complete without the need for users to touch or even download the files. These plugins have accses to the file-system on the server, where the sys-admin for the ROSMOD webserver has already configured the build system and deployment infrastructure so that these plugins can automatically perform the compilation and deployment as requested by the users.
Features
-
Integrated support for run-time monitoring using ROS Bridge
-
Integrated support for run-time mission control / command and telemetry using NASA OpenMCT and ROSMCT
-
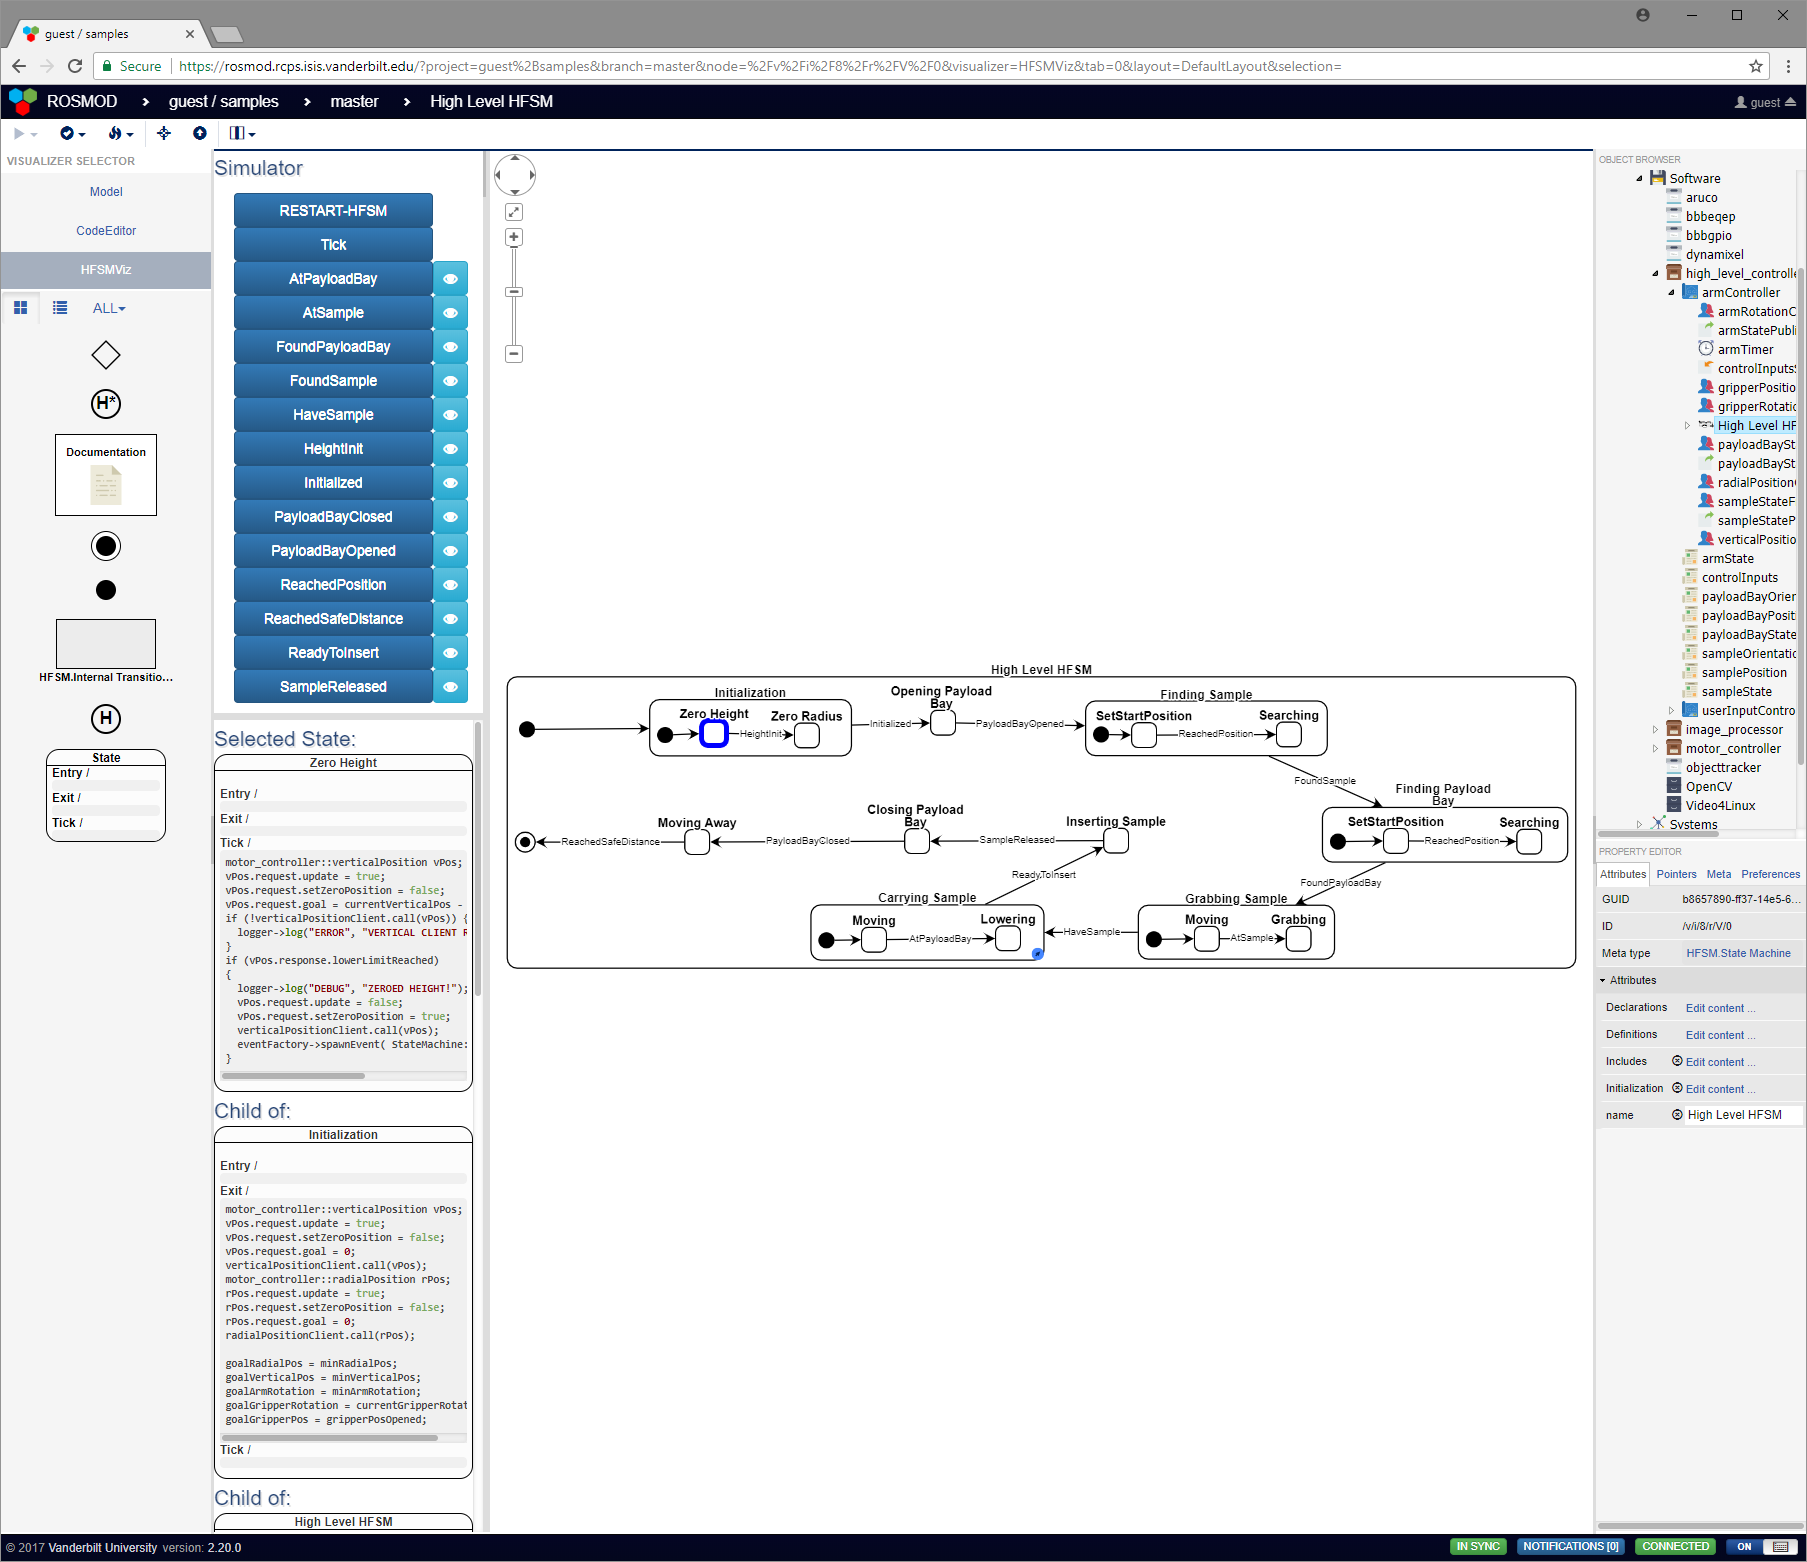
Integrated Hierarchical Finite State Machine (HFSM) Modeling, Simulation, and Code Generation
See webgme-hfsm for documentation, walkthroughs, videos, etc.
-
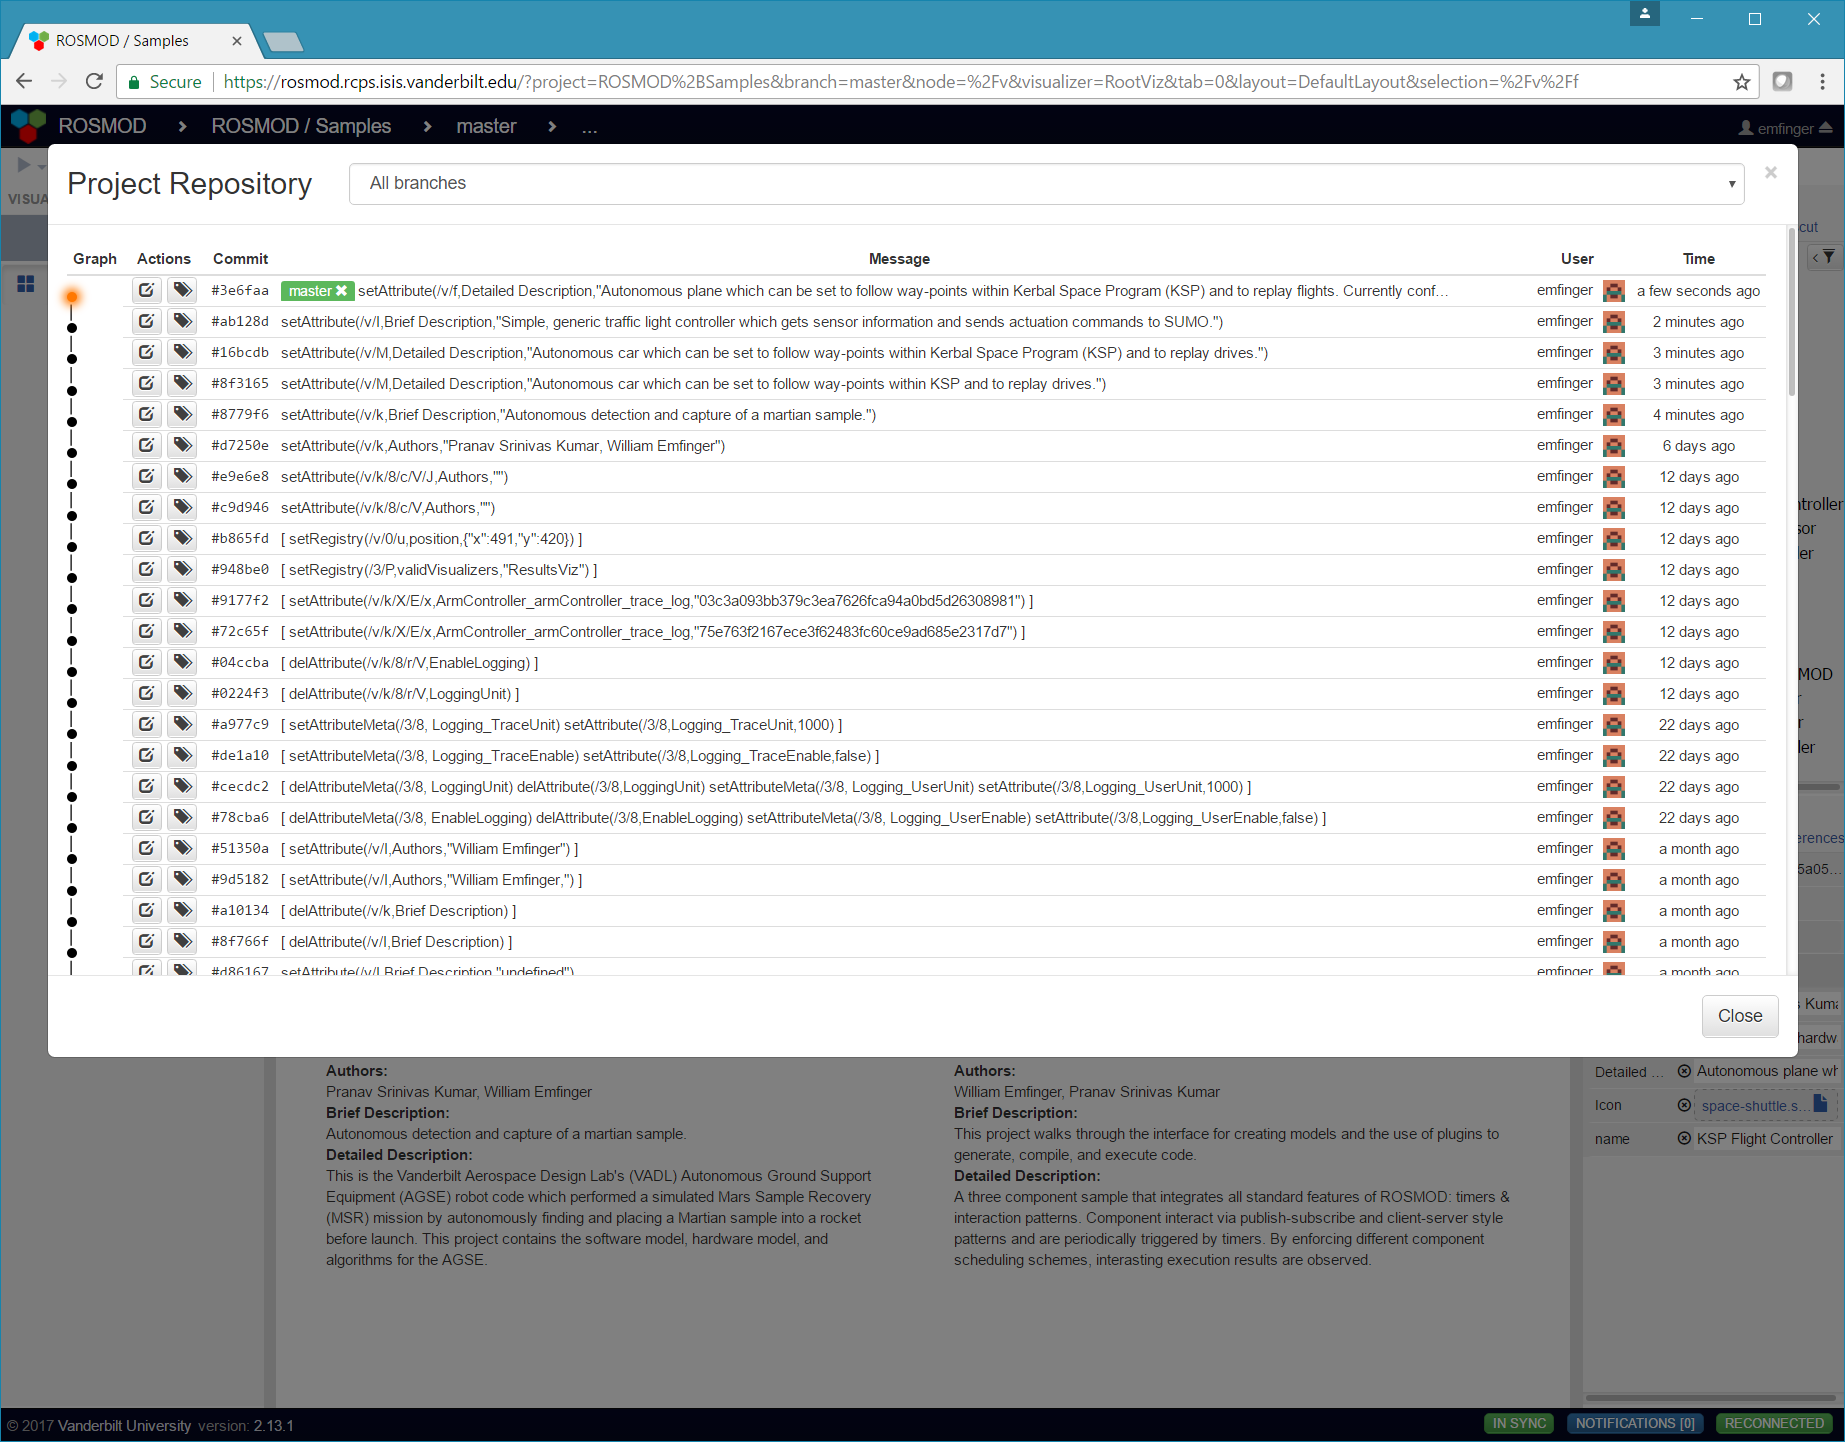
Collaborative, automatically versioned web-based development
-
Model-based framework for developing hardware and software
-
Fully integrated code development, with documentation generation
-
Fully integrated code generation, compilation, and deployment
-
Interactive deployment visualization
-
Embeddable documentation at every level of the model
-
Distributed debugging enabled by automatic trace logging and plotting of trace and user logs
-
Automatic load management of embedded targets
I don't have a picture here because it's in the backend :)
How to set up ROSMOD
Setting up the ROSMOD Server
Required Dependencies
-
Install Node.js LTS
cd ~/Downloadswget https://nodejs.org/dist/v8.11.1/node-v8.11.1-linux-x64.tar.xztar xvf node-v8.11.1-linux-x64.tar.xzsudo cp -r node-v8.11.1-linux-x64/{bin,include,lib} /usr/. -
Install Bower
sudo npm install -g bower -
Install MongoDB
sudo apt-get install mongodb -
Clone this repo
git clone https://github.com/rosmod/webgme-rosmod -
Install dependencies
cd webgme-rosmodnpm install
Optional Dependencies
# for documentation generation
sudo apt-get install pandoc doxygen texlive-full

# for debugging
sudo apt-get install gdbserver gdb-multiarch valgrind

# add repo for rosbridge - this is copied from http://wiki.ros.org/kinetic/Installation/Ubuntu
sudo sh -c 'echo "deb http://packages.ros.org/ros/ubuntu $(lsb_release -sc) main" > /etc/apt/sources.list.d/ros-latest.list'
sudo apt-key adv --keyserver hkp://ha.pool.sks-keyservers.net:80 --recv-key 421C365BD9FF1F717815A3895523BAEEB01FA116
sudo apt-get update

# for connection to rosmct / rosbridge
sudo apt-get install ros-kinetic-rosbridge-suite
Start the server
npm startNOTE: to make changes to the META or to view the META, you can run
npm run start-dev
which enables the META visualizer.
Setting up target systems to run ROSMOD
Note: If you want to be able to compile on the server, you will need to follow these steps for the server as well.
Note: These steps have changed and no longer depend on rosmod-comm, please make sure to update your targets accordingly.
-
Install ROS onto the target platform.
NOTE: only ros-<version>-ros-base is required, but any install target works.
-
Install ROSMOD-Actor onto the target platform. (Optionally) If you want to use
Action ClientsorAction Serversfrom actionlib, you will need to install our custom fork of actionlib from rosmod/actionlib. To install both, simply copy these commands below.# install both rosmod/actionlib and rosmod/rosmod-actor to /opt/rosmodmkdir -p ~/rosmod_ws/srccd ~/rosmod_wscatkin config --extend /opt/ros/kineticcatkin config -i /opt/rosmodcatkin config --installgit clone https://github.com/ros/common_msgs.git src/common_msgsgit clone https://github.com/rosmod/actionlib src/actionlibgit clone https://github.com/rosmod/rosmod-actor src/rosmod-actorcatkin build -
Ensure the target has SSH capabilities; configure an ssh key that the ROSMOD server can use to remotely access the target device.
NOTE: password-based authentication is not allowed for ROSMOD targets.
-
(Optional) If you want to perform debugging - you should install valgrind and gdbserver on the target systems
sudo apt-get install valgrind gdbserver
How to use ROSMOD
This section serves as a short guide for users who want to develop
robotics with ROSMOD. A more complete guide into what each of the
elements of a ROSMOD model is can be found in the
Samples Seed, which contains some
example projects for robots, autonomous cars, and automous planes, as
well as a simple Introduction to ROSMOD sample which is fully
documented (within the model using Documentation objects that render
Markdown within the
model. This sample is hosted on the live server listed at the top of
this page, but can also be used as the base for any project created in
any deployment of the server since it is part of this repository.
Creating a ROSMOD Project
In ROSMOD, there are two different types of Projects:
- A WebGME Project which can contain any number of ROSMOD Projects, and which is the granularity at which you can authenticate for user / organization RWD access.
- A ROSMOD Project, which is a self-contained model tree which
describes the
Software,Systems,Deployments, andExperiments.
Creating a WebGME project
To create a WebGME project, you open your web-browser (NOTE: Google Chrome is the fully-supported browser, YMMV with any other browser) and navigate to the web address of the ROSMOD server.
After you login (if authentication is enabled) you will be presented
with the WebGME landing page, which will show you the available
projects you have access to on the ROSMOD server, and will provide a
Create New button in the bottom left of the modal dialog that allows
you to create your own project. When creating a WebGME project, you
can either use one of the ROSMOD seeds (base or samples) as the
basis for your project or you can duplicate an existing project on the
server (that you have access to). The seeds provide the meta-model
that defines ROSMOD, and all projects made on the ROSMOD server start
out with one of the two seeds as a base.
Creating a single ROSMOD Project
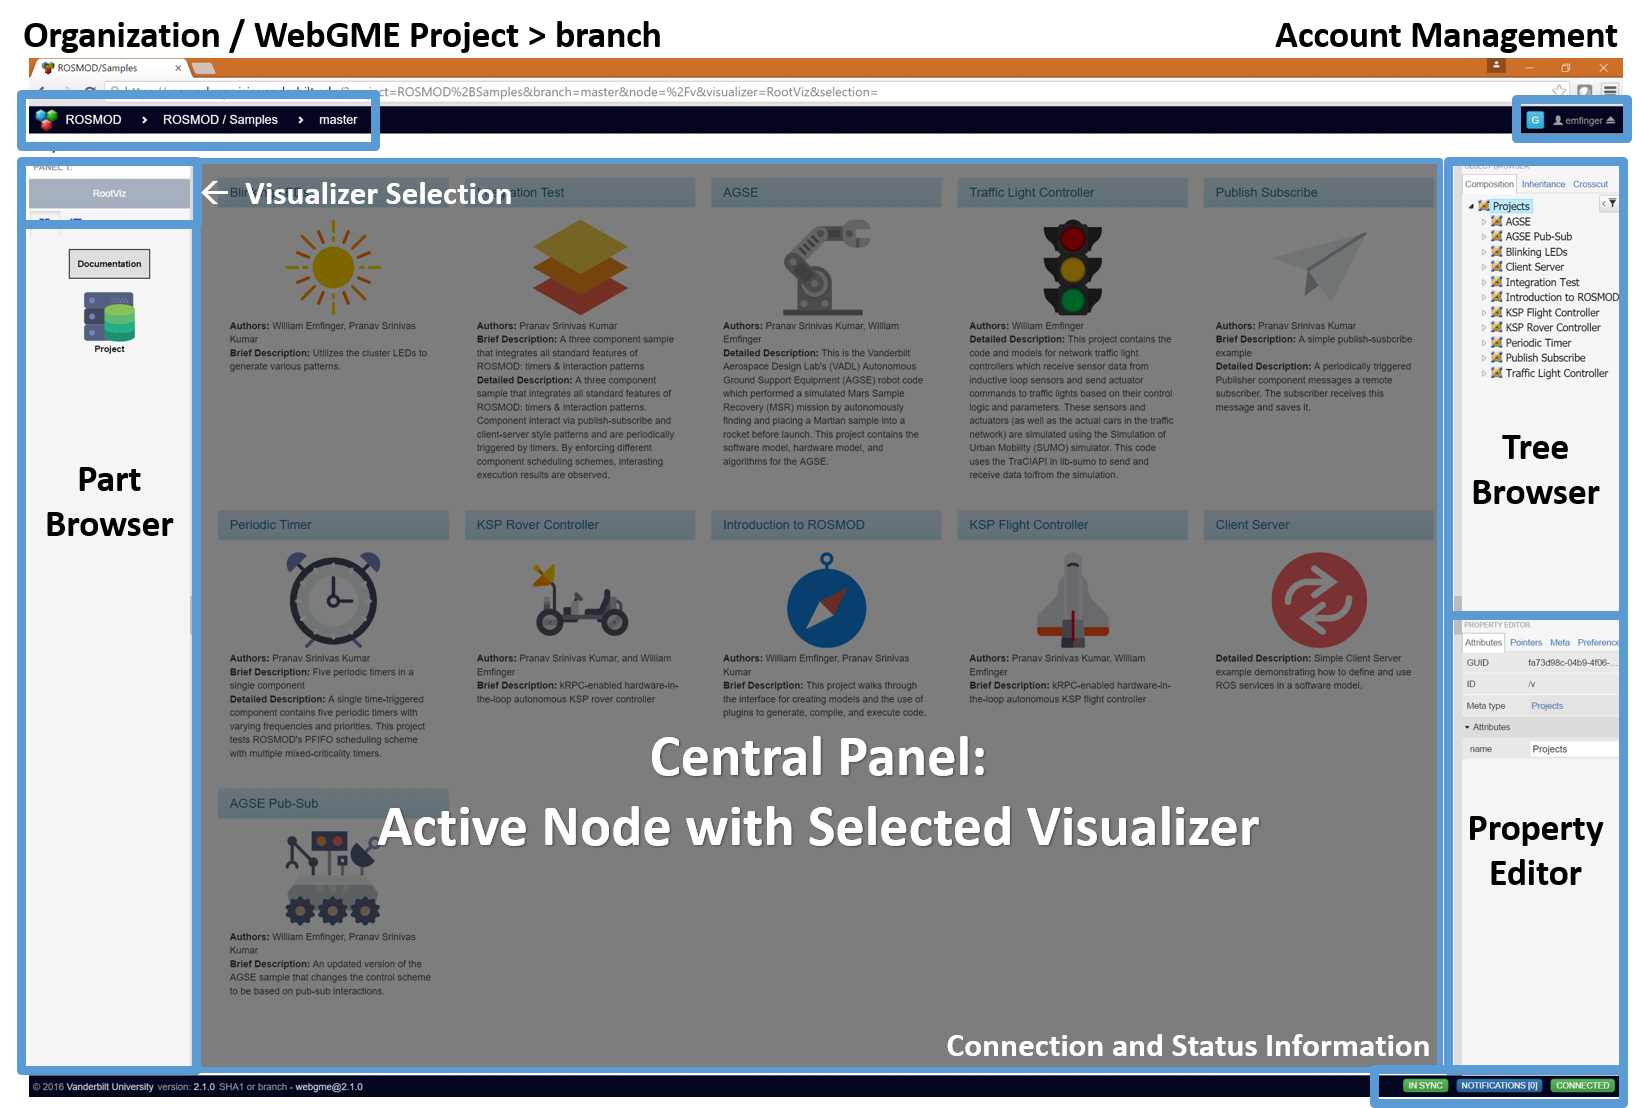
Having created a WebGME project, you will see the ROSMOD Project Root
view, which shows all ROSMOD projects contained within the WebGME
project. If you copied an empty WebGME project or used the base
seed, then the page will be empty.
To create a ROSMOD project, you simply drag and drop the Project
object from the left panel (the Part Browser) into the empty space,
and a new ROSMOD Project will show up.
Note: single clicking within the project's space in the center panel
will select the project within the Property Editor in the right
panel which allows you to edit the Project attributes.
Note: to edit the Authors, Brief Description, or Detailed Description project attributes, you can double click on the text for
those attributes within the center panel (the Visualizer) or you
can single click on the attribute in the Property Editor in the
right panel.
Note: to edit the icon the displays for the project, you should
click the New Document icon that is on the far right side of the
Icon attribute in the Property Editor in the right panel. This
will bring up a file upload dialog where you should select the SVG
Icon you wish to associate with this project.
Modeling the Software
Having created a ROSMOD project, double click on the project icon to
open the project within the Visualizer, which will automatically
switch to the Model Visualizer. With the project open in the
Model visualizer, drag a Software object into the center panel,
this Software object will be the root of the sub-tree that describes
all of the software for this project.
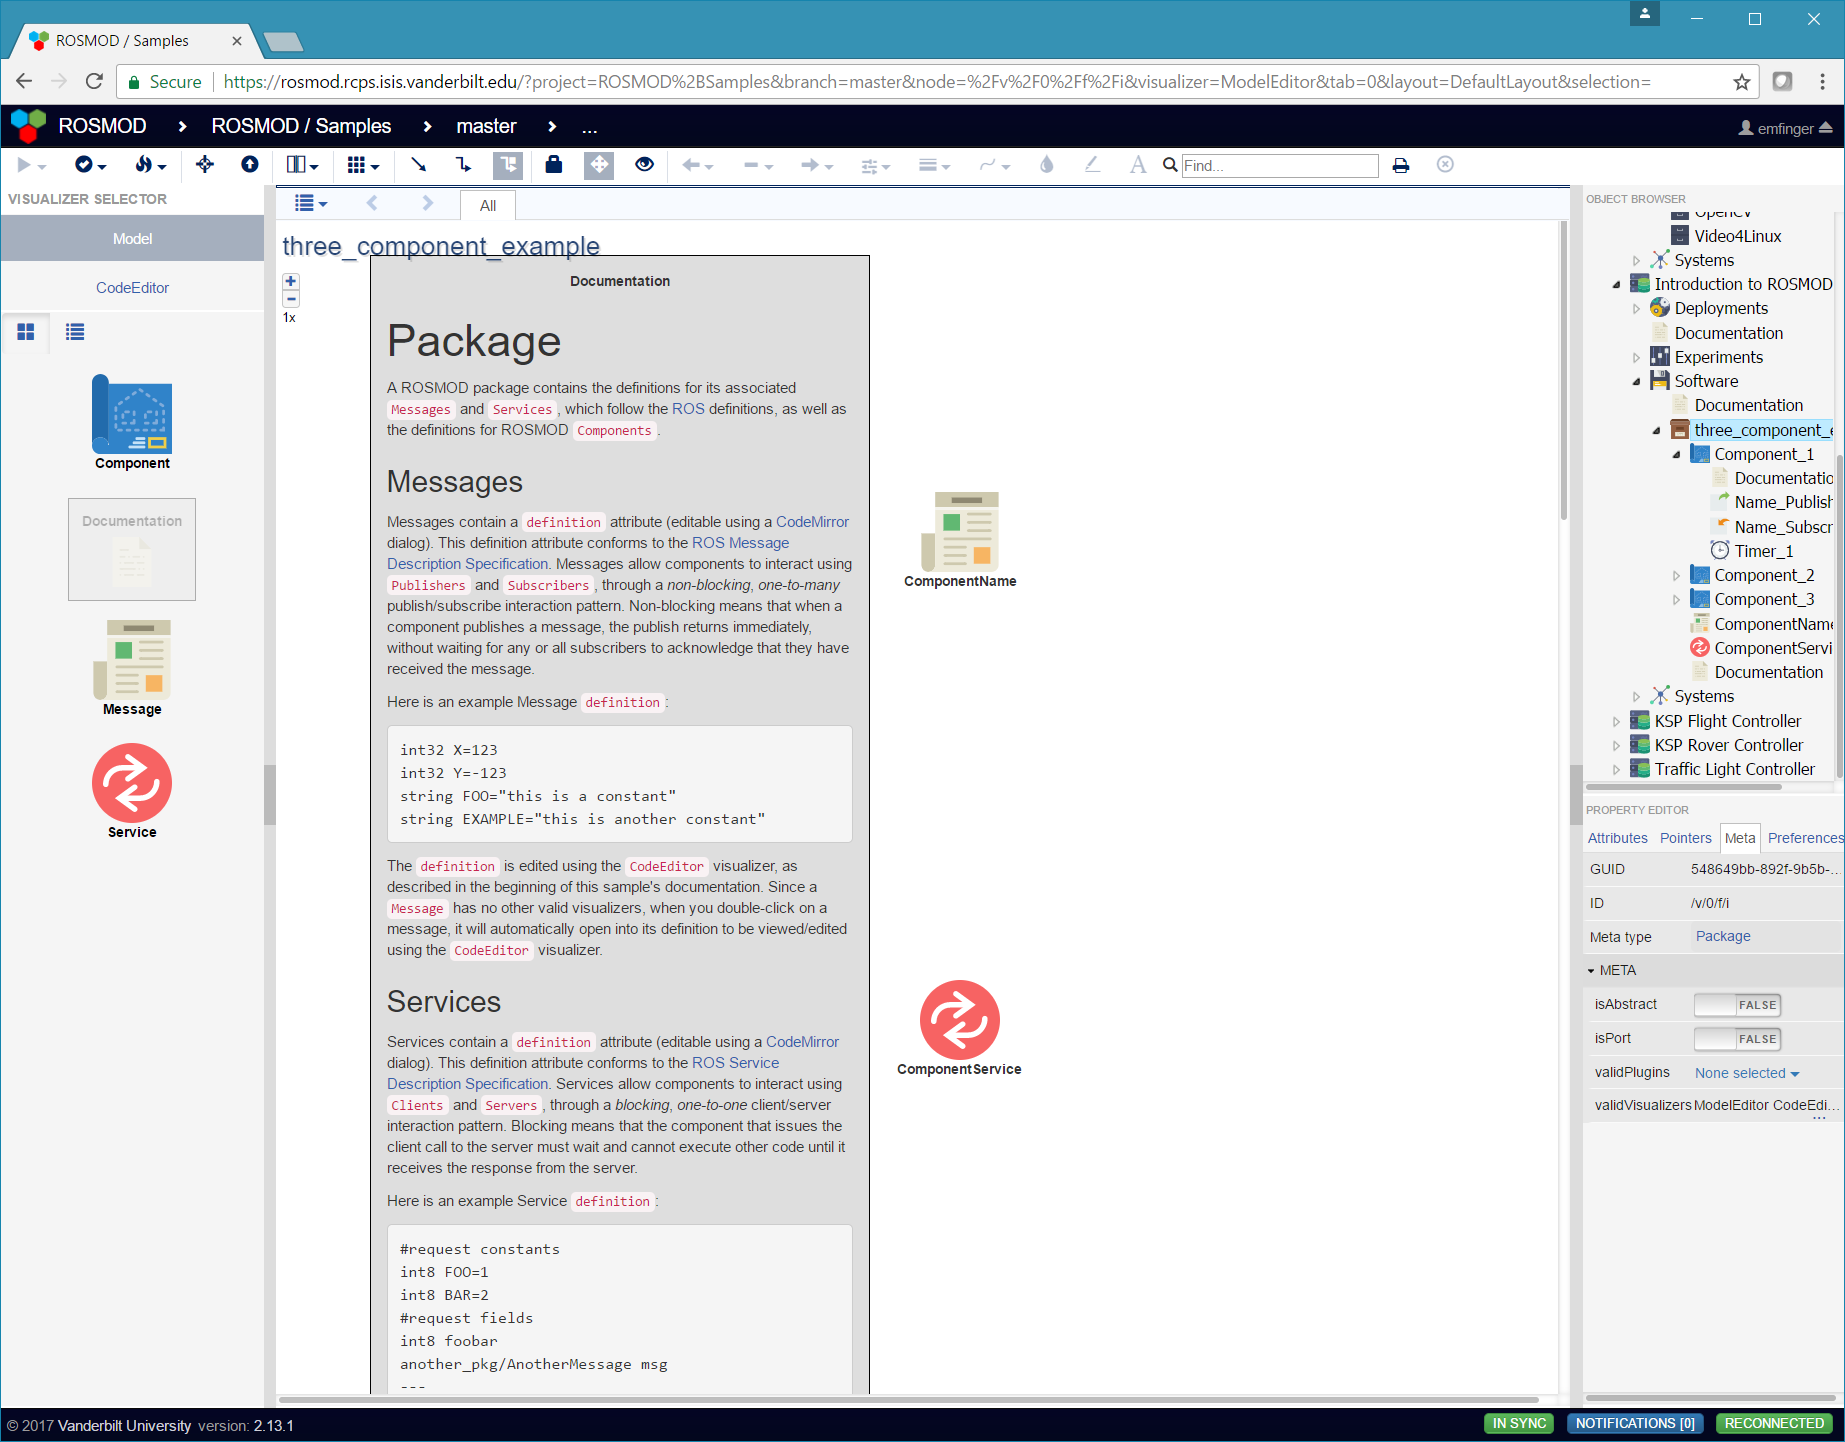
Within the software object, you can create any number of ROS
Packages, Source Libraries, and System Libraries.
Within a Package, you can define any number of ROS Messages and
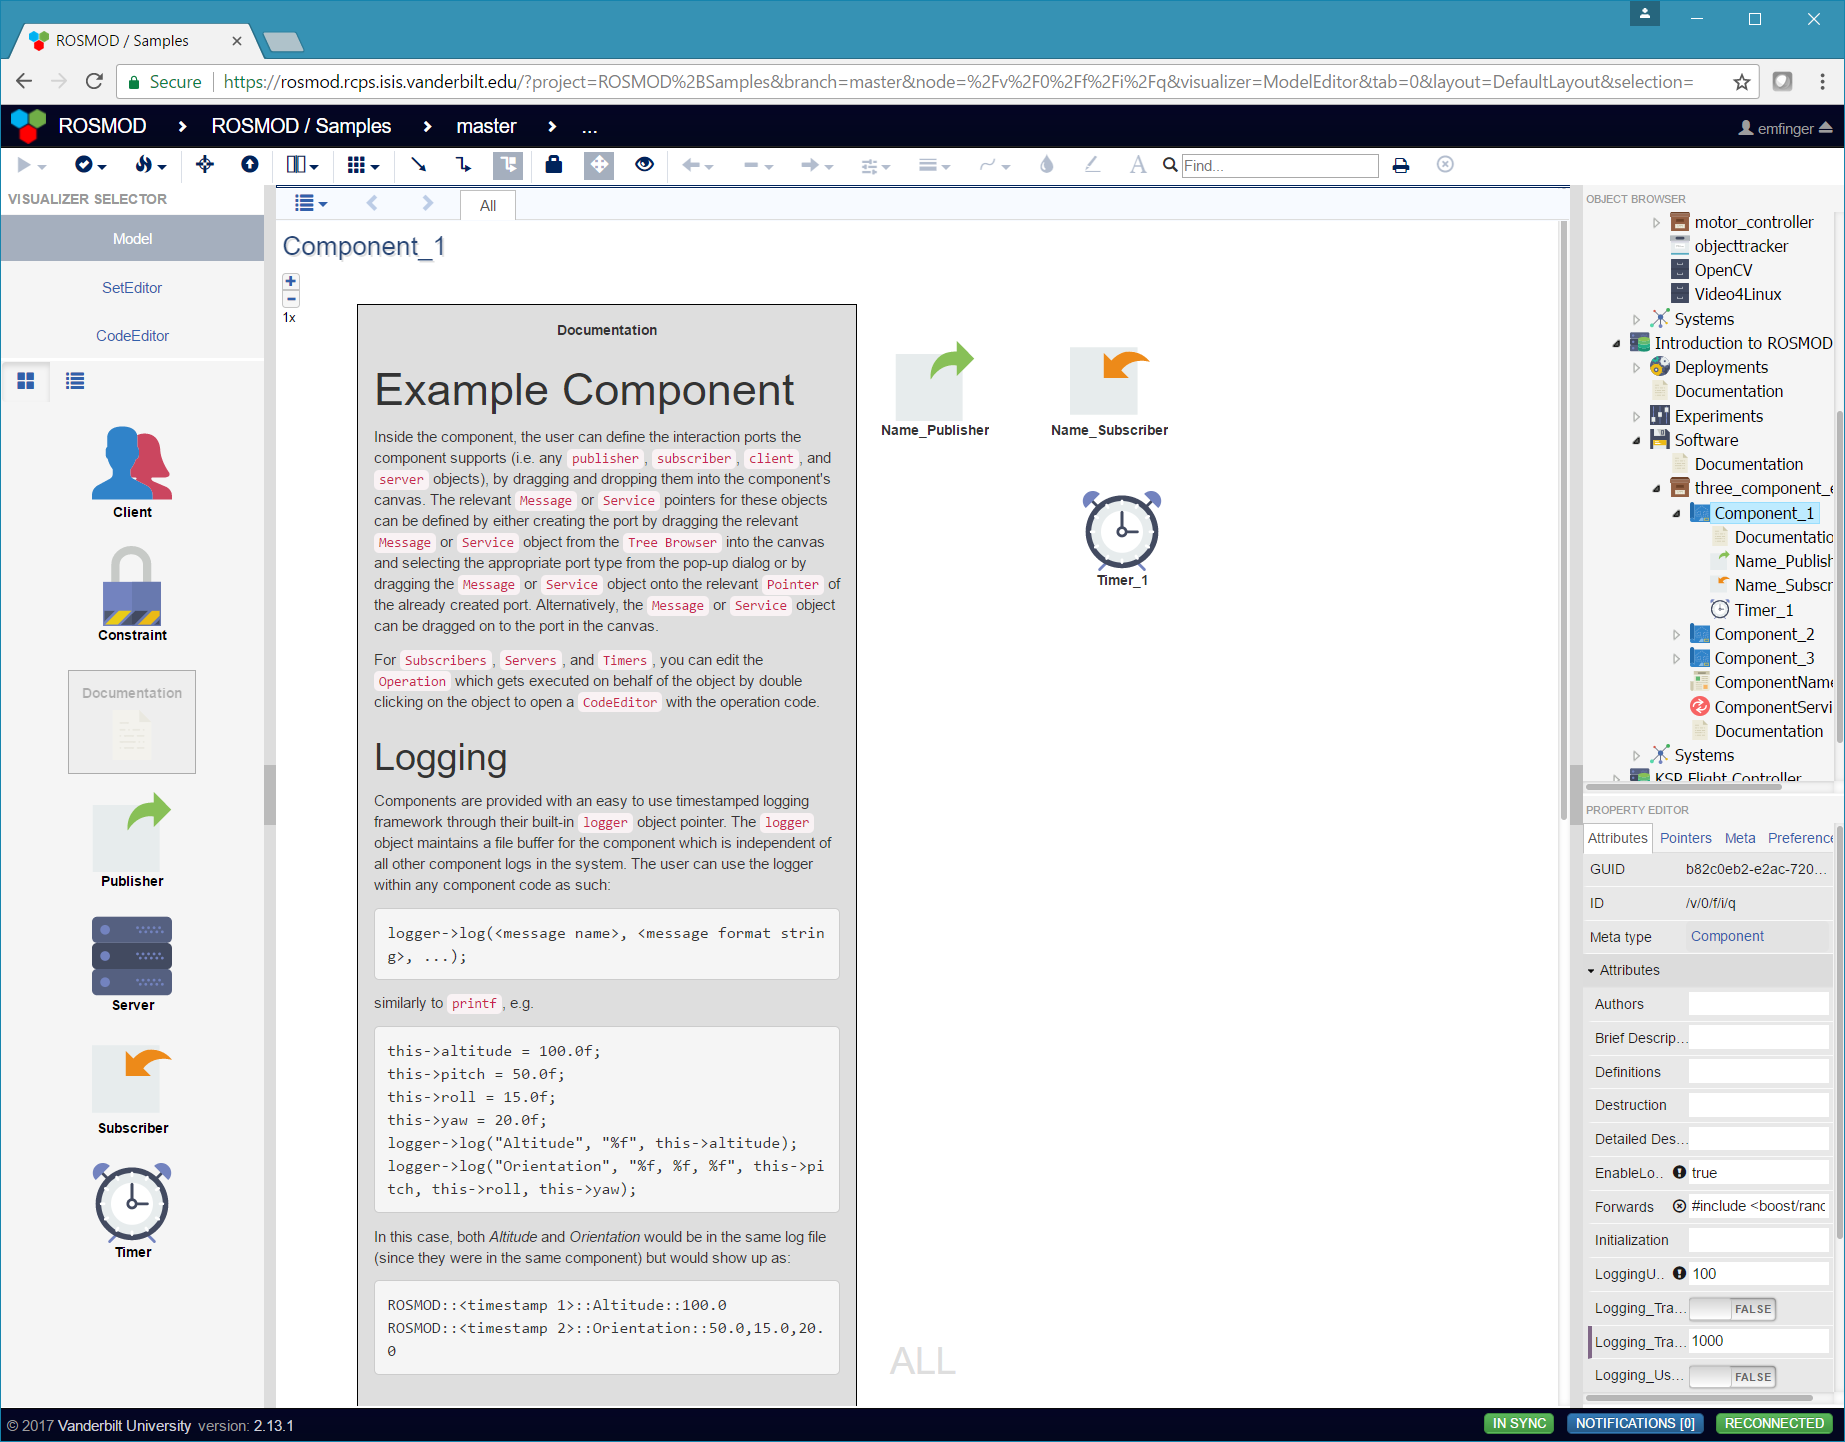
ROS Services, as well as any number of ROSMOD Components.
Within a Component, you can define any number of ROS Publishers,
ROS Subscribers, ROS Clients, ROS Servers, and ROS Timers.
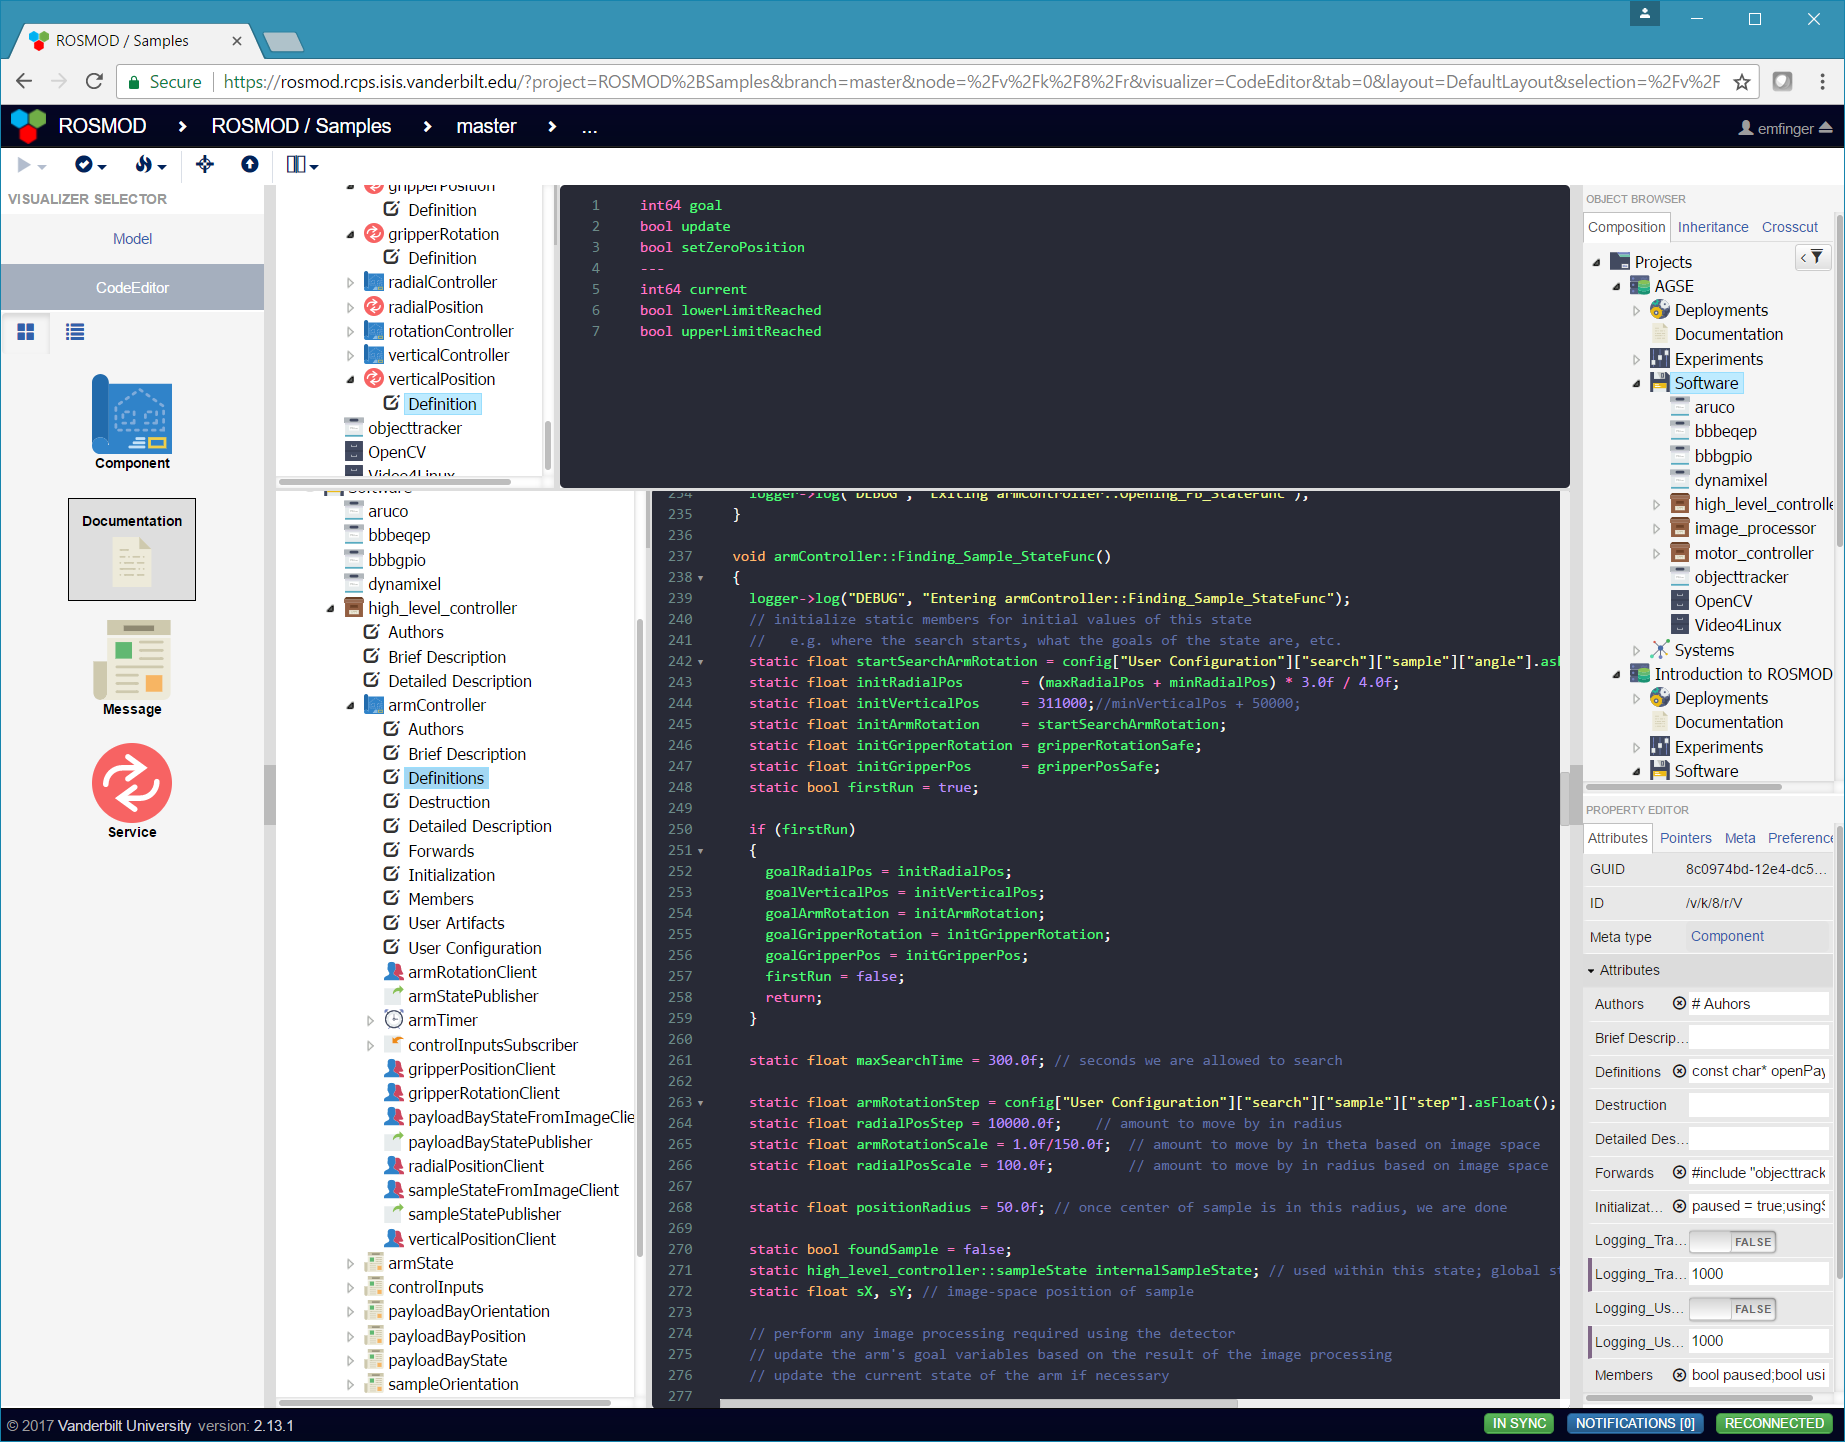
To edit the code defining any of these objects, click the CodeEditor
visualizer, which will bring up the CodeEditor's code attribute tree
on the left (in the active visualizer) and the code being edited on
the right.
Modeling the Systems
Having created a ROSMOD project, double click on the project icon to
open the project within the Visualizer, which will automatically
switch to the Model Visualizer. With the project open in the
Model visualizer, drag a Systems object into the center panel,
this Systems object will be the root of the sub-tree that describes
all of the systems for which this project has been developed.
Double click the Systems object to open it. Within this aspect, you
can drag a System object to describe a single system. A System
is a collection of Hosts connected by one or more Networks and a
collection of Users which may have access to certain Hosts.
Creating a Deployment
Having created a ROSMOD project, double click on the project icon to
open the project within the Visualizer, which will automatically
switch to the Model Visualizer. With the project open in the
Model visualizer, drag a Deployments object into the center panel,
this Deployments object will be the root of the sub-tree that describes
all of the deployment configurations for this project.
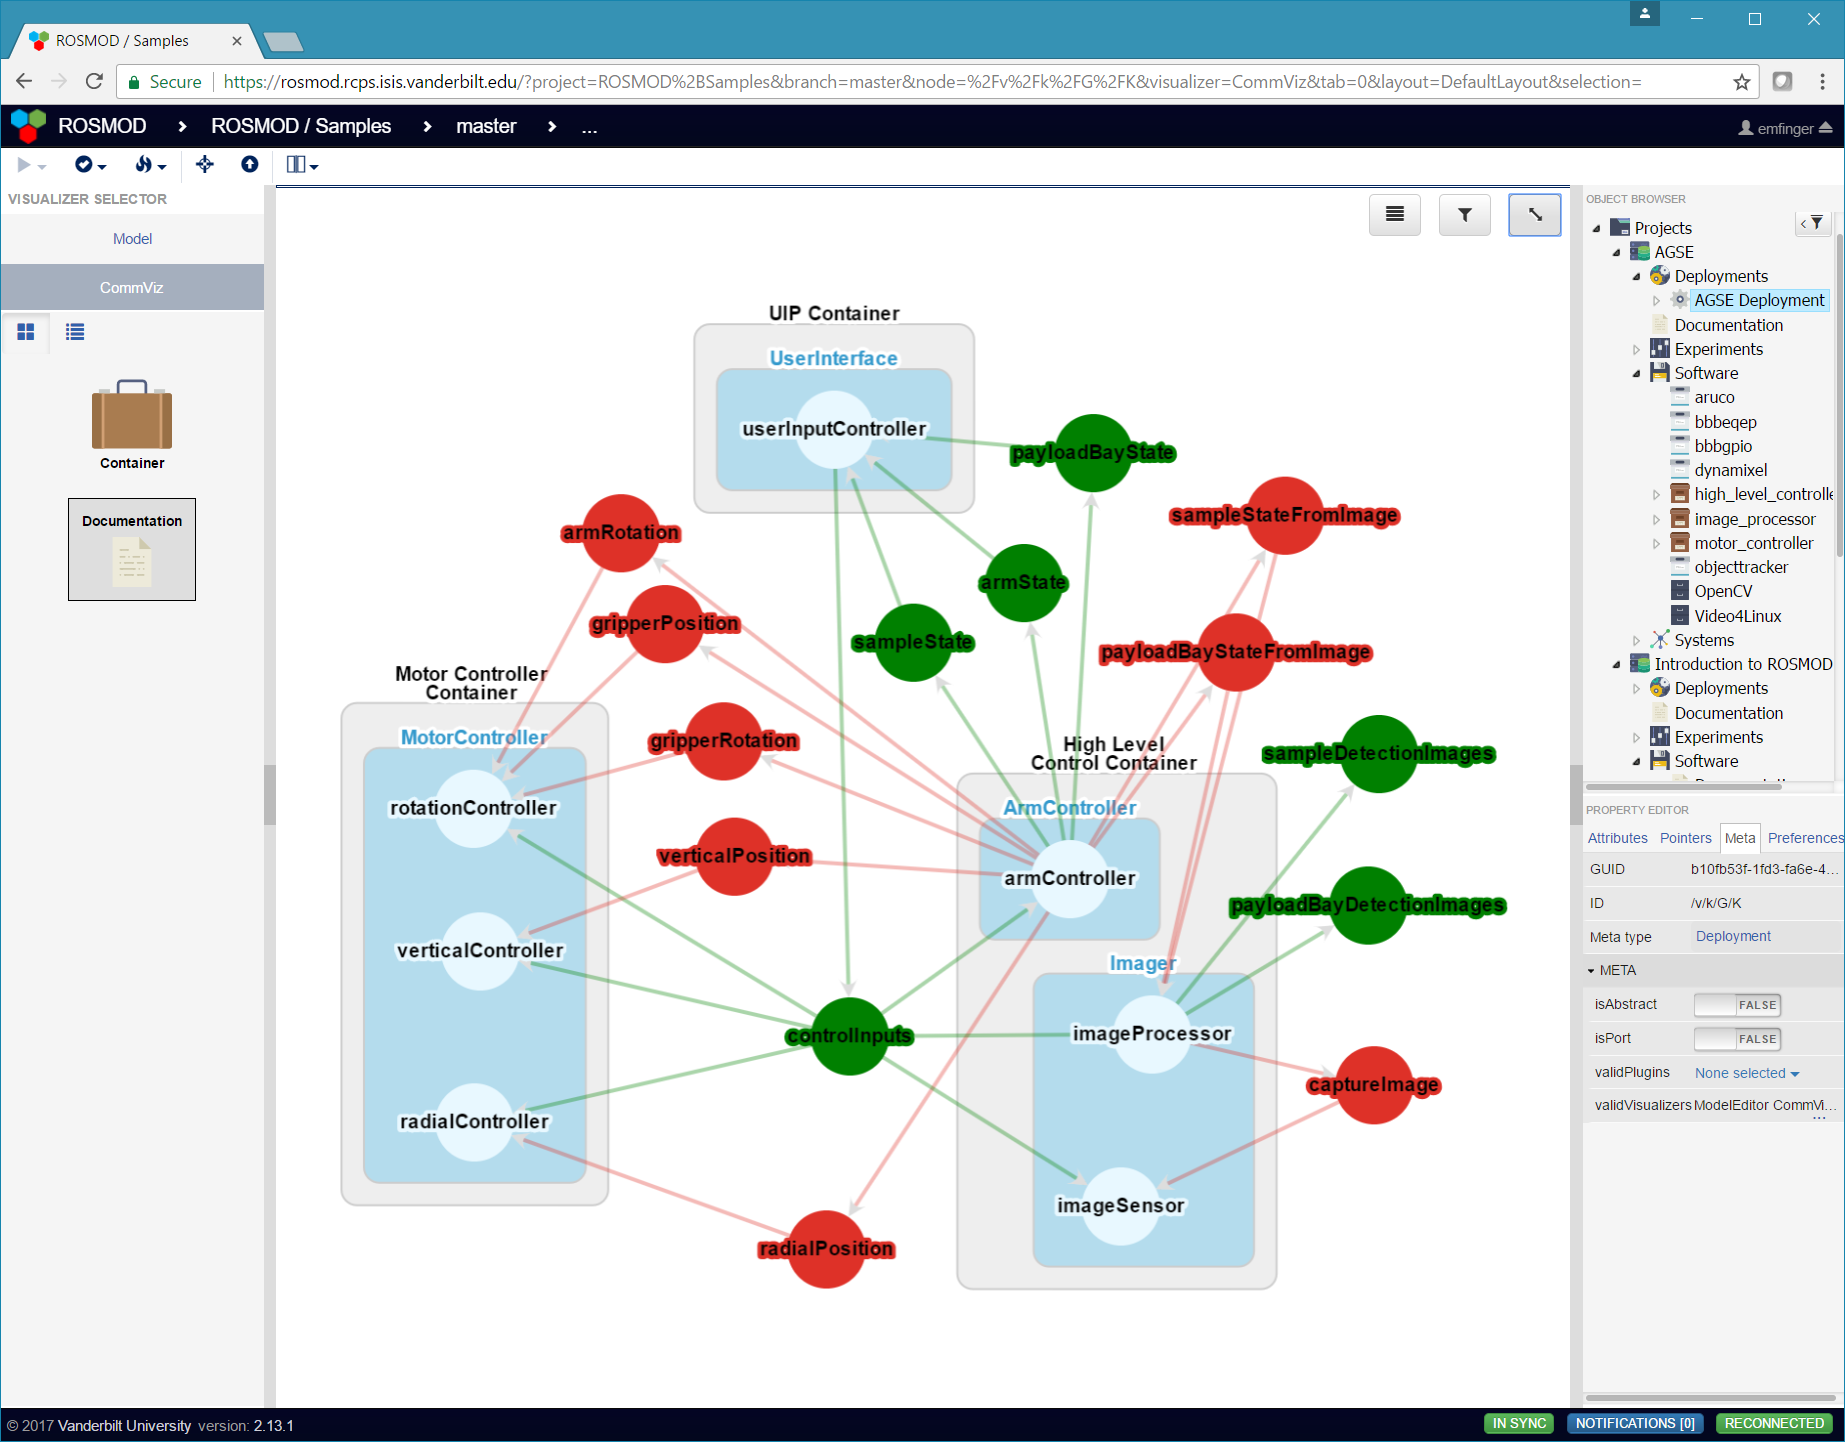
Double click on the Deployments object to open it. Within this
aspect, you can drag a Deployment object to describe a single
deployment. A Deployment is a collection of Component Instances
which are colocated into Nodes ( POSIX processes ), which are
themselves colocated into Containers. Containers are abstract
representations of computing hardware.
Creating an Experiment
Having created a ROSMOD project, double click on the project icon to
open the project within the Visualizer, which will automatically
switch to the Model Visualizer. With the project open in the
Model visualizer, drag an Experiments object into the center
panel, this Experiments object will be the root of the sub-tree that
contains all of the current experiments, past experiments, and their
results for this project.
Double click on the Experiments object to open it. Within this
aspect, you can drag an Experiment object to describe an experiment
you wish to run. An experiment maps a Deployment to a
System. To configure the experiment with the deployment you want to
run and the system on which you wish to run it, you can drag from the
Object Browser in the right panel a Deployment and a System
(that must be within the same ROSMOD project onto the Experiment
object you have created. The Experiment will turn green while your
drag is over it, indicating the Experiment is a valid drop target
for the object you are dragging. This will set the respective System
or Deployment pointer within the Experiment object. To view
(or set or clear) the value for these pointers, single click on the
Experiment to select it within the Property Editor panel. With the
Experiment active in the Property Editor, press the property
editor's Pointers tab, which will show the pointers the object has.
NOTE: Never alter an object's base pointer!
Running an Experiment
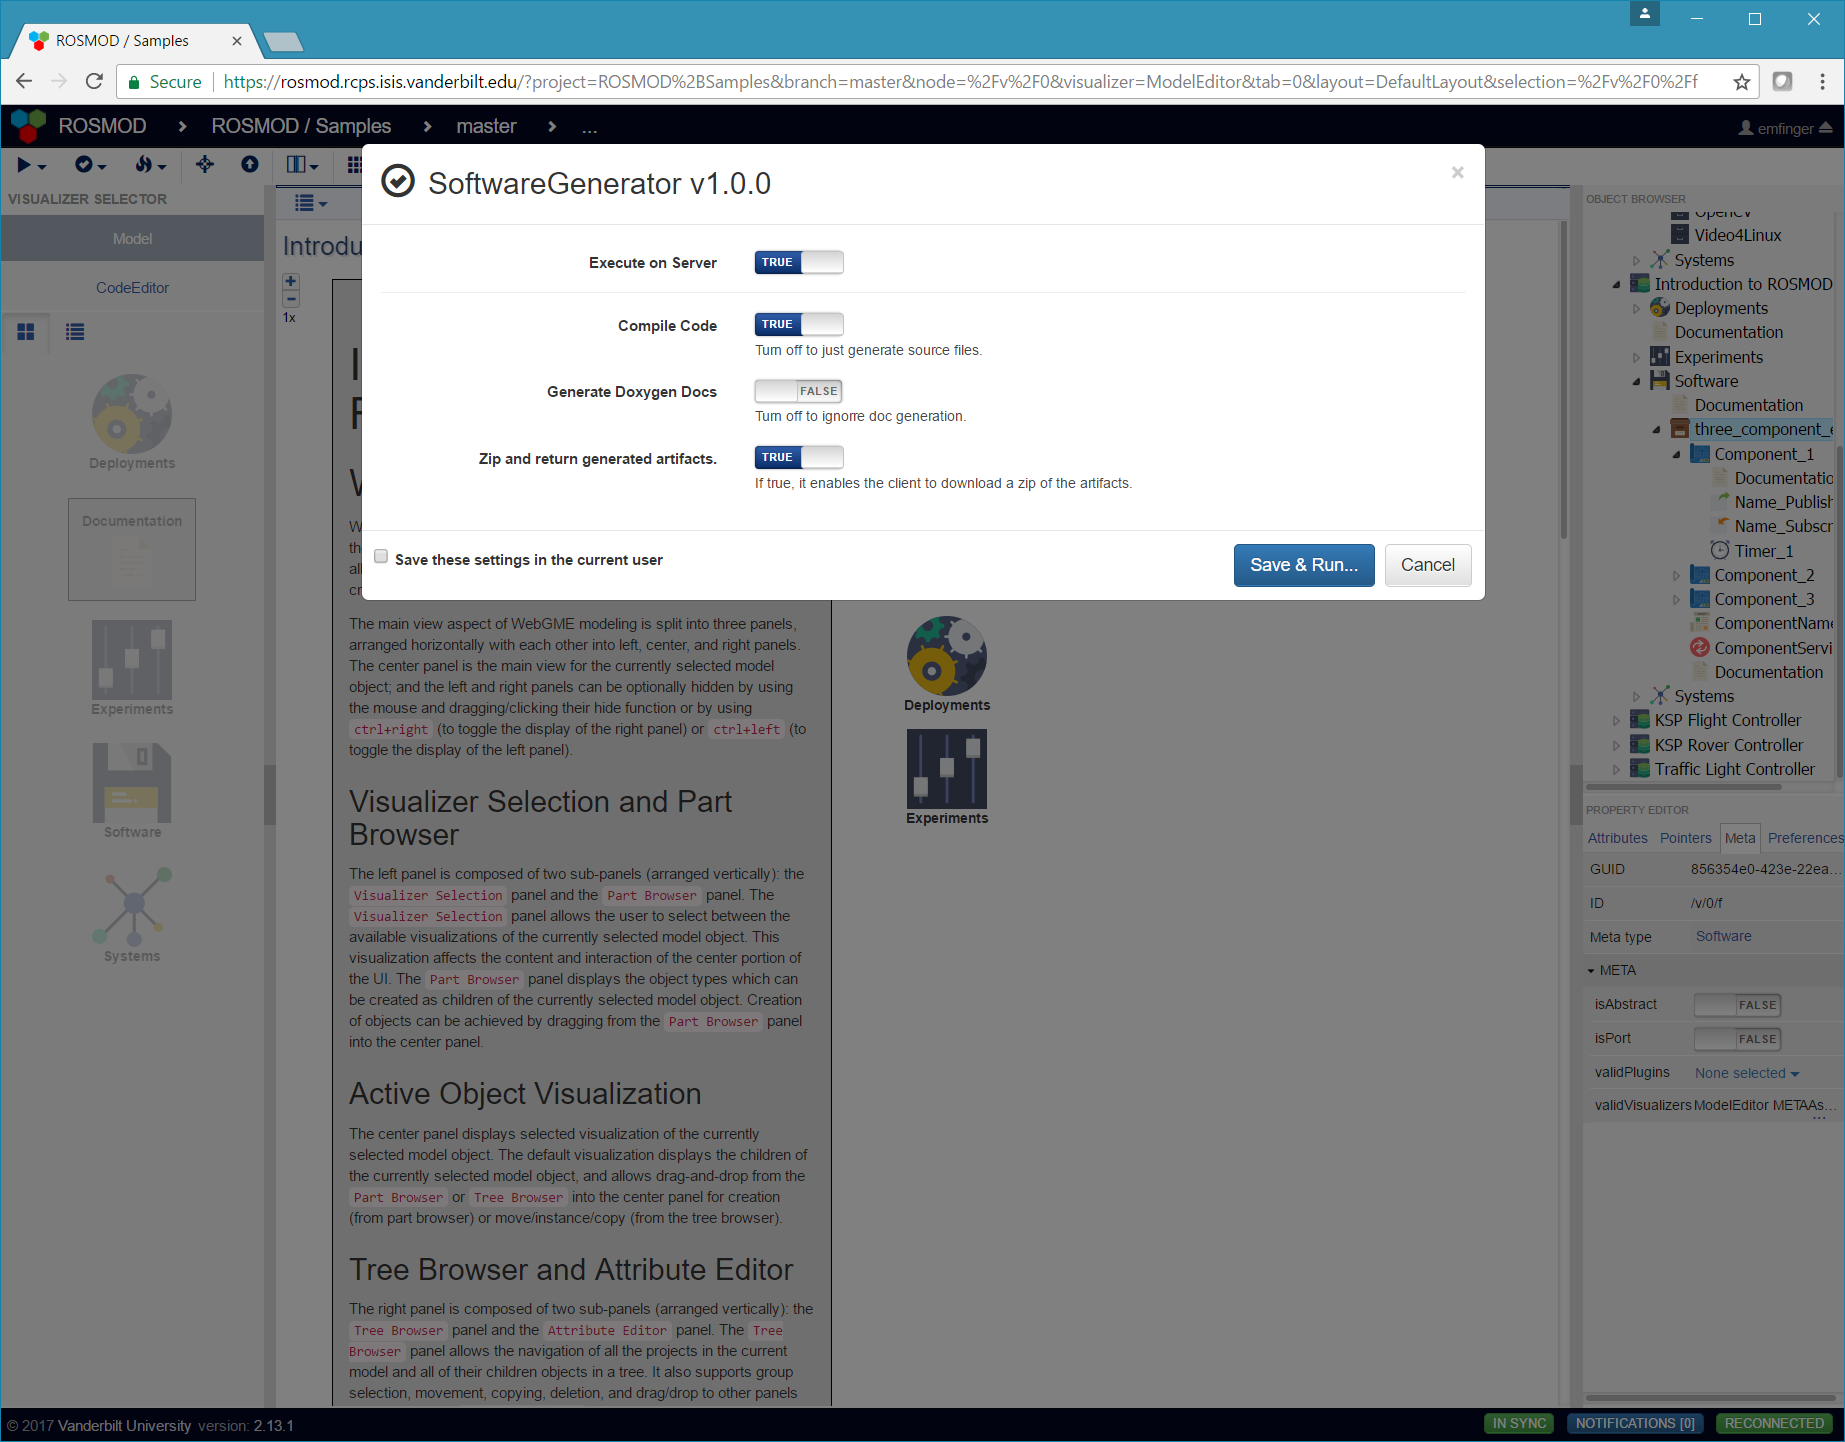
To run an experiment, simply execute the RunExperiment plugin. The
plugin will automatically check to ensure that the system pointed to
by the experiment is running and has the available resources while
also satisfying the constraints of the software.
If the experiment successfully deploys to the system, the plugin will update the model to show which containers from the deployment mapped to which hosts of the system.
Stopping a Running Experiment
If the experiment has a valid model mapping containers to hosts (which
can only be created by running an experiment), then the
StopExperiment plugin will stop the experiment's processes and copy
the component and ROS logs back into the model as attributes of a
time-stamped Results object.
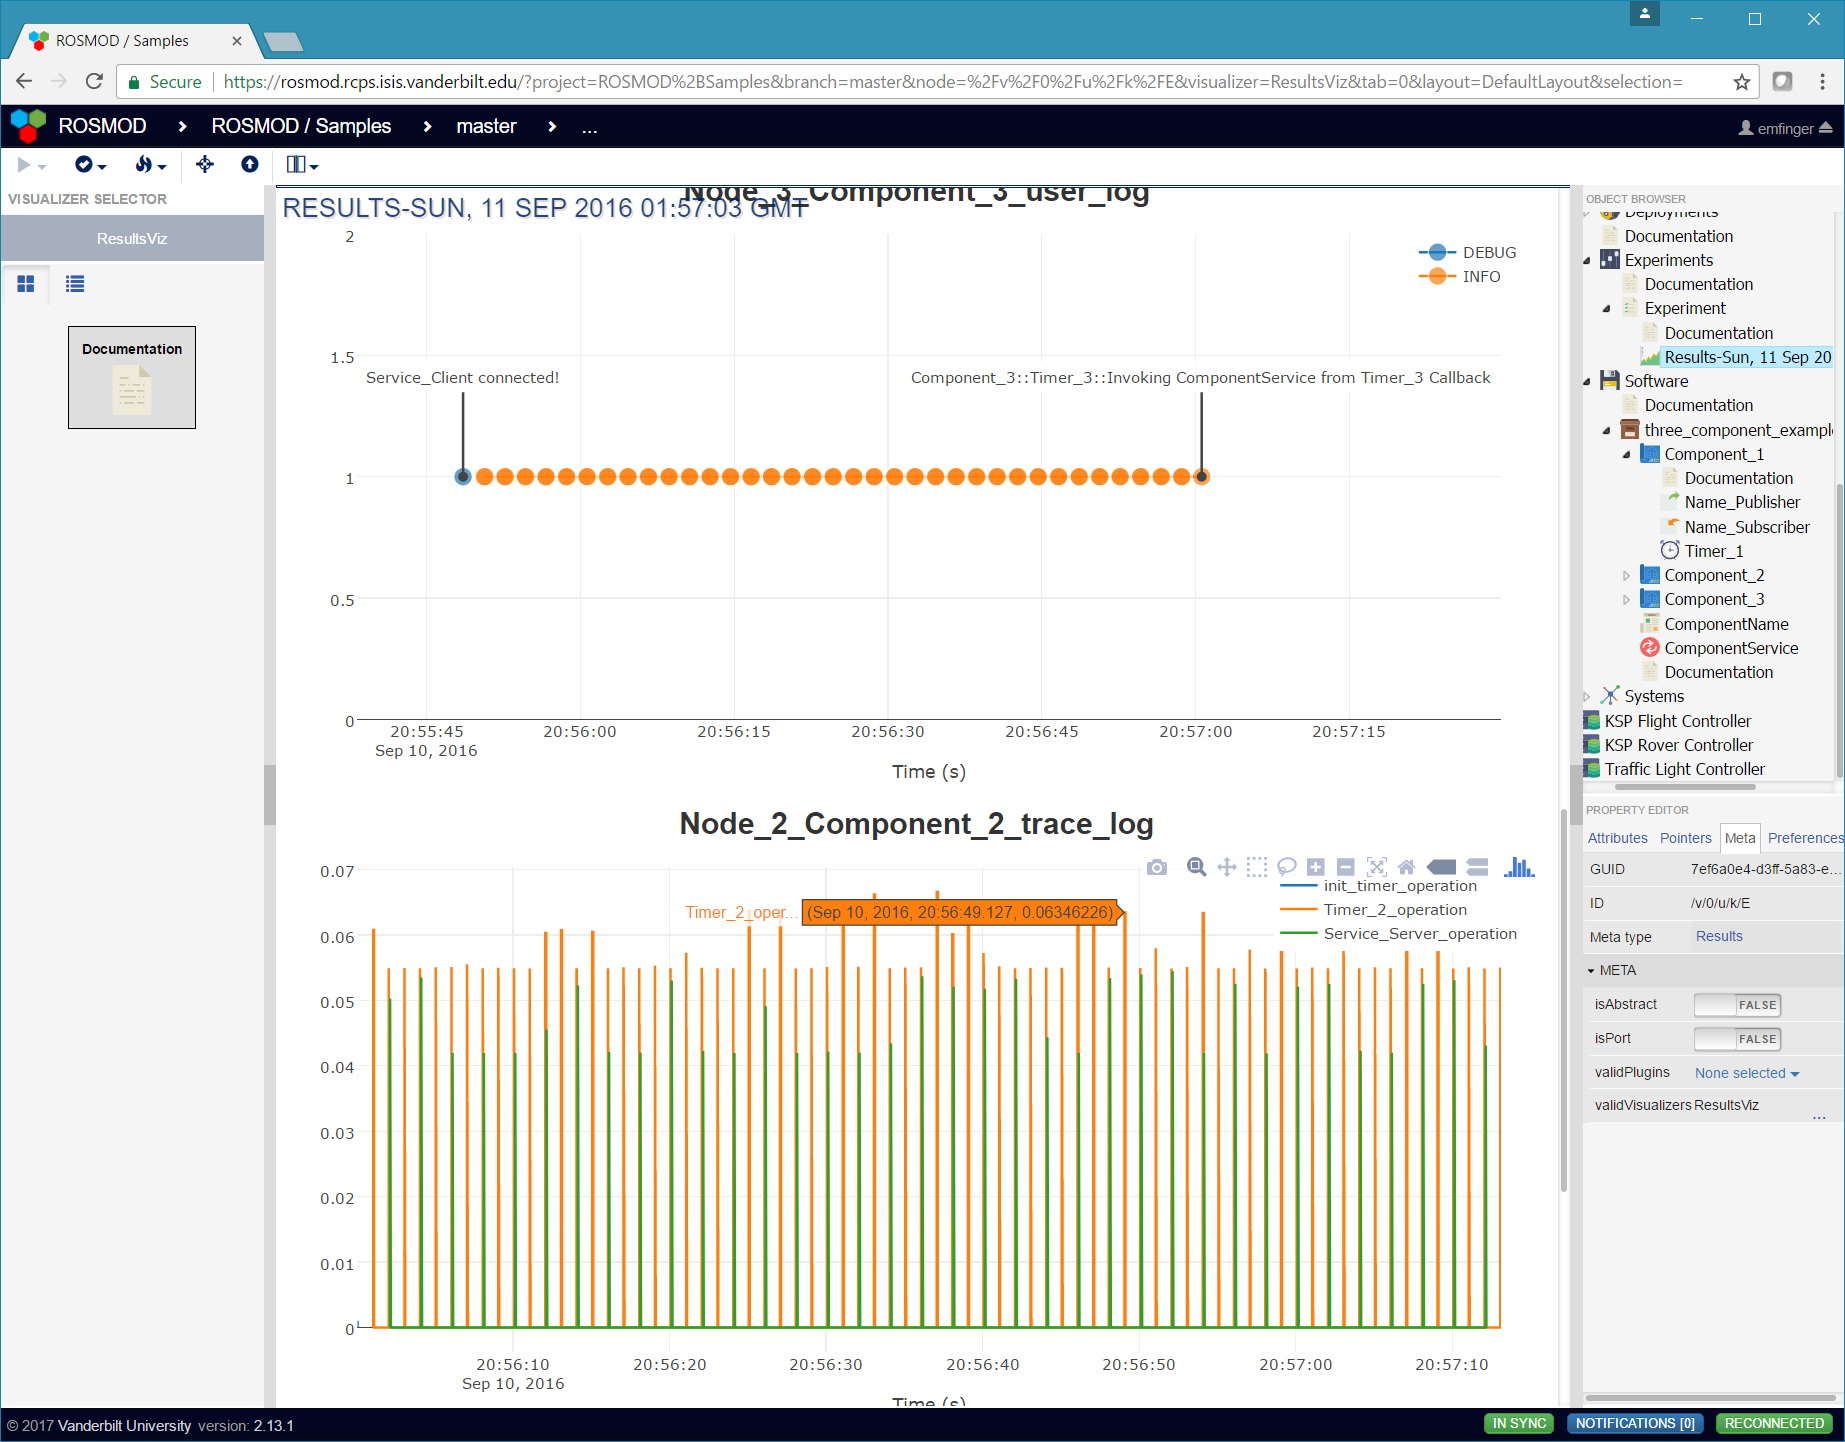
Opening the Results object generated by the StopExperiment plugin
will open the ResultsViz visualizer which will automatically plot
the logs recovered from the experiment.
Keeping ROSMOD Up-to-Date
To keep ROSMOD up to date, you simply need to periodically stop the server, pull from the repository, update the npm packages, and then restart the server.
# 1. within the terminal that is running the server press ctrl+c to stop the server^C# 2. pullgit pull# 3. updatenpm update# 4. restartnpm start