
Usabilla for Apps - React Native
Usabilla for Apps allows you to collect feedback from your users with great ease and flexibility.
This React Native bridge to the Native Usabilla SDK allows you to load passive feedback forms and submit results from a React Native app. This release uses the Usabilla SDK for ios v6.5+ and android v8.+ .
This React Native bridge supports React Native app builds with version 0.61.5 that contains Auto-Linking. For React Native versions without Auto-Linking, please follow these steps.
- Usabilla for Apps - React Native
Requirements
This version of the react native bridge works with the latest release of XCode 12.
For Xcode versions between XCode 9.3 to XCode 10.3 please use the package version @0.8.2 and lesser till @0.5.4.
For Xcode versions lesser than XCode 9.3 please use the package version @0.5.3 or less.
Installation
The installation of this SDK consists out of two parts, one part for your projects a whole and the second part for iOS(#ios) and Android(#android) specifically. To install the Usabilla SDK into your React Native Application:
In a terminal window, navigate to the root directory of your project and run :
yarn add usabilla-react-native
iOS
This release uses the Usabilla SDK v6.5+ .
Fetching the latest Usabilla SDK can be done by updating the pod. This can be done with the following command:
cd ios && pod --repo-update install && cd ..
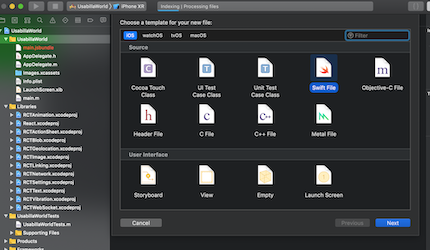
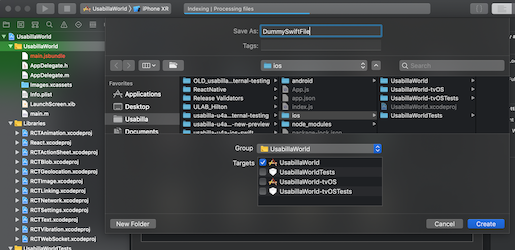
The native Usabilla SDK is written in Swift, so make sure that your iOS Project contains a Bridging-Header file or add one. The default project created by react-native will not create this. To have XCode create the bridge-header automatically, open the ios-project in XCode:
- select "New File"
- select "Swift file"
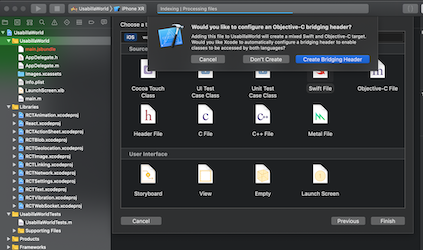
- save it with any name, as its not being used
- choose "Create Bridging Header"


You can start using the Usabilla for React Native module in your app by requiring:
const usabilla = require('usabilla-react-native')
Android
- Make sure that your
MainActivity.javaextendsReactFragmentActivity - In case of compilation problems in Android Studio, set the
compileSdkVersionin the app modulebuild.gradleto33 - React-native module will support Android OS version 6 and above
- You can start using the Usabilla for React Native module in your app by requiring:
const usabilla = require('usabilla-react-native')
Note : For using latest SDK and Standard Events, Hosting App's Gradle needs to be updated
- Change
distributionUrlin gradle-wrapper.properties -distributionUrl=https\://services.gradle.org/distributions/gradle-7.4-all.zip

- Update build.gradle to use
buildToolsVersion = "30.0.3"compileSdkVersion = 33targetSdkVersion = 33minSdkVersion = 23
classpath("com.android.tools.build:gradle:7.3.1")

- Explicitly declare the
android:exported=”true”attribute in the AndroidManifest.

Note : Android sdk v8.+ has been migrated from localbroadcast to livedate or lifeccyle observer implementation
Campaigns
In the Usabilla for Apps Platform, a campaign is defined as a proactive survey targeted to a specific set of users.
Being able to run campaigns in your mobile app is great because it allows you to collect more specific insights from your targeted users. What is even better is that creating new and managing existing campaigns can be done without the need for a new release of your app. Everything can be managed from the Usabilla web interface.
You can run as many campaigns as you like and target them to be triggered when a specific set of targeting options are met. The configuration of how a campaign is displayed to the user will be familiar to existing Usabilla customers. You can configure it to suit your needs just like you are used to from the Passive feedback forms.
The most important aspect of running a mobile campaign is 'Events'. Events are custom triggers that are configured in the SDK. When a pre-defined event occurs, it will allow you to trigger a campaign. A good example of an event is a successful purchase by a user in your app.
The App Id
The app Id is an identifier used to associate campaigns to a mobile app. By loading the SDK with a specific app Id, it will fetch all the campaigns connected to the given app Id.
It is possible to target a campaign to more than one app (e.g. iOS Production App, iOS Beta App) by associating it with multiple App Ids.
To run campaigns in your app, you should first start by initializing the SDK and define the App ID that is generated in Usabilla:
usabilla.initialize("YOUR_APP_ID")
For Android - wait for UsabillaReadyCallback and once isUBInitialised returns true then usabilla methods for forms and campaigns can be called.
This call loads and updates all your campaigns locally and you can start targeting them by sending events from your app.
Events
Campaigns are triggered by events. Events are used to communicate with the SDK when something happens in your app. Consequently, the SDK will react to an event depending on the configuration of the Usabilla web interface. To send an event to the SDK, use :
usabilla.sendEvent("YOUR_EVENT_NAME")
There are multiple options which allow you to define more specific targeting rules of a campaign:
- You can set the number of times an event has to occur (e.g. 3 times).
- Specify the percentage of users for whom the campaign should be triggered (e.g. 10%).
- Define whether you would like to target a specific device language.
It is also possible to segment your user base using Custom Variables. Custom Variables can be used to specify some traits of the user and target the campaign only to a specific subset.
For more on how to use custom variables, have a look at Custom Variables.
Note: A campaign will never be triggered for the same user more than once.
Standard Events
From v1.0.0 onwards we are introducing a new feature Standard Events.
Note : Now with Standard Events you can show campaigns in your application(Host application embedded with GetFeedback Digital/ Usabilla SDK) without adding any extra lines of code. You just have to create Standard Campaigns(Campaigns with Default/System Events) with your User-Account at GetFeedback.
Currently we are supporting these lifecycle / system events :
-
LAUNCH: Define as when the app is entering foreground -
EXIT: Define as when the app is entering to the background -
CRASH: Define as when the app is crashed ( terminated due to an unexpected behaviour)
Note : SDK will not listen to any Default / System events, until it has been initialised and it is recommended to initialise only once. In order to make this work properly, SDK has to be initialize using initialize at the earliest possibility
To get some additional information about the response left by your user, you have the option to use the callback method. This is a listener that listens in to the moment a Campaign with standard events is closed.
Click here to read more about Standard Events.
Campaign submission callback
To get some additional information about the response left by your user, you have the option to use the setCampaignDidClose method. This is a listener that listens in to the moment a Campaign is closed.
Android:
usabilla.setCampaignDidClose((response) => {})
/**
 * response {
 *  rating: int,
 *  sent: boolean,
 *  abandonedpageindex: int
 * }
 */
The response array contains the following information: rating: this value contains the response to the Mood/Star rating question. sent:.. abandonedpageindex: this value is set if the user Campaign is closed before submission.
iOS:
 usabilla.setCampaignDidClose((response) => {})
/**
 * response {
 *  results: {
 *  rating: int,
 *  sent: boolean,
 *  abandonedpageindex: int
 *  },
 * isRedirectToAppStoreEnabled: boolean
 * }
 */
The response array contains the following information: rating: this value contains the response to the Mood/Star rating question. sent:.. abandonedpageindex: this value is set if the user Campaign is closed before submission. isRedirectToAppStoreEnabled: defining a value will enable the App Store Rating prompt.
NOTE: isRedirectToAppStoreEnabled is not included in the response array on Android since displaying the Play Store Rating prompt is handled automatically by the SDK.
Reset Campaign data
This specific method allows you to reset all the Campaign data. This can be helpful in the implementation process where you would like trigger the same Campaign multiple times. By default this wouldn't be possible since a Campaign will only be triggered once for each user. Resetting the Campaign data can be done by calling the following method.
Android: usabilla.resetCampaignData()
iOS: usabilla.resetCampaignData(callback) , the callback here lets you know when the reset is done.
Managing an existing Campaign
You can start collecting campaign results right after you create a new campaign in the Usabilla for Apps Campaign Editor. By default, new campaigns are marked as inactive. On the Usabilla for Apps Campaign Overview page, you can activate or deactivate an existing campaign at any moment to reflect your specific needs.
Moreover, you can update the content of your campaign (e.g. questions) at any time. Keep in mind that the changes you make to an existing active campaign might affect the integrity of the data you collect (different responses before and after a change).
Furthermore, you can also change the targeting options of a campaign. Keep in mind that updating the targeting options of an active campaign will reset any progression previously made on the user's device.
Campaign results
Aggregated campaign results are available for download from the Campaign Overview. Here you can download the results per campaign, in the CSV format.
Campaign results will contain the answers that your users provided. Responses from a campaign are collected and sent to Usabilla page by page. This means that even if a user decides to abandon the campaign halfway through, you will still collect valuable insights. When a user continues to the next page, then the results of the previous page are submitted to Usabilla. Besides campaign results showing the answers to your campaign questions, you will be able to view the device metadata and custom variables.
As for campaign results. Please note that editing the form of an existing campaign will affect the aggregated campaign results:
- Adding new questions to a form will add additional columns to the CSV file.
- Removing questions from an existing form will not affect the previously collected results. The associated column and its data will still be in the CSV file.
- Replacing the question type with a different question is also possible. When you give the same 'name' in the Usabilla for Apps Campaign Editor, then results are represented in the same column.
Feedback Form
Feedback forms that are Forms that are created in Usabilla. These are not triggered by events. They are mostly, but not necessarily, initiated by the user.
The Form ID
Implementing a Feedback Form is done by configuring the Form ID that is generated when a Feedback Form is created in Usabilla.
In order to load a Passive Feedback form with the Usabilla library you need to call:
usabilla.loadFeedbackForm("YOUR_FORM_ID_HERE")
This method only performs the call to fetch the Passive Feedback form and in order to handle its response there are two methods available.
To check whether the form is fetched successfully, we have the following method:
Android:
usabilla.setFormDidLoadSuccessfully((response) => {})
/**
 * response {
 *  success: true
 *  }
 */
iOS:
 usabilla.setFormDidLoadSuccessfully((response) => {})
/**
 * response {
 *  success: true
 *  },
 * isRedirectToAppStoreEnabled: boolean
 * }
 */
To check whether fetching the form failed, we have the following method:
Android:
usabilla.setFormDidFailLoading((response) => {})
/**
 * response {
 *  error: String
 *  }
 */
iOS:
 usabilla.setFormDidFailLoading((response) => {})
/**
 * response {
 *  error: String
 *  }
 */
NOTE: the error parameter contains text explaining why the Form wasn't loaded.
NOTE: Usabilla provides a standard callback for showing a successfully fetched form with the method usabilla.showLoadedForm()
Screenshot
The Screenshot feature can be enabled in the Advanced Settings of your Form. By default, users will have the option to either attach a Photo or a Screenshot to the Feedback item. However, it's also possible to create a Screenshot when the user opens the Feedback Form. The method below will take a screenshot of the current visible view and attach it to the Form:
usabilla.loadFeedbackFormWithCurrentViewScreenshot("YOUR_FORM_ID_HERE")
Submit the results of the form
This functionality is embedded in the native Usabilla library and there is no need to perform any specific action from the React Native environment.
Feedback submission callback
To get some additional information about the response left by your user, you have the option to use the setFormDidClose method. This is a listener that listens in to the moment the Form is closed.
Android:
usabilla.setFormDidClose((response) => {})
/**
 * response {
 *  rating: int,
 *  sent: boolean,
 *  abandonedpageindex: int
 * }
 */
The response array contains the following information: rating: this value contains the response to the Mood/Star rating question. sent:.. abandonedpageindex: this value is set if the user Campaign is closed before submission.
iOS:
 usabilla.setFormDidClose((response) => {})
/**
 * response {
 *  results: [{
 *  rating: int,
 *  sent: boolean,
 *  abandonedpageindex: int
 *  }],
 * formId: String,
 * isRedirectToAppStoreEnabled: boolean
 * }
 */
The response array contains the following information: rating: this value contains the response to the Mood/Star rating question. sent:.. abandonedpageindex: this value is set if the user Campaign is closed before submission. isRedirectToAppStoreEnabled: defining a value will enable the App Store Rating prompt.
NOTE: isRedirectToAppStoreEnabled is not included in the response array on Android since displaying the Play Store Rating prompt is handled automatically by the SDK.
Android hardware back button
Android hardware back button press should be captured and passed to usabilla react native in order to remove feedback form properly and get a callback. To achieve this, you can use a pattern like this;
  import { BackHandler } from 'react-native';
  ...

  var isFormVisible = false;

  constructor() {
    super()
    this.handleBackButtonClick = this.handleBackButtonClick.bind(this);
    usabilla.setFormDidLoadSuccessfully((response) => isFormVisible = true);
    usabilla.setFormDidClose((response) => isFormVisible = false);
    ...
  }

  componentDidMount() {
    BackHandler.addEventListener('hardwareBackPress', this.handleBackButtonClick);
  }

  componentWillUnmount() {
    BackHandler.removeEventListener('hardwareBackPress', this.handleBackButtonClick);
  }

  handleBackButtonClick() {
    usabilla.onBackPressed()
    return isFormVisible;
  }
If you close a feedback form with onBackPressed(), then the response will contain the following information:
rating: -1
sent: false
abandonedpageindex: -1
Masking Private Identifiable Information
The SDK has an option to mask (on the back-end side) the data from input texts, specifically Text Input and Text Area. Please note that the an email input field is not being masked.
It matches a list of RegEx and replaces them by the "X" character by default.
The SDK has a setDataMasking method that can be used as:
usabilla.setDataMasking();
usabilla.setDataMasking([String]);
usabilla.setDataMasking([String], String);
1st parameter - [String] masks is a list of RegExes to mask data in input fields. It uses the default RegExes that the SDK provides.
2nd parameter - String maskCharacter is a character to replace the matched RegExes. By default it uses 'X'.
NOTE: To clear / remove data masking use usabilla.setDataMasking(masks: []) empty array masks removes the data masking feature.
The default RegExes that the SDK provides are: Email Addresses & Numbers
For email it uses:
[a-zA-Z0-9\+\.\_\%\-\+]{1,256}\@[a-zA-Z0-9][a-zA-Z0-9\-]{0,64}(\.[a-zA-Z0-9][a-zA-Z0-9\-]{0,25})+
For Numbers with the length 4 or more
[0-9]{4,}
The default RegEx can be accessed by:
usabilla.getDefaultDataMasks();
Custom Variables
In order to set custom variables in the Usabilla native library it's necessary to call the method:
usabilla.setCustomVariables(customVars)
NOTE: This method accepts as parameter a valid JSON object with the limitations as the key,value should be String type:
var customVars = {'Key': 'Value'};
Trying to set an invalid object as a custom variable will result in that object not being set and in an error being printed in the console.
Custom variables are added as extra feedback data with every feedback item sent by the SDK, whether from a passive feedback or a campaign.
Localization
For all the text that is not customizable in the web interface, you can provide your own translation using a .string localized file inside your application.
This file also includes all the accessibility labels read when VoiceOver is enabled.
iOS
usabilla.loadLocalizedStringFile("YOUR_LOCALIZED_STRING_FILENAME'");
NOTE: This method accepts as parameter a valid String file name and available only for ios. To read more about localisation in ios follow here
To read more about localisation in android follow here
Installation steps for React Native without Auto-Linking
The installation of this SDK consists out of two parts, one part for your projects a whole and the second part for iOS(#ios) and Android(#android) specifically. To install the Usabilla SDK into your React Native Application:
- In a terminal window, navigate to the root directory of your project and run :
yarn add usabilla-react-native
- To link the bridge to your project:
react-native link usabilla-react-native
Android
- Make sure that your
MainActivity.javaextendsReactFragmentActivity - In case of compilation problems in Android Studio, set the
compileSdkVersionin the app modulebuild.gradleto26 - You can start using the Usabilla for React Native module in your app by requiring:
const usabilla = require('usabilla-react-native')
iOS
-
The native Usabilla SDK is written in Swift, so make sure that your iOS Project contains a Bridging-Header file or add one. The default project created by react-native will not create this. To have XCode create the bridge-header automatically, open the ios-project in XCode:
- select "New File"
- select "Swift file"
- save it with any name, as its not being used
- choose "Create Bridging Header"
-
In your iOS project go to
Build Settings->Framework Search Pathsand add :$(SRCROOT)/../node_modules/usabilla-react-native/ios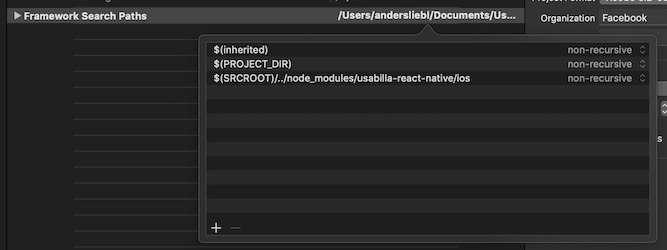
-
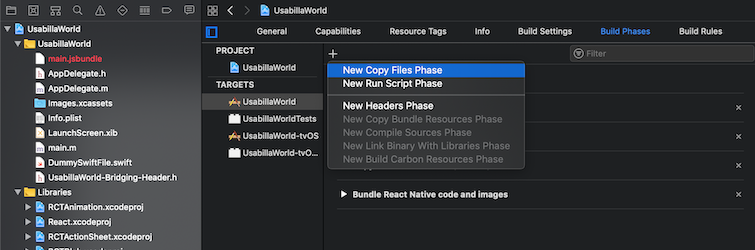
In
Build Phasescreate aNew Copy Files Phase

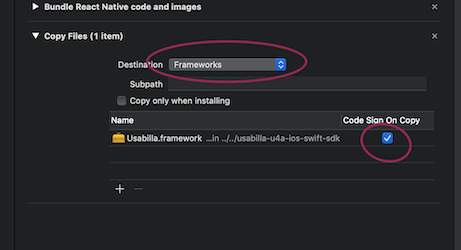
-
Setup Destination to Frameworks.
-
Drag and drop the
Usabilla.frameworkfromReactNativeUsabilla/Frameworksand check thecode sign on copy. -
Make sure that You set Destination to "Frameworks"
-
Make sure to add :
Privacy - Camera Usage Descriptionand
Privacy - Photo Library Usage Descriptionwith a meaningful explanation to the end-user.


The project can now be compiled without any errors related to Usabilla SDK.
Support
If you require help with the implementation, want to report an issue, or have a question please reach out to our Support Team via support@usabilla.com. When contacting our Support Team please make sure you include your Usabilla Account Name and the name of your Customer Success Manager.