thinkdevice
This is a node.js module designed to make device integration with the Think Automatic home automation machine learning platform very simple.
Getting Started
This module has mainly been tested on the Raspberry Pi as it is quite well suited as a home automation hub, therefore these instructions are aimed at setting up and running on a Raspberry Pi. However it should be able to run on other node installations.
Prerequisities
You will need to have node.js and npm installed.
Installing
To get up and running first create a directory for your thinkdevice project.
cd ~
mkdir MyDevice
cd MyDevice
Then install the thinkdevice module ignoring any warnings.
npm install thinkdevice
Copy the example to your MyDevice directory.
cp node_modules/thinkdevice/example/example.js .
The example is short but fully functional.
"use strict";

var td = require("thinkdevice");

// Connect to Think Automatic platform as a Widget whose interface is specified
// by the given deviceTypeUuid. Device types can be designed and browsed by
// going to https://app.thinkautomatic.io/deviceTypes.
td.connect({
  name: "Example Widget",
  deviceTypeUuid: "f760179f-8206-45cc-a158-64fd9e99489d",
});

td.on("connect", function () {
  console.log("Connection to platform opened");
});

// This is the main message handler
td.on("message", function (data) {
  console.log("Received:");
  console.log(data);
  if (data.action && data.action.volume) {
    // This is where commands for the widget would be processed.
    console.log(
      '** Do something with volume value "' +
        data.action.volume.toString() +
        '" here'
    );
  } else if (data.link) {
    // The Widget can act as a hub device meaning that it can relay messages for
    // other devices. This section would be where a link request from the
    // platform would be handled.
    console.log("** Link request received " + JSON.stringify(data.link));
  }
});

td.on("error", function () {
  console.log("Error receiving data from platform");
});

// The code below is to send device events to the platform based on key presses.
var stdin = process.stdin;

stdin.setRawMode(true);
stdin.resume();
stdin.setEncoding("utf8");

stdin.on("data", function (key) {
  switch (key.charCodeAt(0)) {
    case 3:
      process.exit(1);
      break; // Ctrl - C
    case 27:
      switch (key.charCodeAt(2)) {
        case 65:
          td.patch({ button: "on" });
          break; // up arrow key
        case 66:
          td.patch({ button: "off" });
          break; // down arrow key
      }
      break;
  }
});
It can be run using the following command.
node example.js
And it will generate output that looks something like this
Attempting to start local server on port 3205
Local http server running at http://192.168.2.83:3205
Connection to platform opened
Received:
{
  name: 'Example Widget',
  homeId: null,
  deviceId: 1424,
  deviceToken: 'a9ad87c7-d79a-4491-be3a-90ead66564b8'
}
There will also now be a new in your MyDevice directory called device.json.
The device.json file contains the same information reported above along with a security token for the Think Automatic platform. Although you can look at this file, you can also safely ignore it.
Testing that the example is already integrated with the platform
Next step is to create a free account on the Think Automatic platform by going here or if you already have an account login here. Note this is designed for a phone screen, but works in any browser.
Once you have an account and are logged in, create at least one home with one room if you have not done so already by following the on screen instructions.
Once you have created a home and as long as you are on the same local network you should see an option for 'Show discovered device(s)'.
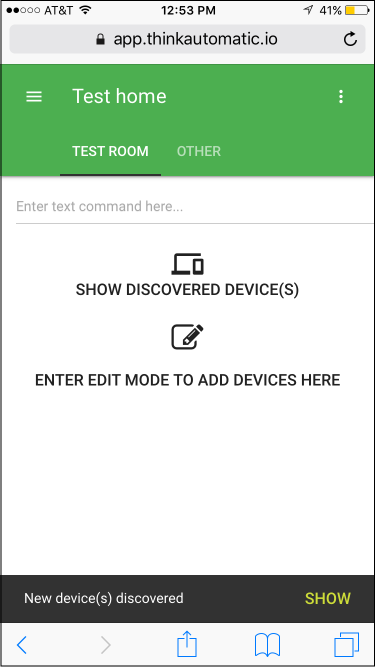
After tapping that you will see your newly created 'Example Widget' listed. Tap on that and you should see a popup for linking.
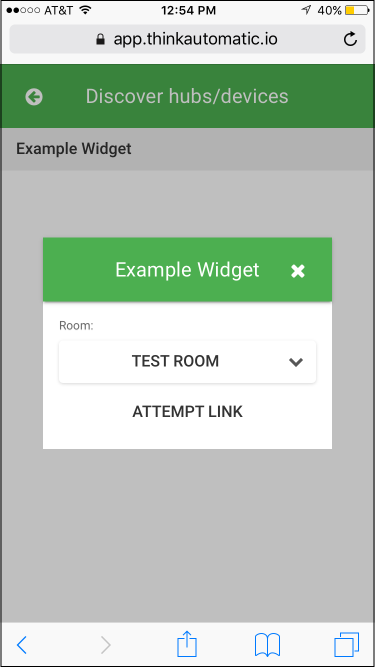
Tap 'Attempt Link' and your 'Example Widget' will be securely linked to your account and you should then see the room it was linked into now with three preset scenes which you can tap on.

When you tap on them you should see the commands received by the 'Example Widget' output to the console that should look something like this.
Received:
{ action: { ramp: 0, volume: '50', sceneId: 1215 }, deviceId: 1424 }
** Do something with volume value "50" here
Congratulations! You have successfully created a sample device that is integrated with the Think Automatic machine learning platform.
Experiment with the Example Widget
In the Widget example the up arrow and down arrow on the keyboard generate events for { button: 'on' } and { button: 'off' } respectively. These are designated as triggering events for the Widget device type which means that they trigger scene changes in the same room where the Widget is placed. When you press these keys you can see the command that comes back to the Widget from the platform based on those triggering events.
For further experimentation try creating other virtual devices by using other device types that you can browse and/or create here. Once you have two or more devices running try moving them between rooms using the web UI to see how they interact.
License
This project is licensed under the MIT License - see the LICENSE file for details