A nodeschool workshop to learn how smart (iot) things work.
General Prerequisites
- A working knowledge of JavaScript.
- No knowledge of hardware/Arduino is assumed.
- A Unix based environment - Mac OSX or a Linux flavour.
Install & run
# Install npm install -g smart-pinhole-workshop # Run smart-pinhole-workshopOverview
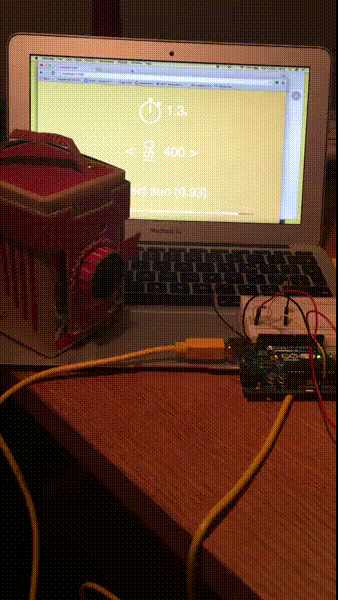
The mission is to create a smart Pinhole Camera while covering core Internet of Things principles.
And, you dont need an Arduino or a Pinhole Camera to get going. We simulate as much as possible. Generally, the challenges will take up 1 to 2 hours.
Also, once you have the Arduino and camera just setup the hardware on the side. This is enough to showcase what a smart camera can do.
Do let us know if you're having any problems. We really want to make this a pleasant learning experience.
Coming soon is our first all in one DIY smart product kit. Stay in touch to find out when its ready.
How smart?
Our objective is to detect the level of brighness in a space. Then use some basic calculations to tell a photographer how long the camera film should be exposed for.
The end result
How will it work?
We will sense brightness using Johnny Five and a cheap light sensor on the Arduino. Then publish that data over the internet and create a real time UI to showcase the optimal film exposure time for a photo.

The workshop will pose a challenge, and test your solution.
You can use your favourite text editor to create a solution.
Each of your solutions can be run directly as a node program like this:

Again, to start fast NO Arduino OR Pinhole Camera is needed for this workshop.
Sample data is pushed through the solution to simulate the experience.
But wire up an Arduino UNO, connect the USB and you can see your solution run for real.
For the Pinhole Camera, either make your own or get one from here.
Exhaustive bill of materials
Here's the list of all the materials to run your solution 100% end to end.
- LED - http://node-ardx.org/electronics-primer#led [buy]
- Photoresistor - http://node-ardx.org/electronics-primer#photoresistor [buy]
- Resistor - http://node-ardx.org/electronics-primer#resistor [buy]
- Breadboard - http://node-ardx.org/electronics-primer#breadboard [buy]
- 3 Jump wires - https://en.wikipedia.org/wiki/Jump_wire [buy]
- Arduino UNO [buy]
- Pinhole Camera - make one / [buy one]
Pre-requisites for the Arduino
Flash your Arduino with Standard Firmata:
- Connect the Arduino UNO to your PC using the USB Cable
- Open the Arduino IDE, select: File > Examples > Firmata > StandardFirmata
- Click the "Upload" button.
- The text "Done Uploading" will appear once the upload is complete.
Having problems? Perhaps adjust one of the following.
- Select : Tools > Board and ensure that "Arduino UNO" is selected.
- Select : Tools > Serial Port and select another serial port. On a Mac the correct port may look like "/dev/tty.usbmodem:1411" or "/dev/cu.usbmodem:1411".
- Check the USB Cable is connected - consider also trying a different cable.
- You can also try pressing the Reset Button on the UNO.
They try the upload process one more time.
Feedback
Again, we love feedback! Let us know what you thought, good or bad.
Code style
To move towards a consistent style for nodeschool projects we use the .jshintrc as defined in learnyounode: https://github.com/rvagg/learnyounode/blob/master/.jshintrc
Your favourite jshint runner will work. And, a gulpfile is provided.
npm install -g gulpgulpOur thanks
Thanks to the brilliant work of @olizilla, @alanshaw & @achingbrain on tableflip/nodebot-workshop.
Your workshopper gave us the perfect foundation to build on!