


Shubox
Simple. Fast. Customizable. Upload images from your web app directly to Amazon S3.
What does this do?
The Shubox mission is to take the tedium and boilerplate out of the web-based file storage and image manipulation story. After creating your Shubox account, and setting our js library up on your website(s), you will be able to:
- Upload to S3, "the internet's ftp server", directly from the web browser.
- Manipulate and transform images and videos after they are uploaded - cropping, optimizing, changing formats.
- Using front-end technologies you are comfortable with, Javascript and CSS, you can create the user experience YOU want using our Javascript library. We have some demos at Codepen!
Why?
Quite frankly I was tired of setting up the file attachment library du jour that was uploading files to an app server then to S3. It was slow, it hogged compute resources, it was repetitive and rote. In addition to that, the solutions that existed that did this sort of thing were ugly, hamfisted, and didn't provide for ways to customize the user experience that I wanted. I built Shubox so that I had some way to quickly and elegantly build the file upload processes that lived in my mind's eye.
Huh?
Visit shubox.io to learn more. Contact the Shubox team directly via email, or the "Send a Message" chat box on bottom right of the Shubox website (thanks smallchat!).
Follow @shuboxio on Twitter for important announcements, or the occasional pithy tweet.
Table of Contents
- Installation
- Set Up Your Own S3 Bucket
- Examples & Ideas
- Library Documentation
- Development Notes
- Code of Conduct
Installation
Using the "Sandbox"
To get things working as fast as possible we'll operate under the understanding that we'll use a sandbox bucket that we've already set up. It's an ephemeral S3 bucket with limitations that you can use to upload and test against.
Sign up for an account
There's a lot under the hood (bucket setup, signatures, CORS policies) that needs to happen in order to get things working just right. We handle all of that stuff via the Shubox service.
- Sign up for an account at Shubox
- Obtain your "Sandbox" key from the Shubox dashboard.. You'll need this for your Javascript code when you initialize your first Shubox object.
Download the Library
With Yarn or Npm
You can use npm or yarn to install the library from npm:
$ npm install shubox
$ yarn add shubox
Require the Shubox library in your JS, via ES module:
import Shubox from 'shubox'Or via the UMD module (IIFE)
Download and embed the shubox js file directly in your html
$ curl -L https://unpkg.com/shubox -o public/shubox.umd.jsIn your HTML:
<script src="shubox.umd.js"></script>
Initialize your Shubox object
For this (very contrived) example let's say you want your users to upload an
avatar or profile photo. You have an HTML element with the ID "#avatar".
And your provided sandbox key is "abcde-qwerty-12345.
new Shubox('#avatar', { key: "abcde-qwerty-12345" })
That's it! When you click that element you will see a file dialog pop up where you can select your image. Once that image is selected it will be uploaded to the sandbox S3 bucket. Your code works! Sure, it uploads to a temporary S3 bucket, but the code works! (More info soon on how to set up your own bucket)
Set Up Your Own S3 Bucket
Coming soon!
Examples & Ideas
Between the common and not-so-common use-cases, we've gathered some up and will be adding to them down below for the times you might be looking for a quick copypasta, or ideas as to what you could do with the Shubox library.
NOTE: All of the following are in ES6 syntax and assume that you have already installed the shubox script into your JS bundle, or have embedded and executed the standalone shubox.js script.
Upload an "Avatar" and manually insert into your element
<div id="avatar"></div>const shuboxKey = "[copied from Shubox dashboard]"
const avatar = new Shubox('#avatar', {
key: window.shuboxKey,
// prevents from inserting the base64 preview image
previewsContainer: false,
success: function(file) { // passed a ShuboxFile object
// create new image element
let img = new Image()
// once loaded, insert it inside div#avatar
img.onload = function() {
let el = document.getElementById('avatar')
el.insertAdjacentHTML('beforeend', '<img src="' + file.s3url + '">')
}
// assign the src and let it load
img.src = file.s3url
}
})Upload several images with preview thumbnails
<div class="multiple-files-container">
  <div class="shubox--upload-target" id="shubox--multiple-files"></div>
  <div class="shubox--upload-preview" id="shubox--multiple-files-preview"></div>
</div>.multiple-files-container {
padding: 40px;
width: 500px;
text-align: left;
margin: 0 auto;
}
.shubox--upload-target:hover {
border-color: silver;
}
.shubox--upload-target:before {
content: 'Drag && Drop || Click';
font-size: .6rem;
color: silver;
display: block;
font-family: courier;
margin-top: .4rem;
line-height: 1rem;
}
.shubox--upload-preview {
overflow: hidden;
}
.shubox--upload-preview > div {
display: inline-block;
position: relative;
width: 4rem;
height: 4rem;
margin-right: 1rem;
overflow: hidden;
}
.dz-progress {
display: block;
position: absolute;
bottom: 5px;
left: 5px;
right: 5px;
}
.dz-upload {
border-radius: 3px;
height: 5px;
background: #bce29e;
display: block;
clear: both;
}
.dz-upload[style="width: 100%;"] { display: none; }
.dz-error-message,
.dz-filename,
.dz-size,
.dz-success-mark,
.dz-error-mark { display: none; }
.dz-complete.dz-success .dz-success-mark,
.dz-complete.dz-error .dz-error-mark {
display: block;
position: absolute;
right: 5px;
bottom: 0px;
text-shadow: 1px 1px white;
}const shuboxKey = "[copied from Shubox dashboard]"
const multfiles = new Shubox("#shubox--multiple-files", {
key: window.shuboxKey,
previewsContainer: '#shubox--multiple-files-preview',
})
Upload avatar and insert generated transform/variant image
"Transforms" are variants of uploaded images that you define in the Shubox
dashboard. If you want a 100x100 sized image generated after an 800x600 photo
is uploaded you can define that image transform in the Image
Transforms section of the
dashboard.
In the JS library you can define a corresponding callback that will fire once
that version of the image is generated, and HTTP request and response
successfully executed. For example, if you define a "144x144#" transform,
that will intelligently resize and crop all uploaded images to that exact pixel
size -- 144 pixels wide by 144 pixels tall. To run a callback once that image
exists, the following options will add an image tag with that version of the
image's URL.
<div id="avatar"></div>const shuboxKey = "[copied from Shubox dashboard]"
const avatar = new Shubox('#avatar', {
key: window.shuboxKey,
previewsContainer: false,
// the image transform's name, as defined
// in the dashboard, is 'test-transform'
transformName: 'test-transform',
// a hash with N keys corresponding to
// the versions of the transforms
transformCallbacks: {
// the image size defined in the dashboard is '144x144#'
'144x144#': function(shuboxFile) {
// once image is found, insert an `img`
// tag with that url as the src
let el = document.getElementById('avatar')
el.insertAdjacentHTML(
'beforeend',
`<img src='${shuboxFile.transforms["144x144#"].s3url}'>`
)
}
}
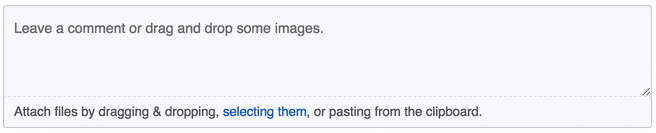
})Mimicing the GitHub file upload user experience
<textarea placeholder="Leave a comment or drag and drop some images."
class="shubox--textarea"
id="shubox--textarea"></textarea>
<div id="shubox--click-to-upload" class="shubox--click-to-upload">
Attach files by dragging & dropping, <strong>selecting them</strong>,
or pasting from the clipboard.
</div>const shuboxKey = "[copied from Shubox dashboard]"
const githubForm = new Shubox('#shubox--textarea', {
key: window.shuboxKey,
// clicking on the element corresponding to the `clickable` selector
// will trigger the file dialog
clickable: '#shubox--click-to-upload',
// Once the file starts uploading the string in `uploadingTemplate` will be
// interpolated with the file's name and added to the textarea
uploadingTemplate: '![Uploading {{name}}...]()',
// Once the file completes uploading the string in `successTemplate` will be
// interpolated with the file's name and S3 url, then placed in the textarea
successTemplate: ''
})
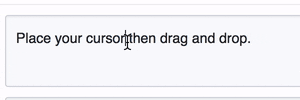
Add the final S3 url to the location of the cursor in the input/textarea
<textarea placeholder="Leave a comment or drag and drop some images."
          class="shubox--textarea shubox--textarea--no-click-bar"
          id="shubox--textarea--cursor">Click to place cursor and upload.</textarea>
const shuboxKey = "[copied from Shubox dashboard]"
const atCursor = new Shubox('#shubox--textarea--cursor', {
key: window.shuboxKey,
// when inserting text into an input or textarea the `insertAtCursor` value
// tells shubox to add the S3 url wherever the cursor is currently placed
textBehavior: 'insertAtCursor',
// the text inserted into the form element is the final S3 url with a space
// before and after
successTemplate: ' {{s3url}} '
})
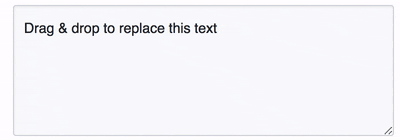
Replace all text in input/textarea with S3 URL
<textarea
  tabindex="1"
  placeholder="Leave a comment or drag and drop some images."
  class="shubox--textarea shubox--textarea--no-click-bar"
  id="shubox--textarea--replace">Drag & drop to replace this text</textarea>
const replace = new Shubox('#shubox--textarea--replace', {
key: window.shuboxSandboxKey,
s3urlTemplate: 'Replaced with: {{s3url}} ',
textBehavior: 'replace',
})
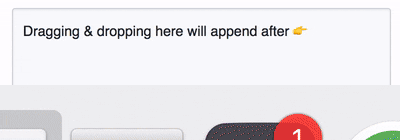
Append S3 URL at the tail end of input/textarea
<textarea
  tabindex="1"
  placeholder="Leave a comment or drag and drop some images."
  class="shubox--textarea shubox--textarea--no-click-bar"
  id="shubox--textarea--append">
    Dragging & dropping here will append after 👉
</textarea>
const append = new Shubox('#shubox--textarea--append', {
key: window.shuboxSandboxKey,
successTemplate: ' See? Told you. Right after --> {{s3url}}',
textBehavior: 'append',
})
Capture a photo with your webcam
<div id="webcam-photo" class="webcam"></div>const webcamPhoto = new Shubox('#webcam-photo', {
key: window.shuboxSandboxKey,
webcam: 'photo',
success: function(file) {
console.log(`File ${file.name} successfully uploaded!`)
console.log(file.s3url)
},
})
... Webcam capture with controls for start, stop, & capture
<div id="webcam-with-options" class="webcam"></div>
<ul>
  <li><a href="#" id="webcam-start">Start Camera 📷</a></li>
  <li><a href="#" id="webcam-stop">Stop Camera 🚫</a></li>
  <li><a href="#" id="webcam-capture">Take Photo ✨</a></li>
</ul>
const webcamOptions = new Shubox('#webcam-with-options', {
key: window.shuboxSandboxKey,
webcam: {
type: 'photo',
startCamera: '#webcam-start',
stopCamera: '#webcam-stop',
takePhoto: '#webcam-capture'
},
success: function(file) {
console.log(`File ${file.name} successfully uploaded!`)
console.log(file.s3url)
},
})
Record a video with your webcam!
<div id="webcam-video" class="webcam"></div>const video = new Shubox('#webcam-video', {
key: window.shuboxSandboxKey,
webcam: 'video',
success: function(file) {
console.log(`File ${file.name} successfully uploaded!`)
console.log(file.s3url)
},
})Record a video with controls, and camera and microphone selection
<div id="webcam-video" class="webcam"></div>
<ul>
  <li><a href="#" id="video-start">Start Camera 📹</a></li>
  <li><a href="#" id="video-stop">Stop Camera 🚫</a></li>
  <li><a href="#" id="video-record-start">Start Recording 🔴</a></li>
  <li><a href="#" id="video-record-stop">Stop Recording ⏹ </a></li>
  <li><select class="shubox-audioinput">
    <option>Select Mic</option>
  </select></li>
  <li><select class="shubox-videoinput">
    <option>Select Camera</option>
  </select></li>
</ul>
const videoWithOptions = new Shubox('#webcam-video', {
key: window.shuboxSandboxKey,
webcam: {
type: 'video',
startCamera: '#video-start',
stopCamera: '#video-stop',
startRecording: '#video-record-start',
stopRecording: '#video-record-stop',
audioInput: '.shubox-audioinput',
videoInput: '.shubox-videoinput',
cameraStarted: (_webcam) => { console.log("camera started") },
cameraStopped: (_webcam) => { console.log("camera stopped") },
recordingStarted: (_webcam) => { console.log("recording started") },
recordingStopped: (_webcam, _file) => { console.log("recording stopped") }
},
success: file => {
console.log(`File ${file.name} successfully uploaded!`)
console.log(file.s3url)
},
})Uploading a file directly from javascript
There are some cases where you might have a file object programmatically
generated for you and all you want to do is upload it to S3 yourself. Using any
combination of the options we provide to you, you can accomplish this by
explicitly calling upload on the instantiated Shubox object. Example:
const shuboxObject = new Shubox('#element', { key: window.shuboxSandboxKey })
const file = new File(["contents"], "file.png", { type: "image/png" })

shuboxObject.upload(file)
Library Documentation
The following section outlines what the Shubox specific options are for the Shubox object instantiation. You might ask - "Isn't it all Shubox specific?" Well, the answer is "No" because under the hood is a wonderful little library called Dropzone.js. Shubox does a tremendous amount of heavy lifting in addition to, instead of, on top of, Dropzone.js. You can pass any Dropzone.js options to the Shubox instantiation and they will be passed along into Dropzone.js in addition to Shubox.
Without further ado, here's what you get out of the box (no pun intended)
with Shubox.
Event Lifecycle callbacks
These are all piggybacking on the Dropzone events and are also documented there but should be called out here nevertheless. These are the big-ticket events that would be most often used during the lifecycle of uploaded files.
sending:
The sending callback is called immediately before each file is sent. It
receives file[1], xhr, and formData objects. This
allows you to modify any or all of these object before they go in flight to
your endpoint (to add headers, etc).
sending: function(file, xhr, formData) {}success:
Assign a function to the success key that accepts a file parameter which will
be run after files are successfully uploaded. More information about the File
type passed into this function can be found below.
success: function(file) {}error:
Assign a function to the error key, accepting a file object and error string. This method will be called when errors are incurred with a file upload, or during the S3 signature generation process
error: function(file, message) {}queuecomplete:
The queuecomplete callback will be called when all files are finished uploading.
queuecomplete: function() {}File Object
Upon successful upload of an image the Shubox library will pass a file object to all JavaScript callbacks. The format of this file object follows:
{
  accepted: true,
  custom_status: "ready",
  name: "my-upload.jpg",                          // filename w/ext
  width: 281,                                     // in pixels
  height: 500,                                    // in pixels
  size: 15596,                                    // in bytes
  lastModified: 1446064073000,
  lastModifiedDate: Sun Jan 1 2016 00:00:01 ...,  // Date Object
  postData: {
    AWSAccessKeyId: "...",                        // AWS Key
    Content-Type: "",
    acl: "public-read",
    key: "path/to/file/in/bucket/filename.jpg",
    policy: "...",                                // policy string
    signature: "...",                             // signature string
    success_action_status: "201"                  // HTTP response code
  },
  processing: true,
  s3: "path/to/file/in/bucket/filename.jpg",
  s3Url: "https://bucket.s3.amazonaws.com/path/to/file...",
  transforms: {
    "variantName": {
      s3Url: "https://s3.amazonaws.com/bucket/variantName_file.jpg"
    },
    // ...
  },
  status: "success",
  type: "image/jpeg",
  upload: {
    bytesSent: 999,
    total: 999,
    progress: 100
  }
}
Shubox-specific Parameters
cdn:
CDN's are ubiquitous and almost a requirement these days. To that end, putting
newly uploaded images behind a CDN, or a hostname that lives between a web
browser and the S3 bucket, instead of linking directly to the S3 object is
something you can with the cdn option.
cdn: 'https://cdn.example.com' // will replace "https://s3.amazonaws.com/bucketname"
s3Key:
(NOTE: the s3Key option is not permitted when using the
sandbox)
Do you want any/all files uploaded through one of your Shubox uploaders to have
an exact S3 key? The default behavior is for Shubox to send files up to your
bucket with the key /[random string]/filename.ext so that you will not
overwrite previously uploaded files.
Setting the s3Key would be useful if you know that you are not risking an
overwrite unless you deliberately mean to. For example, you're logged in as
"Sam" and the Shubox uploader for your avatar shuttles all images up to
/users/avatars/sam.jpg. Similarly, if you have a resource/record that needs a
single photo associated with it, like
/dealership/:dealership_id/cars/:id/photo.jpg.
If you are looking to customize part of the s3Key, but want to use some values that are determined at the time a file is uploaded -- like the filename -- then you can interpolate some values with representations in the string like:
-
{{domainSlug}}- the domain slug -
{{uuid}}- uuid (the random generated string) -
{{filename}}- file name (duh) -
{{fileExtension}}- file extension (the "jpg" part of "hello.jpg") -
{{baseFilename}}- base filename (the "hello" part of "hello.jpg")
s3Key: '/[random letters and numbers]/filename.extension' // default
s3Key: '/users/avatars/sam.jpg'
s3Key: '/client-name/project-name/{{filename}}'
transformKey:
Over in the Shubox dashboard
you can set up what we call Image Transforms. These are named pipelines of
"transformations" you can execute when images are uploaded through your Shubox
uploaders. For example - you could name one "userProfilePhoto" and configure it
to create a 200x200 image every time an image is run through this pipeline.
By setting transformKey to userProfilePhoto in your Shubox initializer's
options you are telling the Shubox app to run your images through that
transformer pipeline and create that 200x200 version of the image.
transformKey: null                  // default
transformKey: 'myTransformerName'
transformCallbacks:
To tie together the Image Transform you set up on the Shubox
dashboard you use the
transformKey option above. But what about after you upload images that pass
through your transform pipeline? What if you want to trigger a callback once
one of those files is generated and available? With this option you can. If
you've set things up in the dashboard to generate a "200x200" image, for
example, the following will run once it's available via an OPTION HTTP request.
Here are the variants that you can watch for.
The file formats you can convert to:
'.webp''.webm''.mp4''.jp2'
The imagemagick geometries/sizes (more here):
-
'200', width - Width given, height automagically selected to preserve aspect ratio. -
'x200', xheight - Height given, width automagically selected to preserve aspect ratio. -
'200x200', widthxheight - Maximum values of height and width given, aspect ratio preserved. -
'200x200^', widthxheight^ - Minimum values of width and height given, aspect ratio preserved. -
'200x200!', widthxheight! - Width and height emphatically given, original aspect ratio ignored. -
'200x200#', widthxheight# Width and height emphatically given, cropped to fill.
The extracted animated GIF frame:
'frame'
transformCallbacks: null // default

transformCallbacks: {

  // for the 200x200 image, trigger this
  // method when it's available
  '200x200': function(shuboxFile) {
    // the `shuboxFile` has a property, `transforms`
    // that is a hash with the versions of the file
    // you are waiting for.
    console.log(shuboxFile.transforms["200x200"].s3url);
  },

  // if you ask to convert images to WEBP format, this
  // will run when it is available
  '.webp': function(shuboxFile) {
    console.log("a JPG converted to WEBP");
    console.log(shuboxFile.transforms[".webp"].s3url);
  },

  // ... or combine the two
  '200x200.webp': function(shuboxFile) {
    console.log("a JPG resized AND converted to WEBP");
    console.log(shuboxFile.transforms["200x200.webp"].s3url);
  }

}
NOTE:
- You can have more than one variant callback, like in the above example.
- You can combine a resized variant with a new file format variant (
200x200+webp). - The resulting variant images/files need to have publicly readable permissions.
- If there are many variations in your transform pipeline it may take a long time to get through them, and therefore a long time (or not at all) before your callback is triggered.
successTemplate:
NOTE: Formerly s3urlTemplate. Will be deprecated with version 1.0.
When uploading to a form element, a string containing the URL to your S3
resource will be placed in your form element's value. By default this is a
result of a template having placeholder values interpolated before being
placed in your form element. That template is merely a handlebars-like value of
'{{s3Url}}' to start out with but has several more values that can be used.
This can be changed to any string. For example, to instead insert markdown's
image pseudo code you would change this to ''.
Other placeholders you may use:
-
height- image height -
width- image width -
name- filename -
s3- path of s3 object -
s3url- url to file -
size- file size in bytes -
type- file type
s3urlTemplate: '{{s3Url}}' // just the url
s3urlTemplate: '' // markdown image tag
s3urlTemplate: '<img src="{{s3Url}} width="{{width}}" height="{{height}}">' // img tag
uploadingTemplate:
Similar to successTemplate - this is a string that gets interpolated with the
following values, however this is added while a file is being uploaded.
-
height- image height -
width- image width -
name- filename -
s3- path of s3 object -
s3url- url to file -
size- file size in bytes -
type- file type
uploadingTemplate: 'uploading {{size}} byte file: {{name}}'
uploadingTemplate: '![Uploading {{name}}...]()' // "temp" markdown tag a-la GH
textBehavior:
When uploading through a form element (<input>, <textarea>, etc) the
behavior, by default, will be to 'replace' the contents of the form element
value with the URL to the newly uploaded file.
The value 'append' will append the resulting value from the newly uploaded
file to the form element.
'insertAtCursor' will, as I am sure you are shocked to hear, insert the text
wherever your cursor is placed at the time of the upload.
textBehavior: 'replace' // default value
textBehavior: 'append'
textBehavior: 'insertAtCursor'
extraParams:
Shubox provides a mechanism with which to post custom data via a webhook
to an address of your choosing whenever files are uploaded. This will
allow you to share any information available during your users' session. The
information within the extraParams hash will be sent to your webhook
endpoint along with the data from the uploaded file.
As an example, you may want to send data about the uploaded file(s) with a user's ID or email. It's not uncommon to want to know who is uploading a particular file.
extraParams: {} // default
extraParams: {  // override with whatever you want
  userID: 123,
  userEmail: 'team@shubox.io',
  reecesPiecesOrPBCups: 'cups, obviously'
}
acceptedFiles:
If you only want certain file types allowed to be uploaded, you may provide a list of mime types or extensions. The contents of the option may include a comma separated list of mime types or file extensions. Eg.:
acceptedFiles: "image/*"                      // default value
acceptedFiles: "image/*,application/pdf,.psd" // image, pdfs, psd
Webcam Configuration
The webcam option(s) for the library support two modes of capture: "photo",
and "video".
webcam: basic capture
You can capture a photo or record a video via your webcam and have it sent
right up to S3. The most straightforward approach is to initialize Shubox by
pointing to an element (usually a div) sized to how large you would like the
video element to be. The webcam key accepts a string "photo" or "video",
or an object with a required key of type, and optional keys that are detailed
below. To start:
// let shubox handle everything in the context of your target el

// for a photo, set the root-level key of "webcam" to "photo"
webcam: 'photo',

// for a video, set the root-level key of "webcam" to "video"
webcam: 'video',
The above will wire up the video elements to trigger the steps in the lifecyle
by clicking on the element. Eg: start camera -> take photo, or
start camera -> start record -> stop record.
webcam: with extended options for type: "photo"
The options you can pass to the nested hash in webcam: are as follows:
webcam: {
  type: 'photo',
  startCamera: '#webcam-start',    // selector to element to start camera
  stopCamera: '#webcam-stop',      // selector to element that stops camera
  takePhoto: '#webcam-take',       // selector to element that takes the photo
  // startCapture: '#webcam-take', // deprecated. same as `takePhoto

  // the template that gets inserted into the shubox element div. You may
  // customize this but do make sure the video, canvas, and img are in there
  photoTemplate: `
    <video class="shubox-video" muted autoplay></video>
    <canvas style="display: none"></canvas>
    <img style="display: none">
  `,

  // selector to a <select> element that will be populated with all camera
  // devices. When changed that will change the video input stream
  videoInput: '#select-camera',

  // Callbacks that get triggered during the photo-taking lifecycle. `webcam`
  // is an instance of the Webcam class. `file` is of type `Blob`.
  cameraStarted: (webcam) => ();
  cameraStopped: (webcam) => ();
  photoTaken: (webcam, file) => ();
}
webcam: with extended options for type: "video"
The options you can pass to the nested hash in webcam: are as follows:
webcam: {
  type: 'video',
  startCamera: '#webcam-start',    // selector to element to start camera
  stopCamera: '#webcam-stop',      // selector to element that stops camera
  startRecording: '#video-start',  // selector to element that starts recording
  stopRecording: '#video-stop',    // selector to element that stops recording
  timeLimit: 5,                    // default: undefined. video recording time limit

  // the template that gets inserted into the shubox element div. You may
  // customize this but do make sure the video is in there.
  // the following is the default:
  videoTemplate: `<video class="shubox-video" muted autoplay></video>`,

  // selector to <select> elements that will be populated with all camera and
  // and microphone devices. When changed, each will change the video or audio
  // input stream
  videoInput: '#select-camera',
  audioInput: '#select-mic',

  // Callbacks that get triggered during the photo-taking lifecycle. `webcam`
  // is an instance of the Webcam class. `file` is of type `Blob`.
  cameraStarted: (webcam) => ();
  cameraStopped: (webcam) => ();
  recordingStarted: (webcam) => ();
  recordingStopped: (webcam, file) => ();
}
Development Notes
Development Setup
Clone this repo:
git clone https://github.com/shuboxio/shubox.js.git shubox.js
cd ./shubox.js
Set everything up
./bin/setupThis will install dependencies, build the demo html files, and copy local demo config files.
Grab your "Sandbox" key from the Shubox dashboard.
open http://dashboard.shubox.io/v2/sandbox.txtPlace your key into shubox_config.js as a global variable. This will allow
your local dev/example server to use your sandbox key. _This is done within
./bin/setup but, just in case:
cp demo/javascript/shubox_config_sample.js \
   demo/javascript/shubox_config.js

echo "var shuboxSandboxKey = '[SANDBOX KEY GOES HERE]';" > \
   demo/javascript/shubox_config.js
Run local example server
npm run dev
# ... then open up http://localhost:3000/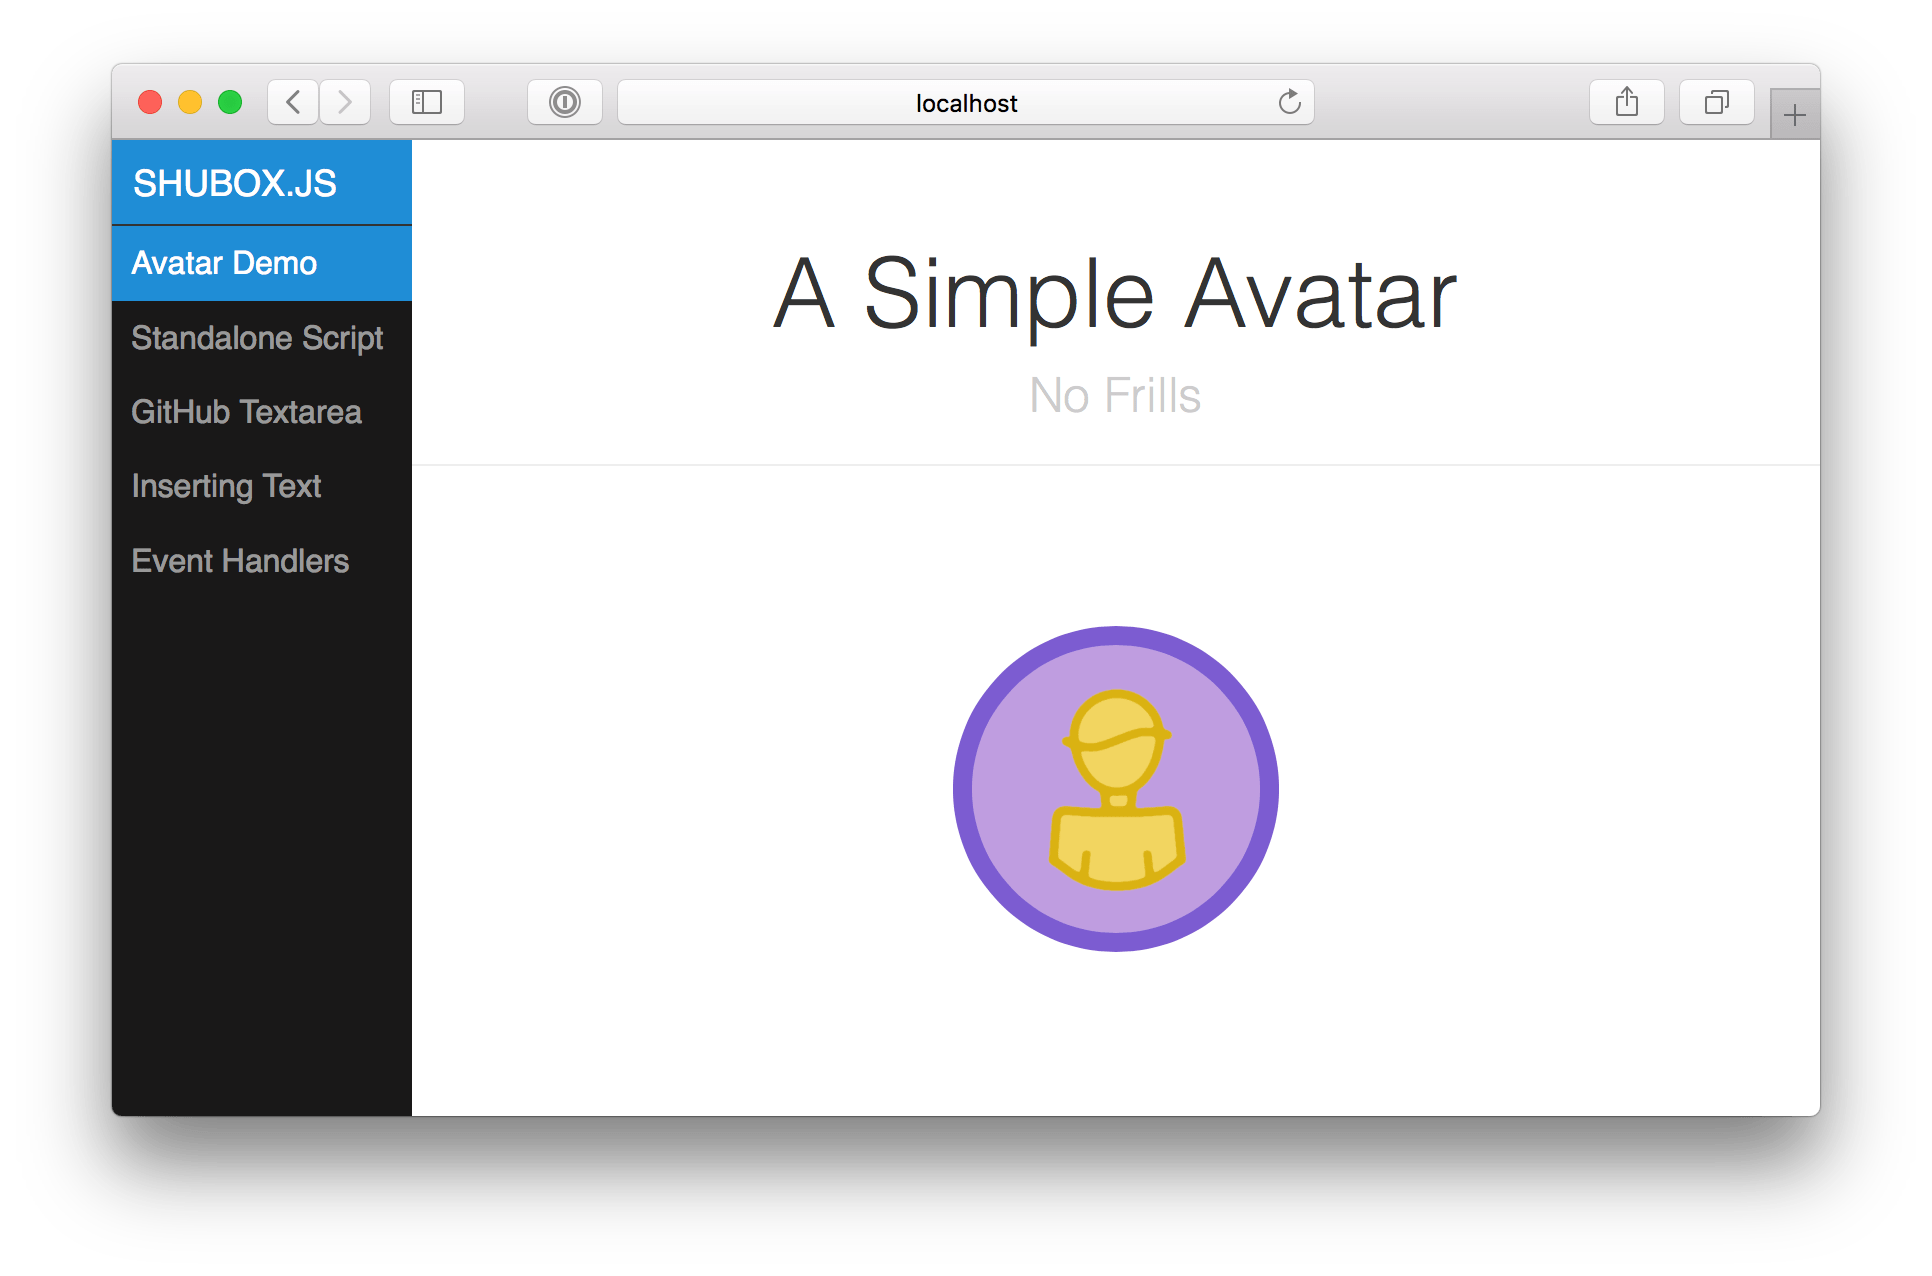
Code of Conduct
We believe in safe, open, and inclusive environments to collaborate in. As such this project adheres to the Contributor Covenant code of conduct. By participating, you are expected to uphold this code. Please report unacceptable behavior to team@shubox.io.