react-native-zopimchat-zendesk
Simple module that allows displaying Zopim Chat from Zendesk for React Native With Support for push notifications. Module works for both Android and iOS
NOTE
This package was inspired by react-native-zendesk-chat
department is set to ZDCPreChatDataRequiredEditable.
Getting started
Further Reading (Important)
Follow the instructions and understand how nativeley to install the SDK for. This will assist you in troubleshooting installing & configuring the module
Pre-Reqisites
To use the push notifications features you must first install firebase. I recommend React Native Firebase.
Then go through the installation for enabling notifications with the rnfirebase package
Installation
Run in terminal
npm i react-native-zopimchat-zendeskAutomatic Integration (Not Recommended)
Using React Native Link
Run
react-native link react-native-zopimchat-zendeskafter which you should be able to use this library on iOS and Android directly
Manual Integration (Recommended)
iOS
Using CocoaPods (Best Approach)
If the CocoaPods package manager is new to you, please first review its installation guide
-
Setup your Podfile (found at ios/Podfile as below, replacing all references to YOUR_PROJECT_TARGET with your project target (it's the same as project name by default).
# Uncomment this line to define a global platform for your project# platform :ios, '9.0'target '_YOUR_PROJECT_TARGET_' do # <--- Replace with your project name# use_frameworks!rn_path = '../node_modules/react-native'...pod 'Firebase/Core'pod 'Firebase/Messaging'pod 'ZendeskSDK' # <--- Add this line to your project pod file...post_install do |installer|installer.pods_project.targets.each do |target|# The following is needed to ensure the "archive" step works in XCode.# It removes React & Yoga from the Pods project, as it is already included in the main project.# Without this, you'd see errors when you archive like:# "Multiple commands produce ... libReact.a"# "Multiple commands produce ... libyoga.a"targets_to_ignore = %w(React yoga)if targets_to_ignore.include? target.nametarget.remove_from_projectendendendend -
In Xcode, drag and drop
node_modules/react-native-zopimchat-zendesk/RNZopimChatModule.mandnode_modules/react-native-zopimchat-zendesk/RNZopimChatModule.hinto your project. -
Configure
ZDCChatin yourAppDelegate.m:
#import <ZDCChat/ZDCChat.h>

[ZDCChat initializeWithAccountKey:@"YOUR_ZENDESK_ACCOUNT_KEY"];
- Enable Capabilities In Xcode:
- Push Notifications
- Background modes > Remote notifications
NOTE
To receive notifications on iOS you must configure your APNs mapping to FCM. Please follow the instructions on the Firebase docs on how to setup your APN certificates with FCM.
Android
- Define the
react-native-zopimchat-zendeskproject inandroid/settings.gradle:
...include ':react-native-zopimchat-zendesk'project(':react-native-zopimchat-zendesk').projectDir = new File(rootProject.projectDir, '../node_modules/react-native-zopimchat-zendesk/android')- Add the
react-native-zopimchat-zendeskas an dependency of your app inandroid/app/build.gradle:
...dependencies { ... implementation project(':react-native-firebase') implementation (project(':react-native-zopimchat-zendesk')){ // <--- Add this block exclude group: 'com.android.support' exclude module: 'appcompat-v7' exclude module: 'support-v4' } }If you've defined project-wide
properties
(recommended) in your root build.gradle, this library will detect
the presence of the following properties: (Project level gradle file) in android/build.gradle
buildscript { ... repositories { google() jcenter() } dependencies { classpath 'com.android.tools.build:gradle:3.3.2' classpath 'com.google.gms:google-services:4.2.0' classpath 'com.google.firebase:firebase-plugins:1.1.5' } /** + Project-wide Gradle configuration properties */ ext { compileSdkVersion = 28 targetSdkVersion = 28 buildToolsVersion = "28.0.3" supportLibVersion = "28.0.0" googlePlayServicesVersion = "16.1.0" // or set latest version HERE } ...}allprojects { ... repositories { mavenLocal() jcenter() google() maven { // All of React Native (JS, Obj-C sources, Android binaries) is installed from npm url "$rootDir/../node_modules/react-native/android" } // Crashlytics repository maven { url 'https://maven.google.com'} maven { url 'https://zendesk.jfrog.io/zendesk/repo' } } ...} If you do not have project-wide properties defined and have a different play-services version than the one included in this library, use the following instead (switch 16.0.1 for the desired version):
...dependencies { ... // Google and Firebase Dependencies implementation project(':react-native-firebase') implementation "com.google.android.gms:play-services-base:16.0.1" implementation 'com.google.firebase:firebase-core:16.0.8' implementation 'com.google.firebase:firebase-messaging:17.5.0' implementation (project(':react-native-zopimchat-zendesk')){ exclude group: 'com.android.support' exclude module: 'appcompat-v7' exclude module: 'support-v4' } ...}- Open up
android/app/src/main/java/[...]/MainApplication.java
- Add
com.zaidiapps.zopimchat.zendesk.RNZopimChatPackage;to the imports at the top of the file - Add
new RNZopimChatPackage()to the list returned by thegetPackages()method :
// Firebase packages // Zopim Chat package // <---- Add this line here ... @Override protected List<ReactPackage> { return Arrays.<ReactPackage>; }- Configure
ZopimChatinandroid/app/src/main/java/[...]/MainApplication.java
... static RNZopimChatModule rnZopimChatModule; // <--- Instantiate this ZopimChatModule variable here @Override public void { super.; SoLoader.; // Init the chat module from taskrabbit ReactApplicationContext reactContext = new ReactApplicationContext(this); rnZopimChatModule = new RNZopimChatModule(reactContext); // <--- Initialize the module here rnZopimChatModule.; // <---- Set your account key here to initialize the module } ...Push Notifications
Receiving Push Notifications (Firebase)
Zendesk Support notifies an endpoint that you set up when a notification needs to be sent. After that, your service must handle sending the push notification for the end user's device.
You must set up a push notification service/function like on Firebase Cloud Functions and then register an end user's interest in receiving push notifications on the app side as shown below
When Zendesk Support sends a notification to the end user, it sends a POST request to the URI set in the app configuration.
Account Configuration
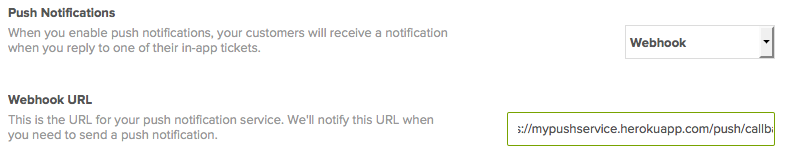
In the Zendesk Support admin interface, select the "Webhook" option in the push notifications combo box in the Customization tab on the Mobile SDK page.
Push Notifications Webhook Configuration
You'll be prompted to provide the webhook URI.
Server Integration
Webhook API
As explained above, Zendesk Support sends an HTTP POST request to the URI of your service. The payload looks like this:
POST <your_push_notification_callback_uri>Content-Type: application/jsonAccept: application/json "devices": "identifier": '<YOUR_DEVICE_FCM_TOKEN>' // a Token that you sent to Zendesk as shown in the sections below "type": "ios" "identifier": '<YOUR_DEVICE_FCM_TOKEN>' "type": "android" "notification": "body": "Agent replied something something" "title": "Agent replied" "ticket_id": "5" //Use this number in the FCF function data payload to resume to the correct chat Firebase Cloud Functions
The POST request sent above can be used to trigger a firebase function which in turn then sends a notification to your device. Below is a sample bare-bones example of a firebase cloud function that can receive this POST request and use it to generate the notification in the correct FCM Format. Feel free to use it as a basis to build upon
const functions = const admin = const cors = origin: true...// The admin_service_account file can be downloaded from your project's cloud console. See https://support.google.com/a/answer/7378726?hl=enlet serviceAccount = admin exportssendZendeskPushNotification = functionshttpsInvoking your notification function (REST)
Invoking this function for testing is as simple as using a REST API client like Postman. Below is a sample
NOTE
As explained above, Zendesk Support sends an HTTP POST request to the URI of your service automatically as shown in the Webhook Section. This is for testing purposes before deployment
Testing With JavaScript
const request = const function_url = 'https://<YOUR_FUNCTION_REGION>-<YOUR_APPLICATION_ID>.cloudfunctions.net/sendZendeskPushNotification' Android
Adding the server key to Chat
You must be a Chat admin to upload the server key. If you're not a Chat admin, ask one to do it for you and provide them with the key. For the admin instructions, see Enabling push notifications for the Chat SDK for mobile in the Chat Help Center.
Note
If your app is targeting Android O and above, make sure the app properly handles the notification channel for these push notifications.
After the Chat admin confirms they've uploaded the server key to the account, enable push notifications in your app as described in the next section.
Enabling push notifications in your app
You need to register devices interested in receiving push notifications with Zendesk Chat.
First, go through the following guide from React Native Firebase on implementing an FCM client on Android. After initializing Firebase you will be able to access the device registration token.
iOS
Generating a combined PEM file
To generate the combined PEM file, export the APNS SSL certificate and the private key from Keychain Access on your Mac computer.
When exporting, don't enter a password when asked about protecting the export.
If you don't know how to combine the certificate PEM and server key PEM, use the following command in Terminal:
cat PushAppCert.pem PushAppKey.pem > PushAppCertAndKey.pem
Then test the combined PEM file against the sandbox Apple server using the following command:
telnet gateway.sandbox.push.apple.com 2195 Finally, test the connection using the SSL certificate and private key to set up a secure connection:
openssl s_client -connect gateway.sandbox.push.apple.com:2195 -cert PushChatCert.pem -key PushChatKey.pem
Uploading the combined PEM file to Chat
You must be a Chat admin to upload the PEM file. If you're not a Chat admin, ask one to do it for you and provide them with the PEM file. For the admin instructions, see Enabling push notifications for the Chat SDK for mobile in the Chat Help Center.
Make sure you use the proper certificate and key in the PEM file for the profile you're using. For example, don't use a combined PEM file for staging in the production profile of the app.
After the Chat admin confirms they've uploaded the PEM file to the account successfully, enable push notifications as described in the next section.
Enabling push notifications in your app
You need to register devices interested in receiving push notifications with Zendesk Chat.
First, go through the following guide from React Native Firebase on implementing an FCM client on Android. After initializing Firebase you will be able to access the device registration token.
Implementing and Subscribing to Push Notifications (JavaScript)
Send the user token Zendesk Chat servers through the Chat SDK as follows to register the device:
ZendeskChatStyling
The default Activity provided by Zendesk for the Chat may not fit into your App Style.
Android
Therefore add the following to your styles.xml in androud/app/src/main/res/values/styles.xml
<!-- Base application theme. --> <!-- Customize your theme here. --> @color/theme_color ... <!--Chat UI uses the toolbar so no need to show ActionBar--> false <!-- Customize chat theme here. --> @color/theme_color @color/theme_color @color/statusBarColor @color/theme_color 8dp @android:color/white <!--Customize toolbar that replaces action bar--> ?attr/colorPrimary ?attr/actionBarSize @style/ThemeOverlay.AppCompat.Dark.ActionBar @style/ThemeOverlay.AppCompat.Light <!--Customize where chat widget appears--> bottom_left <!--Customize chat colors--> @color/theme_color ... Remember to add all the referenced colors to your colors.xml file in androud/app/src/main/res/values/colors.xml
... #00A19B #fff #000000 #ffffff #00000000... There are many more styling options available for Android. HERE
iOS
// loading the chat // offline message view // chat view // chat UI and nav buttons // chat overlay icon // agent chat avatar There are many more styling options available for iOS. HERE
Usage
In your code
App Container
Component { superprops thisstate = fcm_token: '' alert: title: '' message: '' confirmText: '' showLoading: false } { const alert = thisstate return <Router screenProps= alert /> } { let notification = notification = notification // Found in android/app/src/main/src/res/raw/ notificationiosbadge = 10 notificationandroid notificationandroid notificationandroid notificationandroid notificationandroid notificationandroid notificationandroid notificationandroid firebase } // This method handles notifications based on the state the app is in upon receiving a notif i.e whether closed or open { let alert_title = '' let alert_message = '' let alert_button_text = '' let destination = '' let notif_type = '' let notif_data = {} if 'data' in notif const data = notif notif_data = data alert_title = 'alert_title' in data ? dataalert_title : 'Urgent Message' alert_message = 'alert_message' in data ? dataalert_message : 'Urgent Message' destination = 'destination' in data ? datadestination : null // The destination to navigate to (Zendesk component screen below) notif_type = 'notif_type' in data ? datanotif_type : null // Check if the type is zendesk or other as shown in the docs below if source === 'app_open' // Notification opened from app open foreground/background state if notif_type === 'alert' this else if source === 'app_closed' // Notification opened from app open closed state. AsyncStorage } // The app listener handles notifications that came in while the app is in the foreground or in open state in the background. { thisnotificationListener = firebase thisnotificationOpenedListener = firebase; thisonTokenRefreshListener = firebase; thismessageListener = firebase; } componentDidMount = async { const channel = 'main_channel' 'App Main Channel' firebasenotificationsAndroidImportanceMax // Create the channel firebaseandroid this // Here we retrieve the notification that woke the App from state CLOSED and handle it firebase // As of Android M permissions must be requested explicitly if !await firebase try await firebase; catch e // alert('Failed to grant permission') firebase } ...Other Component
...;... ZendeskChat; TODO
- Add examples