

react-native-openalpr
OpenALPR integration for React Native. Provides a camera component that recognizes license plates in real-time. Supports both iOS and Android.
Requirements
- iOS 9+
- Android 5.0+
- RN 0.60+
Installation
Installation with React Native
Start by adding the package and linking it.
$ yarn add react-native-openalpriOS Specific Setup
Install pods
$ cd ios && pod install && cd ..Add post_install tweeks into Podfile
There is workaround for a missing libstdc++.6.0.9.dylib in newer xcode. Please refer to example/ios/Podfile. Remember to set target.name when copy pasting.
There is also an workaround for xcode 12.5 if neeeded.
Camera Permissions
- Add an entry for
NSCameraUsageDescriptionin yourinfo.plistexplaining why your app will use the camera. If you forget to add this, your app will crash!
<?xml version="1.0" encoding="UTF-8"?>
<!DOCTYPE plist PUBLIC "-//Apple//DTD PLIST 1.0//EN" "http://www.apple.com/DTDs/PropertyList-1.0.dtd">
<plist version="1.0">
<dict>
  ...
 	<key>NSCameraUsageDescription</key>
 	<string>We use your camera for license plate recognition to make it easier for you to add your vehicle.</string>
</dict>
Bitcode
Because the OpenCV binary framework release is compiled without bitcode, the other frameworks built by this script are also built without it, which ultimately means your Xcode project also cannot be built with bitcode enabled. Per this message, it sounds like we want this feature disabled for OpenCV anyway.
To disable bitcode in your project:
- In
Build Settings→Build Options, search forEnable Bitcodeand set it toNo.
Android-specific Setup
Camera Permissions
- Add permissions for
CAMERAandFLASHLIGHTand the related features (below) toAndroidManifest.xml. If you forget to add these permissions, your app will crash!
<manifest xmlns:android="http://schemas.android.com/apk/res/android"
  <!-- Camera Permissions -->
  <uses-permission android:name="android.permission.CAMERA" />

  <uses-feature
      android:name="android.hardware.camera"
      android:required="false" />
  <uses-feature
      android:name="android.hardware.camera.autofocus"
      android:required="false" />

  <uses-permission android:name="android.permission.FLASHLIGHT" />
Add to Gradle
Your android/settings.gradle file should have following lines:
rootProject.name = 'RNOpenALPRExample'
apply from: file("../node_modules/@react-native-community/cli-platform-android/native_modules.gradle"); applyNativeModulesSettingsGradle(settings)
include ':app'

// Add these lines
include ':openalpr'
project(':openalpr').projectDir = new File(rootProject.projectDir, '../node_modules/react-native-openalpr/android/libraries/openalpr')
include ':opencv'
project(':opencv').projectDir = new File(rootProject.projectDir, '../node_modules/react-native-openalpr/android/libraries/opencv')
Linking
The library is linked automatically with leptonica, opencv, tesseract, and openalpr (openalpr).
To make it work, copy and paste the directory with the runtime needed data to your project at path android/app/src/main/assets/runtime_data.
The runtime_data file can be found in /example/android/app/src/main/assets/ in this repo. Open runtime_data/openalpr.conf file and replace com.rnopenalprexample with your package name
[common]

; Specify the path to the runtime data directory
runtime_dir = /data/data/com.rnopenalprexample/runtime_data


ocr_img_size_percent = 1.33333333
state_id_img_size_percent = 2.0
...
Usage
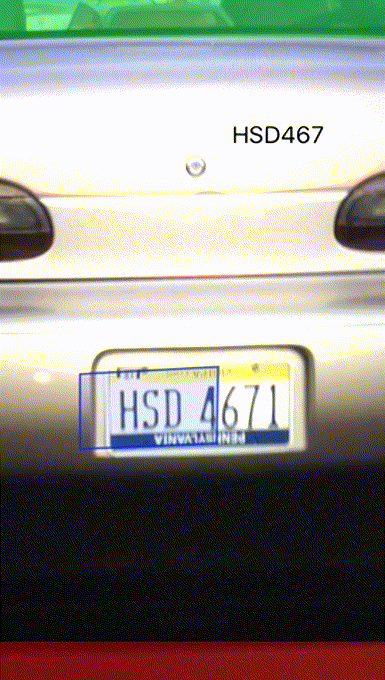
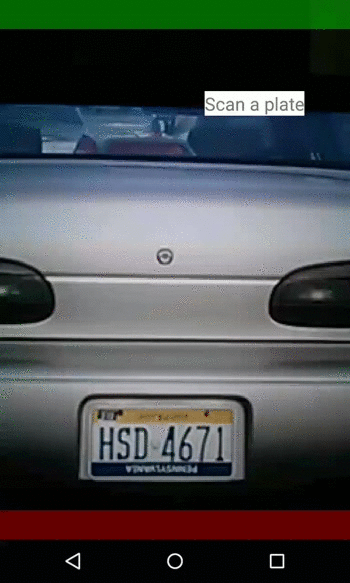
OpenALPR exposes a camera component (based on react-native-camera) that is optimized to run OpenALPR image processing on a live camera stream. Among other parameters, the camera accepts a callback, onPlateRecognized, for when a plate is recognized.
import React, { Component } from 'react'
import { StyleSheet, Text, View } from 'react-native'

import Camera, {
  Aspect,
  CaptureQuality,
  TorchMode,
} from 'react-native-openalpr'

const styles = StyleSheet.create({
  container: {
    flex: 1,
  },
  textContainer: {
    position: 'absolute',
    top: 100,
    left: 50,
  },
  text: {
    textAlign: 'center',
    fontSize: 20,
  },
})

export default class PlateRecognizer extends React.Component {
  state = {
    plate: 'Scan a plate',
  }

  onPlateRecognized = ({ plate, confidence }) => {
    this.setState({
      plate,
    })
  }

  render() {
    return (
      <View style={styles.container}>
        <Camera
          style={styles.preview}
          aspect={Aspect.fill}
          captureQuality={CaptureQuality.medium}
          country="us"
          onPlateRecognized={this.onPlateRecognized}
          plateOutlineColor="#ff0000"
          showPlateOutline
          zoom={0}
          torchMode={TorchMode.off}
          touchToFocus
        />
        <View style={styles.textContainer}>
          <Text style={styles.text}>{this.state.plate}</Text>
        </View>
      </View>
    )
  }
}
Options
zoom
The zoon of the camera (Android only). Can be :
0 to 99
aspect
The aspect ratio of the camera. Can be one of:
Aspect.stretchAspect.fitAspect.fill
captureQuality
The resolution at which video frames are captured and analyzed. For completeness, several options are provided. However, it is strongly recommended that you stick with one of the following for the best frame rates and accuracy:
-
CaptureQuality.medium(480x360) -
CaptureQuality.480p(640x480)
country
Specifies which OpenALPR config file to load, corresponding to the country whose plates you wish to recognize. Currently supported values are:
aubreufrgbkrmxsgusvn2
onPlateRecognized
This callback receives a hash with keys:
-
plate, representing the recognized license plate string -
confidence, OpenALPR's confidence(%) in the result
plateOutlineColor
Hex string specifying the color of the border to draw around the recognized plate. Example: #ff0000 for red.
showPlateOutline
If true, this draws an outline over the recognized plate
torchMode
Turns the flashlight on or off. Can be one of:
TorchMode.onTorchMode.offTorchMode.auto
touchToFocus
If true, this focuses the camera where the user taps
Examples
Development
- This project works with iOS and Android. It may have some bugs depending on how the underlying native components are updated
Running the Example project on Android While Developing
- Clone the repo and enter the
exampledirectory
git clone https://github.com/RobertSasak/react-native-openalpr.git
cd react-native-openalpr
cd example
-
From the
exampledirectory, runyarn -
Copy the
androidfolder from/react-native-openalpr/androidto/react-native-openalpr/example/node_modules/react-native-openalpr/ -
Open Android Studio and import the project
react-native-openalpr/example/androidand wait until Android Studio indexes and links. -
Run
npm startfrom dir /react-native-openalpr/example/ -
Open the path in your browser
http://localhost:8081/index.android.bundle?platform=android&dev=true&hot=false&minify=false -
Create file the
/react-native-openalpr/example/android/app/src/main/assets/index.android.bundle. Copy and paste the data from browser window to the file you just created and save. -
Return to Android Studio and run project on your development device.
Note: If you are getting errors, double check that you have completed all of the steps above. If you are having issues running npm start on Mac OSX and are using homebrew, this issue might help.
Credits
- OpenALPR built from OpenALPR-iOS
- Project scaffold based on react-native-camera