rabbit-communications
Configure two-way communication between microservices via RabbitMQ 📥 📤
Install
npm i rabbit-communicationsTest
$ docker run -d -p 5672:5672 rabbitmq$ export RABBIT_URL=amqp://guest:guest@localhost:5672$ npm testBasic concepts
This library provides several abstractions for communication between individual services via RabbitMQ. There are two main entities: service and communicator.
The scheme of their interaction is as follows:
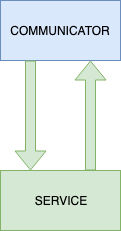
As you can see, the Service and its interaction channels (arrows) are marked with the same color (green). This is because the Service is the main entity in the system, and the Communicator is only connected to its channels.
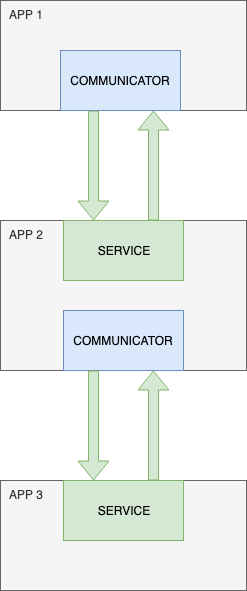
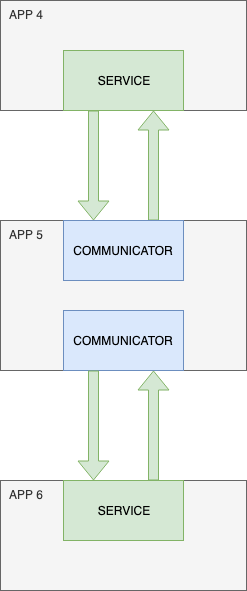
You can build any data pipelines and service architectures using Services and Communicators, there's a pair of examples:
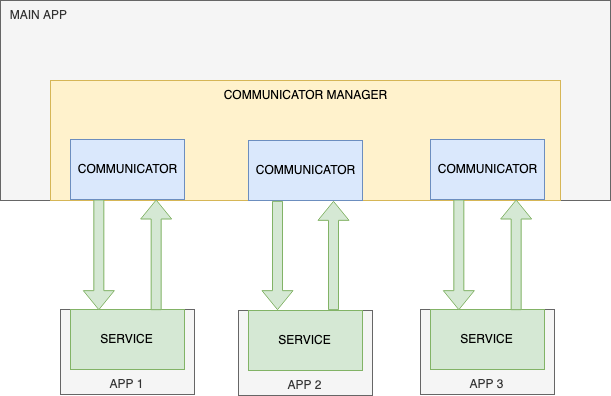
For cases when you have a main application that interacts
with many services at the same time,
there is a CommunicationsManager in rabbit-communications,
which manages pool of Communicators and provides helpful features
like outputListener's middleware, RabbitMQ connection sharing and other cool features.
Here is a diagram of the service architecture using the manager:
Usage example
Let's write a Service and Communicator that will exchange "ping-pong" messages and log it into the console.
service.js
const Service = ; async { const service = namespace: 'my-services' // namespace must be the same name: 'example-1' isInputEnabled: true isOutputEnabled: true shouldDiscardMessages: true rabbitOptions: url: 'amqp://guest:guest@localhost:5672' ; service; await servicestart; // returns promise}communicator.js
const Communicator = ; async { const communicator = namespace: 'my-services' // namespace must be the same targetServiceName: 'example-1' isInputEnabled: true isOutputEnabled: true shouldDiscardMessages: true rabbitOptions: // and the RabbitMQ configuration, obviously, should also be the same :) url: 'amqp://guest:guest@localhost:5672' ; communicator; await communicatorstart; // this will trigger Service's input listener await communicator;};In this example, the following happens:
- Service instance is created and started with input callback added (
service.addInputListener(fn)call) - Communicator instance is created and started with service's output callback added (
communicator.addOutputListener(fn)call) - Communicator sends "ping" message to service's input channel (
communicator.send(data)call) - Service logs it and responds with "pong" message to it's output channel (input listener callback invocation)
- Communicator receives service's "pong" output and logs it (output listener callback invocation)
After writing these two simple applications, you need to start RabbitMQ, after which you need to start the applications themselves.
In this example, we will use Docker to start RabbitMQ:
$ docker run -d -p 5672:5672 -p 15672:15672 rabbitmq:managementService app launch:
$ node service.jsCommunicator app launch:
$ node communicator.jsNow, when all the necessary things are running, in the service`s output you will see the following:
Service "example-1" successfully started﹂RabbitMQ connection url: amqp://guest:guest@localhost:5672﹂Input queue name: my-services:example-1:input﹂Output queue name: my-services:example-1:output Received message from Communicator: pingAnd in the output of the communicator is:
Communicator for service "example-1" successfully started﹂RabbitMQ connection url: amqp://guest:guest@localhost:5672﹂Target service's input queue name: my-services:example-1:input﹂Target service's output queue name: my-services:example-1:output Received message from Service: pongIf you are interested in the queues topology in RabbitMQ, then you can go to the browser at http://localhost:15672 (RabbitMQ management board) with login "guest" and password "guest".
There you will see the exchange my-services
(this is the name of the namespace from the service and communicator configurations),
to which two queues are binded: my-services:example-1:input
and my-services:example-1:output
(these queues are generated automatically,
their names are in the application logs above)
API Reference
RabbitClient
const RabbitClient = ;rabbit-communications exports RabbitClient
class from rabbit-client npm package.
Documentation and usage examples can be found on the it's npm page.
You can pass RabbitClient instance to Service, Communicator and CommunicationsManager constructors, if you don't, RabbitClient will be created under the hood (configured from rabbitOptions)
Service
const Service = ;- constructor(settings)
- .addInputListener(fn)
- .addAskListener(subject, fn)
- .send(data, metadata = {})
- .start()
constructor(settings)
Create Service instance.
const service1 = namespace: 'my-namespace' name: 'my-service-1' isOutputEnabled: true isInputEnabled: true shouldDiscardMessages: false metadata: foo: 'bar' rabbitOptions: url: 'amqp://guest:guest@localhost:5672' ; // or const rabbitClient = 'amqp://guest:guest@localhost:5672' appName: 'my-rabbit-client' disableLogging: true json: true; const service2 = namespace: 'my-namespace' name: 'my-service-2' isOutputEnabled: true isInputEnabled: true shouldDiscardMessages: false metadata: foo: 'bar' rabbitClient // RabbitClient instance is passed instead of rabbitOptions;Settings description:
- namespace - the name of the service group used
to distinguish them based on their part of your system,
for example,
namespace "shop" -> service "accounts"andnamespace "social" -> service "accounts" - name - service name used to connect Сommunicators
- isOutputEnabled - whether the service should send messages to Communicator
- isInputEnabled - whether the service should receive messages from the Communicator
- shouldDiscardMessages - whether the service should delete messages instead of returning them back to the input queue if an error occurred during its processing
- metadata - object, that would be sent with every output message
and could be accessed via
ctx.metadatain listener - metadata - object, that would be sent with every service input message
and could be accessed via
ctx.metadatain listener - rabbitOptions - settings for connecting to RabbitMQ (used if rabbitClient was not passed to the constructor)
- rabbitClient - RabbitClient instance (if rabbitClient is passed, rabbitOptions are ignored)
.addInputListener(fn)
Add callback to messages from input queue.
If you passed isInputEnabled: true to the Service constructor,
you must add input listener before service.start() is called.
service.addAskListener(subject, fn)
Add ask callback
For this to work you need to enable both input and output channels
service;.send(data, metadata = {})
Send message to output queue.
await service;.start()
Start service (input and output queues and channels are created).
await servicestart;Communicator
const Communicator = ;- constructor(settings)
- .addOutputListener(fn)
- .send(data, metadata = {})
- .ask(subject, data, metadata = {})
- .start()
constructor(settings)
Create Communicator instance.
const communicator1 = namespace: 'my-namespace' targetServiceName: 'my-service-1' useAsk: false askTimeout: 5e3 isOutputEnabled: true isInputEnabled: true shouldDiscardMessages: false metadata: foo: 'bar' rabbitOptions: url: 'amqp://guest:guest@localhost:5672' ; // or const rabbitClient = 'amqp://guest:guest@localhost:5672' appName: 'my-rabbit-client' disableLogging: true json: true; const communicator2 = namespace: 'my-namespace' targetServiceName: 'my-service-1' useAsk: false askTimeout: 5e3 isOutputEnabled: true isInputEnabled: true shouldDiscardMessages: false metadata: foo: 'bar' rabbitClient;Settings description:
- namespace - the name of the service group used
to distinguish them based on their part of your system,
for example,
namespace "shop" -> service "accounts"andnamespace "social" -> service "accounts" - targetServiceName - name of the service to which communicator will be connected
- useAsk - set it to true if you want to use ask method, this will enable both input and output channels automatically
- askTimeout - the number of milliseconds for which the service will have to respond when using the ask method
- isOutputEnabled - whether the communicator should listen service's output queue
- isInputEnabled - will the communicator send messages to service's input queue
- shouldDiscardMessages - whether the communicator should delete messages instead of returning them back to the service's output queue if an error occurred during its processing
- rabbitOptions - settings for connecting to RabbitMQ (used if rabbitClient was not passed to the constructor)
- rabbitClient - RabbitClient instance (if rabbitClient is passed, rabbitOptions are ignored)
.addOutputListener(fn)
Add callback to messages from service's output queue.
If you passed isOutputEnabled: true to the Communicator constructor,
you must add service output listener before communicator.start() is called.
service;.send(data, metadata = {})
Send message to service's input queue.
await service;.ask(subject, data, metadata = {})
Ask service (receive response from
service's .addAskListener(subject, fn) callback)
const data metadata = await communicator;.start()
Start communicator (connect to the target service input and output channels).
await communicatorstart;CommunicationsManager
const CommunicationsManager = ;- constructor(settings)
- .registerCommunicator(targetServiceName, communicatorOptions, outputListener)
- .send(targetServiceName, data, metadata = {})
- .ask(targetServiceName, subject, data, metadata = {})
- .broadcast(data, metadata = {})
- .applyMiddleware(...args)
- .addOutputListener(targetServiceName, fn)
- .start()
constructor(settings)
Create CommunicationsManager instance.
const manager1 = namespace: 'my-namespace' rabbitOptions: url: 'amqp://guest:guest@localhost:5672' ; // or const rabbitClient = 'amqp://guest:guest@localhost:5672' appName: 'my-rabbit-client' disableLogging: true json: true; const manager2 = namespace: 'my-namespace' rabbitClient;All manager’s communicators will use the same RabbitClient instance.
Settings description:
- namespace - namespace in which all communicators controlled by the manager will work
- rabbitOptions - settings for connecting to RabbitMQ (used if rabbitClient was not passed to the constructor)
- rabbitClient - RabbitClient instance (if rabbitClient is passed, rabbitOptions are ignored)
.registerCommunicator(targetServiceName, communicatorOptions, outputListener)
Create and configure communicator.
outputListener argument is optional, you can add
listener method later using addOutputListener or not add at all if you don't need
manager; // or manager;.send(targetServiceName, data, metadata = {})
Send message to specific service.
Communicator for targetServiceName must be registered for this action
await manager;.ask(targetServiceName, subject, data, metadata = {})
Ask service (receive response from
service's .addAskListener(subject, fn) callback)
.broadcast(data, metadata = {})
Send message to all registered services.
await manager;.applyMiddleware(...args)
Apply async koa-like
middleware functions for outputListeners.
There are several ways to use this method:
.applyMiddleware(func)- single middleware for all listeners.applyMiddleware([func1, func2, func3])- multiple middleware functions for all listeners.applyMiddleware(targetServiceName, func)- single middleware for specific listener.applyMiddleware(targetServiceName, [func1, func2, func3])- multiple middleware functions for specific listener.applyMiddleware([name1, name2], func)- single middleware for several specific listeners.applyMiddleware([name1, name2], [func1, func2, func3])- multiple middleware functions for several specific listeners
manager; manager;.addOutputListener(targetServiceName, fn)
Add output listener for specific registered communicator.
manager;.start()
Start manager and all registered communicators.
await managerstart;Coming soon
- Allow to pass custom input/output processing function (not just default JSON.parse/JSON.stringify)
- Add communicator.ask(type, data, metadata) method mapping
service's output messages with input messages.
For example,
authCommunicator.ask('login', { token: 'pih8gw1a32' }) - Add JSDoc or TS-typings
License
MIT.