PLICITY 🏗
An Open Source Node.js Cloud-Operator for Development supported by consol with 💛.
This project is "work in progress" 🚧. Many features are still missing. Same for security. ⚠ Don't use this version in production.
![]()
🤔 What is it?
You and your team 👥
- ✔ is developing a web application in the ☁ cloud?
- ✔ use branches for parallel 🔃 feature development?
... great, maybe PLICITY can help you! 👨⚕️
The idea is very simple 💡
- 🔍 PLICITY will watch your Git repository
- 🔧 every time a branch is created, it will trigger a hook
- 🚮 same for deleting or updating a branch
A simple idea needs simple implementation ✌:
- 📃 the operator is Node.js script in your project
- 🕶 it will start everything and implement the hooks
- 👌 hooks are simple JS callbacks
operatorstart onCreateBranch: setup // a new git branch is created onChangeBranchHead: startBuild // push to a branch onDeleteBranch: deleteAll // delete a remote branch onServerBuild: startBuild // press "Build" in the Operator UI;onCreateBranch
When a new git branch is created, we could oc process -f ...yml | oc apply -f - a template which will deploy everything needed for the application? It should create an ImageStream, BuildConfig, ..., maybe also a new isolated Database and of course a Route because we want to access it.
{ await oc; await oc;}onChangeBranchHead, onServerBuild
When a branch has a new commit or someone presses "Build" in the Operator UI, we simply want to start the build.
{ await oc; await oc;}onDeleteBranch
When a branch is deleted, we want to delete everything we set up in setup. We use labels, that we can delete everything with one command.
{ await oc; await oc;}Conclusion
Of course you're free to do more in the hooks, like running smoke 🚬 or ⚙ integration tests or create 📫 notifications on your Slack channel.
You run the operator. You implement the hooks. Everything is under your control. Create your very best build pipeline for development. PLICITY will ♥ to support you and your team with 🚀 development, 🧪 testing and finally ⛵ ship faster.
Now give it a try and please give feedback 😬.
Install
Before using it, please also check Security section.
The target folder has to exist and should be empty.
1. Initialize your project
npm init @plicity <target dir>2. Commit plicity to your repository
git add -Agit commit -m 'add plicity'git push3. Update .env file
Go into your target directory and open /plicity/.env.
3.1 Openshift Configuration
You can get url and token by copying your login command
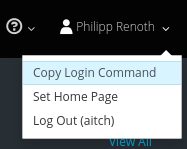
It should look like this:
oc login https://openshift.mycompany.org:8443 --token=abcdefghijklmnopqrstuvwxyz0123456789
Use an openshift project which is already created for your app.
PLICITY_OPENSHIFT_URL=https://openshift.mycompany.org:8443PLICITY_OPENSHIFT_TOKEN=abcdefghijklmnopqrstuvwxyz0123456789PLICITY_OPENSHIFT_PROJECT=plicity-test3.2 Gitlab Configuration
Note: Gitlab project needs to be public. Also see Security section.
3.2.1 PLICITY_GITLAB_HOST
Just the Gitlab host. Not the URL to the repository.
PLICITY_GITLAB_HOST=https://gitlab.mycompany.org3.2.2 PLICITY_GITLAB_PROJECT_ID
Go to your Gitlab Project and copy the Project ID.
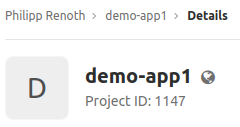
PLICITY_GITLAB_PROJECT_ID=11473.2.3 PLICITY_GITLAB_TOKEN
Go to Settings.

Go to Access Tokens.
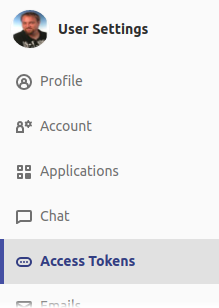
Create Access Token.
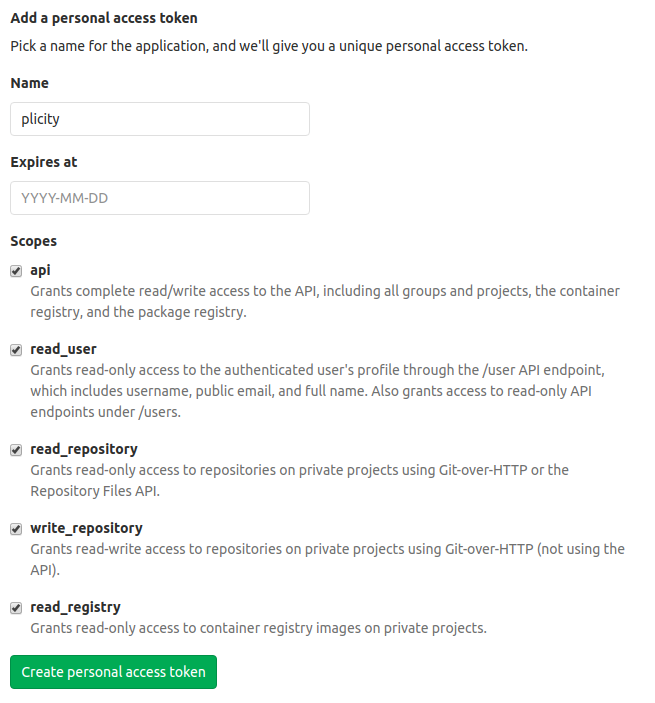
PLICITY_GITLAB_TOKEN=abcdefghijklmnop3.3 Further PLICITY configuration
3.3.1 PLICITY_NAME
Name of the Operator and used as prefix $name-... for all OpenShift resources. It has to only contain valid characters or it will crash.
PLICITY_NAME=pli3.3.1 PLICITY_LOG_LEVEL
Just for local development of your Operator.
Valid log level according to pino logger. In OpenShift it will run info.
PLICITY_LOG_LEVEL=debug3.3.1 PLICITY_LOG_PRETTY
Just for local development of your Operator.
Log output has json format. Make it human-readable setting this to true. In OpenShift it will output json.
PLICITY_LOG_PRETTY=trueExample
mkdir demo-appnpm init @plicity demo-app# npx: installed 123 in 9.758s # ✔ copied 10 files to demo-app # ✔ install dependencies # ✔ add scripts - write demo-app/plicity/package.json # ℹ 1. please commit and push # ℹ 2. update demo-app/plicity/.env # ℹ 3. initialize openshift: `cd demo-app/plicity; npm run init`. cd demo-app/plicitycat .env# PLICITY_OPENSHIFT_URL=https://openshift.mycompany.org:8443 # PLICITY_OPENSHIFT_TOKEN=abcdefghijklmnopqrstuvwxyz0123456789 # PLICITY_OPENSHIFT_PROJECT=plicity-test # # PLICITY_GITLAB_HOST=https://gitlab.mycompany.org # PLICITY_GITLAB_TOKEN=abcdefghijklmnop # PLICITY_GITLAB_PROJECT_ID=1147 # # PLICITY_NAME=pli # PLICITY_LOG_LEVEL=debug # PLICITY_LOG_PRETTY=true npm run init# > plicity@1.0.0 init demo-app/plicity # > plicity init # # INFO (…openshift/oc.js): using KUBECONFIG /tmp/.kube/config Check OpenShift to see Operator build.

When Operator POD is up and running all branches will be deployed.

Advanced Settings
If you want to use your own registry:
npm init @plicity <target dir> \ --npm-registry=http://registry.mycompany.org \ --npm-strict-ssl=falseSecurity
Good things first 😬:
- 100% On-Premise in your Private or Public Cloud.
- No OpenShift cluster admin rights needed.
- Your OpenShift token is not exposed. The Operator will run with a special
ServiceAccountwith aRoleBindingallowed to control your project. Your token is just used for the initial setup or if you want to run the Operator local, e.g. updating it.
Need of improvement 🤐:
- Gitlab project needs to be public. Yet no authentication implemented.
- We give full Gitlab access to the Operator. Assumption is that the only API call we need at current is to add and remove the badge to the Gitlab project. This may change when implementing authentication for OpenShift for Gitlab.
- Your Gitlab Token is exposed as OpenShift secret. Everyone with access to your project can use that Gitlab token.
Grey zone 🤫:
- download OpenShift client
ocfrom https://github.com/openshift/origin/releases/download/v3.11.0/openshift-origin-client-tools-v3.11.0-0cbc58b-linux-64bit.tar.gz. Customizable alternative location to be implemented.
Contribution
alphabetical order
Known Issues
- Will not work on Windows and probably not on MacOS
- Only OpenShift compatible with oc v3.11.0 and Gitlab supported